Tofu Tender Supper

Tofu Tender Supper (1)

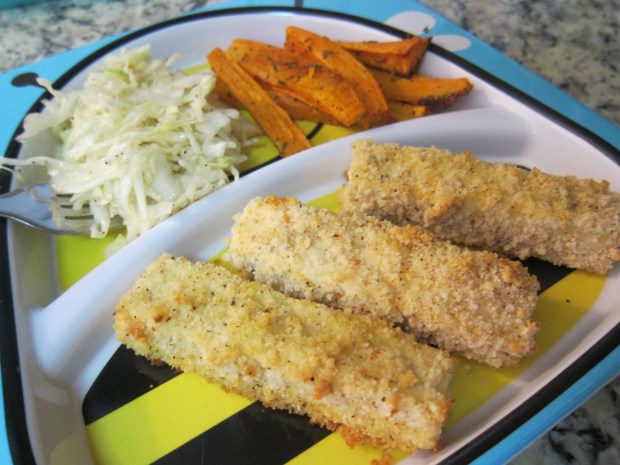
There are days in your child’s culinary life that definitely feel like milestones – the first bite of solid food, obviously; the first cupcake; the first time they use their own fork. Tonight was the first time I made a complete meal for my almost-three-year old – not just an entree paired with a random steamed vegetable, but a main dish with two sides. He devoured all three components, making this a hit we will return to again and again!

Ingredients:

For the tofu:

  • 1/2 (14-ounce) pkg. extra-firm tofu
  • 2 Ener-G eggs
  • 1/2 cup breadcrumbs
  • 1 teaspoon Old Bay seasoning
  • 1/4 teaspoon garlic powder
  • 1/4 teaspoon black pepper
  • 1/4 teaspoon salt
  •  Cooking spray

For the sweet potatoes:

  • 1 large sweet potato
  • 1 and 1/2 teaspoons olive oil
  • 1/2 teaspoon garlic powder
  • 1 teaspoon minced fresh rosemary
  • 1/4 teaspoon black pepper

For the coleslaw:

  • 4 cups packaged coleslaw mix
  • 1 and 1/2 teaspoons olive oil
  • 1 tablespoon apple cider vinegar
  • 1/8 teaspoon salt
  • 1/8 teaspoon black pepper
  1. To prepare the tofu, cut into 3 slices crosswise, and then cut each slice in half lengthwise – you’ll have 6 (3×1-inch) sticks. Pat dry with paper towels.
  2. Prepare the Ener-G eggs in a shallow bowl.
  3. In a separate shallow dish, combine the breadcrumbs, Old Bay, 1/4 teaspoon garlic powder, 1/4 teaspoon black pepper, and 1/4 teaspoon salt. Dip each tofu piece in the Ener-G mixture and then in the breadcrumb mixture. Arrange on a baking sheet lined with aluminum foil. Lightly coat the tops of the tofu with cooking spray and set aside.
  4. To prepare the potatoes, peel and cut into 1/2-inch thick wedges (alternatively, leave on the peel, but scrub well before slicing).
  5. Toss the potato wedges with 1 and 1/2 teaspoons olive oil, 1/2 teaspoon garlic powder, the rosemary, and 1/4 teaspoon black pepper. Arrange next to the tofu on the baking sheet.
  6. Bake at 450 degrees F for 25 minutes.
  7. Meanwhile, prepare the coleslaw: Toss together the coleslaw mix with the final 1 and 1/2 teaspoons olive oil, the vinegar, 1/8 teaspoon salt, and 1/8 teaspoon black pepper.

Tofu Tender Supper (2)


Garden Crate

Koala garden (11)

We received our Garden-themed box from Koala Crate this month – perfect for summertime! This kit was very much about Travis playing with the items in his own way, not necessarily as “intended”, but there’s nothing wrong with a crate that simply prompts ideas and play!

As always, Travis was eager to lift the lid and see what was inside this time around. The first project, a Gardening Apron to decorate, was a huge hit – not so much to decorate, but to try on and to put the gardening tools inside of.

Koala garden (2)

The kit came with string and felt flowers/leaves to decorate the apron, but he preferred to scoop the felt items and pretend he was planting them (cupcake liners made great “flower pots”!).

Koala garden (5)

I finally coaxed him into helping decorate the apron as intended, which was good lacing practice, before I finished it for him. You’ll notice that he adorned the apron with pencil scribbles as the finishing touch, in the photo at the top of this post!

Koala garden (4)

Travis also did things his own way when it came to building the Growing Plant; he loved squeezing drops of the provided glue, meant to glue on tissue paper flower buds, but instead he wanted to stick the cardboard leaves together.

Koala garden (7)

I let him have fun his own way while I pressed on the “flowers” so he could see the final, intended result.

Koala garden (6)

Once the glue dried and it was time to slot the cardboard leaves and stems of the plant together, he decided we should “drill” it together!

Koala garden (8)

The final “project” this month was a bit of a disappointment – a book to read along with the growing plant, rather than another craft, which I felt could have been included in Imagine magazine.

Koala garden.JPG

However, the story is a nice vocab builder, and touched off discussion about plants and gardening.

Koala garden (9)

The biggest hit by far? The provided recipe to make your own, homemade lemonade!

Mint Lemonade

Mint Lemonade (4)

Just in time for the hot days of summer, we received this homemade lemonade recipe from Koala Crate!

To start, have your child squeeze one lemon half into a cup.

Mint Lemonade (1)

Add 2 tablespoons powdered sugar, and let your little sous-chef stir until the sugar is dissolved.

Mint Lemonade (2)

Now it’s time to add fresh mint – and fresh is the key word here! If you have your own herb garden, so much the better. Our next best option was a mint plant from the grocery store; Travis loved selecting three leaves before adding them to his cup and muddling.

Mint Lemonade (3)

Adults: Fill the cup the rest of the way with water (about 5 ounces) and stir.

Mint Lemonade (5)

Add a straw and enjoy summer in a glass!

Mint Lemonade (6)

Painted Hydrangeas

Painted Hydrangea (7)

We needed a quick craft pick-me-up for the afternoon, and just about all I had on hand was a bouquet of white hydrangeas. They turned out to be the perfect canvas!

Simply set out the blossoms, along with watercolors.

Painted Hydrangea (5)

Liquid watercolors will provide the most vibrant color, but after this mama tipped over a cup of a very bright pink (and this stuff stains, folks), we decided to play it safe with Crayola’s watercolor paints!

Painted Hydrangea (3)

Travis liked seeing all the different colors appear on our white flowers.

Painted Hydrangea (6)

These would make a great centerpiece for a summer dinner al fresco!

Painted Hydrangea (8)

Sponge Balls

Sponge Ball (1)

If it’s hot and the kids need a novel way to get wet, look no further than this update on a classic water balloon fight.

Place three different colored sponges in a stack, and cut each sponge into three strips – you’ll end up with three piles that look like a rainbow layer cake. Secure each pile with a rubber band in the middle, and fan out the sponges slightly – now you have sponge balls!

Sponge Ball (2)

Grab a bucket filled with water and go wild.

Sponge Ball (6)

See who can throw their sponge ball the furthest, have fun dipping them into the bucket and squeezing the water out…. or get each other wet with a gentle game of sponge ball tag!

Sponge Ball (3)

Perfect on a hot summer day!

Whatta Melon Smoothie

Whatta Melon Smoothie

Credit for this fun recipe goes to Family Fun magazine. I recommend purchasing a whole watermelon since you will need to cube and freeze 2 cups worth for the recipe – that way your child will have a visual of the green rind, black seeds, and pink flesh.

Ingredients:

  • 2 kiwi fruit, cubed and frozen
  • 1/2 banana, frozen
  • Handful of fresh spinach
  • 1 and 1/2 cups vanilla coconut milk, divided
  • 2 tablespoons agave nectar, divided
  • 2 cups frozen cubed watermelon
  • 1 cup frozen strawberries
  • Mini non-dairy chocolate chips (such as Enjoy Life)
  1. In a blender, combine the kiwi, banana, spinach, 1/2 cup milk, and 1 tablespoon agave; process until smooth and green – the more spinach you use, the greener it will be! Pour into the bottom of smoothie glasses.
  2. Rinse out the blender and add the watermelon, strawberries, remaining 1 and 1/2 cups milk, and remaining tablespoon agave. Process until smooth.
  3. Spoon the watermelon layer over the green layer – ideally the two won’t mix, but we still got a layered, slightly mixed-up effect.
  4. Top with chocolate chips for the seeds!


Popsicle Stick Pirate Ship

Popsicle Ship (5)

Travis has been learning about pirates lately (he now does a mean “ahoy matey!”), so to bring the fun alive, we made this little ship to join us at bathtime.

To make the raft, glue 8 craft sticks lengthwise across 8 additional sticks crosswise. Once the glue dries, it will hold everything in place. In retrospect, I recommend painting them first, or purchasing ones that are already colored.

Putting the craft stick raft together like this is largely a grown-up step, because it’s tricky to line up both layers. Travis helpfully added a few squirts of glue before I finished.

Popsicle Ship (1)

To make the mast, you really need a hot glue gun, with which you can glue one craft stick upright on the raft. Failing that, I quickly decided to use a toothpick instead, which I could wedge in the tiny space between two of the craft sticks.

Popsicle Ship (2)

Use glue to add any fabric scrap to your mast as the sail.

Popsicle Ship (3)

As the finishing touch, add a pirate or two!

Popsicle Ship (4)

Ahoy mateys, time to sail.

Popsicle Ship (6)

Clay Flower Pots

Clay Pots (6)

This project couldn’t be simpler, but kids will love playing with the clay and watching their decorations take shape! A great summer craft, especially if you’re teaching your little ones about gardening.

Use any small terracotta pot as the base. I ended up wishing that I had several on hand, because Travis covered his first with clay designs so quickly; consider picking up a few at a craft store ahead of time!

Clay Pots (1)

For the clay, we used Model Magic – it’s easy to work with, mess free, and will air-dry in a few days.

Clay Pots (3)

Travis loved just smooshing on big designs, but older kids can be more deliberate in their art, creating flowers or mini clay gardens. I added a few details as examples.

One cool result of Travis smooshing all the clay onto the pots was a swirled, marbled effect.

Clay Pots (4)

These pots would make a great summer gift for anyone who loves to garden!

Chickpea and Squash Curry

CHickpea Squash CUrry.JPG

I’m always looking for recipes that gently introduce spicy flavors, so was delighted to see this (already vegan!) recipe in our July issue of Parents magazine.

Ingredients:

  • 1 tablespoon olive oil
  • 3 and 1/2 cups (3/4-inch) cubed butternut squash
  • 1 medium onion, chopped
  • 2 teaspoons curry powder
  • 2 cups vegetable broth
  • 1 (15-ounce) drained and rinsed can chickpeas
  • 2 tablespoons red curry paste
  • 1/2 teaspoon salt
  • 1/8 teaspoon black pepper
  • 1/2 cup canned coconut milk
  • 2 cups packed baby spinach
  • 2 cups cooked brown rice
  • Plain non-dairy yogurt
  • Lime wedges
  1. Heat the olive oil in a large saucepan over medium heat. Add the squash and onion; cook for 5 minutes, stirring frequently.
  2. Stir in the curry powder and cook for 30 seconds.
  3. Add the vegetable broth, chickpeas, curry paste, salt, and black pepper. Bring to a boil, then cover, reduce heat, and simmer for 10 minutes.
  4. Stir in the coconut milk and spinach.
  5. Place 1/2 cup rice on each plate, and top with the curry. Add a dollop of yogurt and a spritz of lime juice if desired!

Chickpea Squash Curry var


Summer Squash Saute

Summer Squash Saute

Bumper crop of summer squash? Look no further than this easy recipe. My toddler loves it plain, or served atop orzo pasta with a bit of tomato sauce stirred in.

Ingredients:

  • 2 minced garlic cloves
  • 2 tablespoons olive oil
  • 1 zucchini
  • 1 yellow squash
  • 1 teaspoon Italian seasoning
  • 1 tablespoon nutritional yeast
  1. Heat the olive oil in a large skillet over medium heat; add the garlic and saute for 2 minutes.
  2. Thinly slice the zucchini and yellow squash, and add to the pan; cook for 5 minutes, until the squash is very soft.
  3. Stir in the Italian seasoning and nutritional yeast and cook for a final minute.

Older kids might like a bit of hot sauce for zip!

Summer Squash alt.JPG