Pumpkin and Chick’n Curry

Pumpkin and Chick'n Curry

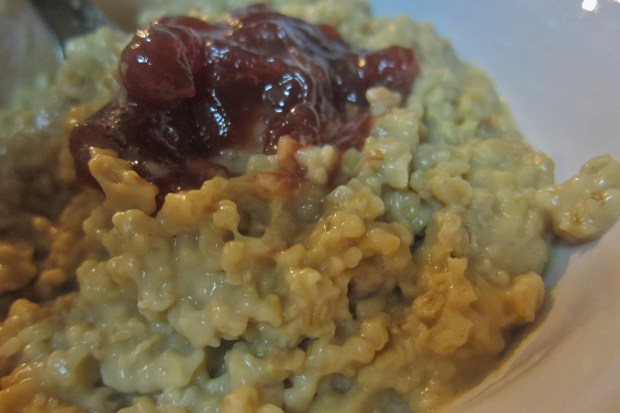
This is an easy first curry for toddlers because the spice is very mild. Your little one will never know pumpkin is hidden in the sauce!

Ingredients:

  • 1 tbsp. olive oil
  • 12 ounces Gardein chick’n strips
  • 1 tsp. ground ginger
  • 1 tsp. turmeric
  • 1 cup coconut milk
  • 1 cup canned pumpkin
  • 1 and 1/2 cups chopped baby spinach
  • 1  lime (optional)
  • Cooked basmati rice
  1. Heat the olive oil in a large skillet over medium-high heat. Add the chick’n and cook until heated, about 6 minutes. Remove the chick’n from the skillet, chop into bite-sized pieces, and set aside.
  2. Return the pan to the heat and add the ginger, turmeric, coconut milk, and pumpkin. Simmer over medium-low heat for 10 minutes.
  3. Add the chopped chick’n and spinach to the pan, and cook for a final minute, until the spinach wilts. Add a spritz of fresh-squeezed lime juice if desired.
  4. Serve over hot cooked basmati rice. For a toddler, I recommend about 1/4 cup rice per 1/2 cup serving of curry.

Water to Ice

Water to Ice (3)

Use this simple experiment to introduce your toddler to two of the basic states of matter – liquid and solid.

Using an eye dropper, let your child fill the compartments of an ice cube tray with just a thin layer of water per compartment. You could also simply pour in a small amount of water, but the eye dropper is great practice for fine motor skills!

Wait 10 to 20 minutes for the water to freeze, then ask your child if they’re ready to see the exciting results… Has your liquid turned into a solid?

Travis loved playing with the ice that we made, dumping it from the ice cube tray and putting it back in again, and watching with delight as rivulets of water melted off and got us wet. As we played, I talked about how water + cold = ice, and how ice + hot = water. He loved this simple equation, and repeated it to himself when he took his bath later in the evening.

Water to Ice (2)

For added fun, you might try adding food coloring to the ice. If you try this version, please let me know how it goes in the comments! If you’re interested in ice play for slightly younger toddlers, check out my previous post on why Ice is Nice.

Water to Ice (1)

Homemade Tambourine

Homemade Tambourine (4)

It’s easy to create your own musical collection at home without purchasing toy instruments. To wit, a paper plate and jingle bells from a craft store can turn into a tambourine in mere minutes!

To start, have your child decorate the backs of two paper plates with markers or crayons. After a little marker mishap, we switched to crayons for the other side! Good thing markers are washable.

Homemade Tambourine (1)

Once the decoration is complete, place the jingle bells on one plate, and cover with the other. You can use any number of bells, depending how jingly you want it, but I recommend at least 3.

Homemade Tambourine (2)

Seal the plates together with a stapler (or tape) and let your budding musician make some noise.

Homemade Tambourine (3)


Let’s Go Fly a Kite

Let's Go Fly a Kite

I’m not normally one for food art, but this whimsical snack was too cute to pass up – especially here in the lazy kite-flying days of summer! Preschoolers can definitely help you assemble this one.

Ingredients:

  • 1 slice whole wheat bread
  • 1 teaspoon eggless mayonnaise
  • 1 slice non-dairy cheese
  • 1 carrot stick
  • 6 raspberries
  • Popcorn kernels
  1. Lightly toast the bread and cut into a square, discarding the crusts.
  2. Spread the bread with the mayo, and top with the cheese. I cut the cheese into triangles for a cute, patterned-kite effect.
  3. Place the carrot stick at the bottom, and arrange the raspberries on either side.
  4. Add a few popcorn pieces for clouds!

PB&J Overnight Oats

PB&J Overnight Oats

Take a little crazy out of the morning by preparing this hearty bowlful the night before. It’s a nice twist to get you out of an instant oatmeal rut!

Ingredients:

  • 2 cups vanilla almond milk
  • 1 cup steel-cut oats
  • 1/3 cup creamy peanut butter
  • 2 tablespoons agave nectar
  • 4 tablespoons strawberry jam
  1. Combine the milk, oats, peanut butter, and agave in a saucepan. Bring to a simmer and continue to cook for 5 minutes, until the peanut butter is melted.
  2. Let cool slightly, then refrigerate overnight.
  3. Reheat individual servings in the microwave, and top each portion with 1 tablespoon jam.

Lemon Ink

Lemon Ink (1)

“Painting” with lemon juice sounded like a delightful trick to show a toddler. The ink goes on nearly invisible, but appears once the juice dries and is held up to a light. Turns out Travis was way more into the lemon itself, but that still meant we had fun!

Since toddlers don’t typically eat lemons, this is a great way to introduce the fruit and its color and texture. Travis had so much fun squeezing the lemon, and watching as I collected juice in a cup.

Lemon Ink (3)

Then it was time to “paint”! We used q-tips as paintbrushes, adding another layer of novelty to the project.

Lemon Ink (2)

To be honest, Travis was only mildly interested (he was still busy squeezing another lemon half), so I made shapes and spelled his name, in addition to his squiggles, for the big reveal. He had fun holding it up to our ceiling lights…

Lemon Ink (4)

…although the effect was best in the window.

Lemon Ink (5)


Microphone Craft

Microphone Craft (5)

Encourage a budding rock star with this cute, easy craft!

To make the base of the microphone, have your child help wrap an empty toilet paper tube in foil. Travis immediately loved how shiny and crinkly our creation was.

Microphone Craft (1)

For the top of the microphone, the best bet is really a small foam craft ball. Since I didn’t have one on hand, we used a ball from an old baby toy, which I wedged into place and secured with a bed of duct tape.

Good enough for now, though I hope to buy a craft ball as a replacement! Now, is this thing on? Testing, testing, one-two-three.

Microphone Craft (3)

Travis latched right onto the idea that it was a microphone, and loved singing songs from our local music class. Wait, is that a microphone or an ice cream cone?

Microphone Craft (4)

All around, good fun. I might even make a few of these, and keep one in the car for road trip sing-alongs.

What’s your child’s favorite song to sing? Please share in the comments!

Wind-Themed Day!

Wind theme (6)

We had one of our “theme” days today, basing several games and other activities on the concept of the wind.

As a fun craft to start, we made a homemade windsock. The craft couldn’t be simpler: Have your toddler apply a thick layer of glue around the inside rim of an empty paper towel tube.

Wind theme (1)

Attach long streamers to the glue, and let dry. Once the streamers are set, take the wind sock outside to see how it flutters and catches the wind.

Wind theme (3)

While Travis held the windsock, I also showed him how today’s strong gusts made our pinwheel whip around, without us having to blow like we do indoors. A magical moment of the day.

Wind theme (5)

For some silly gross motor play, you can take turns pretending to be the wind. One person huffs and puffs as the other turns in a big circle!

We continued the fun at bedtime with two storybooks about wind (Like a Windy Day; The Wind Blew), and then enjoyed our latest evening ritual – “blowing” off all the lights on a count of 1-2-3 before bed, and giving his nightlight a gentle blow to illuminate it.

The perfect lullaby to cap things off? Rock-a-Bye-Baby of course!

Wind Sock maybe.JPG

Super Smoothie Bowl

Super Smoothie Bowl (2)

Kick off the morning with this tropical bowlful – it’s cute and customizable in a way that will satisfy even picky toddlers.

Ingredients:

  • 3 kiwis, peeled and chopped
  • 1 cup pineapple chunks
  • 1 banana, peeled and chopped
  1. Combine the kiwi, pineapple, and banana in a blender and process until smooth
  2. Adorn each smoothie as desired! Stir in chia seeds about 5 minutes before serving for a great Omega-3 punch. Other topping options include berries, shredded coconut, or granola.

Super Smoothie Bowl (1)

Nature Treasure Hunt Bracelet

Nature Bracelet (5)

While in the park recently collecting treasures to paint, Travis and I also made a nature collection bracelet. I was surprised that he didn’t want to wear it himself, since he usually loves things around his arm – my watch, his father’s elastic wrist bands – but apparently he draws the line at duct tape! So I was the bracelet model, and Travis helped build our collection.

To make the bracelet, wrap duct tape around itself in a loose circle, big enough to slip on and off your wrist easily.  You want the sticky side facing out.

As you walk, loosely press your nature finds onto the bracelet.

Nature Bracelet (2)

Travis adored this part, hunting for flowers and leaves, and helping me stick our treasures on. It was a great way to talk about some new items, too, like pine needles and a bird feather.

Nature Bracelet (1)

Once you decide your bracelet is complete, cut a strip of clear contact paper just a little wider than the duct tape. Remove the backing and place the contact paper, sticky side down, over the bracelet. Fold the overhanging edge over the duct tape to seal.

Nature Bracelet (4)

Another magical creation here in late summer!

Nature Bracelet (6)