Halloween Luminaries

Halloween Luminary (10)

Last year we indulged in an extra crate from Kiwi Co to make a trick-or-treat tote bag (which we’ll be using again this year!). This Halloween, Travis has graduated up in crafting skills and could help put together Kiwi Co’s neat luminary project, a reminder that it’s not just pumpkins that glow on All Hallow’s Eve.

To replicate the project at home, you can purchase similar materials to everything described below at a craft store.

To start, we taped down the two provided clear sheets of flexible plastic onto a work surface (a brown paper bag or scrap paper work fine), and painted them with a layer of glaze (which looked quite similar to Mod Podge).

Halloween Luminary (1)

We divided the provided tissue paper squares into oranges and purples, and pressed onto the sticky glaze.

Halloween Luminary (2)

Travis had fun with the orange one, but then decided he didn’t like the way the glaze felt on his fingers. So I finished up the purple one, and then we painted over the tissue with an additional layer of glaze before setting them aside to dry.

Halloween Luminary (3)

To make our luminaries spooky, we had fun adding the provided stickers – Travis particularly liked making a “pumpkin patch” on one.

Halloween Luminary (4)

The plastic is then folded into a cylinder, and secured with clear round stickers.

Halloween Luminary (6)

Place your luminaries on any surface, then add a tea light inside.

Halloween Luminary (7)

Boo-tiful!

Halloween Luminary (8)

Blow Your Nose!

Nose Blow (2)

As much as we all hate to think of it, cold and flu season will be upon us all too soon. Before those first stuffed-up sniffles hit your little one, arm them with the knowledge of how to blow their nose. It seems obvious to adults, but how do you explain this motion to a little tyke? With a game, of course!

To start, set out a variety of light objects such as pom poms or wadded up pieces of tissue paper. We’ve played games where we tried to move such objects about by blowing through a straw. This time I challenged Travis to huff through his nose.

It took him a few tries, but soon he got the hang of it!

Nose Blow (1)

If you want to make things more interesting or challenging, try moving the items to a goal line, using nothing but your nose blows. Older kids might enjoy turning this into a race!

Nose Blow (4)

Just be forewarned that your play surface might get a bit… snotty. Have wipes on hand to clean up any mess when you’re done.

Halloween Sensory Bin

Halloween Sensory (3)

Seasonal sensory bins are always good fun, equally delightful for little tots as they are for preschoolers. This one gets an October twist with an orange and black background, and Halloween goodies tucked inside.

To prepare the rice, place white rice in a zip-top bag and shake with orange food coloring – I achieved a nice orange by mixing the yellow and red from Color Kitchen. Spread on a foil-lined baking sheet and let dry.

Halloween Sensory (1)

Fill a tub with the orange rice on one half and dried black beans on the other – it’s getting spooky in here!

Halloween Sensory (2)

Next I placed a few odds and ends in the bin, like mini pumpkins and gourds, and foam in the shape of jack-o-lanterns. I added a whisk and spatula, then presented the bin to Travis after a morning at school.

Halloween Sensory (4)

He loved sprinkling the black beans onto the rice for a startling contrast. Pretty soon this was an imaginative game of making pumpkin soup.

Halloween Sensory (7)

The texture of the dried beans was a big hit…

Halloween Sensory (5)

…as was the sound they made when sprinkled on top of the pumpkins, making this bin a delight for auditory senses as well.

Halloween Sensory (10)

You can keep bins like this around for a couple of days for children to return to. Later, we added some wobbly Halloween stickers and a few more pumpkins to our “patch.”

Halloween Sensory (12)

What else would you add to your Halloween sensory bin? Please share in the comments!

Halloween Sensory (13)

Leaf Paintbrush

Leaf Brush (6)

Wondering what to do with the leaves and other odds and ends that have blown in from your fall nature walks? Turn them into paintbrushes!

We tried out a few different methods for this fun art project. Some twigs we brought home already had multiple leaves attached, and these were ready-made brushes.

Leaf Brush (1)

The other option is to gather together a few leaves of the same size and shape, and secure with twine or string around a twig.

Leaf Brush (2)

Pine needles made a brush that looked like a mini broom!

Leaf Brush (5)

I set Travis up with his “brushes” and paints, and let his creativity go wild. We started out with small pieces of poster board to paint on…

Leaf Brush (3)

But he requested a bigger canvas, which soon had him splattering and swishing colors this way and that.

Leaf Brush (7)

He loved pouring out big dollops of paint and running the brush through them.

Leaf Brush (8)

Our verdict is that the pine needle brush definitely worked best, but all of them were fun. “Mom, is it okay if I’m messy?” he asked at one point. Embrace the chaos and say yes, and let your little artist have fun with this one! You can always wipe the paints off the floor after.

Leaf Brush (4)


Flying Ghost Teabag

Flying Ghost (3)

Here’s a Halloween experiment that’s exciting for kids and grown-ups both. A note of caution, since the game involves fire; I recommend making this an activity for two adults and any children; one grown-up can light the match while the othe keeps kids a safe distance away.

Snip open a tea bag and empty the tea – as a nice bonus, the experiment smells lovely already!

Flying Ghost (1)

Once you open up the tea bag you’ll be left with a long cylinder. To give it a spooky flair, draw a ghost face on the bag.

Flying Ghost (2)

Now set alight the top edge of the cylinder with a match.

Flying Ghost (4)

The flame will travel down the “ghost”, and when enough heat is trapped in the cylinder, he rises up and flies!

Flying Ghost (5)

Everyone in the room gasped and giggled at this one, from kids to grandparents.

Interestingly, we tried it with a different brand of tea bag on the final go, and it burned faster but didn’t fly as well – so if yours doesn’t work spectacularly at first, consider testing a few tea brands. This final try is the one I caught on video, though, so enjoy!

Glow-in-the-Dark Jars, Two Ways

Glow Lantern (14).JPG

We seem to be having endless fun with our glow-in-the-dark paint lately. To add to a budding collection of gleaming creations, we put two additional mason jar projects together! Basically this is just two different methods of using the same two materials, so I’ve combined the crafts into one post.

First, we made a glow-in-the-dark lantern. This one was simple as can be, but giddy fun. Squirt glow-in-the-dark paint into a mason jar.

Glow Lantern (1)

Now seal the lid, and shake shake shake, like it’s a maraca!

GLow Lantern (2)

Travis loved seeing how this dispersed the color. Once your jar is coated, you can make a handle out of pipe cleaners: Twist one pipe cleaner in a U-shape in the center of the other.

Glow Lantern (12)

Wrap the long pipe cleaner around the jar’s neck securely.

Glow Lantern (13)

Charge up, and enjoy the lantern! This would be fun to add to any Halloween patio scene.

Glow Lantern (8)

For the second version of jar + glow paint, we wanted to replicate the old tradition of collecting fireflies in a jar – without harming any fireflies!

Put glow-in-the-dark paint into containers; a few different colors will make the prettiest result.

Glow Lantern (9)

Dip your paint brush into one color, and place in a mason jar; tap against the jar (almost like you’re ringing a bell), so the paint splatters.

Glow Lantern (10)

Repeat with the remaining colors – very Jackson Pollack-esque!

GLow Lantern (11)

Set your jar under direct light so your “fireflies” glow once the sun goes down.

Play Dough Monsters

Play Monster (6)

Here’s the perfect way to shake up your play dough routine in the spooky month of October! This little craft is great for kids who might be experiencing their first fears about monsters; your silly and cute creations will have them giggling and realizing monsters don’t need to be scary.

Travis didn’t quite understand the concept at first, so I set about making a few goofy monsters as he watched. Beads made for silly fangs and smiles, and googly eyes are always fun.

Play Monster (1)

Trim lengths of pipe cleaner to be smiles, curly hair pieces, or even whiskers!

Play Monster (5)

Once he got the idea, Travis was so into the craft. He loved adding shiny beads as eyes.

Play Monster (3)

And decided that each monster needed a smile, which he drew on with his finger.

Play Monster (4)

We wound up with quite the little monster mash family.

Play Monster (2)

Glowing Nature Crate

Koala Glowing (13)

There seems to be a feedback loop between our Little Explorers and Koala Crate subscriptions these days! Having recently learned all about glowworms through the former, our most recent crate form the latter was not just about nature but about glowing nature and touched upon… glowworms! Luckily there was very little overlap in the projects. Thanks to the booklet and crafts, we covered: glowing fungi; glowing insects; and glowing sea creatures.

Koala Glowing (14)

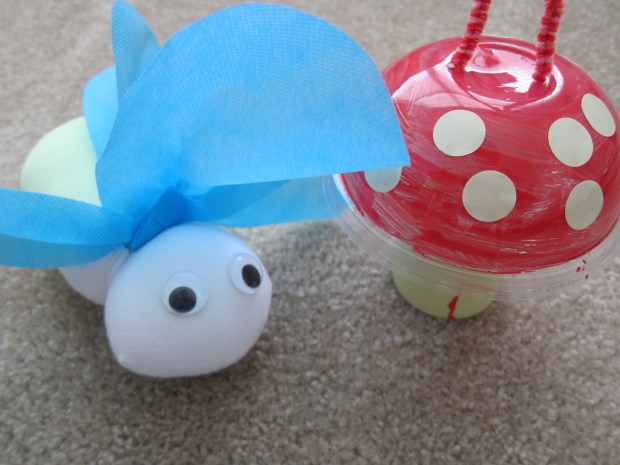
Travis loved the crafts in our kit this month. We started with the Mushroom Lantern, which featured a pitch-perfect way for preschoolers to paint; squeeze from the provided paint tube onto the mushroom’s plastic cap…

Koala Glowing (1)

And then dab on with the sponge brush.

Koala Glowing (2)

Travis loved the method so much that some additional squeezing and dabbing on newspaper had to happen.

Koala Glowing (3)

We left the mushroom cap to dry, after which it fell to me to finish the craft. Attach the cap to a cardboard tube base by threading a pipe cleaner through the cap and a foam circle (this is your lantern’s handle), and then pushing the foam circle into the tube to secure. Glow-in-the-dark stickers around the mushroom cap are the final touch, and what will make your lantern glow after charging in sunlight or other direct light.

Koala Glowing (4)

While our mushroom dried, Travis couldn’t wait to start on the next craft – the most adorable stuffed Glowing Firefly. The kit came with a sock in glow-in-the-dark material; try painting glow-in-the-dark fabric paint on a white sock to replicate this at home. Before we even began the craft, the sock itself and the fluffy roving were big hits.

Koala Glowing (6)

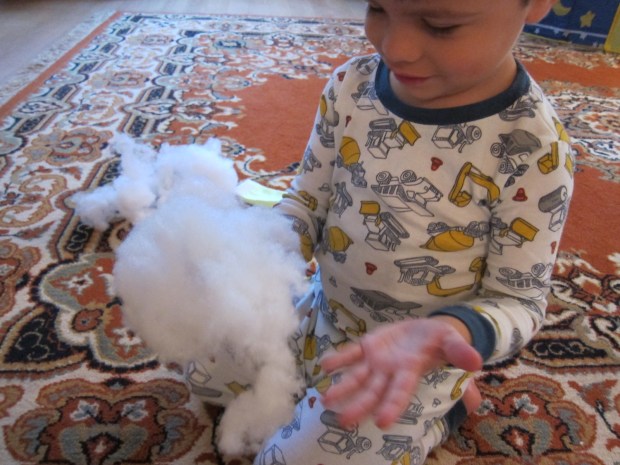
We’ve had stuffing projects from Koala before which Travis was a bit young to help with at the time; this time around, he inserted much of the roving himself!

Koala Glowing (7)

I added the provided rubber bands to seal off the end and head, and looped through the fabric wings. Travis squealed with how cute our firefly was once we attached 2 googly eyes.

Koala glowing (17).JPG

Then it was time to set it beneath a lamp (direct sunlight also works) to charge up. For some daylight fun, the firefly is also perfect for adorable games of catch.

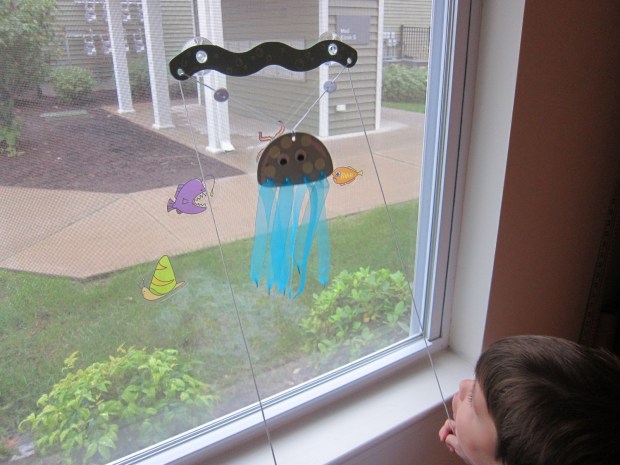
As we waited, we dove right into the final project: a glow-in-the-dark Jellyfish Game. I was a bit disappointed in the mechanics of this one, both because it was very hard for little hands to put the craft together and because it didn’t last long once created.

Travis could definitely help thread the fabric tentacles through the cardboard jellyfish body…

Koala Glowing (8)

And add the eyes and glow-in-the-dark stickers…

Koala Glowing (9)

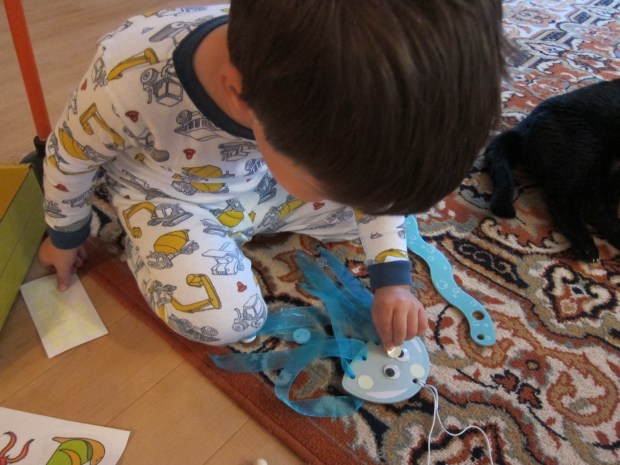
But from there it was up to me to thread the jellyfish through a provided cardboard frame and rig it up on the window with provided suction cups.

Koala Glowing (10)

To be fair, Travis went wild for the game; by tugging on the strings, children can now wiggle and wobble the jellyfish around.

Koala Glowing (12)

A couple vigorous tugs broke the frame, however, so the fun didn’t last long. I was disappointed Travis didn’t get a chance to see the jellyfish in motion after dark and all aglow. Luckily there were additional stickers to decorate our underwater scene, which Travis loved with and without the jellyfish around. So my best advice for enjoying this craft is to proceed gently!

Koala Glowing (11)

The booklet included a very cute counting poem about glowworms, which became a fast favorite of all the glowing creatures.

firefly jar (1)

We looked them up online, before acting out the glowworm activities – inching along, and curling up to sleep.

firefly jar (6)

For further glowworm fun, make a quick glowworm cave by squirting glow-in-the-dark paint into a mason jar.

firefly jar (2)

You can simply squirt in the paint, or smear it with a q-tip. Or perhaps your child will think this looks like little fireflies caught in a jar!

Firefly Jar (7).JPG

As the grand finale, we set all three toys under his lamp near bedtime, then turned out the light for a glowing extravaganza!

Koala Glowing (16)

Gourd Pets

Gourd Pets (10)

On the heels of our Fall Friends, Travis wanted to decorate more little creatures to celebrate autumn. This time we turned gourds into patio “pets”, thanks to this cute suggestion from Barefoot Books‘ Kids Garden set.

We don’t have our own garden, so didn’t actually harvest our gourds, meaning we could skip the steps of cleaning them and leaving them to dry out for a few weeks (!). A quaint stop to purchase gourds at a farmstand did the trick instead. Still, because I knew he would love it, I told Travis we needed to clean the gourds before we could decorate them.

Add a little dish detergent to warm water and give your gourds a nice soapy scrub, then dry.

Gourd Pets (3)

From there, I simply placed a big pile of craft supplies in front of Travis and let his imagination take over. The older he gets, the more I love providing minimal direction and seeing what he’ll do.

Gourd Pets (5)

He was most into painting the gourds, and loved the way the brush worked on the different textures, i.e. our bumpy ones versus our smooth ones.

Gourd Pets (7)

There was also some fantastic color mixing going on; I loved the hues he made to go on our white gourd.

Because we were making them into pets, I asked Travis if the gourds had names. He quickly responded that they did, including Ranger and Radar. Several of the gourds then received glue and feathers, making them seem like fantastical birds.

Gourd Pets (6)

Googly eyes were the finishing touch before we set them aside to dry. Feel free to add other crafty items as well, such as ribbon, markers, or glitter.

Gourd Pets (9)

Once the paint and glue dry, find a spot for your “pets” in a garden or patio.

Gourd Pets var

Now enjoy them all season!

Gourd Pets alt

Fall Sensory Jars

Fall Sensory Jar (5)

This easy project works on several skills: sorting, fine motor skills, plus a little bit of science when it comes to what will sink and what will float. But never mind all that – kids won’t even notice they’re learning; they’ll just love the process and seeing all the pretty fall-colored things in their final creation!

To start, gather any fall-themed or fall-colored bits that will fit in your water bottle. I had hoped to use foam shapes in the shapes of leaves, pumpkins etc., but wasn’t able to find any at the store. Instead, we had an assortment of little wooden craft leaves, paper leaves, and buttons and pom poms in autumnal colors. Bits of fall-hued ribbon would work well to!

To start, encourage your tot to sort the items by kind (or by color, if you prefer).

Fall Sensory Jar (1)

Travis was impatient with that step because he couldn’t wait to get his hands on the water bottle. Pour a little water from the top, leaving it mostly full, and begin adding your items.

Fall Sensory Jar (2)

Here is where we had fun guessing what would sink and what would float. Buttons made a quick descent to the bottom, whereas our pom poms and wooden leaves stayed near the top.

The narrow opening of the bottle also posed an interesting puzzle for Travis to work out. How could he fold our leaves so they fit inside?

Fall Sensory Jar (3)

Once the jars are filled, use a hot glue gun (grown-up step) to seal on the caps. Now your child can watch the items swirl back and forth!

Fall Sensory Jar (4)