Cardboard Tube Coiled Snakes

Cardboard Snakes (8)

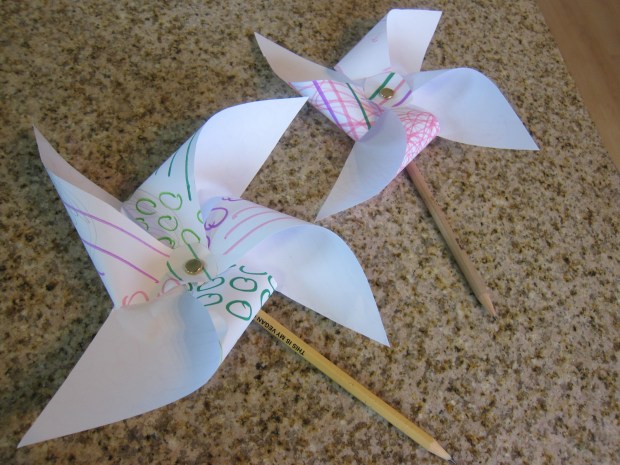
This is a fun craft to put together, and the adorable final product can be used either to play with or to occupy a cute space in your garden!

First, paint toilet paper tubes with paint on the insides and out. We liked selecting fun bright colors for this project!

Cardboard Snakes (1)

If you intend to set the snakes outside in the garden, be sure to use acrylic paint. Painting the inside was a bit tricky for Travis, so I did that part and neatened up the outside of his blue one. Let dry completely.

Cardboard Snakes (2)

Cut each tube into a coil shape. I confess that I found this step tricky, so our snakes only have about 4 loops each. I saw others online that were cut into very thin little spirals – by all means go ahead if it doesn’t hurt your wrists as it hurt mine!

Cardboard Snakes (4)

Coil your snakes around a longer tube (like an old paper towel roll) to hold them steady and add colorful dots using the handle of a paintbrush rather than the bristles – a novelty!

Cardboard Snakes (5)

Let one side dry completely before you flip the tubes and dot the other side.

Cardboard Snakes (6)

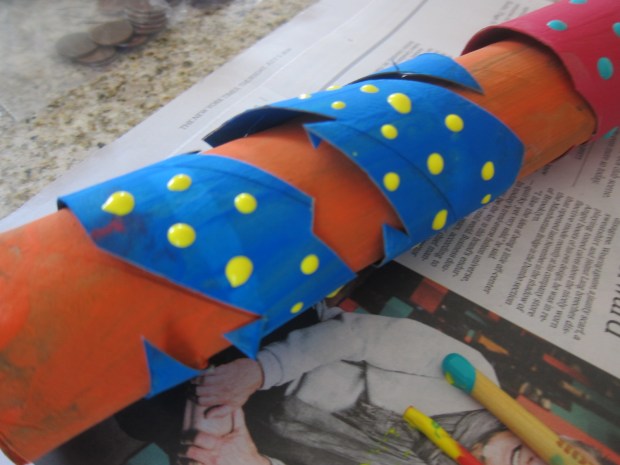
For a final touch, we glued on triangle “tongues” made from red paper and two googly eyes.

Cardboard Snakes (7)

Travis was so excited by the way the snakes stretched out! Great for imaginative games.

Cardboard Snakes (9)

When it’s time to find your snake a place in the rainforest (er, I mean garden), choose a cozy spot and nestle them in.

Red, White, and Blue Berry Shortcakes

Red White Shortcake (6)

It’s not Independence Day until we make a flag-colored recipe from High 5 magazine! To wit, see our recipes in the past for Flags for Breakfast or Red, White, and Blue Nachos.

This year’s candidate: easy shortcakes in the colors of the American flag. We made a few vegan substitutions from High 5’s original recipe, but stayed true to the spirit of the dish.

Instead of refrigerated biscuit dough, purchase frozen pie shells (such as Wholly Wholesome) or make your favorite pie dough recipe. Use a star-shaped cookie cutter to make 12 stars from the crust (you’ll have to re-roll your scraps a few times to have enough dough).

Red White Shortcake (1)

Travis loved playing with extra dough!

Red White SHortcake (2)

Place the stars on a baking sheet, brush with about 1 tablespoon Earth Balance butter, and sprinkle with sugar. Bake at 400 degrees for 5 minutes; cool completely.

Red White SHortcake (4)

Meanwhile, combine 2 cups blueberries, 2 cups raspberries, and 2 tablespoons agave nectar in a bowl. Set aside.

Red White Shortcake (3)

Rather than make our own yogurt cream from scratch, we purchased a can of SoyaToo whipped cream. (Note: there are vegan substitutes that whip up like dairy cream, but I didn’t have enough time to plan in advance and order online).

To assemble each dessert, place one star on a plate, along with a heaping spoonful of berries.

Red White Shortcake (5)

Add a dollop of whipped cream to taste, and enjoy!

Red White Shortcake (7)


Patriotic Popsicles

Patriotic Pops alt

Need a red-white-and-blue snack for this Fourth of July – or any day this summer? These adorable popsicles fit the bill!

First up was using a small cookie cutter on slices of melon. Ideally, we would have used a small star for truly star-spangled popsicles, but a heart was just as cute.

Patriotic Pops (1)

Travis was so proud of the shapes he made! Cut out enough so you have 2 watermelon slices per popsicle mold, and add to your molds.

Patriotic Pops (2)

Fill the molds nearly all the way with lemonade, then top off with a few fresh blueberries.

Patriotic Pops (4)

Freeze completely before serving. Ha, he seems to be asking, “Hey Mom, how do I get to the fruit?”

Patriotic Pops (7)


DIY Fireworks

DIY Fireworks (6)

We’re making our own fireworks this Fourth of July… on our t-shirts that is!

Ages ago Travis and I made toddler tie-dye, and the method for this shirt is a variation on the idea. Except now Travis can design with much more intention.

First, place a piece of cardboard inside a plain white t-shirt.

DIY FIreworks (1)

Use permanent markers (such as sharpies) in blue and red to draw asterisk shapes on the shirt. This design was a bit over Travis’s head, but he enjoyed scribbling with the sharpies.

DIY Fireworks (3)

Use an eye dropper (great for building those little finger muscles!) to drop a few drops of alcohol onto each colored portion of the shirt. The colors will bleed out into “fireworks” and sparkles. Travis had incredible concentration and determination as he dripped the alcohol over each line of marker.

DIY Fireworks (5)

Let dry completely before wearing.

DIY Fireworks (7)

Happy Fourth!

Water Balloon Yo-yo

water balloon (6)

Here’s the perfect water balloon activity for smaller kids who aren’t ready for a good old-fashioned water balloon fight!

Something I didn’t know until now: in order to fill water balloons, you need a special nozzle that attaches only to an outside spigot – our indoor sink didn’t work for this one! That meant we had to wait until a day at the relatives’ house to have fun.

water balloon (1)

Fill up water balloons and tie off.

water balloon (3)

Cut long rubber bands open, and tie one to each balloon. Now they bounce up and down like yo-yos for endless enjoyment.

water balloon (4)

These were Travis’s first water balloons, and he loved how squishy they are.

water balloon (5)

And of course, pelting daddy with a surprise handful is still fun, once the elastics slip off!

water balloon alt.jpg

Green Time: Camp in Your Backyard

camping (2)

I’ve given our Ranger Rick Jr. subscription credit before for getting us outside and inspired, but this time the magazine really hit a home run. Never in a million years would I have taken Travis backyard camping, until it was the magazine’s summer Green Time suggestion. We pledged to join the Great American Campout at National Wildlife’s Federation’s website, originally aiming for the start day of June 23. Rain delayed us by one week, but we’re so glad we got out there!

Let’s start by saying I’m not a camper. Luckily we were able to borrow a tent from a friend, leading to instant excitement once it was up in the backyard.

camping (3)

Folks, I’m here to say backyard camping is the way to go! Easy access to bathrooms if needed, popping inside to cook vegan s’mores over a cast-iron pan, and a cozy bed if kids decide they can’t make it a full night outside.

camping (5)

We headed out at bedtime (8 pm) with the sun still setting. Travis popped up with his flashlight for every sound, enamored with nature.

camping (8)

“I heard something! Let’s check it out!” We loved seeing birds and the setting sun in the clouds.

camping (11)

And fireflies! Can you spot the pinprick of light in this picture?

camping (10)

Stories by flashlight once it as completely dark were especially fun.

camping (14)

Around 10 o’clock, Travis decided he was unable to get comfortable so we headed inside. But this was easily the most magical night of the summer so far. I asked Travis what his favorite part was, and he said playing with the zippers on the tent flaps – ha! Thanks NWF!

camping (13)

Rainforest Crate!


koala rainforest (14)

Coinciding with the hot, humid summer weather, our latest offering from Koala Crate was all about the rainforest.

The first project, a Butterfly Puppet, as actually quite a bit like a butterfly craft we put together recently from Ranger Rick magazine, illustrating how caterpillars morph into butterflies. The one in this crate simplified things greatly, providing us with a felt butterfly puppet body that we needed only to decorate.
koala rainforest (1)

Travis really took charge on this one with his own vision of how the caterpillar and butterfly should look. We didn’t end up with a version that matched the sample, therefore, but I loved his final caterpillar creation.

koala rainforest (2)

You can talk with your child about symmetry as you decorate the butterfly portion, but rather than insist on a symmetrical orientation to our stickers, I let Travis design it the way he wanted.
koala rainforest (5)

Folding the wings in and out of the puppet’s body for the transformation was a delight every time.

koala rainforest (3)

Flutter flutter!

koala rainforest (4)

Next up as the Musical Rainstick. Cap one end of the provided cardboard tube with a provided plastic cap. Next fold up the indents in the provided cardboard insert; this will help the beads fall at a slower “rainy” rate. Here we are very seriously adding the wooden beads:

koala rainforest (6)

Time to shake shake shake! This was so fun that it was a little while before we decorated the rainstick with the rainforest stickers.

koala rainforest (7)

The rainstick gets used again in the final project, a Balancing Tree Game. Punch out the cardboard branches, and fold the ends up.

koala rainforest (8)

Use a Velcro dot to adhere these branches to one end of the rainstick. You can also add a few more of the rainforest stickers.

Now the challenge was to fill the rainforest tree with pom-pom leaves using the provided tweezers. This was great fine motor skill practice.

koala rainforest (10)

A note of caution: The game is hard, even for grown-ups, so be prepared to ease some preschooler frustration.

koala rainforest (13)

As a nice touch, the pom-poms store handily in a provided pouch when you’re done with play.

koala rainforest (11)

As a final craft, we put together a suggested Venus flytrap. Parents, cut little triangles all along the edges of a paper plate. Use markers to color the inside of the plate red and the outside green.

Venus Fly (1)

We didn’t even finish coloring before Travis eagerly made his flytrap chomp on some pom-pom flies!

Venus Fly (3)

Oh no, can a Venus flytrap eat a whole caterpillar?

Venus Fly (2)

I loved seeing Travis’s imagination at work with this one.


Ice Boat Races

Ice Boat (2)

This is one of those projects that didn’t turn out quite like we planned, but it got us outside into beautiful summer sunshine, and turned into a separate kind of fun – always a happy ending!

The night before you want to race your boats, freeze water in small containers – tupperware works best. After about an hour, when the water has started to set, insert a straw into each boat to be the mast.

The next morning we decorated flags as the sails and taped to our masts. Run a little warm water on the bottom of the container, and your boats will slip out.

Ice Boat (1)

We were sort of set up for disappointment because I didn’t have a large “ocean” for us to race the boats in. An empty sand table or water table would work best, but lacking those, I filled a small craft bin with water.

Oh no, our sails fell off in the water right away!

Ice Boat (4)

Still, Travis got a kick out of huffing through a second pair of straws to move our boats, and see who could sail across the bin fastest. When that didn’t quite work, we paddled the boats with our straws.

Ice Boat (3)

Perhaps more fun, though, was simply holding the slippery “boats”, and then seeing how quickly the ice melted in the summer sunshine. Travis spent the next hour or so on the patio, playing with the water in the bin and cracking apart the ice. So all in all, not a fail!

Ice Boat (6)

Fun with Plastic Dinosaurs


Dino Ornament (6)

Over the years we seem to have accumulated a good-sized collection of tiny plastic dinosaur figurines. You can find these sold in tubes at toy stores, craft stores, and museum stores, and we’ve amassed quite a few duplicates as time has gone by. So it was time to have fun with a few of the extras!

First, Travis decided to cover them in sparkly glitter paint.

Dino Ornament (2)

This immediately made me think of sparkly Christmas ornaments, so we finished off the look with a little chenille stem collar for each one.

Dino Ornament (5)

If you loop thread or an ornament hook through each dinosaur’s collar, you can really hang them up on your tree next holiday season! We’re setting ours aside for Christmas.

Next up was dinosaur “egg” soap. If you truly want yours to look like eggs, you’ll need oval soap molds (available at craft stores). I only had square craft molds but hey, maybe there was a dinosaur somewhere who laid square eggs instead of oval ones.

Place a plastic dino in each empty mold.

Dino Soap (1)

Meanwhile, melt a bar of glycerin soap in the microwave – you’ll need to heat it at 30 second to 1 minute intervals until completely melted, stirring after each interval.

Dino Soap (5)

A word of caution: we first tried a bar of bath soap from the store, but it only puffed up in the microwave instead of melting. Although this led to endless amusement for Travis, it did not make great dino eggs! Turns out you really need to buy what’s called “melt and pour” soap or it simply won’t work.

Dino Soap (6)

Once we had the right soap, it melted in a mere minute! Travis loved pressing the microwave buttons. Let your child carefully stir to remove any final lumps, then (adult step!) pour over the dinosaurs.

Here they are trapped in goo. Travis was gleeful!

Dino Soap (4)

I was impressed with how quickly the soap sets, in under an hour, meaning kids won’t have to wait long for soapy fun. Bring your dinos into the tub, wrap them in cellophane for gifts, or place out as decoration.

Dino Soap (7)

If you get soapy with your “eggs” in the tub, it won’t be long before your dinos hatch!

Dino Soap (8)

Paper Pinwheels

Paper Pinwheel (6)

Summer brings with it a plethora of parades, whether for Fourth of July, local events, or just no reason at all. Inevitably, vendors hawk items for kids on the sidelines like bead necklaces and pinwheels. Skip the expense, put together your own pretty pinwheel and bring it along to all your town events this summer – parades, fireworks, picnic dinners, music at the bandshell – or whatever else is on in your town!

You can use decorative paper to make the pinwheels, but we thought it would be more fun to color our own. Spirals, polka dots, stars and stripes – whatever strikes your kid’s fancy!

Paper Pinwheel (1)

Once colored, cut the paper into 6 inch squares, then cut a slit (about 3 inches deep) at each corner.

Paper Pinwheel (2)

Cut a small circle from your scrap paper to be the center of your pinwheel.

Adults, using a pin or brad, poke through all the layers: start with the center circle, then add the cut corners of the pinwheel one at a time, moving in a circular motion. In retrospect, we would have colored both sides of our paper!

Paper Pinwheel (3)

Finally, poke the brad down into a pencil eraser. The perfect item to wave as the parade goes by!

Paper Pinwheel (4)