Q-Tip Painting

Q Tip Paint (6).JPG

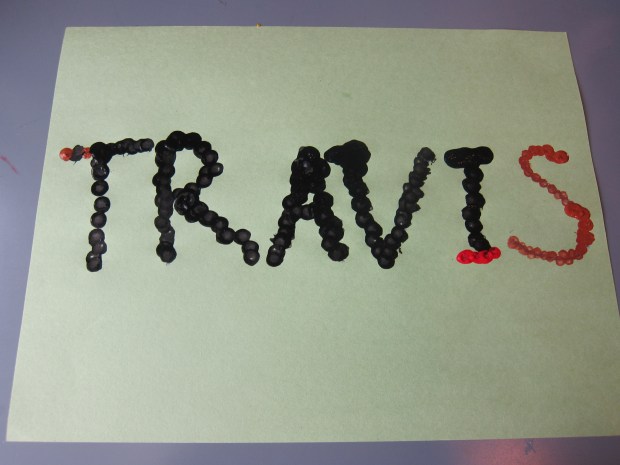
Sometimes it seemed like every other project Travis brought home from pre-k involved dot markers; teachers sure do love this art medium! This craft is almost like a homemade version, but will help with precision and letter tracing.

I wrote Travis’s name all in capital letters on construction paper and set out bowls of paint and q-tips.

Q Tip Paint (1)

He thought the idea of “homemade” dot markers was so neat! At first he intended to smear along the lines of the letters, but when I showed him how to dot the q-tip, he quickly took to it. I had imagined he’d dot at intervals, but he wanted his dots right up against each other so no line showed through.

Q Tip Paint (2)

This activity is nice reinforcement if your child already knows how to spell his or her name. Because he had to move slowly through each letter, Travis noticed that an upper case R starts out looking like a P, until you add the last diagonal line. What a way to notice the building blocks!

Q Tip Paint (3)

He wasn’t satisfied until he’d added the last dot.

Q Tip Paint (4)

And loved mixing up the colors, too.

Q Tip Paint (5)

Design a D

Design D (6)

Our summer letter of the day for tracing and writing was D. Travis doesn’t struggle with the upper case, but still sometimes confuses his little d with little b. Working slowly through a worksheet helped him focus on which direction the line and circle needed to go.

To think about it spatially, we then designed D in two ways. First I gave him a pencil and string; could he make an upper case D?

Design D (1)

At first he was confused, but kept a good attitude about it!

Design D (2)

I helped him make the loop of the D with the string. Now could he see where the pencil needed to go?

Design D (3)

Tada!

Design D (4)

Next we made a lower case d with our hands. He remembered cupping his hand into a c from yesterday, which worked the same for the loop, here. His other hand went straight against it, for a delightful d!

Design D (5)

Garden Games

Garden Games (14)

A trip to a local botanical garden had us playing garden games in two ways today. First up: a scavenger hunt! The printable Garden Bingo card from Raddish Kids gave purpose to our walk along the paths and past the beautiful blooms.

Garden Games (1)

Some items we spotted right away (grass, flowers, leaves, hoses).

Garden Games (2)

Others we really had to look for, like sprinklers:

Garden Games (10)

And wheelbarrows:

Garden Games (9)

Travis got down low to spot clover:

Garden Games (5)

And dug in the dirt for worms!

Garden Games (8)

I was amazed when he spotted a rollie poly bug crossing the gravel path. I thought for sure that one would go unmarked on our sheet.

Garden Games (4)

Travis loved the hunt; near the end we had four boxes crossed off in multiple directions, but no actual Bingo. Then a watering can sealed the deal!

Garden Games (13)

Meanwhile, midway through our hunt we paused to play Bug Detective. I challenged Travis to pick an insect and observe it in close detail. He found a big fat wood ant and stopped to watch.

Garden Games (6)

We kept it in our bug jar for a short time, but then released it.

Garden Games (7)

Travis watched the ant scurry about. We hoped it would pick something up, but never did.

Later, Travis drew the ant, working from memory to make the three parts of the body and the legs. He added an arrow for the direction the ant had gone, as well as the grass it had been crawling through.

Garden Games (11)

Both of these activities really had Travis thinking about nature in new ways, and challenged him to see the garden on the macro and micro levels. What fun!

Garden Games (12)

Cotton Ball C

Chalk c (4)

Today Travis practiced tracing C – an easy one! – but after the tracing, I challenged his dexterity to form a C in three ways.

First, have your child cup their hand (make sure to use the left) to form the letter. Travis had to think hard about this, but was so proud when he got it right!

Chalk c (1)

Next we headed outside to draw c’s with chalk. This was a great chance to make sure his form was correct, since there was no line for him to trace outdoors!

Chalk c (2)

I noticed that his C’s were a little short, and encouraged him to extend the line for a curvier final result.

Chalk c (3)

Finally, back inside, I drew a C for him on construction paper and we filled it with cotton balls.

Chalk c (5)

Travis wanted to do his own glue, following perfectly along the line I’d drawn.

Chalk c (6)

And he was completely in charge of placing each cotton ball, too! Again, what a difference in dexterity and patience.

Chalk c (7)

Button B

Button b (6)

Today’s summer letter of the day was B! After tracing, I helped Travis draw two very careful Bs using white crayon on black paper (a fun chance to use white, sadly always the most underutilized crayon in the box).

Button b (2)

Travis made dots of glue on each B, and filled the upper case with buttons

Button b (3)

…and the lower case with breakfast cereal.

Button b (5)

He was so careful applying each piece along the lines; I sat back and marveled at how his fine motor skills (and patience!) have changed over the course of pre-k.

Button b (4)

Even better, he enjoyed the button art so much that he asked for a second piece of paper and a glue stick to continue the fun once our Bs were complete – what could be better than that? If you don’t have buttons, beads would also work great for this project.

Button b (7)

Aluminum A

Aluminum a (4)

Travis is a pre-k grad, and although we intend to have lots of fun this summer, I also want him to avoid the “summer slide.” To keep him fresh, we’ll be working on the alphabet. This took me back to our journey through the alphabet when he was a toddler! But now the emphasis is different; he knows his letters and phonemes, but needs to work on the fine motor skills of tracing and writing.

After tracing the letter A, both upper and lower case, we designed one from a material that started with a – aluminum foil.

I showed Travis how to roll a sheet of foil into a coiled rope – fun!

Aluminum a (2)

We looked at the “a” in his workbook, and he thought hard about how to shape his foil. For the majority of it, we twisted one coil until it made a circle.

Aluminum a (1)

The second, shorter coil would be the line on the end. Travis has a habit of putting this line closer to the middle of the a’s bottom, but this “close reading” helped him pinpoint that it should go on the side.

Aluminum a (3)

Next we made an Artistic upper case A, using a favorite art medium: crayons.

I presented him with three crayons – two long and one short – and challenged him to decide which should go where.

Aluminum a (6)

After initially making what looked more like an H, he was quite proud when he tilted the two long crayons to make an A.

Aluminum a (7)

One down, 25 to go!

Aluminum a (8)

Walk-and-Spot Game

Walk and Spot (4)

Aaah, those summer walks in the park or the woods. It seems like the perfect family pastime… until the kids tire out, amiright? Here’s the perfect new game to play if you need to motivate your kids through the miles!

One person is the spotter, and picks an item a little ways away without revealing what it is. The spotter tells the other players the color of the item, and then begins beeping.

Beep slowly when the item is far away. Beep faster as you get closer. Whoever guesses correctly is the next spotter. Well, Travis took to it right away! First he got us with this yellow sign.

Walk and Spot (1)

Then it was mommy’s turn – an orange cone!

Walk and Spot (2)

Don’t overlook little items, like purple flowers.

Walk and Spot (3)

Daddy picked something green. Hmmm, what could it be? Beep beep beep. The green bench! Travis guessed.

Walk and Spot (5)

This game kept him happy for ages and easily ate up the last mile of our excursion. What’s your favorite game to play on a walk? Please share in the comments!

Summer Memory Jar

Summer Jar (8)

School’s out for summer! 

My boy is officially a pre-k graduate, and we have two glorious summer months ahead before Kindergarten. To make the most of it, we made this summer jar to fill.

First, glue a ribbon around the top of a mason jar. I purchased a large jar, in anticipation of lots of little mementos.

Summer Jar (1)

Use puffy paint to decorate the jar. I suggested to Travis that we make a yellow summer sun across the front, but Travis had other plans: big drippy blobs in lots of colors.

Summer Jar (3)

It took forever to dry, but why not – it’s his summer!

Summer Jar (5)

Once dry, I used marker to add “Summer 2019” across the top of the jar. We also tried writing “summer” with puffy paint, but this proved to be too drippy.

Summer Jar (4)

Now we’ll fill it, moment by moment and experience by experience.

On the first full day of summer, we did a family walk at a national park, and Travis very carefully selected the best rock to add to our jar.

Summer Jar (6)

I will post an update to this blog at the end of summer!

Summer Jar (7)

What’s in your summer jar? Please share in the comments!

Spring Flower Arrangements

Spring Flower (7)

We’re only one week away from the end of spring and the spring flowers are fading, making room for summer counterparts. It’s the perfect time to put together a floral arrangement for someone special – perhaps a graduate in your life, or a dad you’re celebrating this weekend!

Travis wanted to put together this bouquet for dad; we skipped the store-bought stuff, and opted instead for a wildflower hunt! (Okay, maybe a hunt around our apartment complex).

Spring Flower (1)

Travis loved gathering an assortment of greenery and different colored blossoms, as we took care to take only one flower from each bush.

Spring Flower (2)

Once home, we laid out the flowers and a pretty vase. Fill the vase 2/3 of the way with water – a good little fraction lesson!

Spring Flower (3)

To help our flowers stay healthy and strong, we added 1/2 teaspoon sugar and 1 tablespoon cider vinegar.

Spring Flower (4)

Travis was then in charge of arranging our blooms. Any that were too long, he seriously and carefully snipped shorter.

Spring Flower (5)

Teach your child to hold the stem of each flower on the outside of the vase to assess if it is too long or too short.

Spring Flower (6)

Tada! A beautiful spring bouquet.

Spring Flower (8)

For more flower fun, check out our recent ikebana craft. And for garden recipes to go with these garden blooms, check out our strawberry shortcakes!

Sneak Through Laser Beams

Sneak Laser (5).JPG

Travis returned home from school to discover that, in order to reach his lunch, he’d have to sneak through laser beams!

To set up the surprise, I set out stools and chairs and wound yarn in and out, up and down. For the best results, vary the height and width between your “lasers”.

Sneak Laser (2)

Travis practically dove at the setup when he walked in from school, barely sparing a moment to take off his shoes.

Sneak Laser (3)

On the first attempt, he got nipped slightly by one of the lower “lasers.” I challenged him to think of how he could go over it, since under hadn’t worked, but this would mean ducking his head from those above.

Sneak Laser (4)

Soon there was lots of slithering and maneuvering about. This one will have the kids delighted and sneak in some exercise: a win-win.

Sneak Laser (6)

Finish up by sharing this clip with your kids!