Mother’s Day Hat Card

Mother's Day Card (8).JPG

This adorable card in the shape of a hat, which evokes Kentucky Derby season and all things springtime, makes a wonderfully whimsical card for a special someone on Mother’s Day! When Travis and I spotted the craft in Highlights, we knew we needed to put one together for his grandmother.

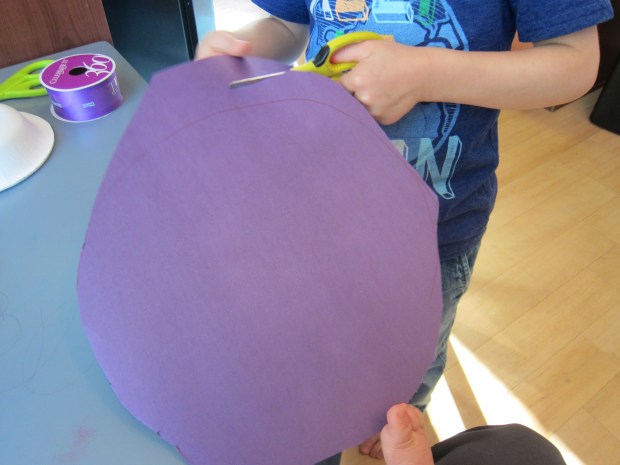
Cut a large circle from colored cardstock; we chose a royal purple. I was impressed with the way Travis followed the lines along the circle I drew – I hadn’t realized his cutting skills had grown so precise!

Mother's Day Card (1)

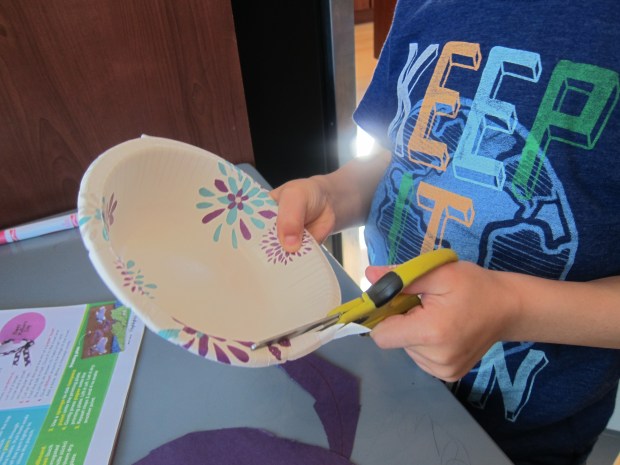
Then we cut the rim from a paper bowl for a smaller circle.

Mother's Day Card (5)

Cut a tab into your cardstock near the middle, and glue onto the bowl. It should be able to lift open and closed.

Mother's Day Card (3)

Next we glued purple ribbon around the bowl, and also affixed a purple bow.

Mother's Day Card (4)

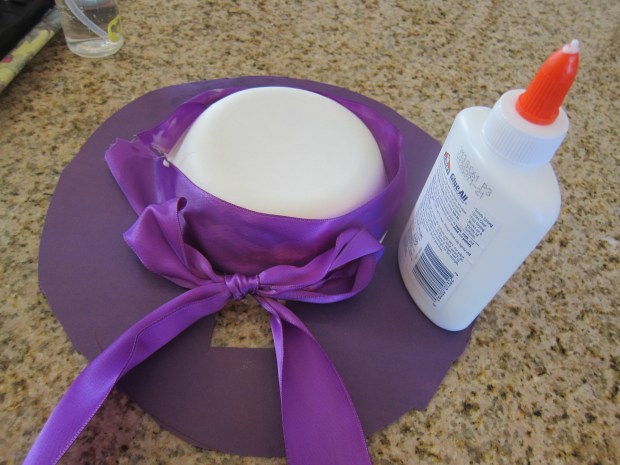
Once the glue dried, we added our Mother’s Day message to grandma under the hat!

Mother's Day Card (6)

Hats off to this cute idea!

Mother's Day Card (7)

Straw Rockets

Straw Rocket (8)Travis and I have been launching all kinds of things lately, from marshmallows to disks. Today, we made little rockets that could have races!

Cut squares of construction paper that are 3 inches x 3 inches. Make as many of these as you’ll want rockets.

Straw Rocket (1)

Wrap each piece of paper around a straw, making sure it is loose enough to fly off the straw when needed. We secured these with tape.

Straw Rocket (2)

Although there’s no need to, it was fun to add decorations. Travis soon was swirling pipe cleaners into all kinds of creations!

Straw Rocket (3)

I helped with one that was recognizably a “rocket,” as well as a few silly ones. Definitely have fun with these; we even had a little alien with googly eyes.

Straw Rocket (5)

We used hot glue to affix our pipe cleaner creations to our paper pieces. Now our rockets were ready to launch!

Lift the straw to your lips and blow, and see how far it flies.

Straw Rocket (7)

You can even turn it into a race, and see whose rocket flies furthest.

Straw Rocket (6)

Sprout Sculpture

Chia Sponge y.JPG

This little project is sort of a DIY chia pet, but you get to control what it looks like! It’s a neat way to introduce kids to the concept of a greenhouse, too.

To set up our “greenhouse,” Travis and I first spooned about 2 teaspoons chia seeds into a measuring cup, and filled with 1/2 cup water. Let sit while you put together the sponge structure.

Sprout Sponge (2)

We glued two sponges to a paper plate as a base, then built upwards using other colored sponges.

Sprout Sponge (3)

Have fun cutting some of the sponges into smaller pieces or shapes, or perhaps getting architectural with your design!

Sprout Sponge (4)

Note: We found that hot glue worked best for holding the sponges in place; a few of them had a slight tower-of-Pisa lean when we tried to use white glue.

Spoon your chia mixture over the sponges. Travis thought it was so goopy!

Sprout Sponge (5)

We spritzed with a water bottle until the sponges and chia seeds were nicely saturated.

Sprout Sponge (6)

Place inside a clear plastic container (this is your “greenhouse”) and set the container some place with plenty of sunshine.

Chia Sponge x

We made sure to spritz at least twice daily and within about four days, we had some sprouts!

Chia Sprout var

By one week, it was looking quite sculptural! Definitely a neat experiment.

Chia Sponge z

A+ for Teachers

A+ Teachers (5)

May 7 is National Teacher Day, so in appreciation, Travis put together “report cards” for his two preschool teachers!

A+ Teachers (1)

Ahead of time, I bought a few packs of school-themed stickers. These served as helpful prompts as I asked him to think about how his teachers help him. For example, cookies and juice reminded him, “They help me at snack time.” Glue, scissors, and paint jar stickers reminded him, “They help me with crafts.”

A+ Teachers (2)

We also added a few more abstract ideas, like “they are patient with me” or “they encourage me.”

Of course for each sentence, we graded his teachers an A+! Once he’d written in his name, the cards were complete.

A+ Teachers (4)

What will you do for your kids’ teachers in appreciation? Please share in the comments!


Cardboard Tube Marble Run

Marble Run (9).JPG

This DIY marble run is a fantastic way to get your kids engineering and learning about laws of motion – all while they just think they’re playing!

I saved up cardboard tubes (from toilet paper and paper towel rolls) for a few weeks, until we had a good-sized collection.

First we needed to decorate our tubes. Travis loved covering them with washi tape, and insisted on being in charge of snipping off the pieces of tape we would use.

Marble Run (2)

Next, we cut the tubes open, which he also loved doing!

Marble Run (1)

If your child wants to, decorate the inside of the tubes with marker or crayon. But at this point, Travis was so excited to design our marble run that he said let’s skip the markers!

Marble Run (3)

We headed over to a blank portion of wall, and I taped up the first tube with masking tape. Slowly, we decided where each tube needed to go.

Marble Run (4)

This part will involve a bit of trial-and-error, and a few test runs! Check to see where marbles bounce out or fall off tubes, and adjust accordingly.

Marble Run (7)

I recommend placing a small container with sides at the bottom to catch the marbles.

Marble Run (5)

We were so proud once we had a run that perfectly deposited the marbles inside our container.

Marble Run (8)

Marshmallow Launcher Redux

Marshmallow Launcher (3).JPG

Every once in a while, it’s fun to repeat an activity at one- or two-year intervals, and see the differences in the way your children play at different ages. Travis and I first made a marshmallow launcher nearly two years ago, but with some extra Dandie’s marshmallows in the pantry, today we decided to do a repeat!

First, cut the bottom from a few paper cups, one for each launcher you want. At nearly 5 years old, Travis can handle the scissors himself, unlike at age 3!

Marshmallow Launcher (2)

I tied the end of a balloon into a knot, then had Travis help snip off the top of the balloon.

Marshmallow Launcher (7)

Stretch this balloon over the cut end of the cup, and secure with an elastic.

Marshmallow Launcher (4)

Place 1 marshmallow in the cup; pull down on the knot of the balloon and release. Boom!

Needless to say, we soon had marshmallow bombs all over the apartment, and an eager little boy who had to run and grab all the ammo.

Marshmallow Launcher (5)

For some experimentation, we tested what happened when we put multiple marshmallows inside, but unsurprisingly, they didn’t launch as far. Then we tried to hone our aim, using some unwitting Ninja Turtles as target practice. Here’s a quick clip:

All in all, what fun!

Marshmallow Launcher (1)

Oatmeal Energy Balls

Oatmeal Energy (5).JPG

Travis and I have talked a lot lately about energy and inertia and what makes things move. That’s why it was so clever of Kiwi Co to include this recipe in Travis’s inertia crate – a snack designed to power human energy!

Ingredients:

  • 1 cup quick oats
  • 1/4 cup agave nectar
  • 1/2 cup peanut butter (or other nut butter)
  • 1/3 cup chopped almonds
  • 1/3 cup non-dairy mini chocolate chips
  • 1/3 cups dried cranberries
  1. Combine all the ingredients in a large bowl; refrigerate for at least 30 minutes.Oatmeal Energy (3)
  2. Shape the mixture into balls (you’ll have enough for about 10 servings) and enjoy!

Oatmeal Energy (4)

Newton’s Tower


Newton's Tower (3)

Yesterday, Travis and I marveled at some good old laws of physics and inertia, making pennies fall into a cup. We wanted a repeat of this magic today, so made this tower named in honor of Isaac Newton and his first law of motion: that an object will stay at rest unless acted upon by an external force.

The idea here is to hit only the bottom box in a tower of boxes. The bottom box is moved by an external force, but not so the others. So what would happen to these higher boxes?

You’ll want to use small boxes for this experiment. I had some old gift boxes that were probably about as big as you want to go; smaller would be even better.

Newton's Tower (1)

To make them pretty, I wrapped each in a separate shade of construction paper.

Newton's Tower (2)

To start, Travis and I tested if we could make the experiment work only three levels high. Zoom! The orange got whacked away with a dowel, and the red and yellow stayed put.

Newton's Tower (4)

Could we make it work with four? It worked perfectly – not the orange box off to the side, now.

Newton's Tower (6)

Notice the orange off to the side there.

Newton's Tower (7)

Needless to say, Travis loved a science experiment that involved whacking things with a stick. I taught him that the secret is to whack the bottom box as hard and as fast as you can. Finally, we challenged ourselves with all 5 boxes.

Newton's Tower (8)

Boom!

Newton's Tower (10)

As always, there’s something a bit magical about this every time it works.

Motion Magic

Motion Magic (%)

You’ll stun your kids with the way a penny doesn’t move in these games, a fantastic illustration of inertia. You can give a quick physics lesson – basically, things that aren’t moving want to stay put – but whether they grasp the concept or not, they’ll be amazed by the results.

We tried out the motion magic in two ways. For the first, we cut a square of cardboard as a base (using a bit of our Kiwi Crate from the Disk Launchers set). Place the cardboard over a glass, and put a penny on top.

Motion Magic (2)

Quickly flick the cardboard away (from the side, not from underneath). The cardboard will fly away but the penny…

Motion Magic (3)

…falls in the glass! This got a whoa from Travis, who then tried himself and was so proud it worked.

There is something sort of magical about inertia, even for grown-ups. Logically we want that penny to fly away, and every time we heard the clink of the penny in the glass, we were excited.

For the second method, we cut a strip from cardstock. Form it into a circle and staple the edges.

Motion Magic (1)

Place the circle over the glass, with the penny on top.

Motion Magic (6)

Very quickly, put a finger inside the cardstock circle and flick it out of the glass. Where did our penny go?

Motion Magic (7)

Down inside!

Motion Magic (9)

Want to really up the wow factor? Try the classic trick of pulling a tablecloth out from under a plate (you might want to use a paper plate, just in case).

Motion Magic alt.JPG

Is it magic? Nope, it’s inertia of course.

Balloon Propeller

Balloon Propeller (6)

We were dealing with big stuff for a four-year-old today! After our disk launchers from Kiwi Co introduced Travis to physics in a way even a preschooler could grasp, now we were talking about Newton’s laws of motion. Full disclosure: this required some review for mommy, who hasn’t touched this kind of material since college!

Here’s my quick recap: Newton’s third law of motion states that for every reaction, there is an equal and opposite reaction. So if the air from a balloon is escaping in one direction, the balloon will try and move forward in the opposite direction, making it spin, in this case.

Here’s how we set it up:

Slightly tug on a balloon and partially inflate it, just to loosen it up – don’t tie off. Now tape the balloon securely to the end of a straw (on the non-bendy side).

Balloon Propeller (1)

Travis immediately wanted to test out if he could blow up the balloon through the straw – neat!

Balloon Propeller (2)

Hold the straw on your fingers to identify the point where the straw balances. This is where you’ll insert a straight pin. Poke the pin all the way through the straw, then down into the eraser of a pencil.

Balloon Propeller (3)

Now blow up the balloon. Have your child hold the pencil, making sure their hand and arm won’t interfere with the motion of the balloon.

Balloon Propeller (5)

Let go and watch! The balloon will deflate, which causes it to spin around on the pin (Note: You may have to tug on the pin or spin the propeller by hand a few times to loosen things up enough).

Balloon Propeller (7)

We did this experiment over and over – a great visual of forces and energy, understandable even at the preschool level!

Balloon Propeller (8)