Mitten Match: Alphabet Game


Mitten Match (5).JPG

Here’s a cute and seasonal alphabet match game to keep little mind’s sharp over winter break!

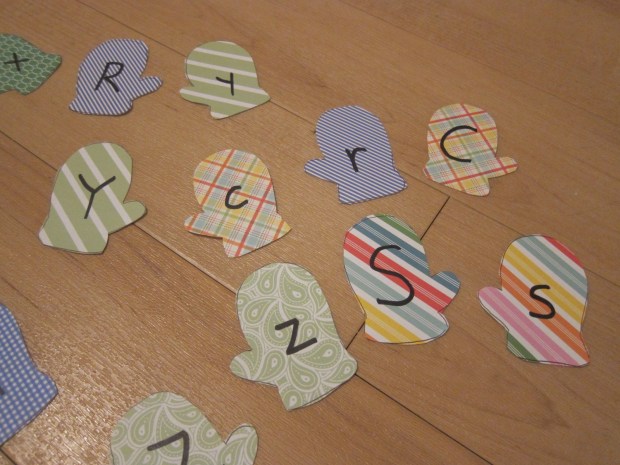
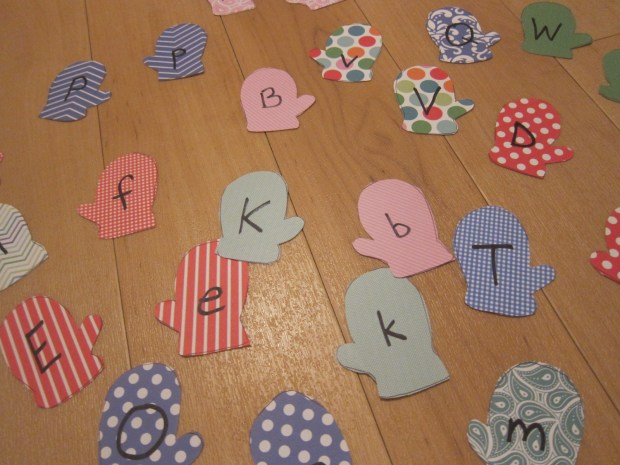
You’ll need 52 mitten shapes to play the game, labeled with all the letters in both upper and lower case. So yes there’s quite a bit of parental prep-work, but you can spread out the task over the course of an afternoon.

Mitten Match (2)

First, I printed out a mitten template (just Google and dozens will pop up), and traced a pair of mittens onto paper for every letter. You can trace onto any paper you like; colored construction paper would be pretty, although white paper would work just fine. I have a pad of patterned paper which worked great because each letter pair could have its own distinct pattern. This served as a cue for finding matches if Travis was in doubt, later on.

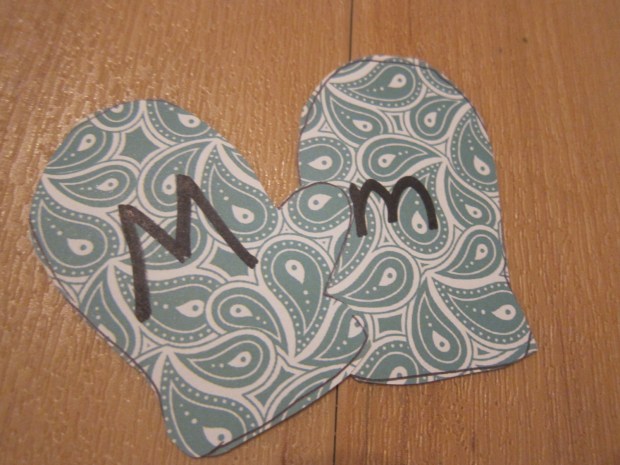
Label each mitten pair with the capital and lower case of each letter. Cut out.

Mitten Match (6)

Now it’s time to play with your mittens, and there’s no right or wrong way to do it!

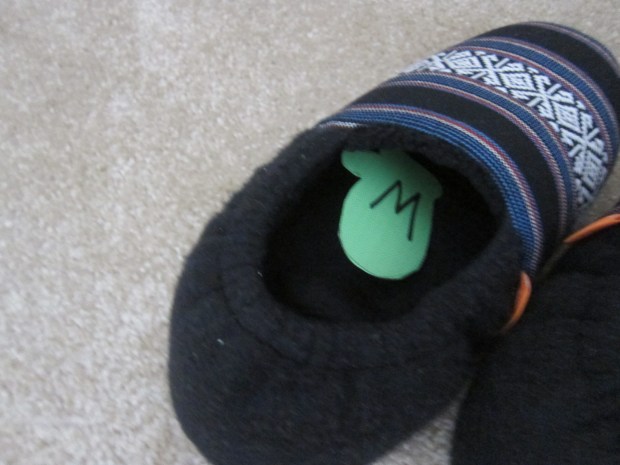
You can set up a hide-and-seek around the house. If playing this version, choose just a few mitten pairs – 26 letters would require a lot of patience and good hiding spots.

Mitten Match (3)

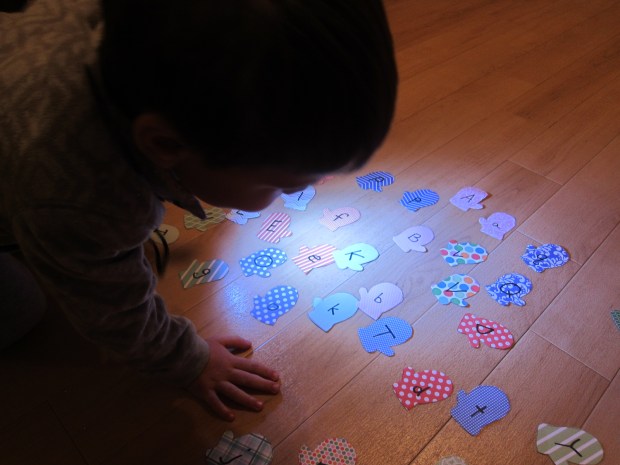
Travis balked a little at the learning aspect of the game, until we found ways to make it exciting. Before bed, I showed him an upper case letter, and he used a flashlight to pinpoint the matching lower case, for example.

Mitten Match (7)

Even more fun, Travis loves loading up toy trucks and cars like they are dump trucks, and I encouraged him to load all the mittens – but only once he had an upper and lower case match.

Mitten Match (8)

He was so thrilled that he went through all 26 pairs, proudly showing me each before it was loaded up into the truck.

Mitten Match (9)

How else will you play with your mittens? Please share ideas in the comments!

Mitten Match (4)


Sand Pendulum

Pendulum (5)

We snagged this idea from an old Parents magazine article, highlighting STEM projects for kids. The game provides a neat visual introduction to gravity, using the simple concept of a pendulum. Pendulums – any suspended weight that swings freely from a pivot – will always come to rest at an equilibrium position, because of gravity of course. Using colored sand makes it purely fun for kids!

Make sure to cover your work surface with a roll of craft paper or other paper, both to catch your sand designs, and to save you from a big mess at clean-up time.

To set up the pendulum, tie three strings at even intervals around a thick rubber band. Travis had fun exploring the materials while I put this step together. Older kids can help with the tying!

Pendulum (1)

Fit the rubber band tightly under the lip of a kitchen funnel. Gather the three strings together and tie in the middle so the funnel hangs evenly.

Pendulum (2)

Slip the strings over a dowel – whoops, not quite balanced yet!

Pendulum (3)

The next step was a bit tricky, since it requires two sets of hands, and my three year old had his own agenda. But ideally, have your child plug the hole at the bottom of the funnel with a fingertip while you fill it with colored craft sand.

Give the pendulum a slight push, and watch the sand go back and forth. It will swing in increasingly smaller motions until it comes to rest.

Pendulum (4)

As mentioned, ours didn’t exactly work as planned…but leftover sand sure is fun to play with!

Pendulum (6)

If you capture really pretty sand designs, please share in the comments.

Cardboard Learning Tree

Learning Tree (11)

This is a great activity that combines seasonal holiday crafting with a little learning. If you play your cards right, the kids won’t even know you’ve slipped in some education with their fun!

For the shape of your tree, you can either paint a large piece of cardboard (holiday gift delivery boxes, perhaps?) or poster board. We chose poster board because I knew it would be easier to cut out the tree. Either way, Travis was thrilled when I said I needed the entire thing painted green.

Learning Tree (2)

We left the paint to dry overnight, and the next day I cut out the tree shape.

Learning Tree (3)

Next we gathered supplies for the “ornaments.” Use holiday-themed cookie cutters or other shapes, and trace the outlines on colored construction paper.

Learning Tree (4)

Don’t worry if your kids don’t trace perfectly, you can always neaten up the lines when cutting the shapes out later.

Learning Tree (5)

The next step was even more fun: laminating the cards. Although this step is optional, it will definitely make your paper pieces last longer. Travis adores whenever he’s allowed to help laminate, so this was a big hit.

Learning Tree (7)

I cut out the shapes, and set them aside.

We hung our tree on the wall and added a brown piece of construction paper as the trunk.

The final step was to add Velcro strips to our tree and ornaments. Place the soft side of the Velcro on the tree at random intervals, then attach one rough Velcro piece to each ornament. Travis loved this even before we added the learning element, hanging his ornaments and then changing their positions.

Learning Tree (10)

There are so many games you can play from this point on! First, I numbered the ornaments one through twenty with a wipe-clean marker, for a number search game.

Learning Tree (12)

A simple wipe with a paper towel and we could play alphabet games. One suggestion is to hide the letters in your child’s name, and have them pinpoint those on the tree.

Learning Tree (13)

As an alternative, write the upper and lower case of a batch of letters, and have your child find the pairs.

In full honesty, Travis was way more into the mechanics of this game (taking on and off the ornaments, wiping them clean with paper towels), than he was with the learning games, but we’ll play again over the course of the next few weeks!

Color Hopscotch

Color Hopscotch (5)

Travis was late to jumping… so all the more reason to celebrate his new accomplishment with this fun game! It had us exercising our brains and our muscles. Instead of leaping from number to number, in this version you’ll be hopping from color to color or shape to shape.

To play, use foam sheets to cut out a variety of shapes. Ideally use two sheets of foam in each color so you wind up with two red triangles, two green squares, two blue circles, etc.

Color Hopscotch (2)

Arrange the shapes in any pattern on the floor, then have fun calling out instructions to leap.

We had fun testing shape combinations, like “Circle, Rectangle, Triangle!”

Color Hopscotch (8)

Or color ones: “Yellow, Black Green!”

Color Hopscotch (3)

Travis also made up silly ways to cross the shapes, such as jumping feet onto one row, then putting your hands down on the second. I loved seeing his creativity with the suggestions.

Color Hopscotch (6)

For bigger kids who are readers, consider making a spinner for the game. Write out different instructions in each space of the spinner, and then perform the motion on the space you spin to.

Color Hopscotch (7)

Days of the Week Chart

Days of Week (4)

Travis is in nursery school three days a week now (!), a transition that has gone remarkably well, but which sometimes leaves him confused as to whether it’s a school day or a weekend – a term used loosely since his “weekend” is now four days long.

This easy chart helps him visualize the week, and is great both for pre-readers and for kids who can read the days of the week.

To make the chart, cut a piece of poster board into a strip, and divide into 7 spaces (decorative washi tape makes a nice border between days). Write the names of the days across the top.

Days of Week (2)

We filled in each space with a visual of the main activity for each day.

Days of Week (3)

You can draw simple pictures on index cards, and write the words of the activity as well. In addition, we added photos for some of the activities that repeat weekly, like school:

Days of Week (1)

You can print out photos, or use a handy instant camera for the pics.

Days of Week (8)

As the final touch, we added a large paperclip along the top, which Travis can slide along as the week progresses. He loves matching up which day it is with which activity we’re headed off to enjoy!

Days of Week (7)

Magnetic Fishing Game

Magnetic Fish (8)

Disappointed with the mechanics of two recent fishing games, we decided to make our own version instead!

As a bonus, this activity was less about the “fishing” and more about a little learning that I wanted to sneak in.

While Travis slept, I cut lots of fish from construction paper – you can use a template or just freehand the shapes.

Magnetic Fish (1)

Some of the fish received a letter, and others a shape, and then each one got a paper clip to make it magnetic.

For the wand, tie yarn to a wooden dowel, and secure the yarn with tape. Tie the other end of the yarn onto a magnet. I have a craft stick with a magnet glued to the tip, which makes for sturdier “fishing“, so used that here.

Magnetic Fish (3)

Now it was time to go fishing! (Or, as we like to say in this vegan household, “rescue” the fish).

Magnetic Fish (5)

For kids just learning the alphabet, you can simply ask them to find any letter at random. For older kids, this is a great name recognition game. We found T-r-a-v-i-s in both caps and lower case!

Magnetic Fish (6)

Next up was a shape hunt, which Travis loved. There are so many other variations you could do with this game, such as finding fish of all one color, or finding the biggest and smallest fish.

Magnetic Fish (2)

Travis ultimately decided that he liked fishing in a slightly different way, affixing the magnet to the paper clip by hand, then tugging up. Either way, I loved that this activity got him playing and learning at the same time.

Magnetic Fish (7)

Color Mixing

Color Mixing (5)

I’ve recently discovered the all-natural, all vegetable-based food coloring from Watkins, which I am loving for their consistency and ease of use (no mixing required, as is the case with many natural pigments).

To have fun with the colors, we pulled out this simple game – it’s also a great way to discuss primary (yellow, red, blue) versus secondary (green, purple, orange) colors.

First we mixed our colors in 4 clear cups, one each of red, yellow, green, and blue. Add a pipette or spoon to each. Either one is good fine-motor skills practice.

Color Mixing (1)

We used an upcycled egg carton for the color mixing, giving ample opportunity to make new colors in the multiple compartments of this one container. Place a little clear water in each compartment, then begin adding your colors and see what happens.

Color Mixing (2)

I thought Travis might consider the game a little old-hat (we did something similar back in the spring) but he was so into his creations.

Color Mixing (7)

Watching purple and orange form were big hits.

Color Mixing (6)

He also was very interested in how he could make brown (which he says is his favorite color!), and intrigued when I said he could create it just by mixing all the colors together.

Color Mixing (4)

An easy and fun diversion for a rainy afternoon.

How Strong Is Paper?

Strong Paper (5)

This quick lesson on engineering was an absolute delight, for kids and grown ups both. A lot of Travis’s toys are packed up due to an upcoming move to a new home, but we still have items to play with. To wit, all we needed for this experiment was computer paper and books. The question was: just how strong was our paper?

First, I asked Travis simply to fold a couple of sheets of paper into a tent shape – could that hold up a book?

Strong Paper (2)

No way! Immediate collapse.

Strong Paper (3)

Now we needed to try something more structurally sound. Wrap three sheets of paper around cans, and tape to seal. Slide out the cans.

Strong Paper (4)

Set up the three sheets of paper like columns (those ancient Greeks were onto something…). I asked Travis to start piling on the books, and to his absolute delight, the paper remained standing. We couldn’t believe how big our pile grew – 3 books, 4 books, 5 books…

Strong Paper (6)

We had laid on about 15 of slender volumes when we decided to really test things.

Strong Paper (7)

It wasn’t until we added a fat hardcover book that the paper buckled and the whole pile collapsed – to Travis’s delight!

Strong Paper (8)

Needless to say, even I was impressed with how much weight the paper held. This activity is guaranteed fun, whether or not your little engineer grasps all of the concepts involved.

Numbered Balloon Hide and Go Seek

Numbered Balloon (2)

This was possibly the best game ever for a rainy morning! Not only did we play multiple rounds of it, but that was just the beginning – read on!

To start, you’ll need to blow up 10 balloons. Number them 1 through 10 with a sharpie. Balloons for no special occasion at all? Already this game was fun!

Numbered Balloon (1)

Next, hide the balloons around the house. For a 3 year old, I kept the hiding places fairly obvious. Where might those balloons be lurking? In kitchen cabinets?

Numbered Balloon (5)

In drawers?

Numbered Balloon (4)

The trick now is that your child needs to find them in numbered order. If they find number 3 before 2, for example, 3 has to stay in its place until 2 has been located. Parents, keep track of where you put each number, or you’ll be scrambling alongside your little seeker!

Numbered Balloon (6)

Ooh, found one!

Numbered Balloon (7)

Travis was surprisingly great about leaving balloons be when he found them out of order; I had been afraid he’d just snatch up each one as he went, but he was really into the counting aspect of the game!

Needless to say, we had to play again. On one of our rounds, number 8 was hidden so well that we enlisted a full family search to dig it up. You wouldn’t think you could lose something as large as a balloon, but I promise we did.

Because he had seen me use the sharpie, Travis also wanted to try his hand at drawing on the balloons. He made lines on each balloon up to the correct number – his first tally marks!

Numbered Balloon (8)

Rounds of balloon tap and balloon kick followed of course, so with this one activity, you can easily help fill a rainy day!

Numbered Balloon (3)

Salt Water vs. Fresh Water

Salt v Fresh (5)

With so much time spent at the beach over the summer, the topic of salt water is bound to come up – that big ocean contains so much water, but it’s no good for drinking! Here’s a neat way to explore some of the different properties of salt versus fresh water at home.

First, pour a generous amount of salt into a cup of water, and stir to dissolve. Pour a second cup full of fresh water.

Salt v Fresh (!)

Next, we added ice cubes to each.

Salt v Fresh (2)

Finally, we mixed up a batch of red food coloring; a dark color is best here, so you can fully see the results.

Salt v Fresh (3)

Slowly pour the food coloring into the top of each glass. Your child will see that it sinks in the fresh water, but stays on top of the salt water.

Salt v Fresh (4)

A quick and easy early lesson on density!

Travis had fun playing with leftover colored water and ice cubes for some time, making this activity a big hit.

Salt v Fresh (6)