Summer Scavenger Hunts

Summer Scavenger (7)

Summer is here and school is out, but there’s still so much to learn on any excursion outdoors. To wit, we headed off on a nature hunt today with a three-part agenda for exploration.

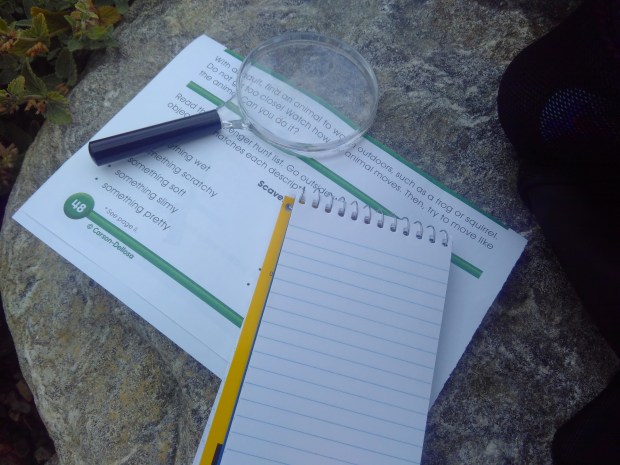
First, I simply announced that we were off to explore: What did Travis hope to find? After some initial thought, he settled on butterflies and bees. To make the hunt exciting, I gave both kids their own little notebook to draw in (though obviously little sister’s drawings would be more of a scribble), a pencil to take notes, and a magnifying glass. It was time to look and discover!

Summer Scavenger (2)

Travis was soon rewarded with a white butterfly, plus lots of bees buzzing among the flowers.

Summer Scavenger (3)

He loved pausing on a bench to draw a flower!

Summer Scavenger (4)

For the second part of the hunt, I gave his search a little more direction with a list of things to find. The categories and his answers were:

  • Something wet: a puddle on a rock
  • Something scratchy: a plant stem
  • Something soft: fern leaves
  • Something slimy: wet lichen on a tree
  • Something pretty: flowers
  • Something dry: tree bark
  • Something from a tree: a leaf on the ground
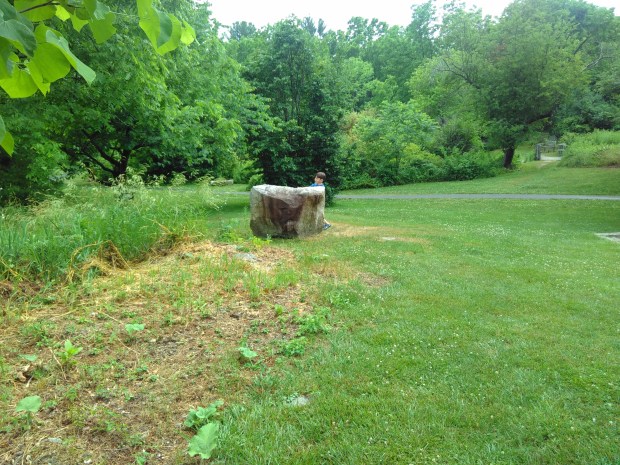
  • Something tall: a rock
  • Something hard: a tree trunk
  • Something blue: a blue jay

He enjoyed the challenge a lot, and pulled out the magnifying glass for most of the items he found.

Summer Scavenger (7)

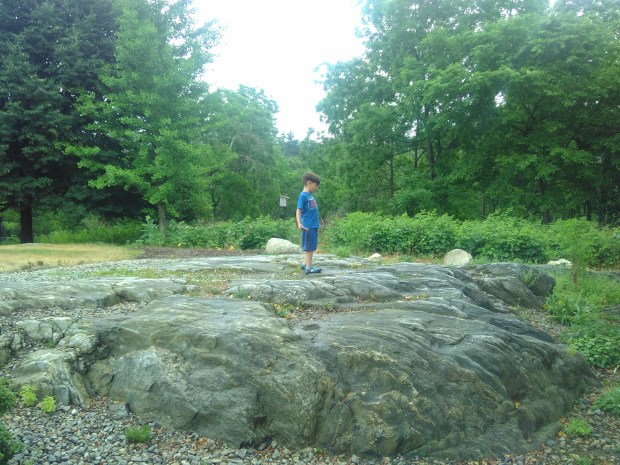
“I see something tall!” he shouted proudly, running to a big rock.

Summer Scavenger (11)

Oddly, the hardest to find was something slimy, though we thought a recent rain storm might have turned up lots of worms.

For the final part of the lesson, it was time for a rainbow hunt. I recommend bringing along paint chips (free at hardware stores) for this activity, and working your way through ROYGBIV. Travis very carefully compared his samples to the flowers and other items that he found, rejecting these flowers as not a true yellow for example.

Summer Scavenger (8)

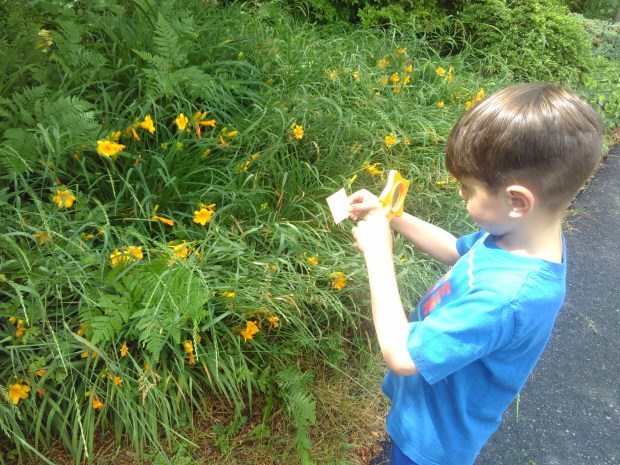
He took it very seriously until each color was checked off the list!

Summer Scavenger (14)

How are you enjoying nature so far this summer? Please share in the comments!

Summer Scavenger (5)

Tea Scented Ice Sensory Play

Scented Ice Play (7)

We’ve been busy with ice lately during a heat wave, and today we added an olfactory element to the fun: ice cubes scented with tea! You’ll want strongly scented teas for the best results with this activity. Think flavors like cinnamon, maple, ginger, mint, or other bold scents.

Scented Ice Play (1)

The night before, I brewed strong cups of 3 tea varieties, using 3 or 4 tea bags for each mug of hot water. Let cool and then pour into the compartments of an ice cube tray.

Scented Ice Play (2)

Partly to add a visual sensory element to the game and partly just so I would remember which cube was which, I also color-coded the three different teas with food coloring. Yellow was for peppermint, red for cinnamon apple, and blue for maple ginger.

In the morning, it was HOT out on our patio and the ice was frozen solid, the perfect combination.

Scented Ice Play (3)

The ice cubes came out of the tray within moments. I held each different scent up to Veronika’s nose in turn. Look how happy the maple ginger made her!

Scented Ice Play (4)

She loved leaning in for a big whiff of each, asking for “more more” insistently since at first the cubes were too cold for her to touch and lift.

Scented Ice Play (5)

Then she wanted to take a lick! She loved the peppermint best.

Scented Ice Play (6)

As the ice melted, the yellow, blue, and red coloring began to trickle off. I couldn’t decide if I was glad I’d used color or not. The kids were more into the smells and tastes anyway, not the sensory look of the colors, and it just meant messier fingers. But oh well!

Scented Ice Play (8)

And then they discovered that the ice on the hot patio melted in a matter of seconds.

Scented Ice Play (9)

I guess this disproves the theory that watching ice melt is dull!

Scented Ice Play (11)

Both kids loved smelling the tea and swirling the cubes and tasting until the last drop of ice had melted.

Scented Ice Play (10)

A perfect sensory experience for a hot morning.

Pool Noodle Seahorse

Pool Noodle Seahorse (5)

It was time for the last of our pool noodle crafts this morning, and it turned out to be the biggest and best yet!

To start, curl the end of one long pool noodle so it resembles a seahorses’s curlicue tail. Secure with garden Velcro strips.

Pool Noodle Seahorse (1)

For the head, curl down the top 10 inches or so of a second pool noodle; secure with a garden strip. We then glued on two foam eyes (alternatively, use sticky-back foam and eliminate the need for glue).

Pool Noodle Seahorse (3)

Travis loved helping with the mane; snip a piece of craft foam to create fringe, then make a slit in the seahorse’s head with scissors and insert the foam.

Pool Noodle Seahorse (2)

Now tape the head and tail pieces together securely with duct tape. Our original seahorse seemed a bit too tall, so I cut about 6 inches from each noodle and then taped them. Now it was the perfect height. Travis was immediately galloping his seahorse around!

Pool Noodle Seahorse (6)

Little sister loved it so much that we needed to make a mini version from just one pool noodle!

Pool Noodle Seahorse (4)

As with the Ball Toss game we made, yes you could use the seahorse in a real pool, but the kids were ecstatic even on dry land. So don’t feel like you need to wait for water before making this craft!

Pool Noodle Sprinkler

Pool Noodle Sprinkler (8)

Here was the perfect project for a day that hit 90 degrees even before noon: turn a pool noodle into a sprinkler to cool off!

We’ve been having lots of fun with pool noodles the past few days, but this was the first time we added water to the mix. Travis loved helping with the set up. Use a sharpie to make dots on a long pool noodle, spaced about 5 or 6 inches apart. Poke through with a skewer.

Pool Noodle Sprinkler (1)

Cut a small piece of foam from a second pool noodle to plug up one end of the long pool noodle. Leave the other end open.

Pool Noodle Sprinkler (2)

Now it was time to get wet! We headed outside and hooked up a garden hose to the faucet, and inserted it into the noodle. Turn the hose on gently and increase the flow as needed.

Pool Noodle Sprinkler (3)

Both kids loved it right away!

Pool Noodle Sprinkler (6)

Our sprinkler turned out to be better for getting hands and feet wet than for running through, but they both seemed just fine with that.

Pool Noodle Sprinkler (5)

The “sprinkler” was also a little faulty; too little pressure and the water wouldn’t rise up through the holes. Too much and the plug on the other end flew out! (You can help avoid this risk if you use a zip-tie to secure the plug, but we had skipped that step).

Pool Noodle Sprinkler (4)

Nonetheless, the kids loved it, even when the hose came out wildly and added to the splashy fun. One thing is for sure: we’ll be using this sprinkler again as the hot summer continues!

Pool Noodle Sprinkler (7)

Pool Noodle Ball Games

Pool Noodle Ball (12)

After making marshmallow launchers with pool noodles, today we got even craftier with them, setting up two silly sports: a Ball Toss and a Golf Game.

For the former, you’ll need to first make the “hoop”. Fold three long pool noodles into a circle and secure with Duct tape. Travis was so proud helping me with this step, definitely a two person job. Repeat two times, for three rings total.

Pool Noodle Ball (1)

Use garden Velcro strips to attach the three rings together in sort of a triangle, as shown.

Pool Noodle Ball (3)

To make the ball, cut a pool noodle in half vertically. Tie each half into a knot, and fold the ends in.

Pool Noodle Ball (2)

It was a bit tricky to get the knot tight, but the tighter it is, the rounder your ball.

Pool Noodle Ball (15)

Time to slam dunk!

Pool Noodle Ball (6)

This game would of course be awesome to play in a pool, but we loved it even on dry land.

Pool Noodle Ball (9)

As you can probably guess, the ball and rings alone were great fun to play with, even when we weren’t keeping score.

Pool Noodle Ball (10)

Then we repurposed the pool noodles to set up the latter game outside. Highlights magazine billed this as golf, but it looked more like croquet to me! For your wickets, fold a pool noodle into an arc and anchor into the ground using two wooden skewers.

Pool Noodle Ball (11)

For a club, cut a notch near the bottom of one long pool noodle. Bend and secure with duct tape to hold the curvature in place. Travis thought this was fun, but then declared it too easy! We’ll have to think of ways to make it trickier.

Pool Noodle Ball (13)

Looking for other ways to get moving at home this summer? Check out some of the simple “sports” we set up last week.

Pool Noodle Ball (7)

Pool Noodle Marshmallow Poppers

Pool Noodle Marshmallow (3)

Travis’s latest issue of Highlights magazine featured tons of ways to craft with pool noodles. With summer mere days away, we decided to test out the first of the lot: a marshmallow launcher! This is similar to a project we made in the past using a cup, but the pool noodle makes a much sturdier version.

To start, cut 3-inch pieces of pool noodle, one for each popper.

Pool Noodle Marshmallow (1)

Tie a knot in a balloon, then cut off the top end of the balloon. Stretch over one end of a pool noodle piece.

Pool Noodle Marshmallow (2)

Secure with duct tape, and add other strips of tape for fun pops of color, if desired. Now fill the cavity of the pool noodle with mini marshmallow (we love Dandies of course!). Pull down on the knot of the balloon and… launch!

Pool Noodle Marshmallow (5)

In addition to great fun trying to catch the marshmallows and eat them, the poppers led to lots of silly marshmallow wars. Travis loved being pelted with them, or pelting me with them, or hiding around the corner waiting to ambush each other.

Pool Noodle Marshmallow (4)

You might just find yourself acting like a kid right alongside your kid! This craft is sure to add a sweet note to any summer day.

Pool Noodle Marshmallow (6)

Frozen Painting, Two Ways


Frozen Painting (7)

It’s beginning to feel a lot like summer, so all things ice are on my mind! To wit, today Veronika tried painting with frozen cubes in two ways.

I set up both games the night before. For the first, I filled compartments of an ice cube tray with water. After about an hour, when the water is firm but not frozen solid, insert a craft stick for a handle into each cube.

In the morning. I gave Veronika these ice “paintbrushes” alongside a paint-with-water book. The ice did all the work!

Magic Painting (1)

I showed her how to swirl it in the paints on the page, then make color magically appear.

Magic Painting (2)

Beyond the magical wow factor, there was the fun of the colors, the thrill of cold ice, glee watching the cubes melt, and more.

Magic Painting (4)

Her final work of art wasn’t bad for a nineteen month old!

Magic Painting (6)

For the second game, I had also frozen cubes the night before, but with paint! Fill the compartments of an ice cube tray with washable paints nearly all the way, then top off with water. Again, insert a craft stick after about an hour in the freezer.

Frozen Painting (2)

For this craft, we headed outside to get messy! Place thick watercolor paper on a tray, and use the frozen paint cubes directly on the paper.

Frozen Painting (4)

The more the paints melt, the deeper the colors.

Frozen Painting (3)

Big brother Travis discovered you can make cool etches with the edge of the craft stick, one the paint melts off.

Frozen Painting (12)

Some of our paint cubes didn’t lift out of the tray neatly, but Veronika loved scooping and stirring at these leftover globs of half-frozen paint, so that was half the fun!

Frozen Painting (9)

I helped scoop the paint onto the paper so she could mush it about with a craft stick.

Frozen Painting (11)

You’ll notice we made an enormous mess, but I had expected as much! Luckily the paint will wash off after the next good rain storm.

Frozen Painting (13)

The kids filled page after page with these frozen cubes, and loved every minute.

Frozen Painting (10)

Mosquito Badminton

Mosquito Badminton (2)

Are you kids sick of swatting away mosquitoes this summer? Then this quirky take on backyard badminton is sure to have them giggling!

To make our “mosquito”, we first inflated a balloon. Any color would work, but Travis chose blue.

I twisted together a mosquito body out of black pipe cleaners. Certainly there is some imagination at work here, but it featured two antennae, a proboscis, and wiggly arms and legs.

Mosquito Badminton (1)

Cut eyes from cardstock or poster board and then tape the mosquito body and eyes to the balloon.

Use flip flops as the “racquets”! Travis thought it was hilarious to bop the mosquito around outside.

Mosquito Badminton (3)

We didn’t make it a true competition, but if you want to keep score, try this: If the balloon lands on the ground on your side, that’s a point for the other team or person. First side to reach 5 points wins!

Mosquito Badminton (4)

7 Fun, Wet Water Balloon Activities

Fun Water Balloon (2)

Because we don’t have a hose and a water balloon nozzle, this summer staple of fun is not something Travis has enjoyed very often. Cue the water balloon hand pump! Now that I’ve invested in one (from Amazon), there are so many backyard games to play with our little water balloons. And some are even educational!

First: Sort by Color. Purchase a few buckets from a local dollar store in a variety of colors and have your child fill the correct bucket with the correct balloons.

Fun Water Balloon (3)

Easy for Travis!

Fun Water Balloon (5)

Second: Number Race. I numbered 10 balloons with sharpie and Travis’s job was to move them from one bucket to another in the correct order.

Fun Water Balloon (7)

This one involved a few slippery balloons running away before the task was complete.

Fun Water Balloon (9)

If two or more kids are playing, make it a race!

Fun Water Balloon (8)

Third: Target Game. Now we got a bit messier! I drew a bull’s-eye and we each had three balloons to toss.

Fun Water Balloon (11)

The person with the highest score wins, extra points for a big splash!

Fun Water Balloon (10)

Travis adored this.

Fun Water Balloon (12)

Which led us to…

Fourth: Balloon Toss! You can’t go wrong with this classic. Just toss back and forth and see who gets wet.

Fun Water Balloon (13).JPG

It meant lots of exploding balloons and lots of giggles.

Fun Water Balloon (14)

Fifth: Relay Race. If you have a group, make it a true relay; balance a balloon on a cup and make it from point A to point B. Since Travis and I were playing just the two of us, we timed ourselves to see who could do it faster.

Fun Water Balloon (15)

Sixth: Balloon Sensory Tub. Float a few balloons in a baby bathtub. Even baby sister Veronika got to enjoy a (supervised) feel. Travis loved throwing the balloons into the tub for a big splash, of course!

Fun Water Balloon (6)

Seventh: Balloon “Parachute”. Place a few filled balloons on a sheet or large towel and pop them like popcorn.

Fun Water Balloon (16)

And with all those games said and done, Travis really just loved splatting them onto the ground for maximum splashy fun!

Fun Water Balloon (17)

Add your own favorite water balloon games in the comments!

DIY Star Wars Sun Prints

Lego Sun Prints (3).JPG

Travis has been obsessed with Star Wars lately, so we used a favorite summer art activity (sun prints) to make DIY room decor!

Print out templates of your child’s favorite characters heads. Favorites around here include Darth Vader and Kylo Ren, but many of the character’s heads or helmets will make iconic shadows.

Cut out the templates and place on colored construction paper. Set in the sun for at least a few hours – the longer the better!

Lego Sun Prints (1)

Travis loved the shadowy images we achieved and proudly hung them in his room.

Lego Sun Prints (4)

Don’t forget you can play this game with plenty of other objects, too. Cookie cutters make cute decor for Veronika’s side of the room.

Lego Sun Prints (2)