Frozen Treasures

Frozen Treasures (3)

Ice play is fascinating for babies and it doubles as a first science lesson on the states of matter (water into ice or vice versa). This little activity is also a puzzle for your little one to figure out!

You’ll need to prep the night before you want to play the game. I cut an old soy milk carton in half, and cleaned it out. Fill with water, then add a few plastic toys. Toy farm animals were perfect! Place in the freezer until completely solid.

Frozen Treasures (1)

The next day I presented the little cube of ice to Veronika. She touched it immediately, then withdrew her hand, quite surprised. It was cold!

Frozen Treasures (2)

I removed the outer carton layer, and posed the question to her of how we could free piggy and the other animals. Big brother immediately swooped in and wanted in on the action.

Frozen Treasures (4)

We tried pouring warm water over the ice first. Veronika loved the cup, and wanted to be a part of every pour!

Frozen Treasures (5)

This made the game great for action words (pour, tip), and great for talking about what was happening. I asked Veronika about how the temperature of the water was changing, from warm to cold once the ice touched it, to warmer again when we poured more from the cup.

Travis wanted to try a little chisel, too, but we decided we liked the warm water method better.

Frozen Treasures (6)

Finally, the animals were free!

Frozen Treasures (7)

Honestly by that point Veronika was more into the tools we had used than the animals themselves, but she was busy and happy, which meant mama was too.

Frozen Treasures (8)

We took the final chunk of ice up to bath time to watch it dissolve – good fun!

Musical Nursery Rhyme Dance Party

Musical Nursery Rhymes (9).JPG

We’re filling a snow day today, which made it the perfect day to set aside some quality time for musical play.

Of course you can always just grab an instrument and play, and in that vein, I laid out every instrument we had at home.

Musical Nursery Rhymes (1)

For some more structured fun, I went through a repertoire of nursery rhymes with Veronika! We started out with Where is Thumbkin. I held up my fingers for the verses, as she played along on the maracas.

Musical Nursery Rhymes (2)

Next up was Head, Shoulders, Knees, and Toes. Make sure to touch each body part, and shake an instrument in between verses!

Musical Nursery Rhymes (3)

The Itsy BItsy Spider was fun with a rain stick for the rain.

Musical Nursery Rhymes (4)

Twinkle, Twinkle Little Star was beautiful on cymbals.

Musical Nursery Rhymes (5)

You’ll probably find that there’s a perfect instrument for each song! For example, bang or rub on a drum for Pat-a-Cake. Or you can simply get up and dance, as I did for The Hokey Pokey while she looked up at me and laughed!

Musical Nursery Rhymes (7)

We added other favorites like Wheels on the Bus, If You’re Happy and You Know It, and I’m a Little Teapot.

Musical Nursery Rhymes (8)

Whatever instrument strikes your little one’s fancy is just fine; there’s no wrong way to play this game. Or simply pick him or her up and dance! This is a great way to pass some time with a one-year-old at home.

Musical Nursery Rhymes (6)

Let’s Count

Let's Count (4)

Counting out loud might seem silly when you play with babies who don’t have many words yet, but it’s never too early to learn! At one year old, here are some fun ways Veronika and I count.

First off, little fingers and toes practically beg to be counted.

Let's Count (2)

You can simply count them out with a touch or a tickle, or recite a classic rhyme like “This Little Piggy”, but add numbers for a twist. (“One little piggy went to market, two little piggies stayed home…”)

Let's Count (1)

Stairs are another fantastic place to count. Chances are your little adventurer loves climbing up these days. Counting helps cement the notion that numbers go in order, plus helps keep grown-ups patient since those little feet take longer than yours on steep steps!

Let's Count (5)

We also play with toys that involve counting, like a veggie farm set or Duplo blocks.

Let's Count (3)

Consider counting bubbles as you blow them. Or pop them!

Let's Count (7)

You could also try counting when you’re out and about, such as when you wait for a green light to change. Finally, read fun counting books together, especially ones with tactile elements.

Let's Count (6).JPG

Before you know it, Veronika will be counting along! Once your baby does reach this milestone, don’t worry if he or she counts out of order. “One, two…five” will still mean he or she is learning these new words and concepts!


Christmas Candy Jar

Mason Jar Santa (2).JPG

The Christmas countdown has begun! Delight your family with this quick candy jar; guaranteed they’ll be nibbling from it all holiday season.

I hot-glued a black ribbon (meant to mimic Santa’s belt) around a mason jar. I added a pretty snowflake decal in the center, but if you want it to look even more like Santa, use a gold buckle!

Mason Jar Santa (1)

Now fill the jar with red or green candies. Red licorice were a dark, Holly berry-colored option.

Mason Jar Santa (3)

I plan to find brighter red candies later in the month so it looks like Santa’s big coat! But meanwhile there were no complaints from my happy nibblers.

Mason Jar Santa (4)

Blanket Waves

Bounce Blanket (2)

Looking for instant entertainment with a one-year-old? All you need is one soft blanket and there’s fun to be had. As a bonus: this one-item game is perfect when traveling!

I sat down holding one edge of a small blanket, with Veronika on the other side. At first, she wasn’t holding on, but I demonstrated how to shake the blanket.

Bounce Blanket (1)

Say or sing funny rhymes as you go. First I chanted, “shaaaaaake and… stop!” This got huge laughter.

Bounce Blanket (4)

Then I started saying, “fastfastfastfast and slooow slooow slooow.” Again, I was rewarded with big grins, and now she picked up her edge of the blanket and wanted to join in.

Bounce Blanket (3)

We did lots more shaking, plus waving it up and down as I sang silly song verses. You can also play little games of a peekaboo. So grab a blanket and play along!

Crumb Writing

Crumb Writing (2)

If you have an older child who is practicing their letters or doing homework, it can be tough occupy a baby or toddler at that time. So here’s a solution: Let your little one practice “writing” too… In crumbs!

I ground up cocoa rice crisp cereal for this activity, but you could also make fine crumbs from baby crackers or cookies, or even use leftover baby rice cereal that is already a fine meal. Either way, pour a generous amount onto the high chair tray.

Crumb Writing (1)

I showed Veronika how to make letters first, followed by shapes.

Crumb Writing (3)

Her curious fingers were soon making trails through my marks, and then branching out to make her own squiggles through the crumbs.

Crumb Writing (4)

She loved swishing the crumbs side to side, and of course watching them splatter to the ground. Just have a dust pan ready nearby for a quick clean up!

Crumb Writing (5)

Spectroscope

Spectroscope (5).JPG

This quick project was a neat follow up to Travis’s exploration with his Rainbow Optics Crate. And to make it, we even got to upcycle the box from Kiwi Co.!

Cut any extra flaps from the box, including those that fold in to the sides and front. Tape a blank CD to the inside of one short end, flush against the back wall. Make sure your box can close!

Spectroscope (1)

Trace around the end of a paper towel tube twice, in overlapping circles, so you have an opening that’s about 1 and 1/2 times as wide as the tube. Insert the tube at an angle, looking towards the CD.

Spectroscope (2)

Also cut a slit on the short edge directly opposite the CD, to let in light. Tape up any other edges where light might slip in.

Spectroscope (3)

Now take a peak inside! We found this worked best when we shined a flashlight directly into our slit. One person can shine the light while the other person makes sure the tube is aimed properly at the CD; you’ll see the spectrum of the rainbow appear.

Spectroscope (4)

You can also try this with other light sources, including sunlight, and see which one works best!

Rainbow Optics Kiwi Crate

Kiwi Rainbow (4).JPG

On the heels of playing with mirrors and illusions, Travis got to delve further into the science of light with Kiwi’s Rainbow Optics crate. Most of the projects involved mixing or pulling apart colors, to explain the way white light bends to form a rainbow.

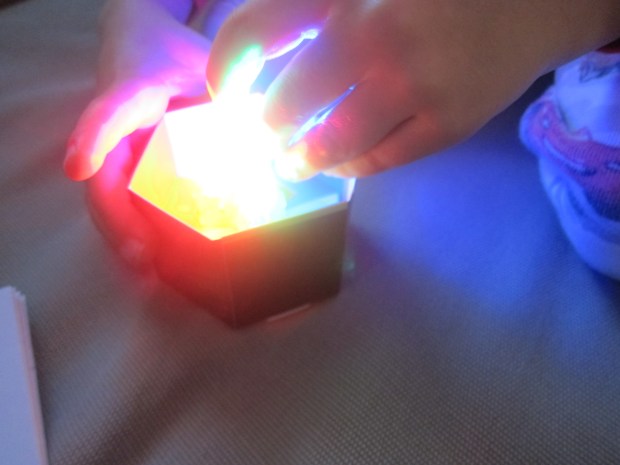
The first project was Mixing Colored Light. Travis helped adhere a wooden hexagon onto the provided box lid, fold up cardboard into a triangle as a support piece, and insert a provided color guide into the base of the hexagon box.

Kiwi Rainbow (1)

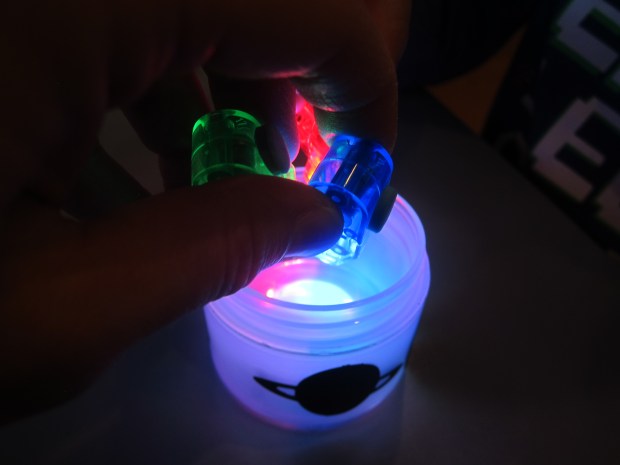
Three neat finger lights (one each in red, green, and blue) then slip into this insert. Travis loved turning these on!

Kiwi Rainbow (2)

Decorate the provided frosted plastic jar with stickers; options include everything from moons and planets to sea creatures. Place an additional black sticker on the bottom of the jar. This has a hole in just one area… And Travis was about to see why!

Place the frosted jar on top of the hexagon box and spin it slowly. Because the bottom sticker only allows one or two lights through at a time, the colors change with each spin, from red, to magenta, to blue, to cyan, to green, to yellow.

Kiwi Rainbow (3)

Travis loved spinning this, and pretending it was a forge in later make-believe games.

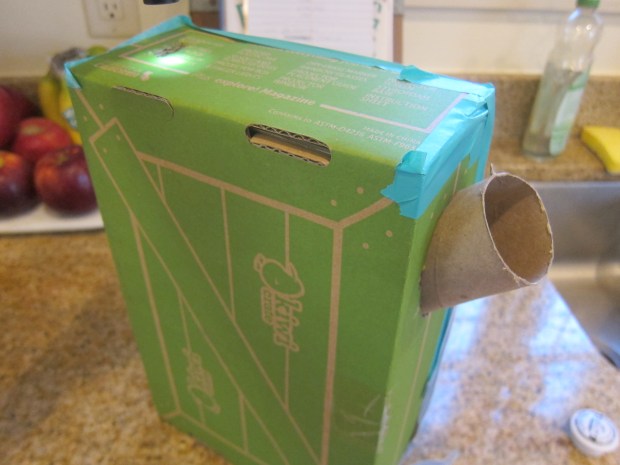
Next up was Projecting Colorful Shadows. Again there were lots of little steps, including adhering the Styrofoam base to a paper guide with sticky Velcro dots.

Kiwi Rainbow (5)

Kids can write on the provided projector window screen, which is then Velcroed onto a projector box.

Kiwi Rainbow (6)

Stretch a projector screen onto the other side of the box and secure with blue stickers.

Kiwi Rainbow (7)

Now it was time to set up the projector box on the paper base, and add another set of those fun finger lights to the Styrofoam block. As you shine these, each light hits the drawing at a slightly different angle, casting shadows in multiple colors.

Kiwi Rainbow (8)

We took the booklet’s suggestion to hold other objects between the lights and our projector screen. Our fingers had definite wow factor!

Kiwi Rainbow (10)

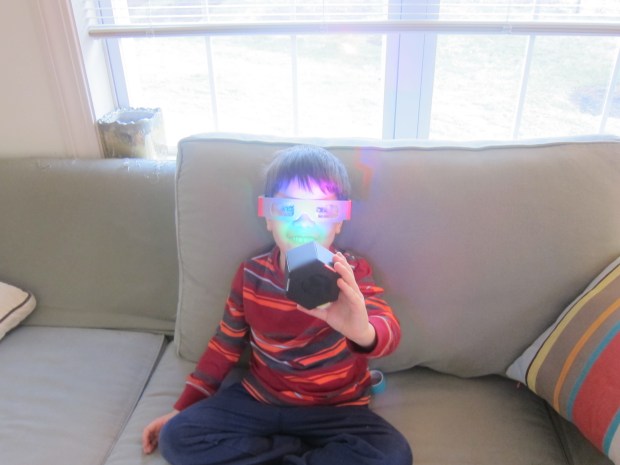
Finally, the kit included Rainbow Glasses, the kind you might remember from childhood! This involved no assembly, just looking around at different light sources.

Kiwi Rainbow (11)

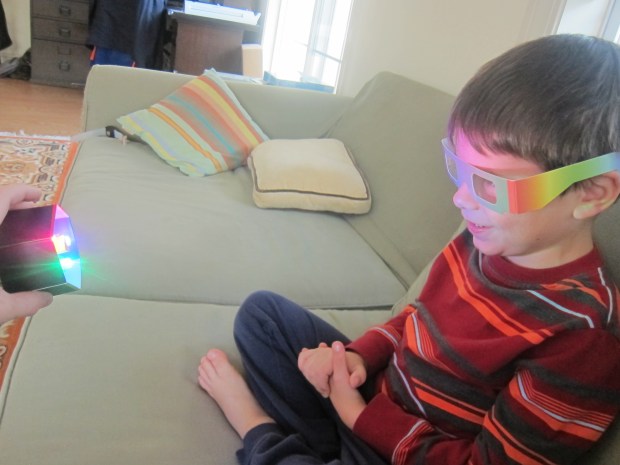
The finger lights, in particular, were fun to look at. Travis wandered all over the house to find his favorite lights, and the booklet helpfully explained how the glasses work through diffraction plastic.

Kiwi Rainbow (12)

Well now we needed to experiment further! We could test out making a rainbow on white paper with a few simple materials: Attach a mirror to a glass pan half filled with water, using modeling clay to attach. Shine a flashlight on the paper mirror where it is under the water. Hold up a piece of white paper, and watch your rainbow appear!

Kiwi Rainbow (22)

It was tricky to get the angle just right, but I was able to hold things steady while Travis manned the camera!

Kiwi Rainbow (23)

We also tried to overlap colors with a twist on the projector box project. Remove the projector paper, and instead add a sheet of aluminum foil. Poke a quarter-sized hole in the center with a pencil.

Kiwi Rainbow (16)

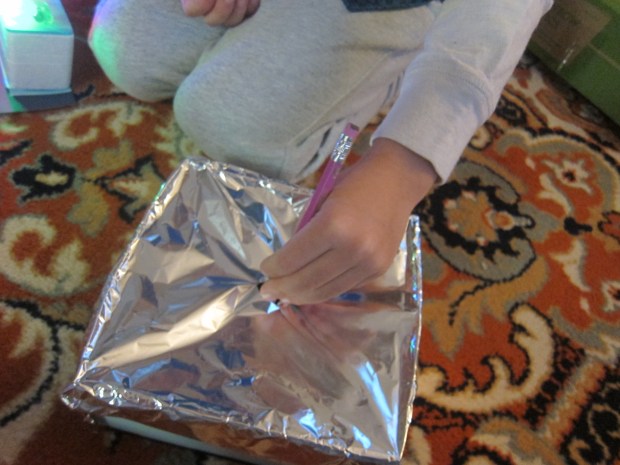
Shine the finger lights through, and watch for overlapping shades (i.e. red and blue should make magenta). The results of this weren’t obvious to Travis, but it was a neat variation.

Kiwi Rainbow (17)

Interestingly, you can also show how red + blue paint = purple paint, but red + blue light = magenta light.

Kiwi Rainbow (20)

Why? Because the paint colors combine towards black, but the light colors combine to towards white. Neat!

Kiwi Rainbow (21).JPG

We finished with a read of two suggested books: All the Colors of the Rainbow by Allan Fowler and The Rainbow Goblins, by Ul De Rico.

All this rainbow talk had us hungry! So finish your fun with rainbow kabobs made of the following:

  • red strawberries
  • orange cantaloupe
  • yellow pineapple
  • green grapes
  • blue blueberries
  • purple grapes

Rainbow Kebabs (1).JPG

Travis reminded me we really needed indigo grapes. Yes indeed, but tasty nonetheless!

Rainbow Kebabs (2)


Off and On

Off and On (5).JPG

Simply taking off lids and putting them back on again is a delight for babies at Veronika’s age (13 months), and it can be fun simply to set your little one up with a lot of lidded items, a few toys, and watch them play!

To get Veronika started, I set out a saucepan with lid and lots of Tupperware with lids, some that twisted off and some that lifted off.

Off and On (1)

That would be enough right there, but for added amusement, I hid a few toys in the saucepan.

Off and On (2)

I also put a toy in a container with a screw-on lid. Leave lids like this relatively loose and your little one should be able to twist them off. I resisted the urge to jump in, and let Veronika problem solve by herself!

Off and On (7)

For some early learning color fun, I put color-coded stickers on the base and lids of two identical containers. I encouraged her to notice that orange went with orange and yellow with yellow.

Off and On (4)

I didn’t expect her to ace this test, of course, but was laying some groundwork! You can work up to lots of different color stickers as your one year old gets older.

Off and On (6)

What other types of containers with lids does your baby play with? Shoe boxes? Baby wipe containers? Please share favorites in the comments!

Off and On (3)

Hide Small Toys

Hide in Sock (5)

This game has elements of surprise, tactile learning, and early language development. And it couldn’t be easier to play!

I filled two small gym socks with a few toys for Veronika to find. Older toddlers may enjoy a long sock to reach into, but the short shocks were just right for my one-year-old.

Hide in Sock (1)

At first, she pulled out a round ball. I named the object for her, and described it. It felt round and smooth.

Hide in Sock (2)

She immediately wanted to try putting it back inside the sock, which I helped her do!

Hide in Sock (6)

But – surprise! – there were more treasures to find inside. Next she pulled out a little pig.

Hide in Sock (4)

And you can see from her lips here, she tried to say “pppp” (she’s testing out new words daily!).Hide in Sock (3)

She kept digging and found a car. Again, I said the name of the object and described what she was feeling. This time she made a “vroom vroom” sound.

Hide in Sock (8)

You could keep going with this game with as many toys as your little one likes before losing interest. Once the socks were empty, Veronika even tried to put them on!

Hide in Sock (7)