Apple Fingers (and More Food Exploration)

Apple Fingers (3)

Pediatricians recommend waiting until your baby is six months old to start solids, with lots of reasons behind the decision. First, babies actually consume fewer calories when they fill up on fruit and veggie purees or rice cereals because breast milk contains such ample calories. But I let both my kids “practice” with solids at five months and here’s why: I want Veronika to hone the skills of eating now (babies four months and older learn to move food from the front of the mouth to the back in order to swallow), so that she can truly dine at six months.

To wit, I’m slowly introducing a few tastes and textures into her world, and she is already smitten. These cute games will help your baby understand food – and have fun!

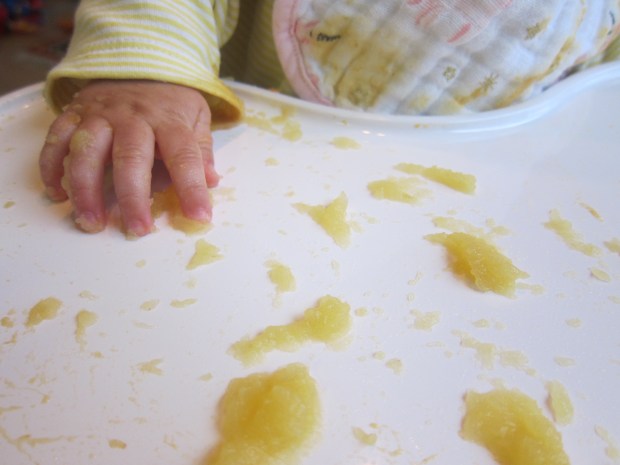
First, we played a game of “apple fingers.” I smeared a little apple puree onto Veronika’s tray, and didn’t need to wait long before those little fingers figured out exactly what to do.

Apple Fingers (1)

Let your baby smoosh it around and get real messy.

Apple Fingers (6)

Unlike her big brother, Veronika wanted control of her spoon right away. This girl knows what she wants!

Apple Fingers (4)

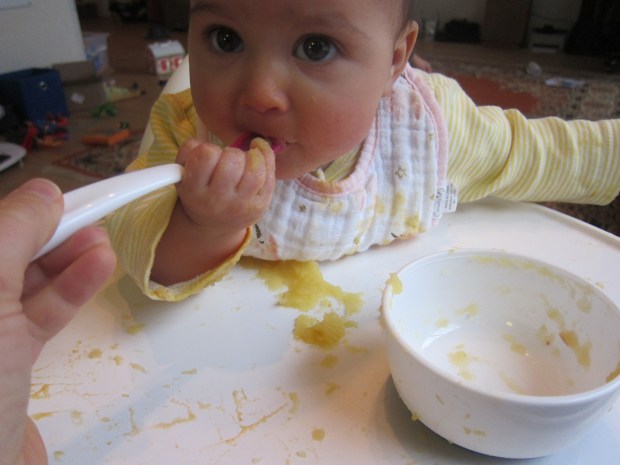
And of course, let those little fingers make it to the mouth. Your baby will receive just enough of a taste for an eye-popping surprise, and you can count fingers as he or she licks.

Apple Fingers (5)

It’s a wonderful introduction to all the healthy and delicious foods to come.

Apple Fingers (2)

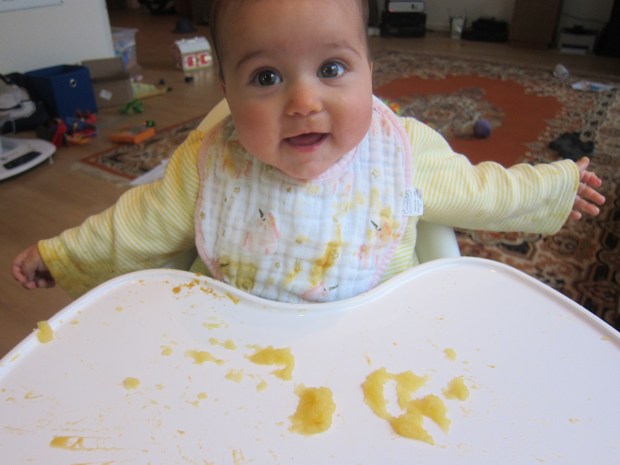
The next day we explored food even more. I smeared a little rice cereal and sweet potato puree onto her tray.

Explore Food (1)

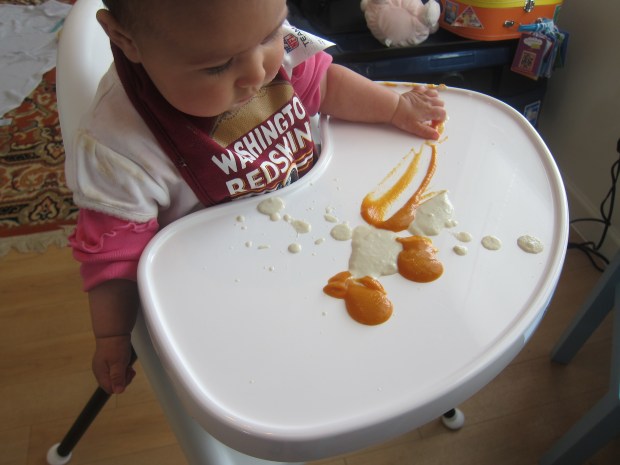
She didn’t waste much time before swishing her fingers in. This is almost like fingerpainting for babies!

Explore Food (3)

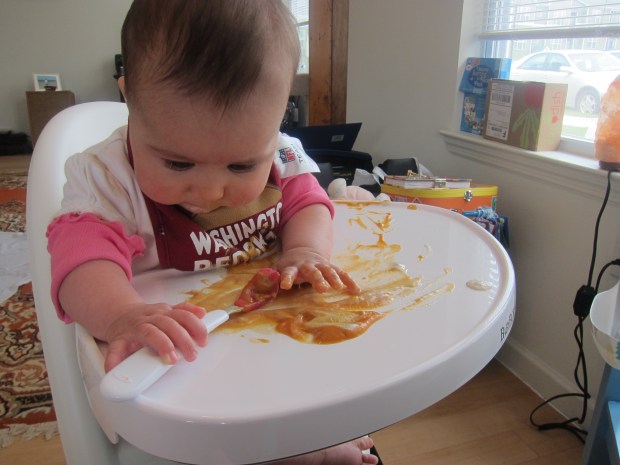
With the bonus of yummy fingers.

Explore Food (2)

When she seemed frustrated that she wasn’t getting much to taste, I handed her a spoon. She knew just what to do!

Explore Food (4)

Finally, you can let your baby explore foods with other textures under careful supervision. I sprinkled a few homemade corn muffin crumbs on her tray.

Explore Food (5)

She was delighted scattering them about, almost impish, as if she knew she was making a mess.

Explore Food (6)

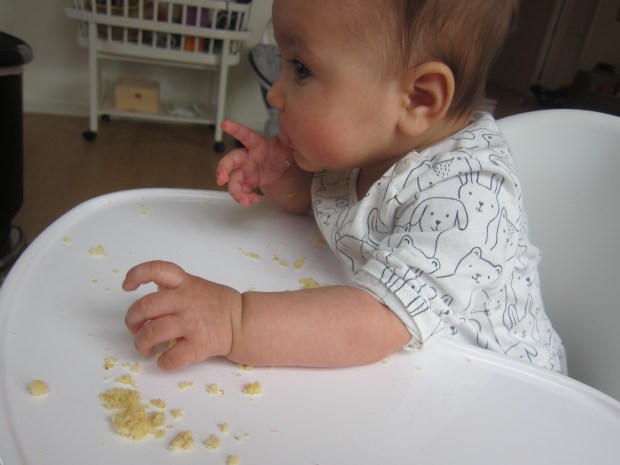
Definitely watch closely if you give your baby something like this, though, since babies under 8 months old aren’t really old enough for baked goods.


Mirrored Action Song

Mirrored Action (3)

I’ve been doing fingerplays and action rhymes with Veronika since she was tiny, but now it’s time to encourage her to get in on the action! As your baby nears his or her sixth month, you’ll find they might be trying to copy all the moves. You can help the process along with this cute game. It’s a great one for big siblings who are eager to interact with a little sib, too.

I sat Veronika down in a chair facing me, and Travis and I acted out a few simple motions. Clapping first.

Mirrored Action (2)

Then stomping.

Mirrored Action (4)

Then patting your head.

Mirrored Action (10)

For each action, we gently moved Veronika’s limbs in imitation. Travis loved helping her hands clap.

Mirrored Action (1)

And feet tap.

Mirrored Action (5)

She looked very surprised at patting her own head!

Mirrored Action (7)

Now we wanted to put it all to music, and we knew just what to sing: If You’re Happy and You Know It, of course! Based on her smile, I think I’m a good performer.

Mirrored Action (6)

We sang through the song, doing each motion (“If you’re happy clap your hands… If you’re happy stamp your feet… If you’re happy pat your head… If you’re happy shout hurray…” and so on).

Mirrored Action (8)

It’s only a matter of time before she’s doing all the moves right alongside us.

Idle Time

Idle Time (5)

One of my biggest regrets with my firstborn was not giving him enough time to do…absolutely nothing! Don’t get me wrong; there are definitely times to be a hands-on parent, but there are also times when it’s important to let baby be “bored”. Because here’s the secret: they won’t actually be bored! Downtime lets your little one learn self-awareness, and take in all the sights, sounds, and smells around them in a way that they otherwise can’t.

By the very nature of being a second child, Veronika gets a lot more time to herself to simply watch, figure things out, and notice. One of the best times is first thing in the morning. After she’s been dressed and nursed, I lay her on her blanket while I get big brother (and the cat!) breakfasted and ready for the day.

Idle Time (2)

This gives ample time to explore. Her fingers develop fine motor skills as she plays with her toys…

Idle Time (3)

Or she finds her feet…

Idle Time (7)

Or gets those feet in soft cat fur – cozy!

Idle Time (4)

Or discovers that fingers taste yummy…

Idle Time (6)

Or practices her gross motor skills, whether that’s the first head turn from side-to-side, or later rolling for tummy time.

Idle Time (1)

I even catch her chatting with her toys!

In sum, these idle “do-nothing” moments are precisely what your baby’s brain needs sometimes, a chance to find fingers and toes, or just turn their head and look side to side and take in the world.

Fingerprint Kit

Fingerprint Kit (10).JPG

Following up on some recent secret agent fun, today Travis got to delve into real forensics! We’ve already talked about how everyone’s fingerprints are unique, and how real detectives use this fact to find “bad guys.” With a few simple tools, we could play detective, too.

First, make sure you have a few sharp pencils on hand, and rub on sandpaper.

Fingerprint Kit (1)

The graphite will flake off, which Travis thought was neat. As we made piles of it, we dumped it into a small plastic jar until we had a nice amount.

Fingerprint Kit (2)

Now invite your suspects (family members or friends, that is!) to press their finger against a piece of glass. We used a baby-safe mirror, but in retrospect I wish we’d used a window pane, as the imprint of a finger would last longer.

Fingerprint Kit (3)

Dip an old make-up brush into the graphite, and then swirl over each print. The black will adhere to the fingerprints.

Fingerprint Kit (5)

Press a piece of tape over the print, and transfer to paper. You can make circles on the paper in advance and label each with “suspect’s” name, if your child wants to!

Fingerprint Kit (6)

Once the prints were on paper, we could examine them with a magnifying glass, too. Hmm, what case would Travis solve?

Fingerprint Kit (8)

Overall, Travis thought the project was neat, but was most into the brush. This then became a forensic tool to dust all about the house. Let the imagination go wild from here!

Fingerprint Kit (9)


Pelvic Lifts with Baby on Board

Pelvic Lifts (4)

I just love it when activities are mutual beneficial, don’t you? In this easy little move, mama gets to tone up and feel strong, and baby gets a fun ride – a win-win!

To do the move, I lay down comfortably on an exercise mat, with my knees bent. Veronika sat on my tummy, her back resting against my thighs, and I held her securely around the middle.

Now raise your pelvis off the floor, so your torso and hips form a straight line. Exhale on each lift, and inhale on the way back down, repeating 10 times.

Pelvic Lifts (3)

Of course for me this was exercise, but for Veronika, it was pure fun! She absolutely adored the ride. Many thanks to big brother Travis who captured the beaming smile on her face.

Pelvic Lifts (1)

She loved it so much that we repeat several times throughout the day now; it’s a surefire way to get her to giggle and laugh. Mama gets toned, and baby gets happy!

Pelvic Lifts (2)

Bubble Bottle

Bubble Bottle (4)

This little sensory bottle is the infant version of a soapy bottle I made for Travis as a toddler, incidentally one of the very first posts on this blog!

For a baby version, fill a small water bottle halfway with water. Add just a few drops of liquid dish soap and a couple drops of food coloring. Don’t shake it together yet!

Bubble Bottle (5)

Screw the lid on very tightly. If you’re worried about it coming off (especially if your little one tends to put things in his or her mouth) you could even glue it on and let dry completely.

I sat down with Veronika and tilted the bottle so the color dispersed and the bubbles bubbled up. She loved looking right away!

Bubble Bottle (10)

You can roll it on the ground for your little one.

Bubble Bottle (3)

Or shake it overhead while they are lying down.

Bubble Bottle (7)

Veronika immediately wanted to grab hold!

Bubble Bottle (2)

As a bonus, the bottle will make plastic crinkling sounds as your little one grabs hold.

Bubble Bottle (1)

It also works during tummy time, where Veronika reached out and tried rolling it back and forth by herself. Easy to put together, and I liked that it engaged multiple senses!

Bubble Bottle (8)

Invisible Ink

Invisible Ink (8)

A few weeks back, Travis and I had fun exploring different ways to hide messages, including revealing lemon juice with a hot iron and exposing white crayon with paint. Today we found an even cooler method; did you know you can reveal a secret message with a flower?

Invisible Ink (4)

First, we wrote messages in two kinds of “ink.” The first was plain lemon juice, and the second was baking soda mixed with a bit of water.

Invisible Ink (1)

Travis made scribbles, but to help illustrate the results better for him, I wrote his name on one piece of paper and a secret map on the other.

Invisible Ink (2)

Be sure to use slightly thick paper, such as construction paper or watercolor paper, or it might tear during the reveal. Let dry.

Once dry, we rubbed over the paper with a red rose. Travis loved the forensic feel to the project!

Invisible Ink (10)

This worked significantly better with the baking soda than with the lemon juice, and we also found that the results are much clearer on on large letters or drawings than small ones.

Invisible Ink (9)

Perhaps the most interesting takeaway was that the baking soda was revealed in blue, and the lemon juice comes out red.

Invisible Ink (7)

In sum, a fun little project for any budding detectives, with results that are both pretty and scientific.

Invisible Ink (6)

Change the Scenery

Change Scenery (5)

We’ve only decorated Veronika’s nursery with little touches here and there, and I wanted to add a nice change of scenery for her. There are two ways to make this cute bunting – the true way if you can really sew, or my super-quick hack if you have no skill with a needle and thread!

First, I traced a triangle onto paper, and cut out. Use the triangle to cut shapes from different patterned fabrics (available at a craft store).

Change Scenery (1)

What a pretty assortment!

Change Scenery (2)

Lay down a long piece of colored duct tape, and arrange the fabric triangles along the tape, evenly spaced. Fold the tape down to secure them in place, then hang on your baby’s wall or in the nursery windows.

Change Scenery (3)

If you are more skilled – and own a sewing machine! – here are more detailed instructions. Safety pin the paper template onto the fabric, and cut two triangles for each desired pattern. Pin the pieces together inside-out, then use a sewing machine to attach on the long sides. Turn the flags the right way around and trim with pinking shears.

Insert the sewn flags into bias tape. Pin the flags to the tape at 2-inch intervals, and sew together. I’d love to see the results if you do this correctly, so please share in the comments!

Change Scenery (6)


Go On a Nature Trail

Nature Walk (13).JPG

Spring has sprung!

For my baby girl, born just as autumn turned cold and gave way to winter, I have been waiting and waiting for this first spring day to show her that the world can be warm and wonderful. So today we took advantage and took her on a nature walk! You can do this activity in any park or wooded trail near you, or even in your own backyard. The goal is simply to engage all the senses and introduce baby to nature.

Strapped in the front carrier, I narrated everything we could see to Veronika, including trees and the first spring flowers. Hello purple!

Nature Walk (17)

If you want, let your baby get up close and feel interesting finds, like the bark of a tree or a smooth stick or soft leaf.

Nature Walk (8)

You can also stop to smell, whether the fresh grass of the meadow we walked through, or any plants you find.

Nature Walk (7)

Don’t forget abut the sense of hearing. We were delighted to happen upon a pond full of chirping sounds! At first I assumed it was birds, but then realized it was more likely frogs.

In sum, the simplest of outdoor trails will be full of wonders for your little one.

Nature Walk (9)

Early Explorers Food

LP Food final

Travis’s latest kit from Early Explorers was about food around the world. It’s not that the information was disappointing (quite the opposite!), only that it was a bit redundant since Travis and I cook together frequently, whether simply for fun or with our Raddish Kids subscription. So while the packet was full of fun facts, projects, and suggestions, it didn’t grab Travis’s interest like previous topics from “Max and Mia” have. Also, because the projects were all culinary, my usual categories of “craft” and “science” didn’t exactly apply here, so I use the terms loosely.

First we went through our usual packet goodies, including stickers for the map, and enjoyed the activities in the booklet

LP Food (5)

Food Craft:

For a craft, we made the booklet’s frittata recipe (a culinary journey to Italy), but we needed to adapt it significantly for a vegan version!

I helped Travis blend up what I know works as a vegan frittata base: In a blender, combine 1 package firm tofu, 1/2 cup non-dairy milk, 2 teaspoons cornstarch, 3 tablespoons nutritional yeast, 1 teaspoon mustard, and 1/2 teaspoon garlic powder. Blend until smooth. Stir in 3 slices chopped vegan ham (we used Yves Veggie Canadian bacon) and 1/4 cup shredded Daiya mozzarella. Divide the batter evenly among 12 muffin cups coated with cooking spray.

LP Food (9)

Bake at 375 degrees F for 25 minutes, until set. These were a huge hit with a very proud Travis!

LP Food (11)

Food Science:

Again, I’m using the term “science” loosely; this activity is more of a social science. Pick a country you love, and cook a meal! We chose India, since Travis is one-quarter Indian and wants to learn more about the country. Little Passport’s website featured this easy dahl recipe.

Sizzling the onions was Travis’s favorite part; he loved watching the onion pieces change color over time. I couldn’t drag him away from the stove!

LP Food (13)

We enjoyed serving the dahl with pita bread.

LP Food (24)

Food Keepsake:

The little gift inside Travis’s package this month was a delight: mini erasers in the shape of food! Way more fun than erasing, he loved just playing with them.

LP Food (4)

Food Field Trip:

We visited a new restaurant of course! This was a special treat, heading downtown after school instead of straight home for lunch. We selected an Indian restaurant in town.

LP Food (15)

Travis loved the adventure. He got to sip mango juice…

LP Food (16)

…and dine on samosas and aloo gobi. This was possibly the best lunch date I’ve ever had, and certainly the cutest.

LP Food (17)

Food Further Activities:

As always, we didn’t stop there. Next up we went to our local farmer’s market, where Travis loved learning about local food and tasting samples.

LP Food (7)

He was particular intrigued by a local homesteader who made jellies!

LP Food (6)

There was also a card game in his package, a food-themed riff on classic Memory. It was fun both to play, and to sneak in some learning. A match!

LP Food (3)

We also made a list of his favorite foods, including avocado toast and sesame tofu. Wanting further exploration, we headed over to Little Passport’s blog to learn more about what people eat in other countries on specific occasions. Travis got a kick out of some of the world lunches.

Finally, I had ordered the sushi kit (and sushi erasers!) from Little Passport’s shop as an extra, which let us have a Japanese sushi night at home. This was easily Travis’s favorite; he was intrigued when we opened up the box, especially by the rolling mat!

LP Food (25).jpg

The kit had us mixing up a rice vinegar sauce, simmering the provided rice, and then spreading it out to cool off.

LP Food (21)

Place a sheet of nori on the rolling mat, and top with rice and sesame seeds.

LP Food (22)

We added California roll fillings (avocado and cuke), then rolled!

LP Food (23)

I was so proud of how adventurous he was eating these, and he was so curious about where they eat sushi, and where the seaweed was from.

So yes, it took us nearly a month to work our way through all these activities, but it ended up being good fun.