Rainbow Paper Experiment

Rainbow Paper (3)

Here’s a quick project that’s equal parts science and art. It was the perfect follow-up to Travis’s Rainbow Optics crate from Kiwi Co.

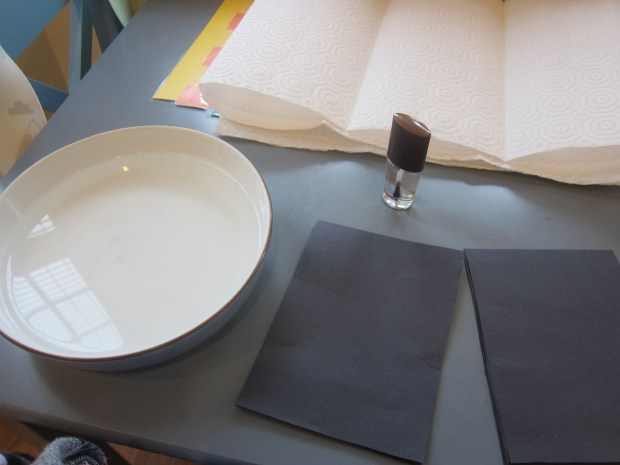
Because it’s a bit messy and you have to work quickly, I gathered all the materials ahead of time. You’ll need paper towels for drying, small squares of black construction paper, a bowl filled with about 1 inch of water, and clear nail polish.

Rainbow Paper (1)

Place one of the black squares in the water, soaking completely. Let float towards the surface. Now it was Travis’s very important job to add 3 drops of the clear nail polish.

Rainbow Paper (2)

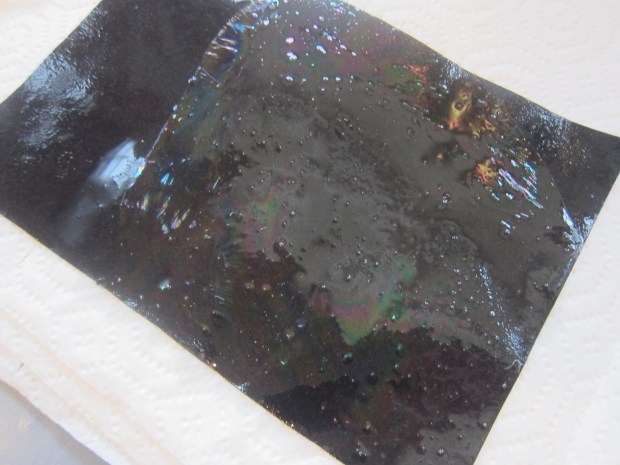
Remove the paper very quickly, pinching it from one corner, and place on the paper towels to dry. Now it was covered in rainbow swirls!

Rainbow Paper (5)

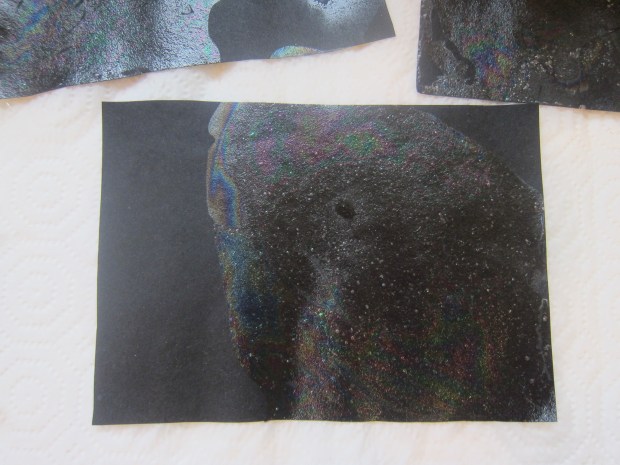
We wanted to make a few more, but found that the nail polish residue made streaks in the water; as a result, each ensuing piece of paper came out a bit messier.

Rainbow Paper (4)

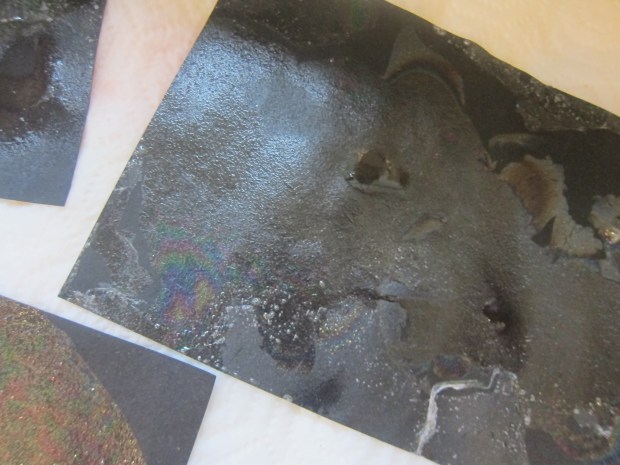
Still, these were quite pretty, and you could glue them onto cardstock for a pretty art print if desired!

Jiggly Rainbow Cups

Jiggly Rainbow (8).JPG

Here’s a cute way to “taste the rainbow”, as the old slogan goes! You’ll need jel dessert in all colors of the rainbow. Jell-o of course comes available in everything from red to purple but is not vegan. Instead, I prepared a big batch of Lieber’s clear unflavored jel dessert. We divided it among 5 cups, and used food coloring to make:

  • red
  • yellow
  • green
  • blue
  • purple

This was a great refresher on color mixing, since I only had food coloring in primary colors!

Jiggly Rainbow (2)

I also had Simply Delish’s orange flavored jel dessert, so we used that for the orange layer.

Jiggly Rainbow (1)

Now you’ll need to layer your dessert. We spooned a layer of purple into a cup and placed in the freezer for about 15 minutes to speed up the setting process.

Jiggly Rainbow (3)

Continue adding layers and freezing briefly until you have a full rainbow.

Jiggly Rainbow (4)

Unfortunately our three dark layers (purple, blue, green) and three light layers (yellow, orange, red) sort of blended in with one another. Shining a flashlight helped reveal the distinction!

Jiggly Rainbow (6)

Meanwhile Travis thought this was just the best dessert ever. Of course there was the obligatory poking and squishing that must happen with jel desserts.

Jiggly Rainbow (7)

Then it was time to spoon through the layers, and he kept me updated on his progress: “Mom, I’m up to the yellow!”

Jiggly Rainbow (9)

A super fun way to play with rainbows.

Rainbow CD

Rainbow CD (3)

If a gray day has you wishing for rainbows, make some at home with this easy craft! It’s just one of several ways Travis and I have made light after dark, lately.

We made our project a bit whimsical by turning it into a sort of “hunt” for the rainbow at the end of a pot of gold. That meant we wanted to decorate our CD with shamrocks. To make them, use a heart-shaped hole punch.

Rainbow CD (1)

For every shamrock, fit 3 hearts together into a clover-shape. Tape the hearts to the back of a blank CD.

Rainbow CD (4)

Now head some place dark, and shine a light!

Rainbow CD (5)

Travis loved holding the flashlight and seeing the rainbows appear on the wall. We experimented with different angles; if he held the light directly over the CD, the rainbow was like a laser line on the CD itself.

Rainbow CD (6)

If he held the light close to the floor, the rainbow appeared on the wall, growing bigger or smaller as he altered the angle.

Rainbow CD (7)

Note: there’s no need to decorate your CD to make this craft work, but it does add a nice touchy of whimsy!

Colored Foods

Colored Foods (3)

Here’s a fun way to introduce your baby to rainbow order: with snack time!

Colored Foods (1)

I set out a little plate for Veronika with bite-sized pieces of nearly all the colors of the rainbow. We had:

Red: tomatoes

Yellow: soft peaches

Green: avocado

Blue: blueberries

I placed the foods on her tray in rainbow order, and pointed out the name of each color and food to her. Which would be her favorite?

Colored Foods (2)

Blueberries got a tentative try.

Colored Foods (6)

Peaches were the clear winner!

Colored Foods (4)

For extra fun, we watched a song about the rainbow while she snacked.

Colored Foods (5)

Rainbow Breadcrumb Edible Sensory Tray

Rainbow Breadcrumb (9)

Aside from a simple bowl of cooked pasta, this was Veronika’s first sensory tray, and the first that I truly prepared for her. At this age, edible sensory trays are best, especially when you have a baby like Veronika who puts everything in the mouth.

The prep for this was so fun. Divide a loaf of bread into equal portions – as many portions as you want colors. You can make a full rainbow, but I stuck with the primary colors: red, yellow, and blue.

Rainbow Breadcrumb (1)

Place 1/3 of the bread in a food processor and process until you have coarse crumbs. Stir 2 to 3 drops of natural food coloring into 2 tablespoons non-dairy milk. Add to the food processor and pulse until the crumbs are coated.

Rainbow Breadcrumb (2)

Transfer to a plastic bag and let dry out. Repeat for your remaining colors.

Rainbow Breadcrumb (3)

Once the bread had mostly dried, I arranged it on a baking tray for Veronika, and sat her down on a blanket; we were prepared for a mess!

Rainbow Breadcrumb (4)

She knew what to do instantly.

Rainbow Breadcrumb (5)

Little hands pulled up big fistfuls of the crumbs.

Rainbow Breadcrumb (6)

They went right to her mouth, which was precisely the point, so I didn’t have to worry one bit.

Rainbow Breadcrumb (7)

I showed her how to run her hands through so that the colors mixed.

Rainbow Breadcrumb (10)

But mostly she was content to reach in, squish the mixture in her hands, have a nibble, and begin again. This one will keep your baby entertained for ages!

Rainbow Breadcrumb (8)

Glass Symphony

Rainbow Symphony (5)

We started off our day with a rainbow of sound! This neat homemade “xylophone” is a great way for kids to visualize the vibrations created in a basic glass symphony.

Fill glasses of the same shape and height with different levels of water. You don’t have to be exact about this, but I found it easiest to add water in 1/2 cup increments.

Add food coloring to the glasses so you have a pretty rainbow of colors. (Note: I use the all-natural coloring from Watkins, but I always find that the green looks very blue in water; instead, use the blue and yellow to mix a truer green).

Rainbow Symphony (1)

Now it was time to hand Travis a spoon, and see what he discovered. I asked him what was different about each glass. First he pointed out the obvious: different colors. But as he dinged each one with a spoon, he was delighted to find the sounds changed.

Rainbow Symphony (2)

“Sort of a low note,” he described.

Rainbow Symphony (3)

“Even higher!” he exclaimed.

Rainbow Symphony (4)

“Really high!”

Your mini Mozart can even try making up a song.

Here is my attempt at Hot Cross Buns, although I would have had to take some time to get scientific if I wanted the notes to be exactly right.

This project is a delight for all!

Nature’s Palette

Natures Palette (9)

This beautiful activity from High Five magazine combines a craft and a way to get outdoors. It’s quite similar to a rainbow hunt we did late last summer, but sometimes it’s fun to repeat an activity as your children age; they’ll reap different rewards from it each time!

This time we started by making a proper artist’s “palette,” which immediately had Travis excited. Cut a palette shape from a file folder (I did this step for Travis, since he wasn’t sure of the shape).

Nature Palette (1)

Next, cut paint chip samples (available for free at paint stores or home good stores) into pieces, and arrange on your palette. Travis was thrilled to use grown-up scissors, with a guiding hand.

Nature Palette (2)

Little drops of color!

Nature Palette (7)

Travis immediately seized upon the fun to be had with the remaining paint chips and extra file folders, and was soon making collages and creations.

Nature Palette (8)

He mostly cut squares and rectangles, but I helped him cut a few nature shapes like leaves and flowers, and we arranged them in pretty nature pictures.

Nature Palette (6)

Then came the real nature walk! Instead of going into the forest, I detoured us to a local botanical garden, knowing we’d find the full rainbow of colors there. Travis loved seeking out different shades on his palette.

Natures Palette (10)

We thought we might have to use the sky as our blue, until stumbling upon the perfect hydrangea!

Natures Palette (12)

In sum, this activity served as the prompt for a perfect mother-son summer afternoon.

Natures Palette (11)


Melted Crayon Art

Melted Crayon (4)

My son loves appliances, which he loves to play with (unplugged) under careful adult supervision. So when I saw this craft involving a hairdryer, I knew we had to give it a try.

I purchased a small canvas (8×8 inches) at the craft store, and cut the wrappers off a rainbow of crayons. You’ll want new crayons with nice pointy ends for this project, so it’s not the best option for recycling broken ones.

We arranged the crayons along the top of the canvas in roughly rainbow order, singing a rainbow song as we worked, and glued them down. Let dry completely.

Melted Crayon (1)

Then it was time to make some art! Cover your work area with newspaper, aim the hairdryer at the canvas, and turn on to the highest setting. He couldn’t believe I was letting him down this!

Melted Crayon (2)

With a guiding grown-up hand, we got right up close to the crayons. Now they were really starting to melt!

Melted Crayon (3)

Let the wax cool, then find some place to hang your work of art!

Melted Crayon (5)

March Magic

March Magic (2)

This year, mom and dad got a little impish (leprechaun-ish??) to make some magic! Here are a few cute suggestions for on or around St. Patrick’s Day.

Travis has been learning about leprechauns at school, so I told him that while he was sleeping they might make some mischief!

Meanwhile, adults: Paint rocks with gold paint, and while the paint is wet, immediatlely sprinkle with gold glitter. Let dry.

March Magic (1)

Hide the rocks around the house, then tell your children the leprechauns have visited and hidden gold!

March Magic (5)

What else have the naughty elves been up to? Instead of making shoes, they’ve mixed them all up! Mess up all your family member’s shoes and then set the clock and see how fast your kids can match up the pairs.

March Magic (4)

Finally, I strung up a rainbow outside. Use yarn or cording thread in all the colors of the rainbow, and wind it around your yard.

March Magic (6)

Your child now gets to go on a treasure hunt – maybe they won’t find a pot of gold, but be sure to leave a mini prize at the end of each string!

March Magic (9)

What have the leprechauns gotten up to in your house? Please share in the comments!

Eat the Rainbow

IMG_0008

In honor of St. Patrick’s Day, we whipped up this meal featuring every color of the rainbow! You can mix and match different components, or serve them over a few days leading up to St. Pat’s.

Red & Orange Salad

Red Orange Salad

Thinly slice one red bell pepper, one orange bell pepper, and 1 red apple. Toss with 1 cup matchstick cut carrots. Add 2 tablespoons olive oil,  2 tablespoons cider vinegar, and 1/4 teaspoon salt. (Note: Bigger kids and adults might also like a little spice – try adding 1/2 teaspoon cumin or 1/4 teaspoon paprika).

Yellow & Green Pasta

IMG_0012

Cook 12 ounces fettuccine or linguine according to package directions, adding 1/2 cup frozen peas toward the end of cooking. Meanwhile, heat 1 tablespoon olive oil in a large skillet and sauté 1 package Gardein chick’n strips and 1 cup sugar snap peas until heated through. Combine the chicken mixture, pasta, 1/2 cup plain non-dairy yogurt, 1/4 cup reserved cooking water, 2 tablespoons lemon juice, 2 tablespoons chopped fresh parsley, and 1/4 teaspoon salt. My son preferred this served in separate components on his plate!

Green Smoothie

IMG_0009

In a blender, combine 1/2 cup plain non-dairy milk, 1/2 cup water, 1 cup fresh baby spinach, and 1/4 cup mint leaves; process until blended. Add 1/2 a green apple, 1 frozen banana, and 1 tablespoon agave nectar; process until smooth. Drink through a green straw of course!

Blue & Purple Parfait

IMG_0004

For dessert, toss 1 cup mixed blueberries, blackberries, and purple grapes with 1 teaspoon sugar and 1/8 teaspoon ground cinnamon. Layer the fruit in parfait glasses with vanilla non-dairy yogurt. This also makes a yummy breakfast treat!

Want even more fun? Eat green snacks all week, like roasted edamame, kale chips, or green olives.

green snack