Barbecue Chick’n Pizza

Barbecue Chicken Pizza (1)

This recipe makes for a loaded pizza topping! Marinara sauce is spiked with barbecue sauce for a zesty update over standard pizza night.

Ingredients:

  • 1 pizza crust (homemade or store-bought)
  • 1/2 cup marinara sauce
  • 3 tablespoons barbecue sauce
  • 1 (10-ounce) package Gardein chick’n strips, cooked and chopped
  • 1/3 cup thinly sliced red onion
  • 3/4 cup shredded vegan cheddar
  • 3/4 cup shredded vegan mozzarella
  • 2 tablespoons minced fresh cilantro
  1. Place your pizza crust on a baking sheet; set aside.
  2. In a small bowl, whisk together the marinara and barbecue sauce and spread evenly over the pizza crust.
  3. Top evenly with the cooked chick’n, red onion, and cheese.
  4. Bake at 425 degrees F for 10 minutes. Sprinkle with cilantro before cutting into slices to serve.

Barbecue Chicken Pizza (2)

Pizza Pasta

Pizza Pasta

Combine two kid favorites (pizza and pasta!) in this quick meal. I had originally intended to use wagon wheel pasta, but opted for sea-themed shapes instead, like boats and sea horses. Any fun-shaped pasta adds to the dish’s whimsy.

Ingredients:

  • 2 tablespoons olive oil
  • 1 (8-ounce) package button mushrooms, sliced
  • 8 ounces fun-shaped pasta
  • 1 cup marinara sauce
  • 1 cup shredded non-dairy mozzarella
  1. Heat the olive oil in a large skillet over medium-high heat. Add the mushrooms and saute until tender, about 8 minutes. Transfer to a large bowl.
  2. Meanwhile, cook the pasta according to package directions. Drain and add to the bowl with the mushrooms.
  3. Add the sauce and mozzarella, stirring to combine.

Chicken & Broccoli Stir-Fry

Chicken and Broccoli Stir-Fry (1)
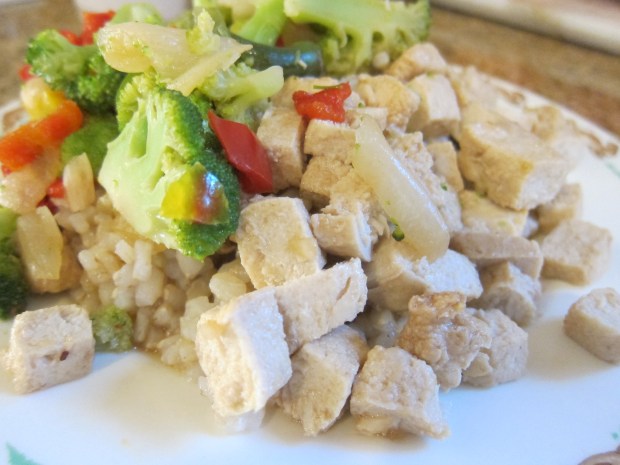
Here’s an easy weeknight meal of protein, veggies and rice. You can use frozen veggies to speed up preparation even further. Feel free to add more veggies to the mix, too, like corn, onions, or water chestnuts!

Ingredients:

  • 1 package Gardein chick’n strips
  • 2 minced garlic cloves
  • 4 tablespoons agave nectar
  • 2 tablespoons low-sodium soy sauce
  • 2 tablespoons orange juice
  • 1/2 teaspoon grated fresh ginger
  • 1/8 teaspoon salt
  • 2 cups chopped broccoli
  • 2 cups bell pepper strips
  • Cooked brown rice
  1. Cook the chick’n strips in a skillet over medium-high heat for about 6 minutes, until lightly browned.
  2. Meanwhile, whisk together the garlic, agave, soy sauce, orange juice, ginger, and salt in a small bowl.
  3. Add the garlic mixture to the skillet and continue to cook for about 2 minutes.
  4. Remove the chicken from the pan and set aside. Add the vegetables to the sauce and continue to cook for about 5 minutes.
  5. Serve the chick’n and veggies over cooked brown rice.

Chicken and Broccoli Stir-Fry (2)

Bean & Avocado Quesadilla

Bean and Avocado Quesadilla (2)

Beans and avocado give an extra nutritional punch to a plain cheese quesadilla.

Ingredients:

  • 1 (15-ounce) can black beans, drained and rinsed
  • 1 (4-ounce) jar carrot puree
  • 4 flour tortillas
  • 1 ripe avocado
  • 1/2 cup shredded vegan cheese
  • Salsa for serving
  1. To prepare the black bean mash, combine the beans and carrot puree in a saucepan; cook for about 5 minutes, until warmed through. Mash with a potato masher in the saucepan.
  2. Spread about 1/2 cup bean mixture over two of the tortillas; reserve any remaining bean mixture for another use.
  3. Peel and mash the avocado, then divide evenly over the bean mixture. Sprinkle each serving with 1/4 cup cheese and top with the remaining two tortillas.
  4. Cook in a heated skillet for about 4 minutes on each side, until lightly browned. Cut into wedges and serve with fresh salsa if desired!

You can try variations on the filling if you want to keep things fresh for the kids. Try pinto beans with butternut squash puree instead.

Bean Quesadilla alt

Or black beans mixed with a little bit of canned pumpkin!

Bean Quesadilla var

All the options are guaranteed delicious.

Bean and Avocado Quesadilla (3)

BLT Sandwich Wrap

BLT Wrap (2)

You can’t go wrong with a classic BLT sandwich filling. Wrap it up in a tortilla for a novel spin.

Ingredients:

  • 1 flour tortilla
  • 2 slices cooked Lightlife bacon
  • 1/4 cup chopped green leaf lettuce
  • 2 tomato slices
  • 1 tablespoon non-dairy ranch dressing
  1. Arrange the bacon, lettuce, and tomato slices down the middle of a warmed tortilla.
  2. Drizzle with the ranch, then wrap up and cut in half to serve.

Repeat as needed for extra sandwiches!

BLT Wrap (1)

Vegan Pork and Beans

Pork and Beans (2)

Here’s a fun way to dress up vegan pork from the freezer aisle and make it a little more gourmet!

Ingredients:

  • 2 (10-ounce) packages Gardein porkless bites
  • 3/4 cup barbecue sauce
  • 1 (12-ounce) can black beans, drained and rinsed
  • Corn tortillas or whole wheat buns
  1. Cook the porkless bites in a large skillet according to package directions, omitting the sauce.
  2. Stir the barbecue sauce and beans into the skillet and cook for about 5 minutes, or until the beans are heated through.
  3. Warm buns or tortillas according to your preference and serve.

With buns, these are almost like Sloppy Joes.

Pork and Beans alt

With tortillas, it’s more of a fun spin on taco night!

Pork and Beans (3)

Finger Paint with Pudding Cups

Edible Paint with Pudding Cups (4)

We love making “paint” that’s good enough to eat, and today’s version was super-quick. Use store-bought vanilla pudding and the cups themselves make the perfect paint pots!

Zen company makes vegan pudding cups, though in a pinch, you can whip up a homemade batch and divide among ramekins. Still, I preferred store-bought here because of those individual pudding cups.

I wanted rich, deep colors for the paint, so used 20 drops of food coloring for each pudding cup. For purple, mix 10 drops of red + 10 drops of blue.

Edible Paint with Pudding Cups (1)

I then laid down a big sheet of craft paper as Veronika’s canvas and set the pots around my little artist.

Edible Paint with Pudding Cups (2)

She instantly asked, “Can I eat it?” Needless to say, the eating of the paint was way more fun than the painting with it. I quickly switched from paint brushes to spoons once I realized she wasn’t going to stop taste-testing.

Edible Paint with Pudding Cups (3)

I did show her how to draw a few images with the paint, like flowers and a blue sky, but snacking won out.

Edible Paint with Pudding Cups (6)

To mix it up, next I taped construction paper to the high chair tray, and this time I poured on blobs of the pudding paint.

Edible Paint with Pudding Cups (7)

She dipped her hands in and did some swirling around.

Edible Paint with Pudding Cups (8)

Needless to say, though, she still preferred to snack than to paint! So this was a delicious activity, if not a terribly artistic one.

Edible Paint with Pudding Cups (9)

Designer Pancakes

Designer Pancakes (8)

Today was Veronika’s first time at the stove! She’s not quite yet 2, so needless to say I supervised this activity very closely. But dripping pancake better is an excellent first stove-top activity, and will make toddlers feel like big helpers in the kitchen.

First up was whipping up a super simple pancake recipe, by whisking the following together in a big bowl:

1 and 1/2 cups almond milk

2 Ener-G eggs

4 tablespoons canola oil

2 teaspoons baking powder

1 and 1/2 cups flour

Toddlers can help with this part, too!

Designer Pancakes (1)

I poured the batter into a liquid measuring cup and helped Veronika climb on a stool by the stove. Together, we held a big ladle and dripped the batter into a heated pan coated with cooking spray.

Designer Pancakes (2)

When it’s your toddler’s turn, chances are the “design” of the pancakes will be completely random. But Veronika loved that she made “baby pancakes”, and we thought one looked like a caterpillar.

Designer Pancakes (3)

Some of the small ones looked like little clouds in the sky.

Designer Pancakes (5)

While she enjoyed sampling the first batch, I prepared a slightly more deliberate design: a pancake gingerbread man! Chocolate chips made eyes, a nose, and buttons.

Designer Pancakes (7)

Veronika absolutely loved this activity, both the cooking and the eating of it.

Designer Pancakes (6)

Mixed-Vegetable Stir-Fry

Mixed Vegetable Stir-Fry (2)

Serve this dish with sesame tofu and brown rice for a well-rounded meal.

Ingredients:

  • 1 cup water
  • 1 tablespoon cornstarch
  • 1 tablespoon soy sauce
  • 1 tablespoon rice vinegar
  • 2 tablespoons canola oil
  • 2 minced garlic cloves
  • 1-inch piece fresh ginger, minced
  • 1/2 onion, chopped
  • 2 carrots, chopped
  • 2 cups broccoli florets
  • 1 cup thinly sliced bok choy
  • 1 cup thinly sliced cabbage
  1. In a small bowl, whisk together the water and cornstarch. Add the soy sauce and rice vinegar; set aside.
  2. Meanwhile, heat the canola oil in a large skillet over medium-high heat. Add the garlic and ginger; cook for 30 seconds.
  3. Add the onions, carrot, and broccoli; cook for about 2 minutes.
  4. Add the bok choy and cabbage; cook for 2 minutes.
  5. Stir in the cornstarch mixture and continue to cook until the vegetables reach desired tenderness for your child.

The kids love this directly over brown rice!

Mixed Vegetable Stir-Fry (3)

Homemade Limeade

Homemade Limeade

This toddler-friendly version of limeade has just the tiniest bite from sour lime, and no added sugars. You can use the same method to make lemonade, too! Add 1 teaspoon agave nectar if your kids do want a little extra sweetener.

Ingredients:

  • 1/4 cup fresh-squeezed lime juice
  • 2 cups white grape juice
  1. Stir together the ingredients in a pitcher, and serve over ice.