Hand-Shaped Dish

Hand Bowl (7)

I’m a sucker for any craft that incorporates the size of a child’s hand. Last year, we made  a wreath featuring Travis’s handprints. This year we switched our art medium to clay. This little dish is perfect for holding holiday candies, and would also make a great gift for grandparents on your Christmas list!

To start, we gathered our materials: air-dry clay and balloons. Balloons and clay first thing in the morning? Travis was in heaven!

Hand Bowl (1)

Blow up one balloon to a size your child can comfortably hold in his or her hand; set aside.

Hand Bowl (2)

Trace your child’s hand onto a piece of paper and cut out; set aside.

Hand Bowl (3)

Now flatten your clay using a rolling pin until it is large enough to hold the handprint.

Use a clay slicing tool or plastic knife to cut around the handprint.

Hand Bowl (4)

Now here’s the slightly funny part: drape the hand over the balloon, and let sit somewhere kids can’t touch it or mess with it until dry.

Hand Bowl (5)

Once dry, remove the balloon and set your hand on the counter as a decorative dish.

Hand Bowl (6)

Don’t forget to inscribe with kids’ names and the year, so you’ll always remember!

Hand Bowl (8)

Symmetry Butterflies

Symmetry Butterfly (9).JPG

In a day with wind chills in the teens, we needed a little reminder that spring always comes after winter! Butterflies always seem to fit the bill, so I set up this butterfly craft in the morning for Travis.

It’s yet another great way to emphasize symmetry found in nature for little kids, a tiny science lesson thrown in with the art.

First, I traced a butterfly wing on paper that was folded in half, and cut out. Open up and you’ll have symmetrical wings.

Symmetry Butterfly (1)

I tried to persuade Travis to paint only on one side of the wings, which he did at first…

Symmetry Butterfly (3)

…but once he knew that was my request, he became impish and painted on both sides. (Don’t worry, the final design will still work; the result just won’t seem as “magical”).

Symmetry Butterfly (5)

Once your child has finished painting, fold the wings in half and rub firmly to make sure the paint transfers over.

Symmetry Butterfly (6)

Open up for a symmetrical surprise!

Symmetry Butterfly (7)

I painted one a bit more cleanly for him,  so he could learn from the example.

Symmetry Butterfly (4)

After the paint dried, we added butterfly bodies (cut from additional construction paper) and drew on faces. Travis has just begun drawing noses and mouths, so I loved watching him do this part.

Symmetry Butterfly (8)

Even if the butterflies look a little grumpy!

Symmetry Butterfly (10)

We were out of googly eyes, but sparkly stick-ons worked for eyes in a pinch. Hang your butterflies in the window, and enjoy watching them soar!

Mac ‘n’ Cheese Muffin Bites

Mac Muffin (2).JPG

What will your kids love even better than a favorite go-to vegan mac ‘n’ cheese? Individual mini mac ‘n’ cheese muffins, of course! I hadn’t pulled out my mini muffin tin in ages (2012 to be exact) until making this recipe, but now the pan is sure to get a lot of use.

Ingredients:

  • 1 package vegan mac ‘n’ cheese mix (such as Annie’s)
  • 2 Ener-G eggs
  • 1/8 teaspoon black pepper
  1. Prepare the mac ‘n’ cheese according to package directions. Let stand for about 5 minutes.
  2. Stir in the Ener-G eggs, then divide the pasta evenly among 20 mini muffin cups.
  3. Sprinkle evenly with the black pepper. Bake at 400 degrees F for 12 minutes. Let stand about 5 minutes before removing from the cups to serve.

Early Explorers Dinosaurs

LP Dino (34).JPG

Unlike many of his peers, Travis has never shown much interest in dinosaurs, but suddenly they seem to be everywhere in his world! His nursery school is doing a dinosaur unit, and we ventured to Dinosaur State Park as part of his Early Explorer’s world discovery unit. Little did we know that our next kit from “Max and Mia” at Little Passports would be all about dinos!

LP Dino (2)

Travis was very into some of the regular items in this month’s kit, adroitly sticking his dino sticker onto his suitcase, proudly matching up each sticker on his map (“Don’t do a thing, Mom!” he commanded me), and eager to check out this month’s flashlight game. He also took right to the activities in the monthly info booklet.

LP Dino (26)

Dinosaurs Craft:

There was no real art project with the dinosaur unit, but the booklet did include a suggestion to draw our own dinosaurs. Since Travis is still making scribbles, I presented him with a dinosaur coloring book instead. He was delighted, and is fast becoming familiar with names like pterodactyl and T. Rex.

LP Dino (23)

He was so proud of his coloring that he raced to hang up his artwork. Soon we had a dino gallery!

LP Dino (24)

Dinosaurs Science:

The booklet includes nifty info on fossils to give your child a quick science lesson: fossils aren’t actually the bones themselves, but a hard rock-like “cast” that forms around them. To approximate a fossil, we followed the booklet’s instructions. First, flatten air-dry clay into a circle, then press in a found object.

LP Dino (12)

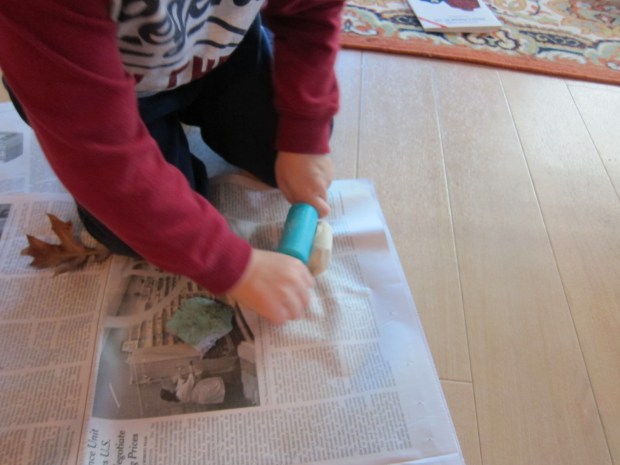
We used leaves and rocks, but I wish we’d had a shell on hand! Sticks or twigs would work too.

LP Dino (13)

Carefully remove the object, leaving an imprint behind.

LP Dino (14)

Next, fill the cavity with glue. Let dry completely. Once dry, peel off the glue – this is your fossil “cast.”

LP Dino (20)

I was skeptical, but we were able to peel off our leaf and rock imprints quite well. In all honesty, I was probably more into the final result than Travis was!

LP Dino (29)

Dinosaurs Keepsake:

This month’s package came with an adorable stuffed stegosaurus.

LP DIno (3)

I also opted for the add-on pack of 4 additional plush dino friends, which included a poster describing where in the world dinos have been found. T. Rex now sleeps with Travis every night, of course.

LP Dino (1)

Dinosaurs Field Trip:

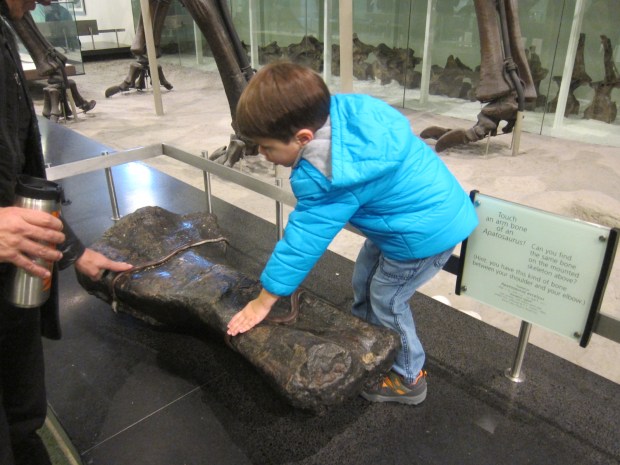
Whoops, we’d just been to a dinosaur footprint park, so needed a new field trip this time! The next obvious answer was to visit dinosaur fossils and skeletons at a Natural History Museum.

LP Dino (32)

If you’re also fortunate enough to live near a place where you child can see full skeletons assembled, do it! Nothing compares to seeing how huge these reptiles were in person.

LP DIno (31)

Dinosaurs Further Activities:

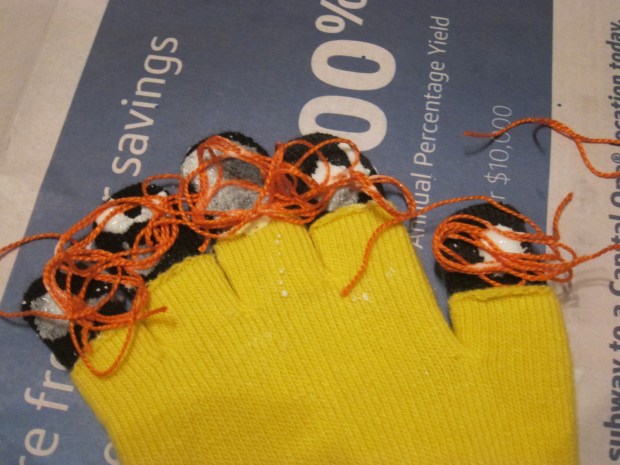
We wanted more dinosaur fun, so I poked around on Little Passport’s blog and dug up this dino excavating activity. It’s something we’ve done before, but not in ages! First, we needed to squeeze dinosaurs through the opening of uninflated balloons (always a stretchy endeavor).

LP Dino (5)

Fill the balloons with water (a funnel is helpful), and then tie off. Freeze overnight.

LP Dino (8))

The next morning I asked Travis if he wanted to excavate our dinosaur egg fossils, and he couldn’t wait! First he needed to hold and explore the frozen balloons.

LP Dino (6)

We started by using hot water and pipettes to thaw out the dinos…

LP Dino (7)

…and we loved whenever a bumpy limb or scale emerged through the ice.

LP Dino (9)Once they were exposed enough, we added tools into the equation. Travis did great chiseling, using a hammer while I supported a screwdriver.

LP Dino (18)

He was thrilled when the ice cracked away from the dinos in big chunks. Freed!

LP Dino (17)

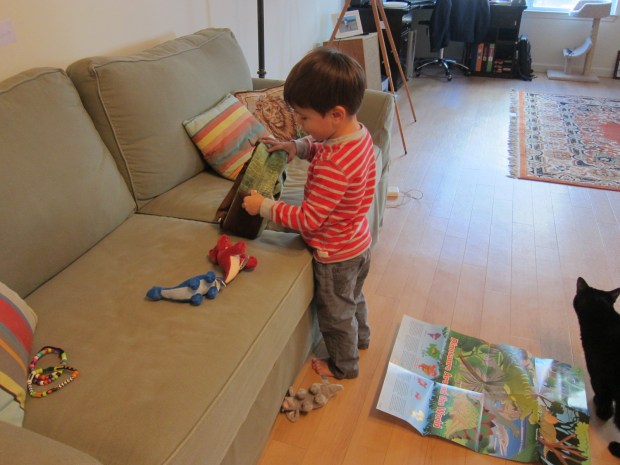
In addition, we checked out a few dino books from the library, and Travis loved matching our plastic dino figures up to the book.

LP Dino (27)

The books were a great prompt to encourage him to imagine life in prehistoric times, asking if he thought it was hot or cold, or what sounds he might hear. He was amazed to learn there would be no noise from car engines or airplanes.

Travis latched on to ankylosaurs as a favorite, so we did some research online and even found cute videos about it!

LP Dino (33)

As a final suggestion, we headed outside to see if we could be archaeologists and find any animal prints or plant impressions left in the ground. We thought this trail might have been left by a slug!

LP Dino alt

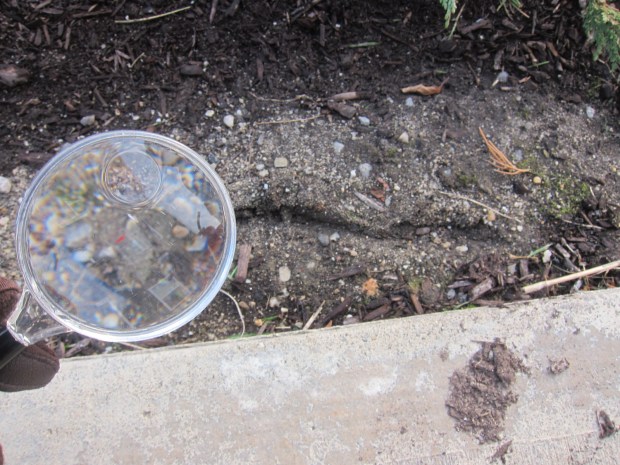
And even found paw prints.

LP Dino var

Looking forward to our next Explorer adventure!

LP Dino other

Starry Holiday Table Runner

Starry Table (7)

This project is a great way to get kids involved in holiday décor! The result is charmingly homespun and sure to delight relatives or other visitors at your holiday table.

To start, I prepped a star stencil. Ideally, you’ll want to use a real star stencil from a craft store. I printed a star template on paper and cut out the star shapes, which worked in a pinch; if you use this method, however, be sure to have several templates on hand, as each one can only take a coat or two of paint before tearing.

Starry Table (5)

Next we prepped our workspace, unrolling a large length of craft paper, and pouring white paint into a foil pie plate.

Starry Table (1)

Travis loved helping thin the paint with just a touch of water, for a creamy consistency.

Starry Table (2)

Next I showed him how to hold the stencil in one place on the paper, and paint over the exposed open star shapes. He loved the challenge, and although his paintbrush sometimes slopped over the edges, this only added to the charm of our final runner.

Starry Table (3)

Keep moving your stencil until you’ve covered the entire length needed with star shapes. He even pretended he was a professional painter as he worked!

Starry Table (4)

We left the paint to dry, and then I cut the craft paper to form a thinner rectangular runner, with a triangle snipped from each end for a banner-like effect.

Starry Table (6)

The runner is perfect under our advent calendar display while we wait for the day to actually celebrate with relatives, and then we’ll move it to the buffet table!

Starry Table (8)

Green & Gold Couscous

Green Gold Couscous.JPG

There are sophisticated flavors in this couscous salad, and if you’re looking to challenge your little one’s taste buds, it introduces new foods in a kid-friendly way.

Ingredients:

  • 1 tablespoon olive oil
  • 1 and 1/2 cups dry pearl couscous
  • 1 teaspoon Dijon mustard
  • 1 teaspoon red wine vinegar
  • 2 tablespoons lemon juice
  • 1 teaspoon minced garlic
  • 1/3 cup olive oil
  • 3 cups arugula
  • 2 cups shredded raw yellow beets
  • 3/4 cup walnuts, toasted and chopped
  • 1/2 cup golden raisins
  1. Heat 1 tablespoon oil in a saucepan over medium heat. Add the couscous and toast for 4 minutes. Add 3 cups water and bring to a boil; reduce heat to low and simmer for 8 to 10 minutes, until tender. Drain any excess liquid and set aside.
  2. Meanwhile, whisk together the mustard, red wine vinegar, lemon juice, garlic, and 1/3 cup olive oil to make the dressing.
  3. Place the couscous in a large bowl. Add the arugula, beets, walnuts, and raisins. Add the dressing, stirring until well coated, and refrigerate until ready to serve.

Note: You can cool the couscous completely before assembling all the ingredients together, but I actually prefer to add the couscous while it is still a touch warm. This wilts the arugula slightly, which suits my preschooler’s tastes better, and helps plump up the golden raisins.

Missing-Mitten Puppets

Mitten Puppets (7)

We loved this suggestion from our December issue of High Five magazine! What parent of small children doesn’t have an odd mitten or two lying around? Kids always seem to be losing just one of a pair. To prolong the fun, I also purchased a cheap three pack of gloves, so our imaginations could run wild with puppet making. Although mittens would have been ideal, gloves worked just as well for our new puppet friends.

First, we followed the two suggestions from High Five. An old yellow glove received orange thread as a mane, which Travis loved gluing to the fingertips.

Mitten Puppets (1)

We added googly eyes and felt pieces for the nose and mouth. Black thread was perfect for little whiskers.

Mitten Puppets (2)

Felt ears (in pink and blue), a blue felt nose, more googly eyes, and more black thread as whiskers turned an odd blue glove into a mouse. Squeak!

From there, I left Travis’s imagination take over. We had a very abstract elephant covered in orange thread and yellow felt, shown here in the foreground:

Mitten Puppets (9)

He next asked to make a porcupine, so I got out “quills” from brown felt and Travis added a pom pom nose.

Mitten Puppets (5)

Then he decided we needed a black cat, with pink felt ears and facial features. Travis insisted that the cat needed a sparkly pom pom, too.

Mitten Puppets (6)

Then of course it’s time for a puppet show!

Mitten Puppets (11)

What color mittens do you have on hand to turn into animals? Please share ideas in the comments!

Mitten Puppets (8)

Making a Rocket

Rocket (9).JPG

An extra mailing tube from the post office spurred this idea, and turned out to be a huge hit.

Rocket (1)

To turn a simple mailing tube into a rocket, the first thing you’ll need to do is paint it silver using a metallic acrylic paint. Travis has his own agenda more and more these days, a busy three-and-a-half year old. He normally isn’t so into painting, but when I told him we were using “big boy paint” (i.e. non-washable) like real astronauts, he leaped to the task!

Rocket (2)

Cut two fins for the rocket from cardboard and paint those as well. Let dry completely.

Rocket (4)

For the flames of the rocket, you can trim lengths of orange and red fabric into strips, hot glue the edge of the fabric onto plastic piping, and insert into the bottom of your rocket. Or you take a vast short-cut, cut strips of orange and red construction paper, and glue them in. Yup, we went the simple way!

As the final step, I hot glued the two cardboard fins to the body of the rocket, and then made the cap. Cut a piece of shiny craft paper into a circle, and cut out 1/4 of the circle. Fold into a cone, and hot glue onto the top of the rocket.

Rocket (5)

As soon as the glue was cool, it was Travis’s toy to zoom, and oh boy was he exited!

Rocket (7)

It was his suggestion that we launch the rocket off a launch pad, so we repurposed an old cardboard box as our launch site.

Rocket (8)

Definitely a big hit with this three-nager.

Duct Tape City Bus Playset

Duct Tape Bus (11).JPG

This was a project that sounded daunting, and so I put it off for a while. But it turned out to be very easy and very cute. My hesitation stemmed from the fact that I needed to purchase magnet sheets and duct tape sheets (note: not a roll of duct tape), which I couldn’t find at my local craft store. Both are readily available on Amazon, so armed with these supplies, we were off and running… er, driving!

Duct Tape Bus (1)

To make duct tape vehicles, peel the sticky side off the duct tape sheet and line up evenly with the sticky side of the magnet sheet. Cut out rectangles to be your cars, buses, and trucks.

Duct Tape Bus (2)

Travis loved the idea of drawing our vehicles. We used permanent marker, and he scribbled away with imaginative designs.

Duct Tape Bus (5)

Meanwhile I added a few vehicles that he could readily recognize, including a city bus…

Duct Tape Bus (3)

…and a propeller plane (Travis’s current obsession). Garbage trucks and cars rounded out our city neighborhood.

Duct Tape Bus (4)

To make your cityscape, tape down two pieces of paper to the back of a baking sheet. Adults and older kids can map out streets and buildings.

Duct Tape Bus (6)

Travis was thrilled to help decorate, and was very focused on drawing a crossing guard. I was so proud when I saw him draw in a nose and smile, his most true-to-life people yet!

Duct Tape Bus (7)

Once your city is drawn, add your magnet vehicles and zoom them along however you like!

Duct Tape Bus (9)

This playset is one your kids can return to over and over again.

Duct Tape Bus (8)


Sight Word Train

Sight Train (5)

I’m on the lookout these days for snekay ways to get Travis to spot his name among a jumble of letters. This time the learning made its way into train set play!

Set up any train track pieces you have (you don’t need anything complicated, just a simple loop), and then set out train pieces. Affix a small post-it note with a letter to each individual train piece.

As mentioned, our first game was to hide the letters of Travis’s name, and see if he could spot them among a jumble of train cars.

Sight Train (4)

The next step was to line those letters up in order!

Sight Train (7)

We also spelled a few simple words; think of easy sight words like yes, no, cat, dog, mom, dad, etc. Because Travis currently loves airplane pilots, we spelled out a-c-e.

Sight Train (3)

Travis is still more comfortable with upper case letters than lower case, so I focused just on the latter today. But really the only limit here is when you run out of post-it notes!

Sight Train (6)

For bigger kids, you can even write full words on the post-its and have them line up their train cars to form a simple sentence.