Learning About Feelings

Feeling Emotions (2)

Here’s a fun way to teach your baby about feelings as he or she begins to navigate the world of emotions; bring stuffed animals in on the action!

The very first one I wanted to illustrate for Veronika was love. I said the word and gave her stuffed animal a big hug.

Feeling Emotions (1)

She wanted to copy me right away!

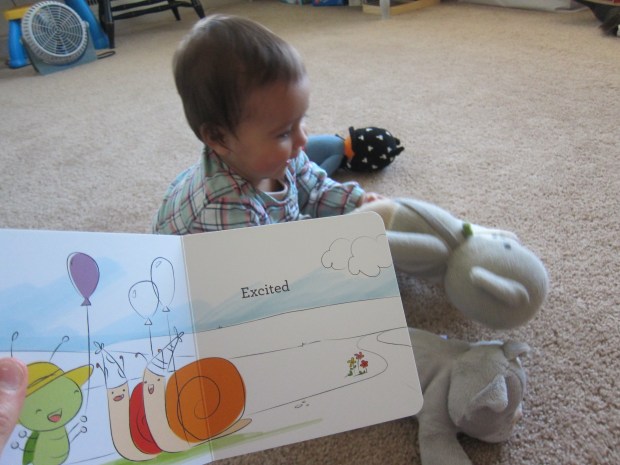
Next, I sat the happy stuffed animals around me for a story time, explaining that story time makes me happy. Make sure to exaggerate the emotion as you say it. For happy, that meant a high voice and big smiles. She was excited.

Feeling Emotions (7)

There are so many children’s books featuring emotions that you can read through. Our book included different scenarios and emotions on each page. After I read the text, I stopped and had her stuffed animals act it out.

The fox was sleepy.

Feeling Emotions (3)

Oh no and then worried.

Feeling Emotions (4)

And then “surprised!” Veronika copied my motions and put her hands up in a big, “Oh yay!”

Feeling Emotions (5)

And there was a happy ending of course.

Feeling Emotions (8)

Read through several books this way, so you can explore the gamut of emotions with your little one. Veronika looked concerned when the animals were worried…

Feeling Emotions (9)

…and thrilled when they were glad. She enjoyed this story time so much, and I did too!

Feeling Emotions (6)

Stacking Rings

Stacking Rings (10).JPG

Stacking rings are such a simple and classic baby toy, but they bring such joy and fantastic learning! Your baby is problem solving as he or she figures out how to stack the rings, as well as honing fine motor skills. Because many are brightly colored and ordered in size from largest to smallest, they are also great for language development.

Today, Veronika and I mixed things up to bring new life to her standard stacking ring set! Instead of threading them onto the provided post, I gave her a wooden spoon to slot them on to (you could also try the game on your arm).

Stacking Rings (1)

She was immediately intrigued.

Stacking Rings (3)

The spoon itself was fascinating to her, and I think she believed herself to be Queen Veronika, brandishing it like a royal scepter and chatting to the spoon for quite some time.

Stacking Rings (2)

Eventually I coaxed her into adding more rings onto it.

Stacking Rings (7)

She was delighted when she saw that her spoon now had three fun rings, not two.

Stacking Rings (9)

She loved to stand up holding it, as well!

Stacking Rings (5).JPG

If you want to challenge your baby with smaller rings, try stacking on shower curtain or window curtain rings instead! How do you and your baby play with stacking rings? Please share in the comments.

Stacking Rings (4)

Floor Art

Floor Art (3)

Veronika is entering such a fun stage of development. No longer are projects and crafts simply things I make for her, but she’s old enough now to get involved in the process. To wit, today I gave her a crayon for the first time. The moment was, quite simply, beautiful.

I laid a long piece of craft paper down in the playroom, securely taping it at all four corners. If you prefer, or worry that your little one will rip up paper, use cardboard instead.

Floor Art (1)

I set out a box of jumbo crayons, the perfect first crayon for the under-age-one set. She took to it more immediately than I ever imagined, not putting the crayon in her mouth, but instead testing out a few scribbles.

Floor Art (2)

I thought I might need to guide her hand..

Floor Art (5)

…but nope! She delightedly began scribbling all over the paper, and even stayed on it instead of wandering to the floor by accident.

As she “drew”, I drew along with her, including a few simple shapes I pointed out.

Floor Art (4)

I added a few simple patterns like black, green, black, green, or square, circle, square, circle. I chatted about these shapes to her as she continued to scribble.

Then I laid her down on her back and traced her! This got giggles.

Floor Art (6)

I guided her hand to show her where eyes, a nose, and a mouth would go on the resulting outline. As I drew on a purple shirt, she happily scribbled over this first “self-portrait.”

Floor Art (7)

For additional art fun, I drew a second human outline on cardboard and cut out a few clothes from construction paper.

Floor Art (11)

I let her help me glue these down with a glue stick, a slightly sticky but delightful process. Clearly she enjoyed this first art class!

Floor Art (10)

Play Dough Sensory Bag

Playdough Bag (2).JPG

I’ve been on a recent kick of making sensory bags for Veronika, a great way to enable my little imp to play with messy materials that might otherwise end up in her mouth. Safely inside a plastic bag, even the messiest items are a go!

Normally for a ten-month-old I’d whip up homemade play dough for added security, but since it was going in the bag, I used the store-bought kind.

I added a few craft beads in fun flower shapes that she would be able to squish into the play dough. Now it was simply a matter of sealing and watching her squish away!

Playdough Bag (1)

Veronika loved grabbing at the bag.

Playdough Bag (5)

I showed her how to squish the hard beads into the soft dough, talking about texture as we played. The contrast seemed to really interest her.

Playdough Bag (4)

I felt comfortable leaving this one around for her to play with since there was no liquid to spill, even in case of a slight tear.

Playdough Bag (3)

A fantastic way to keep her busy, in sum!

Memory Game

Memory Game (3).JPG

Object permanence is probably well-established now for your baby at ten-months old, but this game will help strengthen the concept that an object exists even once hidden. And your little one will love finding it!

I decided to use two foam blocks for the game, because I wanted objects that were different in some ways, but similar enough not to confuse Veronika. One block was a blue square and the other was a yellow triangle. Working with one at a time, I described the block to her: colors, shapes, texture. Let your baby feel (or mouth on!) the toy if they are interested.

Memory Game (2)

Then I hid the block behind my back. She was instantly curious where it had gone, and trotted around to find it.

Memory Game (4)

We repeated with the yellow triangle. Again, your baby won’t be acing quizzes after games like this, but it’s great way to introduce vocabulary about shapes colors and the element of hiding will keep your little one excited.

Memory Game (1)

Shoot and Splash

Shoot and Splash (4)

Following up on yesterday’s simple game of “boom!”, today I made a cause-and-effect game that was a little more sophisticated for Veronika. This game is also great for talking about words like in/out and fast/slow.

I filled a shallow plastic tub with water, and got out two small balls (golf balls or ping pong balls are about the right size) along with an empty paper towel tube.

I held the tube against the bin of water and let Veronika see me put the ball inside. “In!”

Shoot and Splash (1)

Now tilt the tube slightly and let the ball fall in with a splash. There was a great element of surprise here for Veronika, who was wondering where the ball went!

Shoot and Splash (5)

We played around with different variations for quite some time. Sometimes I let the ball fall fast from a steep angle, or sometimes held the tube nearly horizontal so it would roll slowly and build her anticipation.

Shoot and Splash (3)

Soon, she was the one wanting to put the balls in the tube, making this almost like a one-shape shape-sorter!

Shoot and Splash (6)

When we were done with the tube, the leftover balls and shallow water were a big hit.

Shoot and Splash (2)

Boom!

Boom (3)

Cause-and-effect is big at ten months, and this simple game is sure to delight!

I sat down with Veronika in front of an empty plastic bin. Making sure she was watching, I tossed in a bean bag and said, “Boom!”

Boom (1)

Well she sure thought that was funny!

Boom (2)

I repeated with a ball, “Boom!” She immediately began mimicking the word. “Boo boo boo!”

Now it was her turn; I handed her a ball which she placed in rather than dropped into the bucket, but she had the idea!

Boom (7)

For some extra fun, I sprinkled flour in the bottom of the bin.

Boom (5)

The bean bags and balls made just enough of an impact for a light dusting to fly up when items landed, further enhancing the notions of cause and effect.

Boom (6)

And it was so fun that big brother wanted in on the action!

Boom (8)

Baby Oil Sensory Bag

Baby Oil Bag (4).JPG

If you’re looking for a safe way to incorporate messy materials into play with the under-one-year-old set, then gallon-sized plastic bags are your perfect solution. To wit, Veronika has “painted” in a plastic bag, and today we used baby oil for a fun sensory experience.

Pour some baby oil into the bag. Add a few blobs of food coloring.

Baby Oil Bag (2)

I went with a blue theme simply because that was what I had on hand, and added blue buttons and blue pony beads as well.

Now all she had to do was squish! The food coloring is fun, because your baby can chase the blobs around in the baby oil, much like blobs in a lava lamp.

Baby Oil Bag (3)

If your baby is as hands-on as Veronika, you’re going to want to duct tape along the sealed closure for extra security.

Baby Oil Bag (5)

It was also helpful to duct tape the bag to the floor, because this focused her play on squishing items around within the bag, instead of picking up the whole bag and smooshing it in her hands.

Baby Oil Bag (6)

What hands-on fun for a weekend morning!

Shall I Pour?

Shall I Pour (7)

Pouring dry items from cup to cup is a fantastic way to build the fine motor skills that will one day allow your little one to pour liquids. Don’t expect your baby to be pouring his or her own water and juice after this game, but it is great practice and cute fun!

I put a soft blanket down on the kitchen floor, then filled two cups with O cereal and left two cups empty (one set for me, one for Veronika).

Shall I Pour (1)

Once I had her attention, I showed her how to pour the cereal from a full cup to an empty one.

Shall I Pour (2)

“Watch me pour!” I instructed.

Shall I Pour (4)

Well at first she was simply delighted to discover that the game involved a snack. Yum!

Shall I Pour (3)

She also seemed to love the visual of the cereal trickling from one cup to another.

Shall I Pour (8)

After showing her a few times, her hand reached out to mimic me, which I had anticipated; ten-month-olds are fantastic mimics!

Shall I Pour (9)

She tried her own hand at pouring…

Shall I Pour (5)

…and then just wanted to play with Os and cups. As I said, don’t expect your baby to be a pro after the game (your play space will probably look like mine, below), but your little one will have a blast!

Shall I Pour (10)

Bouncing Monkey

Bouncing Monkey (4)

What’s not to love about the Five Little Monkeys rhyme? It’s educational (counting), involves a cautionary tale (don’t jump on the bed!), has fun rhythm and words, and… there’s bouncing!

Today, Veronika and I did exactly what the rhyme cautions not to: bouncing on the bed! I supported her firmly and bounced her up and down as I recited the words, enlisting big brother’s help to capture the huge grin on her face.

Bouncing Monkey (5)

For extra fun, we added props! Our book of the rhyme has touch-and-feel elements on the monkey’s faces, and I added a phone so we could “call” the doctor whenever we reached that line.

Bouncing Monkey (1)

Even more fun was bouncing along a stuffed monkey friend, to make the verse come alive for her.

Bouncing Monkey (6)

In case you need a refresher, here are the words:

Five little monkeys bouncing on the bed.

One fell of and bumped his head.

Mama called the doctor and the doctor said,

“No more monkey business bouncing on the bed!”.

Repeat with four monkeys, then three, then two, then one. Then no more monkeys!

Bouncing Monkey (3)