Kaleidoscope


Kaleidoscope (7).JPG

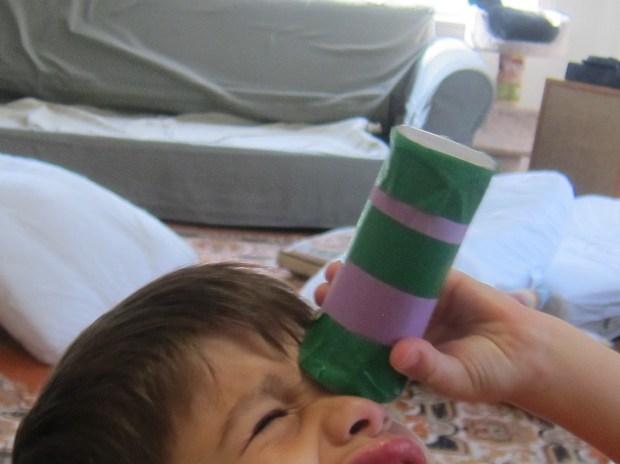
Having made several varieties of kaleidoscope in a Kiwi Crate recently, today Travis helped me tackle a DIY version. Ours didn’t come out exactly as intended, but the materials were fun and it quickly became a prop in Travis’s make-believe games!

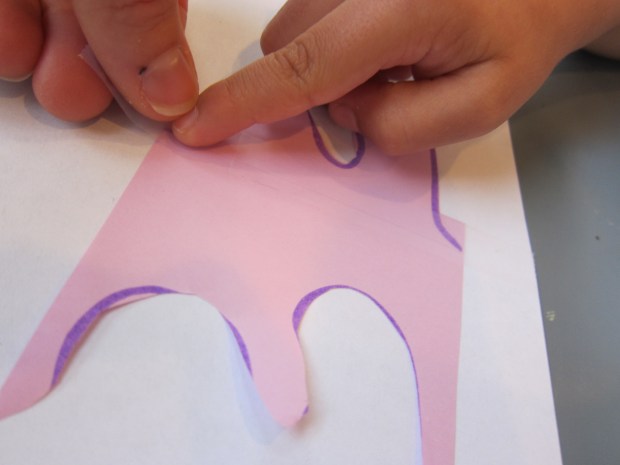
First, wrap an empty toilet paper tube in colorful construction paper; Travis chose purple. Tape on.

Kaleidoscope (1)

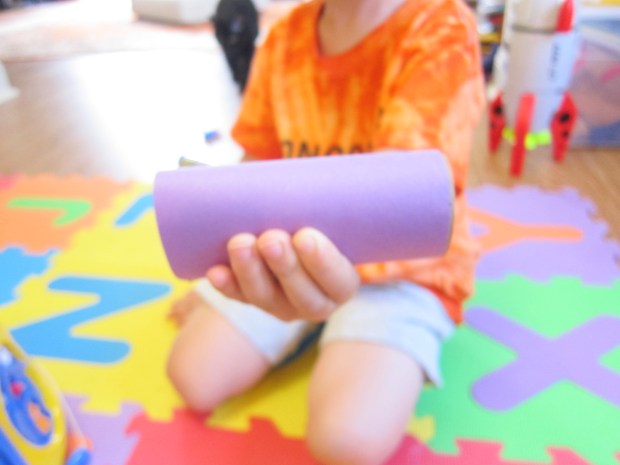
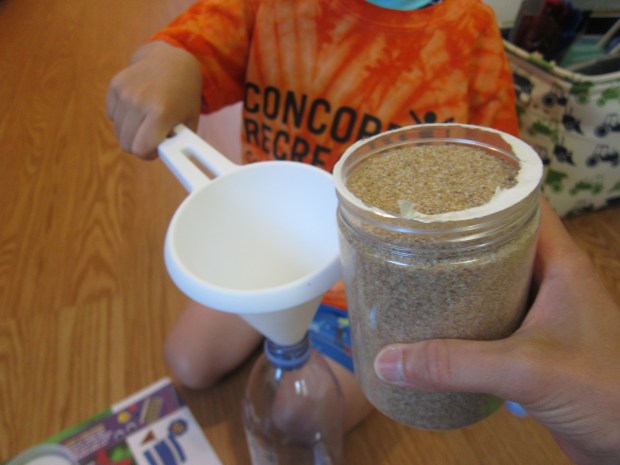
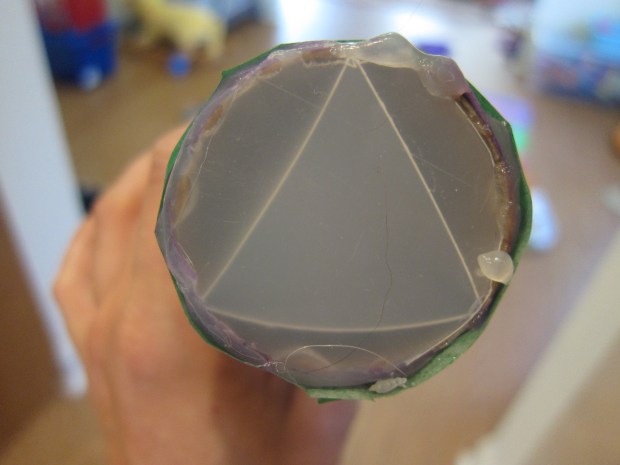
Trace the bottom of the tube three times on a plastic lid. We used the lid of an oatmeal can, which was not entirely clear, and perhaps why our results weren’t 100%. But oh well! Cut out the three circles and hot glue one circle to one end of the tube.

Meanwhile, cut a piece of reflective paper so it is 1 inch shorter than the tube.

Kaleidoscope (2)

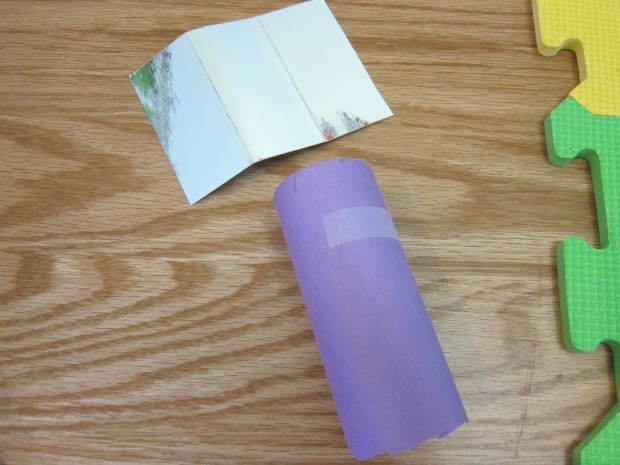
Fold into thirds and then open back up again. Fold it up to form a prism (making sure the reflective side is on the inside) and tape to secure.

Kaleidoscope (3)

Slide the prism into the tube, all the way back against the hot-glued circle.

Kaleidoscope (6)

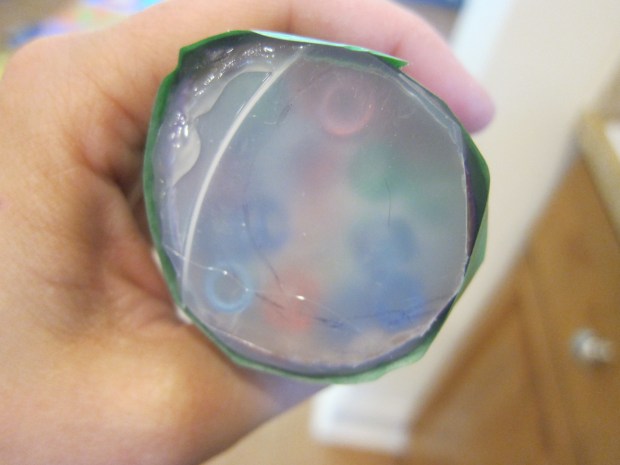
Slip the second circle over the prism. Fill the remaining space with multi-colored pony beads. Hot glue the final circle to the other end of the tube.

Kaleidoscope (4)

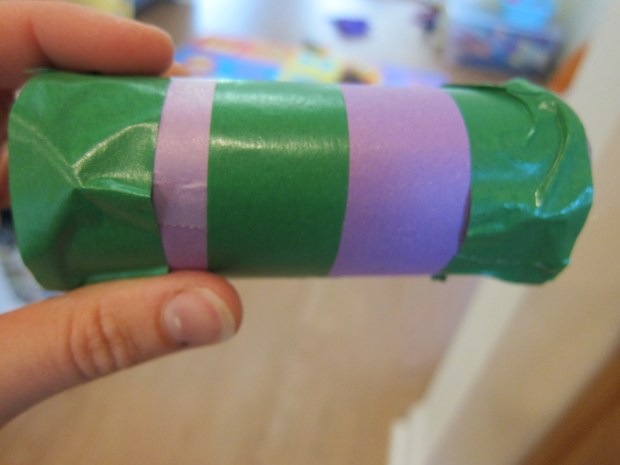
Kids can decorate the outside of the tube with colored tape or markers, if desired.

Kaleidoscope (5)

We found that this worked best when we held it directly up toward a light source. But even with slightly cloudy viewing, it worked great as a “viewfinder” or “telescope” or “homing device” in Travis’s games!

Kaleidoscope (8)

Y and Z!

Ziti Z (4).JPG

Travis’s 3-D models for the last two letters of the alphabet were so simple I decided to combine them into one post. First he traced the penultimate and final letter, and then made the following.

Upper case Y from three crayons:

Y and Z (3)

Lower case y from two socks; make sure to use 1 long and 1 short:

Y and Z (2)

Note: This was the first time he really noticed you need three strokes to form Y but only two to make y.

IMG_0005.JPG

Upper case Z from three strips of paper; be sure to fold or cut all three so they are the same size:

Ziti Z (1)

This was definitely good practice to think about Z spatially, with no line to trace. He had to think hard about which direction the zigs and zags should go.

Ziti Z (2)

Finally, lower case z from pasta… ziti of course!

Ziti Z (3)

Again, he thought carefully about the directions of each line, and was finally able to line up the ziti pieces correctly. Someone is feeling just about kindergarten ready!

Symmetrical Art


Symmetrical Art (10)

Travis has done so many crafts at camp that it felt like a while since we’d sat down just to paint together. We amended that this morning with a craft intended to follow up on recent fun with symmetry.

First he folded a piece of paper in half, very importantly made a nice crease, and opened it back up again.

Symmetrical Art (6)

I squirted out big blobs of paint near the center crease, according to his preference. “Red, and orange, and blue!” he instructed.

Symmetrical Art (1)

He smeared them all together, noting the way the blobs ran together, made new colors (purple!), and got super smeary.

Symmetrical Art (2)

Now we folded the paper over again, smooshing the paint inside. We opened it back up for a neat symmetrical reveal. “I made a footprint!” he said.

Symmetrical Art (3)

He loved it so much that he immediately requested to use the second piece of paper I’d folded. This time he chose a different set of colors, including light blue, yellow, and black.

Symmetrical Art (4)

Blob blob blob and smoosh smoosh smoosh and we opened it up again.

Symmetrical Art (5)

He thought this one looked like Darth Vader’s mask – even cooler!

Symmetrical Art (7)

X X-ing

X Xing (3).JPG

Travis traced X today (we’re so near the end of the alphabet!) and then crossed (x’d) two items to make big X and little x.

For the first, he stood up tall and crossed his arms. No x-ing here!

X X-ing.JPG

Next, I gave him two carrot sticks (stix?) and he crossed them into a little x.

X Xing (2)

Short and sweet today!

Counting and Sorting

Counting and Sorting (1)

Today Travis took a break from tracing the alphabet and focused instead on summer math skills: counting and sorting.

There are so many ways to approach this, and you can tailor it to fit what’s in your home! First up, we pulled out a collection of his toy cars, and I asked him to sort them in two ways. He wanted a quick reminder on what it means to sort, i.e. grouping things by a common characteristic. The first category he came up with was color. Our red pile was the biggest.

Counting and Sorting (2)

I helped him look for a different way to sort this same set of cars and he settled on size. I thought he would do big and small, but he made sure even to include a medium pile!

Counting and Sorting (4)

Next we went through our craft bin to find things to sort. Foam stickers in fun sports shapes were a perfect find! At first, I just gave him the pile and set him the task of sorting them (keeping those fingers busy while I prepped dinner).

Counting and Sorting (7)

This proved to be a little too open-ended, so I gave him two options: sorting the balls by sport or by color. He opted for sport, and soon was off and running. At the end, we wondered: which pile had the most? He proudly counted out 14 soccer balls, but then loved discovering that there were even more footballs – 15!

Counting and Sorting (6)

Another great time for sorting is during clean-up! If your house is anything like ours, the Lego sets are all mixed together and a constant mess. I purchased a set of craft bins to sort the Legos by color, which meant Travis was doing “math” while helping me… and didn’t even realize it was a chore.

Counting and Sorting (8)

The possibilities are almost endless. Have your child count out and then sort their markers or crayons.

Or they can sort the coins in your wallet by denomination.

Counting and Sorting (9)

Or just for fun, make a busy box of different dried pasta shapes and have your child sort and then count out piles of each. Either way, counting and sorting are the perfect math activity to prevent the summer slide.


Bottle Sailboat

Bottle Sailboat (6)
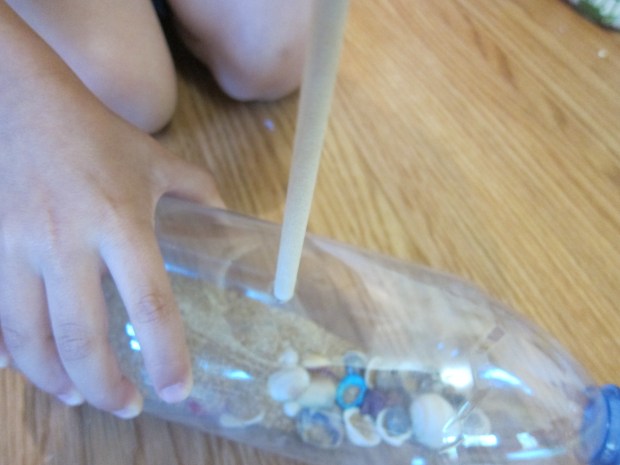
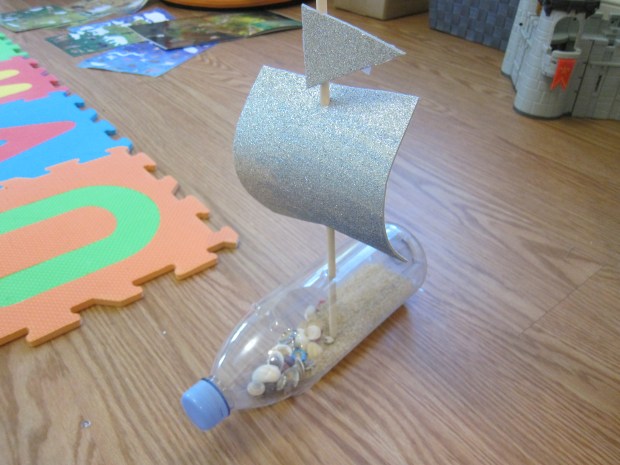
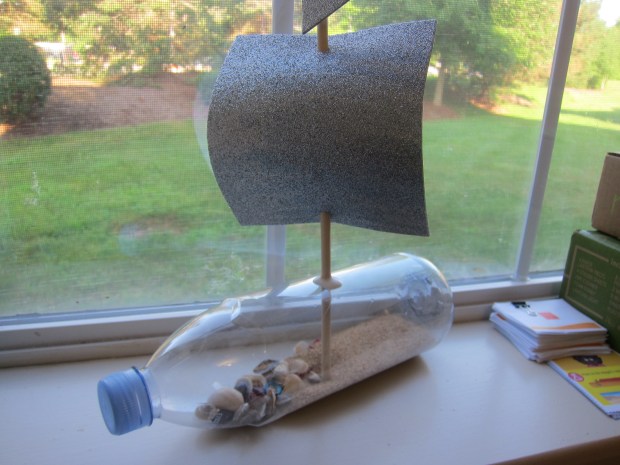
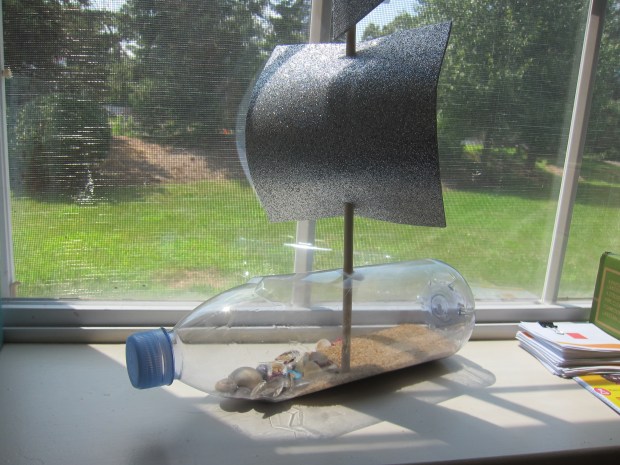
Although not nearly as expert or astonishing as a model ship in a bottle, this craft is a cute riff on the idea, and a version that kids can make all by themselves!

Remove any labels from a plastic water bottle and insert a funnel into the opening. Pour in about 1/2 cup sand; you can use some you’ve saved from the beach, or buy it at the craft store. Travis loved being the very important funnel holder while I poured.

Bottle Sailboat (1)

Sprinkle in a few small sea shells; again, these can either be ones you’ve collected, or store-bought in a pinch. Replace the cap on the bottle.

Bottle Sailboat (2)

To make a sail, pinch the bottle slightly to cut a slit in the center. Insert a wooden dowel and secure with glue.

Bottle Sailboat (3)

Cut out a square from craft foam for a sail, and a triangle from the foam for a flag. Because we used sparkly craft foam, Travis didn’t add much decoration. Your kids may want to decorate their flags with markers or stickers.

Bottle Sailboat (4)

Punch two holes in the “sail” and insert onto the dowel mast. Tape on the flag.

And now set sail! Although the bottle will really float in the tub or a pool, we thought it was prettier just to look at.

Bottle Sailboat (5)

Gummy Ocean Vacation

Gummy Ocean (6).JPG

This snack idea from Highlights magazine is pure summertime fun! We adapted it slightly for our vegan family, and Travis loved the results.

Prepare 1 package of orange-flavored vegan jel dessert (such as Simply Delish) according to package directions. Pour a layer into clear glasses and chill for at least 1 hour, until firm. This will be your beach “sand”.

Gummy Ocean (1)

Prepare 1 package of clear vegan jel dessert according to package directions. Add drops of blue food coloring a few at a time until desired color is reached.

Gummy Ocean (2)

Cool slightly, then pour a layer over the orange dessert. Let chill and set for at least 1 hour.

Gummy Ocean (3)

Now for the real fun! Top your “ocean” with a little swimmer. We used peach gummy rings from Smart Sweets as life preservers and vegan gummy bears from Whole Foods.

Gummy Ocean (4)

Travis absolutely adored watching his bear go for a swim.

Gummy Ocean (7)

These were arguably more fun to play with than to eat… but good for eating, too!

Gummy Ocean (5)

Bugs vs. Birds

Bugs v Birds (3).JPG

To slip some subtle math and science into your child’s next summer nature walk, turn it into a tally hunt for bugs and birds. I told Travis we’d be counting both, and asked him whether he thought he would find more birds or bugs. He quickly replied birds, but then thought about it for a moment; we passed a bunch of flowers, already teeming with five bees. “Bugs!” he guessed.

Bugs v Birds (8)

To prepare a little scientific notebook, print out a picture of a bug and a bird, and tape or glue down to notebook paper. Now you can tally as you walk.

Bugs v Birds (1)

This will also be a great lesson on tallying and making marks in groupings of 5 (good for skip-counting!).

Bugs v Birds (5)

As we walked, Travis sometimes forgot to count, since there was so much else to see. Eventually we decided he would look out for bugs, and I was in charge of birds.

Bugs v Birds (6)

It quickly became apparent that bugs were far more abundant…so much so we eventually stopped our tally at around 35. Although hard to see, the picture above shows two beautiful dragonflies perched on a limb.

In short, this game is a great way to get your little one noticing nature on a closer scale, as well as to think about the differing populations of species within an area.

Tessellations

Tesselations (9).JPG

Tessellations are geometric patterns that perfectly fill an area with no overlaps. I remember making them using a computer program back in middle school, and marveling at the way the patterns could rotate or connect. Here is a highly simplified version that even a kindergartner can grasp, which can gently introduce your child to the concept.

Tesselations (6)

To make your tessellation, draw a line along one edge of a post-it with marker, in any shape, as long as the line extends from corner to corner.

Tesselations (1)

I had to help Travis a bit with this slightly odd instruction.

Tesselations (2)

Cut out along the marker line, then tape that piece onto the front of the post-it. Your tessellation is ready to go!

Tesselations (3)

Now trace this in a line across a piece of paper.

Tesselations (4)

Once you’ve filled in the paper, color each portion, ideally in a pattern.

Tesselations (7)

Travis did great careful work to color within the lines, and thought the final result looked a bit like the scoots on a turtle shell!

Tesselations (8)


Wonderful W

Wonderful W (2).JPG

Ok, we didn’t make W with any materials that begin with the letter, but Travis had good fun tracing and crafting this letter-of-the-day.

He loved discovering that double-u actually is more of a double-v. As he traced, we said, “down, up, down, up,” which served as a good reminder once the tracing line was removed.

This verbal cue also helped once we set out to make 3-D versions of the letter.

First up was markers! He positioned them as two v’s (down, up, down up) and so was able to see how the four markers should come together.

Wonderful W (1)

Next, we used two pairs of pants, as we did a few weeks back for the letter M.

Wonderful W (3)

Again thinking about “down, up, down up”, he was able to position them correctly.

Wonderful W (4)