DIY Burlap American Flags

Burlap Flags (7)

We have little American flags for Travis and Veronika to wave at tomorrow’s Fourth of July parade, but with a roll of burlap in our craft bin, we thought it would be fun to bring homemade ones along as well.

Cut burlap into little flags; these can be square, rectangular, or triangles, whatever your little crafters would like!

Burlap Flags (1)

I set out red, white, and blue paints, and Travis jumped right in.

Burlap Flags (3)

First he smeared lots of blue over his flag, but then remembered to include the other two colors from Old Glory as well. By the end, his flag was a pretty mix. Meanwhile, I made a sort of reverse-color American flag for him.

Burlap Flags (4)

Once the paint dries, hot glue onto dowels. You can leave the dowels plain, but we decided to paint those blue as well!

Burlap Flags (6)

Flowers for the Fourth

Flowers for 4th (7).JPG

Travis checked out the crafts in his July issue of Highlights just in time for the Fourth of July, with these suggested fun flowers; they make the perfect centerpiece at any picnic table or backyard barbecue or pool party for the holiday! Make as many or as few as your little crafters have patience for.

For each flower, cut out a small circle, a medium flower or star shape, and a large star shape from cardstock in red, white and blue. We traced cookie cutters, but feel free to free-hand these!

Flowers for 4th (1)

The trick for assembly is to alternate the colors of the flag.

Flowers for 4th (2)

I challenged Travis to layer our flowers so each contained all three colors, no repeats. He liked this step best!

Flowers for 4th (4)

Poke a hole through the cardstock. This step was a touch tricky; a pin worked best to pierce the thick paper but it made a very tiny hole. We carefully threaded a green pipe cleaner through and added a clear pony bead at the end. Wrap the pipe cleaner around the bead to seal.

Flowers for 4th (5)

Arrange your “flowers” in a mason jar for a patriotic presentation!

Flowers for 4th (6)

Long L

Long L (1)

L is an easy letter of the day for Travis to trace and we used some equally easy ways to form it today.

After tracing upper case L, I asked Travis to show me L with his left hand. He paused a moment to remember which is his left, but then flashed me an L.

Next he traced lower case l. We lined up all his crayons and I asked him to show me the longest crayon. It was a close call between pink and white, but white one.

Long L ((2)

Using this long crayon, I asked him to make me lower case l – just a long line!

Long L ((4)

History of the Flag

History of the Flag (1)

In anticipation of the 4th of July, Travis and I had a lesson about the American flag today, thanks to our Backyard BBQ unit from Raddish Kids. Recipes will follow soon, but for today, we had fun learning about the flag’s history and getting creative. Read on!

First I gave Travis a riddle: “I’m red, white, and blue, and starry too. What am I?” He had peeked (little cheater!) so knew I meant the flag. It’s fun at this point if you have a little flag that your child can examine and hold.

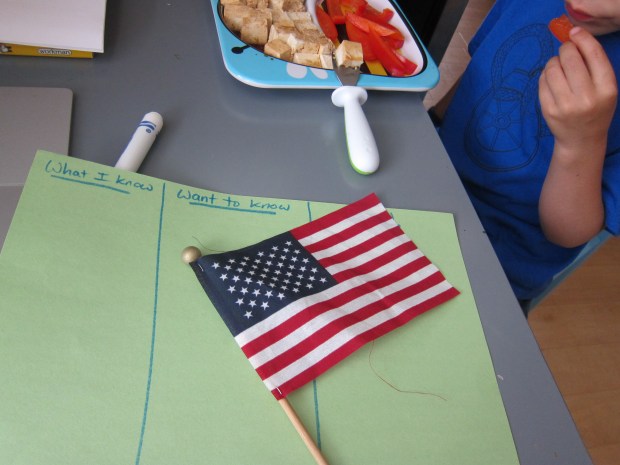
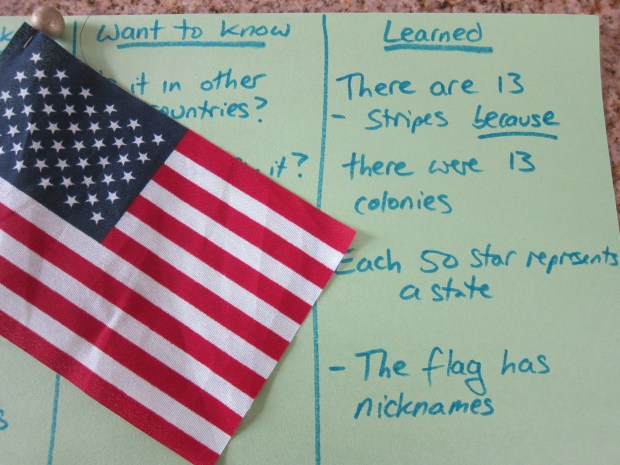
We made a chart known as a K/W/L graph with three columns: Things I Know; Things I Want to Know; What I Learned.

I asked him what he knew for starters, and he rattled off facts: the colors, the inclusion of stars and stripes, and that it’s our American flag, not another country’s.

History of the Flag (2)

Then we discussed what he wanted to know. I encouraged him to go deeper: why are there thirteen stripes or fifty stars, for example; why do we fly the flag. Now it was time for videos suggested by Raddish!

IMG_0001

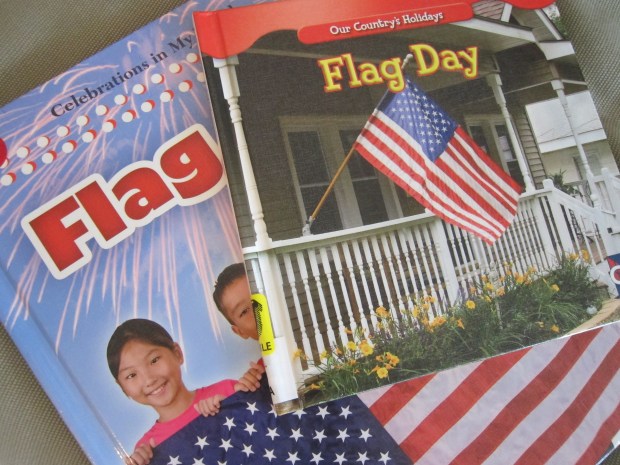
We looked through a few flag books, as well, for further facts. It was useful to have a world map handy so I could point out where other flags were from.

IMG_0002

Now he could fill in the final L column. I was so proud that Travis had learned about the thirteen colonies, for example, or nicknames for the flag like Old Glory.

History of the Flag (3)

So now for the crafty part: designing his own country flag. Being only 5 years old, Travis’s grasp of the project was limited; his was a very fantastical flag for a “snake country.”

History of the Flag (4)

We used cardstock as the background, and of course a coiled yarn snake needed to be in the center. Using stencils was an artistic way to add “symbols”. Big kids can go more in depth into which symbols exist on real flags, and why.

History of the Flag (5)

A tin foil canton (vocab word)!) in the top corner added shine, though soon this was embellished with an old train ticket and construction paper.

History of the Flag (7)

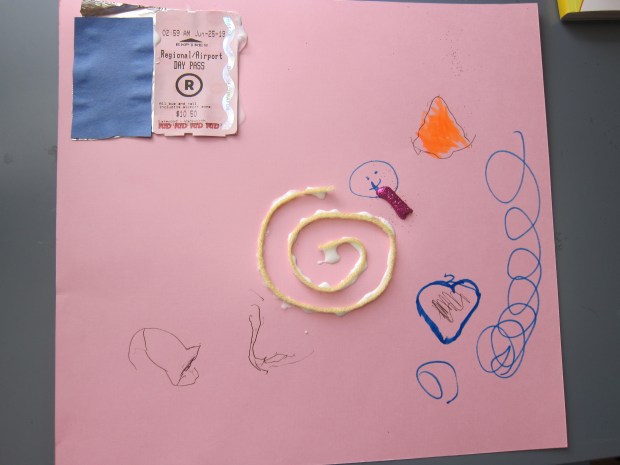
I loved watching his creativity even though his final result was quite busy for a flag. Please share about your own kids’ creations in the comments!

History of the Flag (6)

Chalk K

Chalk K (3).JPGFor today’s tracing letter, Travis and I only used one material, and one that ended with the letter’s sound rather than began with it: chalk, that is!

First he traced upper case K and lower case k on paper. Travis has a difficult time remembering where the two diagonal lines exit out from the straight line, so I knew our 3-D version would be very beneficial today.

I set out three pieces of chalk: 1 long and 2 short.

Chalk K (1)

I challenged him to make big K, angling the chalk pieces correctly. After just a brief pause, he mastered the upper case.

Chalk K (2)

Now for the real trick: could he convert it into lower-case k, moving the chalk pieces only slightly?

He didn’t miss a beat! Kudos, Travis!

Chalk K (4)

Animal Craft Challenge

Animal Challenge (6)

Travis loved this month’s craft challenge from Highlights magazine: to make an animal using nothing more than an empty egg carton, pipe cleaners, pom poms, and googly eyes.

I was thinking something cute and fluffy, but Travis immediately knew he wanted a snake! Pipe cleaners were the obvious choice for the body.

Animal Challenge (1)

We twisted several lengths together to make long snakes. He wanted to attach eyes next, but I asked him if he thought the eyes would affix well to the pipe cleaners. He decided no, and realized an egg carton piece could be the head!

We poked holes through the egg carton segments to attach heads to bodies, and glued on the eyes.

Animal Challenge (2)

With leftover egg carton portions all around him now, he toyed around with gluing pom poms and eyes to single segments, but this didn’t work very well. Could we use the bigger, lid portion of the carton we wondered, for a body?

Animal Challenge (3)

Now Travis knew what he wanted: a spider! We threaded four pipe cleaners through from one side to the other, to make 8 legs. He wanted to glue on 8 eyes, but we only had room for 5 eyes to march across.

Then Travis decided it needed to be furry with pom poms – a tarantula! He was so thrilled with this spider that he couldn’t wait for the glue to dry.

Animal Challenge (4)

What a wonderful craft challenge, thanks Highlights!

Animal Challenge (5)

Listen Like a Whale

Listen Like Whale (2)

Talk about a milestone; my five year old is finally brave enough to tilt his head back in the tub and get his face underwater. This was a big step for Travis!

We celebrated the moment with a fun experiment I’d been telling him about for a while, ever since learning about whales with Kiwi Co’s baleen whale crate.

All you need to do is tap two spoons together in order to experiment with how sound travels both above and below water. First we tapped them out in the open air.

Listen Like Whale (1)

Next I tapped them underwater while his head was above water. The sound was quite muffled.

Listen Like Whale (4)

Now he leaned back until his ears were underwater, and he was able to hear the sounds much more clearly. “It also sounds deeper,” he commented, though I can’t say for sure if this was the case since my ears weren’t under there. Either way, he was quite happy to have done the experiment, and I think our little whale spout cover concurred!

Listen Like Whale (5)

The idea here is to illustrate why whale song can travel for hundreds of miles through ocean water; sound travels farther and faster in water than it does in air!

Bean Picture

Bean Pictures (6)

Engage your child’s budding artistic skills and fine motor skills with this quick project!

I invited Travis to draw anything he liked on thick watercolor paper, but suggested it needed to be something he could truly draw – not a “scribble scrabble” as he’ll do when he’s joking around. He thought about this and decided on a person.

Bean Pictures (1)

I love the way he draws people at age five: a very big head with round cheeks and small facial features, then tiny stick arms and legs.

Next I had him squirt glue all along the lines he had drawn. He took this mission very seriously.

Bean Pictures (2)

Finally, it was time to cover his person with dried beans. He laughed as he worked about “Mr. Bean,” and carefully added beans along every bit of glue.

Bean Pictures (3)

Near the end, he decided it wasn’t Mr. Bean after all… It was his baby sister!

Bean Pictures (4)

She needed a sun to stand under, so he penciled in a second circle, and insisted we cover that with glue and beans, too!

Bean Pictures (5)