The Magic of Mulch

Magic of Mulch (3)

For a final science experiment in his summer workbook, Travis learned a bit about gardening and soil. You’ll need potting soil for this experiment, as well as any “mulch” that your child gathers, either from your yard or on nature walk. Simple dried leaves and pine needles work just fine!

Travis helped measure out potting soil into two small plastic containers, making sure each contained the same amount (we used 3/4 cup soil per container). Add water to make the soil very wet, and again measure to make sure the containers have an equal amount; we used 1/2 cup.

Magic of Mulch (1)

Now cover only one with the mulch you’ve gathered. Travis proudly patted this on.

Magic of Mulch (2)

Place the containers some place sunny and wait 3 days!

After the third day, we headed out to check on our soil, but rain had skewed our results! The idea was that the soil with mulch should remain moister, but instead, both our containers were swamped. Luckily, we had a teachable moment; the soil with no mulch was washed away completely. But the soil under the mulch had been protected! So without intending too, Travis also learned how mulch enhances a garden’s drainage.

Magic of Mulch (4)

He finished the lesson by answering a few workbook questions about the experiment, which was a great chance for inventive spelling.


Mayflower Soap Ship

Mayflower Soap Ship (3)

Here’s an easy history lesson for “summer school”, if you’re helping kids transition back towards an academic mode for the fall. It’s a project that’s equal parts history, STEM, and play!

To start, I wanted Travis to learn a bit about the Mayflower ship that carried the Pilgrims to America, and we found an online read-aloud for kids on YouTube. Travis was thunderstruck (pun intended) by images of the voyage across the ocean as the ship was caught in storms and waves.

Mayflower Soap Ship (9)

Once he finished the video, it was time to create our own ship! Ideally you’ll want a bar of soap that floats for this project and be careful because not all do. Ours was a heavy soap and had a tendency to sink, but we could always nudge it gently back to the top.

To make the sails, cut construction paper (Travis chose blue) to the same size as the soap bar, and tape these “sails” to toothpicks.

Mayflower Soap Ship (1)

Insert the toothpicks into the soap.

Mayflower Soap Ship (2)

Travis sent his boat out to sea! Blow gently on the sails and watch the boat move.

Mayflower Soap Ship (4)

Again, this was tricky since we had to rescue our soap from the bottom of the basin a few times, but Travis loved that he could move it along, and learned a bit about how real sailboats operate.

Mayflower Soap Ship (5)

And then of course he gave his Legos a ride!

Mayflower Soap Ship (7)

Finish the project with a drawing of the boat to add in a little art to the mix!

Mayflower Soap Ship (8)

Go Bowling

Go Bowling (4)

When there’s an extra two weeks of summer to fill because of coronavirus, it’s time for a Camp Mom field trip. What I really wanted was to take the kids out bowling, but the idea didn’t feel safe. What was Camp Mom to do?

Bring the bowling alley in!

There are so many ways you can bowl at home (empty bottles, glowing empty bottles, etc.), but for maximum impact, it was time to splurge. A giant unicorn bowling set cost as much as a single afternoon at the regular bowling alley, but this one will last us much longer.

Needless to say, the unicorns themselves were a pure delight.

Go Bowling (3)

As I inflated the set with a hand pump, the kids each grabbed one and began to run around. Travis paraded them and tossed them in the air. Veronika was about the same height as a unicorn, and would just run up to one and yell “whoa!” and then knock it over.

Go Bowling (1)

They loved holding them by the horn and trotting them around.

Go Bowling (2)

Once the set was fully inflated, we set the pins in a classic triangle, and took aim with a giant rainbow ball. Travis soon had the hang of rolling it…

Go Bowling (5)

…or kicking it.

Go Bowling (9)

He loved watching the unicorns topple! We played inside today while the grass was wet, but we’ll be heading outside with this one soon.

Go Bowling (7)


Road Signs

Road Signs (1)

Travis is officially a bike rider! It’s an exciting milestone, but it also means it’s time for him to learn basic road safety. Here’s a fun game to help kids learn the signs they might encounter as they are out and about.

First up was a real bike ride, with the special assignment to pay attention to any signs he saw. Travis took note of several we passed, including stop and yield.

Road Signs (7)

I then printed out pictures of common signs; once we were home, we could role play! Travis buckled on his helmet (for safety of course…and little sister too!) and then the “bikes” were off. As I held up each of the signs, the kids had to do a corresponding action.

Green light meant jog forward.

Road Signs (3)

For a left turn arrow, he practiced making the left turn hand signal (arm straight out to the left) and spun circles to his left.

If I held up a right turn arrow, he made the right turn signal (left arm in an L pointing up) and spun to the right.

Road Signs (2)

Stop sign meant he stopped and made the stop hand signal (left arm in an L, pointing down).

The yield sign meant to look out for oncoming (little sister) traffic!

Road Signs (6)

He could only walk in one direction if I held up One Way.

And finally the favorite: if I held up the Slippery When Wet sign, it was time to wiggle and slip and slide!

Road Signs (4)

This was a great way to get kids thinking about road safety in an approachable and fun manner.

Road Signs (5)


DIY Sprinkler

DIY Sprinkler (3)

Childhood + summer + sprinklers pretty much never gets old, but if you need a quick sprinkler reboot after the umpteenth hot day of the summer, here’s a homemade version that will delight toddlers and big kids alike.

Use a hammer and nail to make holes in the bottom of an empty gallon water jug. I worried the plastic would be too thick, but this is actually remarkably easy to do. That said, the nail made very small holes so we did then widen them slightly with a rotary tool.

Toddler DIY Sprinkler (1)

To then transform it into a sprinkler, insert a hose, turn on the water and the water will rain down through the holes.

DIY Sprinkler (1)

I simply held this by hand, but you could also rig it up for lasting fun; anything tall like a basketball hoop or tree branch would work, in which case you might want duct tape to hold it all in place.

The kids loved to take turns holding it, too, turning it into almost a watering can over the bushes…

DIY Sprinkler (8)

…and sidewalk.

DIY Sprinkler (9)

Veronika loved stomping in the leftover puddles!

DIY Sprinkler (6)

Travis was thrilled he could make patches of mud.

DIY Sprinkler (7)

And of course they loved catching the water drops as they rained down.

DIY Sprinkler (2)

My kids are hesitant about actually jumping right under a sprinkler, but yours might want to shower directly under the spray!

DIY Sprinkler (5)

Little Passports: India

LP India (12)

Travis has Indian heritage on his father’s side, so he was especially excited to receive this package from Little Passports! It was a great chance to learn more about the culture. The booklet was, unfortunately, advanced for a 1st grader, involving tricky patterns to find and solving for missing letters in an Indian menu.

LP India (3)

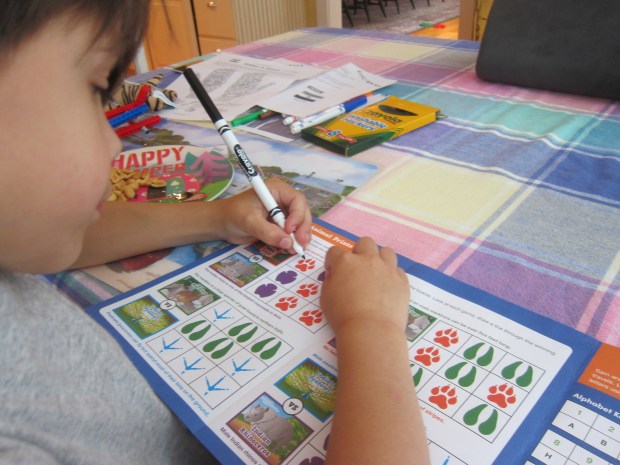
But he enjoyed monthly activities like adding stickers to his passport and world map, and coloring in India’s flag.
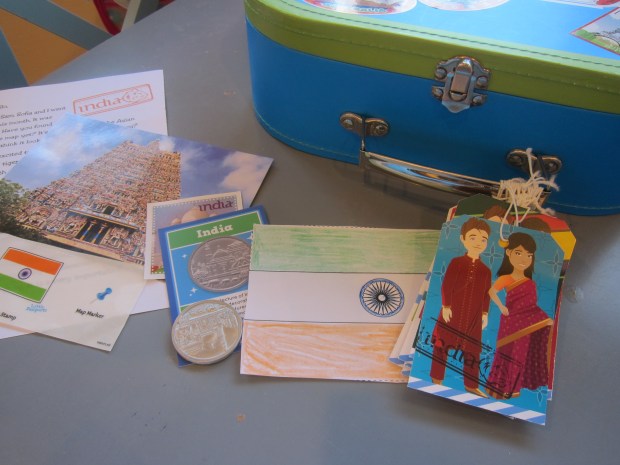
Souvenir:

Luckily, the souvenir hit it out of the park; you can’t go wrong with a stuffed animal! That’s exactly the surprise that was waiting inside, an adorable Bengal tiger to represent India’s national animal.

LP India (1)

Further Activities:

From here, we headed over to the web where there were additional fun activities like a sort of “hidden pictures” image of hennaed hands.

LP India (5)

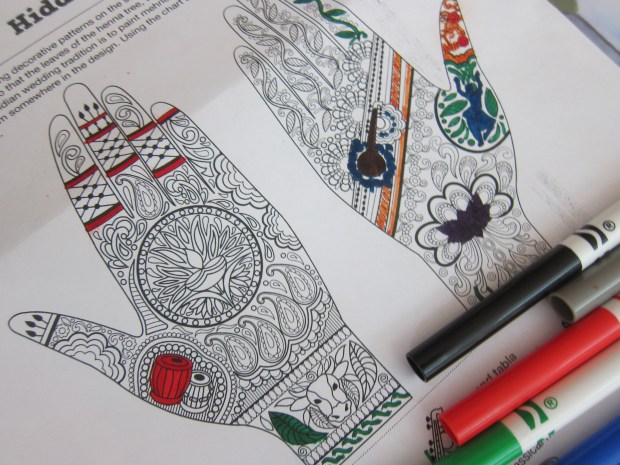
Travis was so proud to spot the sitar, lotus flower, and more! This was intricate to color in, and a great mommy-son project.

LP India (4)

There was also a recipe for Holi powder. A note of caution: this project was not only messy, but also didn’t work for us. In a bowl, stir together 1 cup flour and 1/2 cup water. The instructions said we should have a thick paste, but we had more of a sticky dough. Add drops of food coloring, use a rolling pin to flatten into a disc, then let dry overnight.

LP India (9)

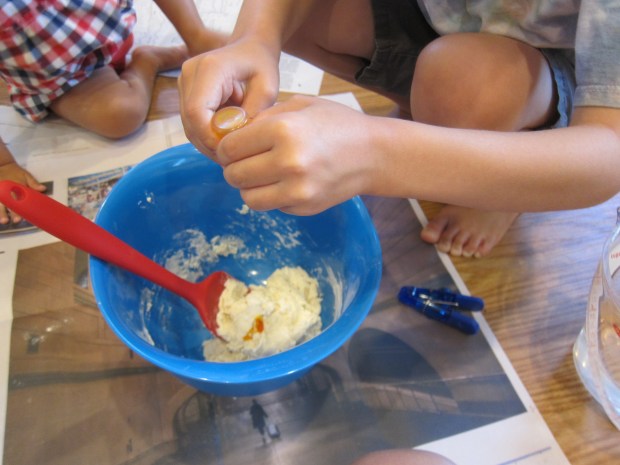
Because the mixture is so sticky, I added additional flour, which may have been part of the problem. I also tried to contain the sticky mess in plastic wrap, which may have been an additional problem. Needless to say, our “paint powder” didn’t dry out, and we really only had a sticky pile to try and crumble with mortar and pestle the next morning.

LP India (13)

If this works for you, please share in the comments!

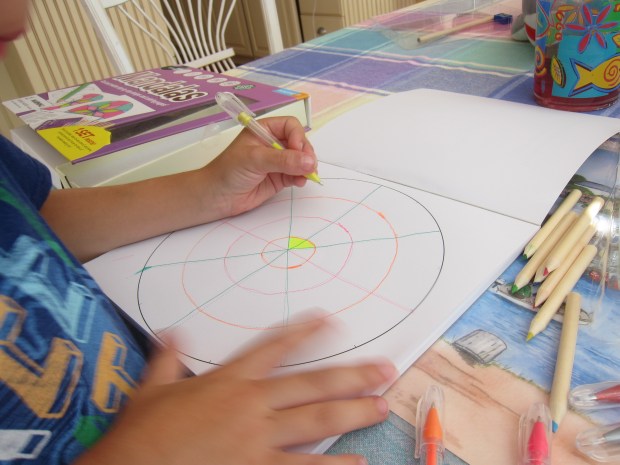
Luckily, the final project, this month’s add-on from Little Passports, was a mandala art kit that Travis quite enjoyed.

LP India (8)

He was thrilled watching me demonstrate how to make patterns on the provided circular paper, and then loved making up mandala designs in his own way.

LP India (6)

The kit comes with sparkly gel markers and he adored the colors, following along the lines with them, and then shading in. These make lovely gifts!

LP India (7)

Recipe:

We finished with dessert, a riff on the Indian frozen treat of kulfi. Grind up shelled pistachios in a food processor ahead of time, and then the rest of this recipe will come together in a flash.

Ingredients:

  • 2 (11-ounce) cans sweetened condensed coconut milk
  • 1 cup non-dairy creamer
  • 2 teaspoons cardamom
  • 1/2 cup ground pistachios
  1. Stir together all the ingredients in a large bowl.
  2. Pour the mixture into Popsicle molds (or paper cups with craft sticks inserted in the center). Freeze until firm.

Kulfi (2)

These hadn’t quite frozen all the way for us by dessert, but we spooned into the molds like it was a dish of ice cream – yum!

Kulfi (4)

Abstract Couch Art

Abstract Couch Art (2)

If you want to challenge your child to make art but don’t have craft supplies on hand, here’s an alternative: raid the couch and make sculptures!

To help Travis understand the idea, I first challenged him to make a burger.

With a pile of clean laundry on hand, we used two pillows as the buns and then layered in lettuce (a green shirt), carrots (an orange shirt), cheese (a white shirt), and tomato (a red shirt).

Abstract Couch Art (1)

Now it was up to Travis to think of which sculpture he could make next. This time he chose a Star Wars character, and although not the direction I would have gone in, I was proud he came up with the idea on his own.

Abstract Couch Art (3)

Pillows formed the head and body, and he added accessories (a mask, cape, and gloves) to complete the work of art.

Abstract Couch Art (4)

What will your child make from couch pillows? Please share in the comments! 

Outside Summer Learning

Outside Summer (3)

If you want to squeeze in a little learning even on vacation, here are three quick ways to hone observational or STEM skills, in the guise of simply having fun!

I was actually excited to wake up one vacation morning to a rainy day because I wanted Travis to observe… raindrops! Stand someplace protected with your child and watch them fall down. I asked Travis his guess as to what shape the droplets would make.

Outside Summer (1)

His hypothesis was an oval, so I played devil’s advocate and guessed a circle. We decided they were more circular but some were larger in diameter than others. They also made neat beads on the screen doors. Throughout the day, we watched them make big puddles on the car sunroof, or diagonal streaks on the patio when the wind whipped harder.

If your budding scientist wants to, record any findings in a notebook using words or pictures!

The next day we had sunshine and squeezed in a quick mapping exercise, in the guise of a treasure hunt. Travis decorated a bag with seashell stickers (you could also use an old shoebox) and hid a few pieces of “pirate treasure” inside.

Outside Summer (4)

Travis hid the treasure to be guarded by a sleepy gnome. Now, his job was to direct a family member to the booty using only three clues. I was so proud he devised these on his own: there was a dirt path, there were steps, and someone was sleeping nearby!

Finally, we returned to a classic sort of color hunt, but this time Travis had to spot five colors from inside the house first, and then find those same five colors outside. A huge art kit full of crayons was the inspiration. Outdoors he matched beige to a mushroom…

Outside Summer (5)

…and vivid reds and purples to the flowers.

Outside Summer (6)

There’s nothing like the palette of a vacation spot to inspire some learning!

Outside Summer (7)

Beach Day Sun Clock

Beach Day Sun Clock (2)

Should you find yourself on the beach for a full day, or even just a span of a few hours, there’s no lovelier way to mark the passage of time than to make a sun clock!

To start, Travis needed to find a stick that we could poke in the center of our dial. But the beach was short on sticks! A sturdy piece of sea grass did the trick instead.

Beach Day Sun Clock (1)

We took note of the first shadow (around 1 pm) and marked the line with stones and shells. It was neat to see how quickly the shadow “ticked” along, already a new line we could mark at the next quarter hour.

Beach Day Sun Clock (3)

It turned into a fun game, too, to protect the sun clock (soon dubbed the ‘Castle of the Sun’) from waves, using moats and mounds of sand.

You can continue the fun with additional rocks and shells for as long as you stay at the beach, marking each new hour or half hour shadow as it appears. And at the end of the day, take the collection of rocks and shells home!

Make a Mini Troll

Troll Statue (5)

After reading in Highlights magazine about an artist who makes troll sculptures from wood and recycled materials, Travis was eager to make his own. A walk to a nearby beach was the perfect opportunity to collect pieces of bark, branches, and wood shavings on the ground.

Troll Statue (1)

We returned with a plastic bag full of pieces and now needed to design the troll! Travis loved setting this out, initially with the troll lying down.

Troll Statue (2)

He carefully arranged arms, legs, and a head.

Troll Statue (3)

I then used hot glue to make his creation stand up in 3D. We even added a little orange peel as a hat!

Troll Statue (4)

What a ferocious little troll it was, and a neat concept to boot.