Milk Jug Bird Feeder

Milk Jug Feeder (8).JPG

It’s that time of year when we start thinking about our feathered friends, providing them with seeds for the colder weather ahead (even though it’s been unseasonably warm!). In the past we’ve made everything from pinecone feeders to a little cafe. I wanted to try this version because it looked nice and roomy for the birds, but it posed a bit of a vegan challenge: the base of the feeder calls for a gallon milk jug. I briefly considered reusing a relative’s milk gallon, but had a hunch the non-dairy milk bottle from Califia Farms would work. It does, but grown-ups, do take care in the step below that calls for an Xacto knife and scissors!

Milk Jug Feeder (1)

First, cut a window in the front of the jug for birds to fly into. I started this with a knife, and finished the cut-out with scissors.

Milk Jug Feeder (2)

You’ll also need to make a hole near the top of the bottle to thread through yarn.

Travis took great pride in painting this project, everything from selecting the color blue…

Milk Jug Feeder (3)

…to mixing shades of blue…

Milk Jug Feeder (4)

…to making sure every last bit was covered.

Once the paint had dried, I tied yarn through the hole in the top and we headed outside.

Milk Jug Feeder (5)

Travis loved scooping in the bird seed.

Milk Jug Feeder (6)

Find the perfect spot to hang your feeder, then wait for your feathered friends to arrive!

Milk Jug Feeder (7)


Acorn Owls

Acorn Owls (3)

It’s autumn, and for us that means the best time of year for nature walks. Some of the supplies we bring home are perfect to play with together, crafting into games or animals. But this one was more of a grown-up project that I put together for Travis, involving very fine fingerwork. He loved playing with the resulting toy! Bigger kids can, of course, help make the “owls” as well.

The longer and taller an acorn you can find for this project the better, and you’ll also want acorns without the caps. My acorns actually weren’t ideal, but I worked with what I had after a pretty stroll.

Acorn Owls (1)

Cut out tiny owl features from various colors of felt. We had pink wings and yellow beaks. If I had been patient enough, I would have cut small felt eyes, but instead used a sharpie for this final step.

Acorn Owls (2)

Glue on the details, and let dry completely. You can also cut out a felt tree or branch for the owls to hang out on. Travis delighted in these little creatures.

Acorn Owls (4)

Perhaps next time we’ll turn our acorns into different animals – what would you suggest? Please share in the comments!

Acorn Owls (5)

Wild Moves

Animal Moves (6)

I was a bit surprised to find no craft or Green Time in Travis’s latest issue of Ranger Rick Jr., but the magazine was full of fantastic facts and stories about animals, as always. It also included an activity to work those gross motor skills: copying the movements of wild animals.

First up was hopping like a kangaroo. This one was especially neat because the magazine pointed out that a kangaroo can jump 30 feet in one bound (!). We needed to pull out the yard stick to visualize that, and measured our own jumps.

Animal Moves (1)

From there, we tried the article’s other suggestions, which had us waddling like a penguin, flapping like a duck, and pouncing like a cat.

Animal Moves (2)

Travis was having so much fun that I encouraged him to decide which animal move he could do next. Soon we had slithering snakes;

Animal Moves (3)

Trumpeting elephants;

Animal Moves (5)

And a very ferocious lion (pictured at the top of this post).

A great prompt for imagination and to get us moving.

Animal Moves (4)


Color Wheel Gecko

Color Gecko (12)

This project requires a bit more adult set-up usual, but is so worth the effort for the learning and beautiful final product! It’s a fun way to introduce the concept of primary and secondary colors to kids and has a fun animal theme thrown in.

Geckos or chameleons are the perfect creature to illustrate the color wheel because they can camouflage, or change their color to reflect their surroundings. If you want, start off this project with a read of Leo Lionni’s A Color of His Own – then get crafting!

As mentioned, a lot of the set-up here will be for grown-ups only, unless your kids are 1st grade or above. But Travis pretended he was a teacher giving a lesson on geckos while I worked!

Color Gecko (2)

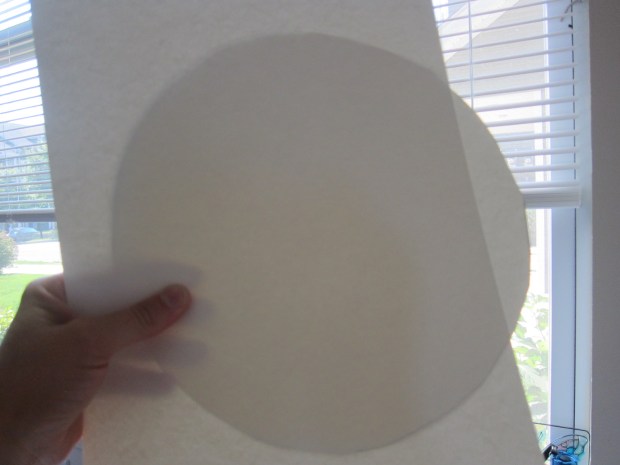
First, trace a circle onto watercolor paper using a paper plate as a guide. Cut out.

Color Gecko (1)

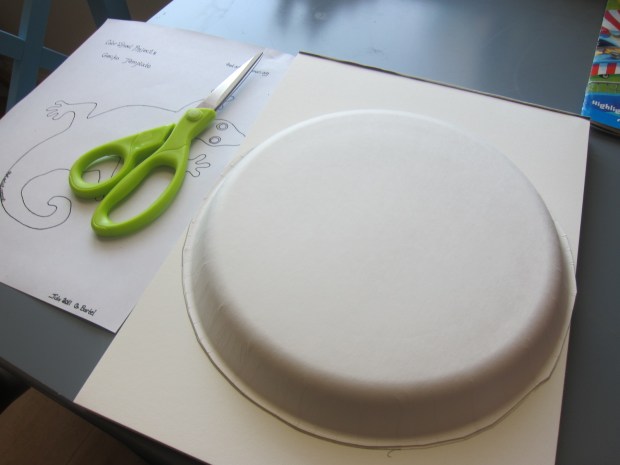
Place the circle over a second piece of watercolor paper, leaving a bit of the circle hanging off the edge (this is the handle that kids will spin later on). Use a pencil to mark where the center of the circle is on the circle itself and on the background paper. If you hold the paper up to the light, you can mark the back as well. Trust me, you’ll want this point as a guide later!

Color Gecko (3)

Cut out the gecko template, and trace onto the background paper, making sure he doesn’t cover that center mark you’ve made.

Color Gecko (4)

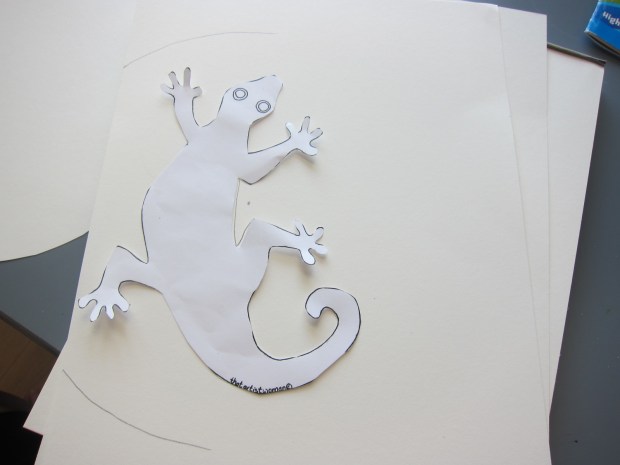
Now you need to cut out the traced gecko. Grown ups can pierce a hole with scissors and cut out, but if your kids want to do this step themselves, it may be easier to cut in half along the gecko, cut him out, and then tape the paper back together with painter’s tape. See this link for a full demo.

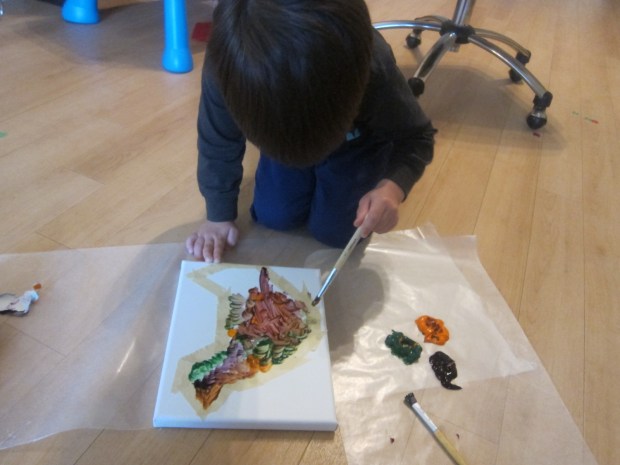
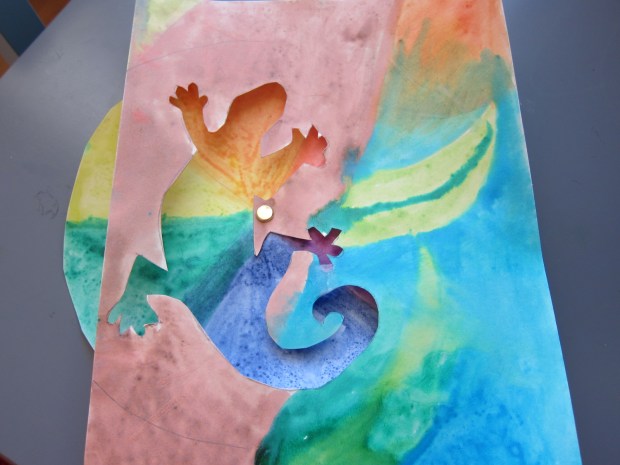
Now it was time to paint! Grab your circle and a set of watercolors. Travis watched as I divided the wheel into six segments and we discussed the primary colors: red, yellow, and blue. Meanwhile, he couldn’t want to start painting his own scene, talking about what colors he chose.

Color Gecko (5)

As I filled in each secondary color on the wheel, I had him guess what we’d make first. “If I have red and add yellow, we get…” “Orange!” he predicted.

Color Gecko (6)

Looks like those art classes are paying off! You can mix up your own version of each secondary color on a paper plate, or just cheat and use watercolors from your set – I won’t tell!

Color Gecko (8)

While Travis continued to paint watercolor masterpieces on blank paper, I painted a background scene for our gecko, a little tree with green leaves, blue sky, and a bit of peachy sunset (on Travis’s request). We left our watercolors to dry overnight.

Color Gecko (7)

In the morning, poke a paper fastener through the color wheel and your background page, so the ends of the fastener are on the back. Fold over to secure.

Color Gecko (10)

Travis was so excited by the way the colors could spin and how he could watch his little gecko change color. “Now he’s blue! Now he’s green!”

Color Gecko (11)

This project was an absolute delight.

Handprint Farm

Hand Farm alt

My formerly fingerpaint-averse boy finally doesn’t mind paint on his hands, thanks to some crafts at his preschool, and I seized the opportunity to put together this adorable handprint painting. It’s a cute way to learn about animals on farm sanctuaries while capturing a palm-sized memento.

The goal was to make 3 animals: a pig, a cow, and a sheep. For the pig, paint your child’s palm completely pink. Press onto a piece of paper with the fingers pointing down as the legs. Whoops, our pig was sideways, but we just worked around the oops!

Hand Farm (1)

For the cow, dot black or brown paint onto your child’s fingertips, and make a few additional dots in the palm. These will be the cow’s hooves and spots. Press onto the paper.

Hand Farm (2)

I didn’t have yellow tempera paint at home, only dot markers, which Travis didn’t want all over his hand. So we ended up with a mommy-sized yellow chick! Press onto the paper with the fingers to the side, as the tail feathers.

Hand Farm (3)

Once the paint dries, you can draw in noses, beaks, tails, eyes, and other features to complete the picture.

Hand Farm (5)

Your kids may want to paint a farm background as well!

Hand Farm (7)

Make a Changing Caterpillar

Butterfly (9)

After a recent documentary on Bugs, Travis is in love with caterpillars. It was perfect timing for a story unit on caterpillars turning into butterflies in our latest Ranger Rick Jr. We downloaded the template and put together this neat felt project that illustrates metamorphosis beautifully.

A note on the project: unless your kids are at the upper age range of Ranger Rick Jr., grown-ups will likely need to assemble the caterpillar and butterfly. But then the kids can play with it!

First, use the template to cut the large butterfly shape from black felt. Cut the small butterfly shape from orange felt, and glue onto the black. (You’ll need fabric glue or a hot glue gun). Set aside.

Butterfluy (1)

To make the caterpillar, cut a rectangle from black felt. Cut a long strip from felt for the antenna (Travis wanted blue instead of black). Fold the strip into a V and glue onto the top of the black body. Add two stripes each of yellow, white, and black felt. Glue on googly eyes (Travis wanted 3 eyes, not 2, hence the odd appearance!) and then 2 eyes onto the back.

Butterfly (2)

For the final component, cut the large butterfly shape from green felt. Glue onto the back of the black butterfly; this will be your chrysalis.

To put it all together, attach 2 Velcro dots to the body of the caterpillar on the black stripes, and line up with Velcro dots on the butterfly’s body.

Butterfly (4)

Place additional Velcro dots on the left top and bottom of the black butterfly wing, and then on the opposite sides of the green “chrysalis” so you can fold it closed.

Butterfly (5)

Now it was time for Mr. Caterpillar to crawl into his butterfly wings and fold himself up into a cozy chrysalis.

Butterfly (6)

Travis loved it! Note: You can also attach a string to the green felt so the chrysalis can hang.

Butterfly (7)

Open back up again for the butterfly transformation.

Butterfly (8)

Egg Carton Baby Animals

Egg Chick (6)

We upcycled our relative’s Easter egg carton to make these cute spring-themed animals. In all honesty, Travis lost interest very quickly, but I still made the animals because we need signs of spring around here! (Yup, there’s more snow in the forecast for tomorrow…)

There are plenty of steps for kids to help out with – cutting out the carton sections and animal templates, gluing everything on, and adding marker decoration if they would like.

First, cut an egg carton into segments. Cut out as many as you’d like, to have a whole menagerie of baby spring animals!

Egg Chick (2)

I used pastel-colored paper and free-handed the shapes to add on to each animal – long ears and rounded paws for a baby bunny; pointed toes, a crest, and wings for a baby chick.

Glue on the paper pieces and let dry.

Egg Chick (4)

Finally, I used permanent marker to make eyes, a white pom-pom for the bunny’s nose, and a diamond shape cut from paper for the chick’s beak.

Egg Chick (5)

What animals would you and your kids make? Please share in the comments!

Egg Chick (7)

Pinecone Hedgehog

Pinecone Hedgehog (4).JPG

Finally we have treasures from our first foray into spring nature walks! What animal did we bring home from our little “safari”? We decided to turn these pinecones into hedgehogs!

First, cut pipe cleaners into pieces about 2 inches in length and set out a cup or dish of white glue.

Pinecone Hedgehog (1)

Travis worked to dip the end of each pipe cleaner into the glue and we nestled them between the scales of the pinecone.

Pinecone Hedgehog (2)

A few finishing touches were all the hedgehog needed. A little glue helped us add a pom pom nose and felt pieces for ears.

To affix googly eyes, we first bent a small piece of pipe cleaner in half, then glued on an eye. Wedge the pipe cleaner ends into the pinecone with a little more glue to hold in place.

Pinecone Hedgehog (3)

What a cute critter – a little prickly though!

Pinecone Hedgehog (5)

Fingerprint Bird Painting

FIngerpaint Bird (6)

I originally planned this springtime-themed painting to be a fingerprint memento – I love capturing the size of Travis’s hands and fingers (and feet!) periodically. Turns out that Travis had different plans… but we still ended up with a great painting!

To make the project feel special, I purchased a real (small) canvas from the craft store – instantly things felt elevated above using regular paper!

Make the shape of a bird on the canvas using masking tape. Big kids will be able to tackle this step themselves, and little kids will like to play with leftover tape!

Fingerpaint Bird (1)

I set out fingerpaints for Travis and showed him how to dip in his fingertips and fill in the bird shape.

Fingerpaint Bird (2)

He very quickly decided he preferred a brush, and began filling in the bird that way. His brush strokes looked incredibly feathery, just like bird wings.

Fingerpaint Bird (3)

I loved the texture he was able to create!

Fingerpaint Bird (4)

So… not the fingerprint memento I had intended, but we still have a lovely work of art to welcome spring.

Fingerpaint Bird (5)

Pressed Tiles

Pressed Tiles (13)

It’s rare that I can grab Travis’s interest for more than 30 minutes of crafting these days, so when this activity occupied us for nearly an hour, I knew we had a winner!

I came home with a new package of oven-bake clay, quite different from the white air-dry clay we normally use.

Pressed Tiles (1)

Travis was thrilled with all the colors, and in no time he had an assortment in front of him for chiseling, shaping, and rolling.

Pressed Tiles (7)

To make a lasting project, we used our collection of stamps – animal and pirate-themed sets worked perfectly – and pressed images into the clay. Once baked, I knew these tiles could be used for numerous games!

Pressed Tiles (2)

For the cleanest method, press the clay into a square, cover with plastic wrap, and press the stamp on top.

Pressed Tiles (6)

Travis didn’t always use the plastic wrap, which was just fine.

Pressed Tiles (5)

He mostly did his own thing with the stamps and clay while I made an actual set of tiles we could use in the future. I confess my fingers hurt by the end from warming up so many different colors and flattening to 1/4-inch thick! Travis meanwhile pretended he was baking some of his in an “oven.”

Pressed Tiles (10)

When it’s time to really bake the clay, arrange your tiles on a parchment paper-lined baking sheet and bake according to package instructions – ours went in at 275 degrees F for 30 minutes.

Pressed Tiles (8)

Now what to do with them! We decided we could use these as a more permanent version of our printable story cards.

Pressed Tiles (12)

You can also play games with the animals, assigning them by habitat or finding other ways to sort them.

Pressed Tiles (11)

If you want any of your tiles to be jewelry, make sure to poke a hole with a toothpick before baking. However you use them, these tiles are great for arts and crafts, fine motor skills, imagination, and more.