Cinnamon Ornaments

Cinnamon Ornaments (10)

Did you know you could make dough just from cinnamon and applesauce? Nor I, but here’s the perfect dough to craft holiday ornaments, thanks to Travis’s Ranger Rick Jr.. Once the cinnamon is in the oven, your whole house will smell like Christmas!

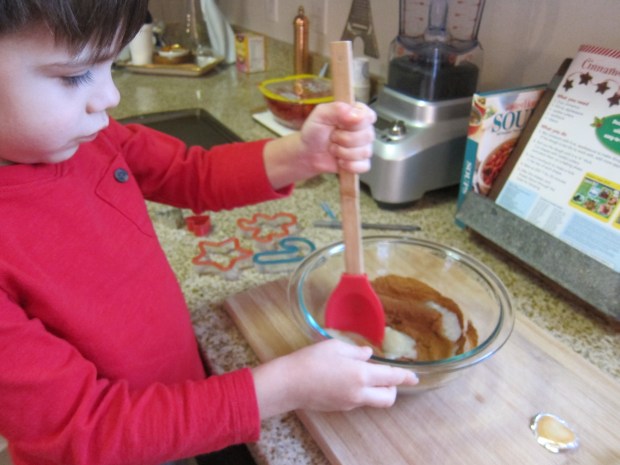
Travis loved concocting the dough. Simply dump in 1 (2-ounce) jar of cinnamon into a bowl. Careful to pour slowly so you don’t get cinnamon in your face!

CInnamon Ornaments (2)

Add 4 ounces applesauce, stirring until very well combined.

Cinnamon Ornaments (3)

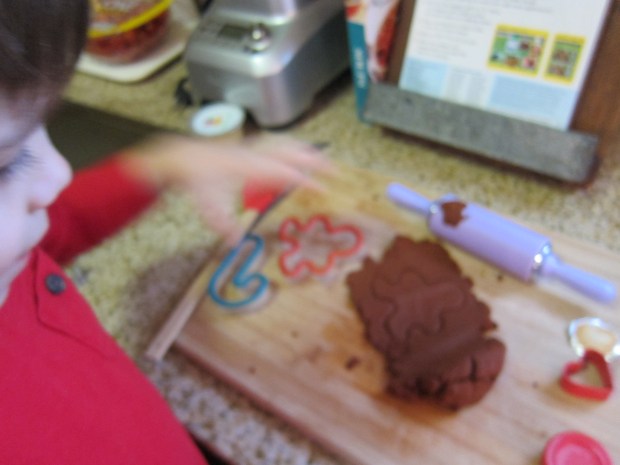
Turn the dough out onto a cutting board and use a rolling pin to flatten to about 1/4-inch thick.

CInnamon Ornaments (5)

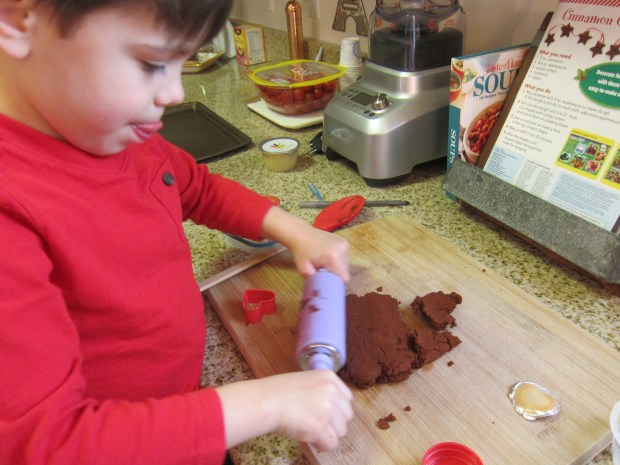
Travis was so excited we got to use our holiday-shaped cookie cutters for the first time since last Christmas.

Cinnamon Ornaments (6)

He loved selecting which shape to use each time we rolled the dough.

Cinnamon Ornaments (7)

Carefully transfer to a baking sheet.

Cinnamon Ornaments (8)

Use a toothpick to poke a hole in each ornament, then bake at 200 degrees F for 20 minutes.

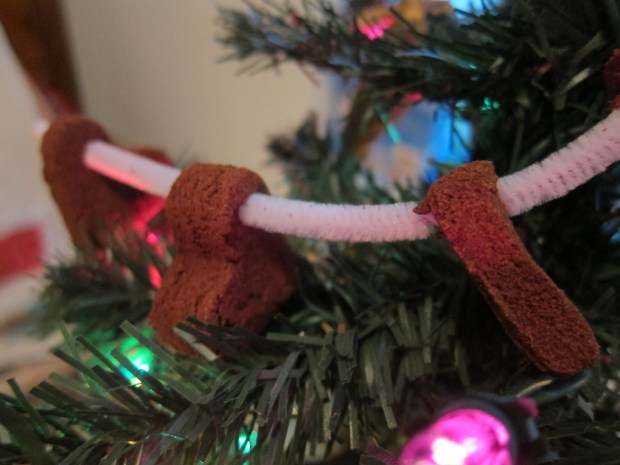
The instructions says to thread pretty ribbon through the holes, but the toothpick holes were much too small for this. Next time I would punch out holes with a straw. Thinking quickly, we threaded the ornaments onto pipe cleaners, instead.

Cinnamon Ornaments (9)

Thread several onto one pipe cleaner (or ribbon) for a pretty garland, or make singles to hang as ornaments. Either way, these would also be wonderful to give away as gifts!

Bright Bean Salad

Bright Bean Salad (6)

This main dish salad from the December issue of High Five magazine is just gorgeous – bright indeed! The dominant colors of red and green would make it right at home in a Christmas holiday spread… or just make it any night with your kids!

Travis loved that the recipe involved kids every step of the way, including actions he’d never done before like washing the vegetables, chopping (!), and draining cans of beans. This was definitely a “next level” recipe in his cooking skills. I did a bit of the tough chopping (the green onions, cilantro, and spinach) ahead of time; judge accordingly for your kids.

Ingredients:

  • 1 (15-ounce) can black beans
  • 1 (15-ounce) can pinto beans
  • 1 (15-ounce) can corn
  • 2 large red potatoes
  • 1 red bell pepper
  • 1/2 cup chopped green onions
  • 1 bunch chopped cilantro
  • 2 and 1/2 cups chopped baby spinach
  • 1 (16-ounce) jar mild salsa
  1. Adults: Ahead of time, cook the potatoes in boiling water until tender; let cool.
  2. Drain and rinse the cans of beans. This was Travis’s first time using a can opener – he loved learning how the mechanism works! Use half of the beans for this recipe (about 1 and 1/2 cups) and reserve the remaining beans for another use.Bright Bean Salad (1)
  3. Drain the corn.
  4. Wash the bell pepper, then cut the bell pepper and the cooked potato into pieces. I let him help me with the knife the whole time, so couldn’t snap a picture, but he was so proud.Bright Bean Salad (3)
  5. In a large bowl, combine the beans, corn, potatoes, bell pepper, green onions, cilantro, and spinach.Bright Bean Salad (4)
  6. Stir in the salsa until well combined.Bright Bean Salad (5)

We served this over tortilla chips the first night for easy “nachos.”

Bright Bean Salad (7)

It would also be great wrapped up in soft tacos…

Bright Bean Salad alt

…or served over scrambled tofu!

Bright Bean Salad alt.JPG

Fruit Boats

Fruit Boat (3).JPG

Origami boats might be fun to play with, but fruit boats are even bettert\ to eat! After a busy school day, Travis helped me create these adorable boats for snacktime.

First, cut a whole cantaloupe into wedges. Travis asked at first if it was mango – it’s amazing how we forget that kids can be disconnected from food, when it’s served to them already cut up. He loved discovering that the big fruit in front of us was his favorite melon.

Fruit Boat (1)

Put a toothpick in each wedge, and add watermelon pieces as the sails.

Fruit Boat (2)

For the pirate, cut a circular piece of banana as the head. Cut the banana lengthwise into pieces for the torso and arms. Use toothpicks to stick your pirate man together, and then another toothpick to affix him to the boat. We made a boat and pirate for Daddy, too!

Fruit Boat (5)

Travis loved it, and delighted in pulling apart the pirate ship piece by piece. There goes your hull, matey!

Fruit Boat (6)

A super cute and fun snack for pirate lovers.

Fruit Boat (4)


Turkey Tacos

Turkey Taco (3)

This adorable dinner recipe from Ranger Rick Jr. is great to make with kids in the run-up to Thanksgiving. Travis was absolutely delighted with his feathered friend. Adults will have to do some chopping ahead of time, and then kids can take it from there to assemble.

To start, pick your favorite taco filling, and add to hard shell tacos.

Turkey Taco (1)

Add cut bell pepper pieces in a fan shape around the taco shell for the feathers.

Turkey Taco (2)

Place a slice of turkey-head-shaped vegan American cheese (such as Tofutti) on top of the taco shell. Add 1 triangle of orange bell pepper for the beak and 1 strip of red bell pepper for the wattle.

Turkey Taco (4)

Two black olive dots completed the face!


Pumpkin Mac and Cheese

Pumpkin Mac (5).JPG

It’s not fall until you’ve made a pumpkin-flavored something, and this spin on mac ‘n’ cheese from High Five magazine is a great way to sneak veggies into your kids’ dinner!

Grown-ups: To start, cook 8 ounces macaroni pasta according to package directions; drain and set aside.

Meanwhile melt 2 tablespoons Earth Balance butter in a saucepan. Whisk in 2 tablespoons flour and 1 cup non-dairy milk. Remove from heat and let cool slightly.

Now the kids can join in! Whisk in 1 cup shredded Daiya cheddar…

Pumpkin Mac (3)

… along with 1 cup canned pumpkin, 1/2 teaspoon mustard, and 1/4 teaspoon nutmeg. Travis loved smelling and taste-testing the mustard and nutmeg!

Pour the pumpkin sauce over the macaroni in a 9×13-inch baking dish, stirring to combine.

Pumpkin Mac (4)

Bake at 375 degrees F for 25 minutes. Little sister’s onesie even matched!

Pumpkin Mac (1)


Pretzel Log Cabin

Pretzel Cabin (6)

We’ve been enjoying a great book recently about Abraham Lincoln (from the Ordinary People Change the World series written by Brad Meltzer), which prompted talk about a log cabin. You can introduce your child to this style of architecture through classic toys like Lincoln Logs of course, but even more fun was putting together this edible version!

To construct the cabin, you need thick pretzel rods and your frosting of choice – we like the vegan vanilla from Wholesome Sweeteners.

Start out with a base, using the frosting as “glue” to attach the four corners.

Pretzel Cabin (1)

Travis loved smearing on the frosting with a plastic knife, but your child may find that a makeshift pastry bag (i.e. a zip-top bag with a hole snipped in it) is easier.

Pretzel Cabin (2)

From there, we spread our pretzels with more frosting (“cement”), and built up several layers.

Pretzel Cabin (3)

A little carpenter at work!

Pretzel Cabin (5)

It was tough to make the roof stay in the way we originally planned; if you have chocolate at home, it may be useful to melt some and use that to adhere two pretzel rods diagonally together. We managed to balance ours with generous globs of frosting, though it wasn’t particularly sturdy.

Pretzel Cabin (7)

Luckily, the cabin was meant to be eaten, not saved – what a fun snack!

If you make this craft in the wintertime, your child may want to sprinkle the structure with coconut “snow” before snacking, too.

Toasty Fall Treats

Toasty Fall (4)

These adorable little toasts, the recipe in our October High Five magazine, make a great snack – simply vary the shape to make them appropriate throughout the entire fall!

For our first toasts, Travis chose pumpkin- and leaf-shaped cookie cutters. Adults: toast 1 slice of bread per each shape.

Toasty Fall (1)

Travis loved helping press the cookie cutters into the bread, and seeing the shapes pop out.

Toasty Fall (2)

Next came spreading them with red-pepper hummus, giving a nice autumnal hue to our snacks.

Toasty Fall (3)

I cut up small strips of red and yellow peppers for him to arrange on the toasts as decoration, including red color for our pumpkin’s stem.

Okay, the leaf veins were care of mama.

Toasty Fall (5)

Closer to Halloween, make a ghost toast! Use a ghost-shaped cookie cutter and spread with non-dairy cream cheese. Add eyes and a mouth from cut black olives.

Toasty Fall (6)

Once we’re into November, consider a turkey version. We spread with red-pepper hummus again, and used bell pepper pieces for tail feathers and a beak.

Toasty Turkey (2)

Happy snacking!

Toasty Turkey (1)

Rainbow Sugar Cookies

Rainbow Cookies (8).JPG

Kids are all too often over-scheduled these days, and I’m as guilty of it as the next parent. That’s why I love the afternoons that I deliberately keep wide open for my son and me. It’s the perfect excuse just to play or, one of our favorites, to bake! This cooking project is messy, that’s for sure, but so worth the smiles.

To start, we made a basic sugar cookie batter. In a bowl, cream together 2 sticks (1/2 pound) Earth Balance butter and 1 cup sugar using a wooden spoon or fork. Travis loved this step! Usually we use our stand mixer, and it was so fun to get in there with muscle power.

Rainbow Cookies (2)

Add 2 Ener-G eggs and 2 teaspoons vanilla extract, stirring until combined.

Carefully stir in 2 and 1/2 cups flour just until blended. Travis pretended he was a stand mixer on “slow” setting for this step. Loved it!

Rainbow Cookies (3)

Now for the messy part. Divide your dough into about 4 or 5 portions on a floured surface. Working with one portion at a time, knead in colors of the rainbow. We didn’t make a full rainbow, but soon had red, yellow, green, and blue portions, using the all-natural food coloring from Watkins.

Rainbow Cookies (4)

You’ll notice Travis took a moment to steal some leftover batter!

Rainbow Cookies (5)

Wrap each portion of dough individually in plastic wrap and place in the fridge for at least 1 hour (longer is fine).

Rainbow Cookies (6)

When it’s time to bake, coat a baking sheet with cooking spray. Pinch off a section of each color and roll into a long worm, then make rainbows on the baking sheet.

Rainbow Cookies (7)

Bake at 375 degrees F for 7 minutes. Transfer the cookies to a wire rack and repeat with the remaining dough until gone. (Note: we made two batches today, and the dough easily freezes for future rainbow-making).

Rainbow Cookies (9)

Seasoned Pretzels

Seasoned Pretzel (6)

Kids will love shaking up this snack… literally! Prepare the pretzels in the morning, and they’ll be ready after school for an afternoon nibble.

You’ll need a 2-gallon zippered plastic bag to make the pretzels. I only had 1-gallon bags on hand, so we divided the pretzels into two portions, and for all of the quantities below, we divided in half among each bag.

Place the plastic bag (or bags) in a large bowl, and fill with 1 (16-ounce) bag mini pretzels.

Seasoned Pretzel (1)

Add 1/2 cup olive oil.

Seasoned Pretzel (2)

Sprinkle in 2 teaspoons garlic powder, 2 teaspoons dried dill, and 4 teaspoons ranch-dressing seasoning (note: try the Saucy Ranch Seasoning from The Vegetarian Express). Travis loved smelling each herb!

Seasoned Pretzel (3)

Now the fun part: seal the bag and shake!

Seasoned Pretzel (4)

Leave the pretzels to marinate at room temperature for at least 8 hours before snacking.

Seasoned Pretzel (5)

Thanks for the great snack idea High Five magazine!

Banana Muffins

Banana Muffins alt

After tons of play with our Baking Crate from KiwiCo, we still wanted more adventures in the kitchen! To wit: these easy banana muffins, the perfect recipe to make after returning from vacation to find three very ripe bananas waiting on the counter.

Ingredients:

  • 1 cup sugar
  • 1/2 cup melted Earth Balance butter
  • 2 Ener-G eggs
  • 1/2 cup unsweetened coconut milk
  • 3 mashed ripe bananas
  • 1 teaspoon vanilla extract
  • 2 cups flour
  • 1 teaspoon baking soda
  • 1 teaspoon salt
  1. Mix together the sugar and butter in a bowl, stirring until combined.Banana Muffins (1)
  2. Add the Ener-G eggs and coconut milk.
  3. Stir in the mashed bananas – mashing these was definitely the best part of the recipe!Banana Muffins (2)
  4. Stir in the flour, baking soda, and salt.
  5. Divide the batter evenly among 12 greased muffin cups. Bake at 350 degrees F for 25 minutes.