Watermelon Squish Bag, Two Ways

Watermelon Squish (7)

Summertime just begs for watermelon in all its forms, and today we decided to use watermelon as a theme not just to eat but to play!

I made two watermelon sensory bags for Veronika and although these didn’t turn out exactly as I hoped, she still had lots of fun.

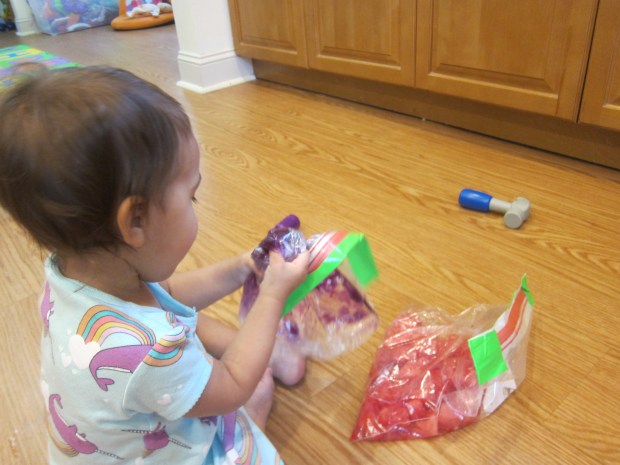
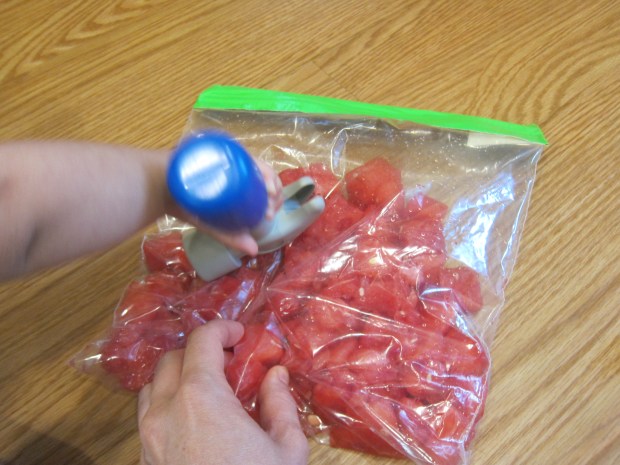
The first was a true watermelon bag. Using leftover chunks from a big watermelon we sliced into for snack, I placed cubes of fruit in a zip-top bag. Seal with green duct tape to prevent your toddler from opening (and to look like a watermelon rind!). Then squish!

Watermelon Squish (1)

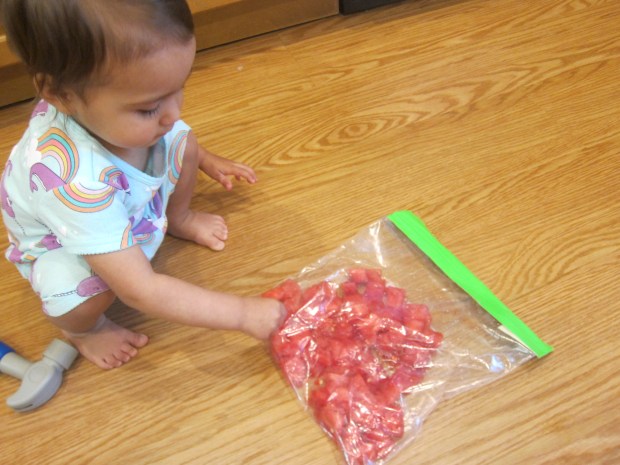
Veronika loved using this bag with her hands, crushing the soft cubes between her fingers. She also smashed at it with a toy hammer.

Watermelon Squish (2)

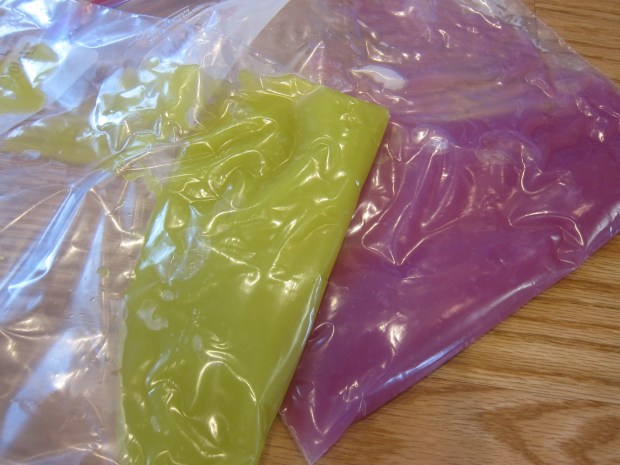
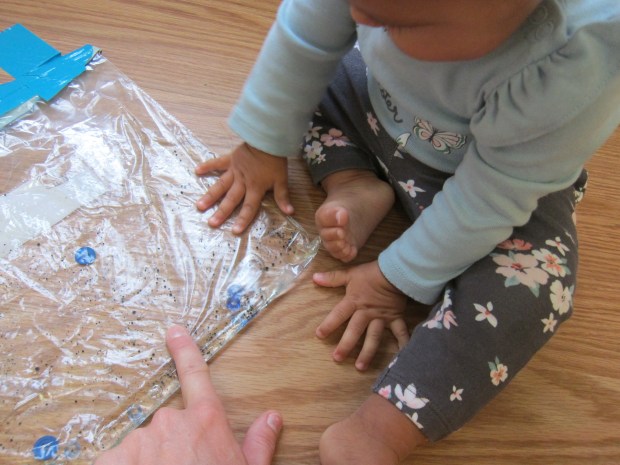
Then we made a pretend watermelon in a second zip-top bag. Fill the bag with clear hair gel and add a touch of red food coloring for a pink tint. Unfortunately my red turned out to look more purple, so next time I would color it with pink tempera paint.

Watermelon Squish (8)

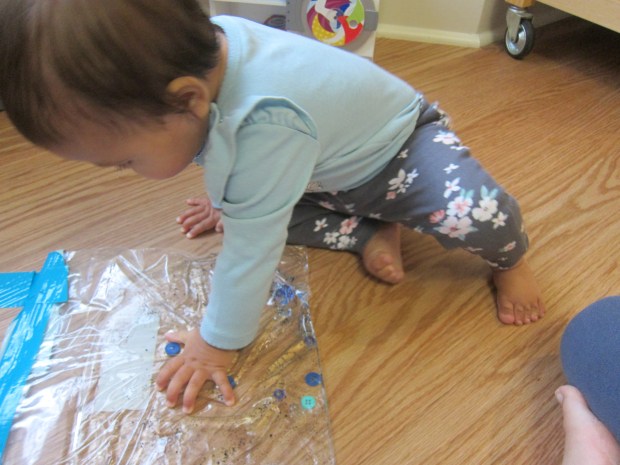
As a result, the fact that we were trying to replicate a watermelon was lost on Veronika. Still, I added a few black seeds from the real watermelon, and she loved moving these around with her fingertips. Initially she thought they were bugs, but then she started saying “seeds!” as she squished at them.

Watermelon Squish (5)

Arguably, she liked this “failed” squishy bag better, holding it, squeezing it, and occasionally even draping it on her head.

Watermelon Squish (6)

So if the goal of a sensory bag is to keep a toddler busy, then this one was a winner.

Watermelon Squish (3)


Squishy Bag

Squishy Bag (6)

Sometimes you just need a good old-fashioned way to entertain a toddler, and today this squishy bag was it. There is nothing fancy here, just good squishy fun.

The mixture inside is similar to a finger paint recipe I’ve made. Bring 3 cups water to a boil. Meanwhile, whisk together 4 tablespoons cornstarch and about 3 tablespoons water to form a paste. Add the cornstarch mixture to the boiling water and continue to cook for 1 to 2 minutes; the mixture will look like Vaseline.

Remove from heat and stir in food coloring. I divided my batch in half so Veronika could have red and green.

Squishy Bag (1)

Let cool slightly before transferring to zip-top plastic bags. Seal (I recommend duct tape along the top for added security) and then it’s time to play!

Squishy Bag (2)

I gave the bags to Veronika while the mixture inside was still warm, but not hot. Be sure to check the temperature with your own hand, first. This added a tiny temperature lesson to the activity.

Squishy Bag (3)

She really loved the way this one felt!

Squishy Bag (8)

She also was delighted when I showed her how to make shapes, which will linger for a few moments in the goo. A “V” for Veronika was easy.

Squishy Bag (5)

A star (her favorite shape) was a bit harder to make clearly, but she loved that we tried!

Squishy Bag (9)

Then I showed her how to hold the bags tightly at one corner and squeeze, which was a delight.

Squishy Bag (11)

Squeeze!

Squishy Bag (12)

Eventually the mixture inside was completely cold, but she still enjoyed squishing about for a while. Next time I would do this particular sensory bag in snack-size zip-top baggies, as I think it would be easier for her hands.

Squishy Bag (7)

A Magnetic Polka Dot Sensory Bag

Magnetic Dot Sensory (5)

The inspiration for this sensory bag was the book Press Here, one of big brother’s favorite books from a young age, and one that never gets old.

Today I read the book with Veronika for the first time, and although she is on the young side for it, she delighted in the actions: tapping on dots, blowing on pages, and especially clapping at the end.

Magnetic Dot Sensory (1)

But we weren’t finished when the book was done; the fun had only just begun! Using magnetic discs and a wand from a magnet set we have, all I needed to complete the activity was a gallon-sized zip-top bag. I added just a little water to the bag, and then sprinkled in the discs. In keeping with Press Here‘s primary color scheme, I used only red, yellow, and blue ones.

Magnetic Dot Sensory (2)

Note: If you’re playing this game with a preschooler, this is a great chance to color sort, first, before adding the discs to the bag!

I showed Veronika how the wand attracted the magnets when waved over the bag (yes magnets work in water), and she loved the seeming magic of this.

Magnetic Dot Sensory (3)

This sensory bag interested her for much longer than previous activity bags we’ve made, and she returned to it throughout the day for more magical wand waving.

Magnetic Dot Sensory (4)

Again, you can engage big kids further with the activity. See if your child can separate the magnets by color in the bag. Or get silly by tapping them or moving them in ways that mimic the art on each page of Press Here.

Magnetic Dot Sensory (6)

This game was so simple to put together, and I know we’ll play it again as Veronika grows!

Seashell Sensory Bag

Seashell Sensory (4)

Veronika has never been to a tropical island, but chances are she’d be longing for a trip to one right now if she knew what she was missing! In a day that dipped down to 0 degrees, I brought some tropical warmth to her sensory play.

For this fun variation on a squishy bag, fill a gallon-sized zip-top bag with any blue goo from the drug store (blue hair gel, blue aloe vera, whatever you can find that has a nice aqua tint to it).

Seashell Sensory (1)

I added a handful of seashells from the craft store, sealed the bag, and simply mushed everything together.

Seashell Sensory (3)

The contrast of the hard seashells versus the gooey gel will fascinate your toddler, and the shells will mush around nicely in the goo if you don’t overfill the bag.

Seashell Sensory (5)

Those seashells might make you feel like you’re briefly on vacation, too!

Seashell Sensory (2)

Easy Nature Sensory Bag

Nature Sensory (6)

You could do this easy sensory activity with a toddler in any season, but it was particularly nice to fit in a little bit of nature in the winter. An unseasonably warm day meant our snow melted and Veronika and I headed outside briefly to find wintery treasures.

We returned inside with a pine cone, pine branches, a few leaves, and acorns. I filled a gallon-sized zip-top bag with just a bit of water, then added our treasures.

Nature Sensory (3)

Veronika was immediately intrigued when I handed it to her at her high chair tray (older toddlers might liked this taped down to a table). We talked about the different textures, especially the hard, round acorns.

Nature Sensory (2)

Because the colors were a bit drab this time of year, I ended up slipping inside a few tiny red jingle bells to mimic the look of red berries. Ok, so they were not really from nature, but they added quite the pop! She loved poking these around through the water with one finger.

Nature Sensory (8)

We can’t wait to do this activity in the spring, and see how different our nature bag looks!

Nature Sensory (7)

Squish Bags

Squish Bags (2)

I made a floor sensory bag for Veronika some time back; today I added two twists for a new version of the game!

In the first, I added 1/2 cup water and then various small items from our craft bin: translucent pony beads, buttons, and wiggle eyes all fit the bill. I got the idea after noticing how much she loved a drum with floating beads under the plastic at music class.

Squish Bags (1)

I taped the bag firmly to the floor on all four sides, almost like framing it. Now she could squish the items inside, but not move the whole bag.

Squish Bags (3)

The second version was even squishier! This time, instead of water, I squirted in a generous dose of shaving cream. I sprinkled in even more beads and buttons, using lots so they showed up through the thick cream. This one, too, I taped firmly down on all four sides.

Squish Bags (5)

Veronika loved pressing her fingers in! Or scooching her whole body across.

Squish Bags (7)

She could move beads and buttons with one little finger or a whole hand pressed down, and the visual effect was dazzling.

Squish Bags (4)

If you make these while your baby is still young enough to need tummy time, it’s a sure way to keep them entertained!

Play Dough Sensory Bag

Playdough Bag (2).JPG

I’ve been on a recent kick of making sensory bags for Veronika, a great way to enable my little imp to play with messy materials that might otherwise end up in her mouth. Safely inside a plastic bag, even the messiest items are a go!

Normally for a ten-month-old I’d whip up homemade play dough for added security, but since it was going in the bag, I used the store-bought kind.

I added a few craft beads in fun flower shapes that she would be able to squish into the play dough. Now it was simply a matter of sealing and watching her squish away!

Playdough Bag (1)

Veronika loved grabbing at the bag.

Playdough Bag (5)

I showed her how to squish the hard beads into the soft dough, talking about texture as we played. The contrast seemed to really interest her.

Playdough Bag (4)

I felt comfortable leaving this one around for her to play with since there was no liquid to spill, even in case of a slight tear.

Playdough Bag (3)

A fantastic way to keep her busy, in sum!

Baby Oil Sensory Bag

Baby Oil Bag (4).JPG

If you’re looking for a safe way to incorporate messy materials into play with the under-one-year-old set, then gallon-sized plastic bags are your perfect solution. To wit, Veronika has “painted” in a plastic bag, and today we used baby oil for a fun sensory experience.

Pour some baby oil into the bag. Add a few blobs of food coloring.

Baby Oil Bag (2)

I went with a blue theme simply because that was what I had on hand, and added blue buttons and blue pony beads as well.

Now all she had to do was squish! The food coloring is fun, because your baby can chase the blobs around in the baby oil, much like blobs in a lava lamp.

Baby Oil Bag (3)

If your baby is as hands-on as Veronika, you’re going to want to duct tape along the sealed closure for extra security.

Baby Oil Bag (5)

It was also helpful to duct tape the bag to the floor, because this focused her play on squishing items around within the bag, instead of picking up the whole bag and smooshing it in her hands.

Baby Oil Bag (6)

What hands-on fun for a weekend morning!