Lentils with Spinach and Quinoa

Lentil Spinach a

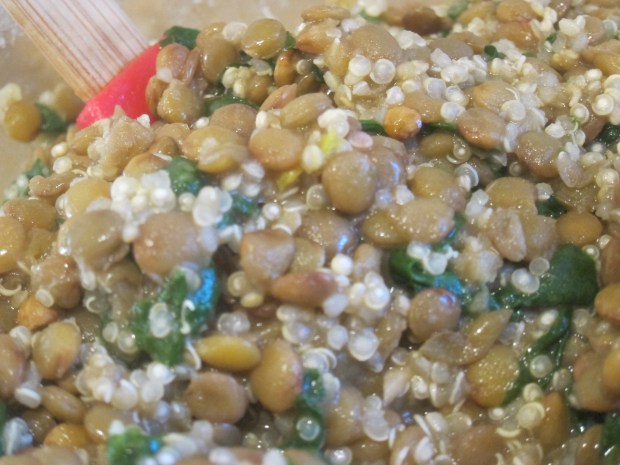
Lentils are one of Veronika’s favorite foods, and this is an easy way to jazz them up. Cooking the quinoa in the microwave means you only need one saucepan, a bonus come clean-up time!

Ingredients:

  • 1/2 cup quinoa
  • 1 cup water
  • 1 teaspoon olive oil
  • 1 garlic clove
  • 1 cup green lentils
  • 2 cups vegetable broth
  • 2 cups chopped fresh baby spinach
  1. To prepare the quinoa, combine the quinoa and water in a microwave-safe bowl. Cover and microwave for 4 minutes. Stir, recover, and return to the microwave for a final 2 minutes. Set aside.
  2. Meanwhile, heat the olive oil in a saucepan over medium heat. Add the garlic and cook for about 3 minutes.
  3. Add the lentils and vegetable broth. Bring to a boil; cover, reduce heat, and simmer for 30 minutes, or until the liquid is nearly all absorbed.
  4. Stir in the spinach and cook for a final 2 to 3 minutes, until the spinach wilts.
  5. Add the lentil mixture to the quinoa mixture, then let cool before serving.

Lentil Spinach b


Sticky-Treat Sushi

Sticky Sushi (8).JPG

There is an international festival coming up at Travis’s school, which has us talking about food from around the world. Here’s a sweet spin on the classic Japanese dish! This candy sushi was so fun for Travis to put together.

To start, make the “rice”: melt 2 tablespoons Earth Balance butter in a microwave-safe bowl, heating at 10 second intervals for a total for 30 seconds, or until melted.

Add 2 and 1/2 cups mini Dandies marshmallows. Microwave at 15 second intervals until melted (we needed about a minute total), stirring after each interval.

Sticky Sushi (9)

Stir in 3 cups rice cereal. If you need to use your hands, I recommend having a grown-up do so, as the sticky marshmallows will still be hot.

Sticky Sushi (1)

Spoon the mixture onto parchment paper. Cover with additional parchment paper and use a rolling pin to flatten about 1/4-inch thick.

Sticky Sushi (2)

The rolling pin ended up being a little tricky, so we found it easier to pat with our hands.

Use a pizza cutter to cut into rectangles. Travis was so proud I let him use this tool!

Sticky Sushi (3)

Now you can make sashimi or sushi rolls!

For “sashimi”, place a Swedish fish candy (Wholesome DelishFish are vegan) on top of a rice rectangle. Cut a strip of fruit leather with a pizza cutter and wrap around the fish.

Sticky Sushi (4)

For a rolled version, cut a strip of fruit leather and cover with a rice rectangle. Top with pieces of candy (Travis chose organic Red Vines) and roll up.

Sticky Sushi (5)

If you really want to get creative, tint a little vanilla frosting with green food coloring for “wasabi”!

Sticky Sushi (6)

Mashed Potato Sculpture

Mashed Po Sculpture (2)

This is a great sensory activity… and a way to get your kid to try mashed potatoes!

Start with instant mashed potatoes as the base. Yes, you can bake and mash your own, but the instant stuff has a sticky quality that makes it better suited to this “art” project. I whipped up a batch using almond milk, Earth Balance butter, and the potato flakes, and then let it cool completely.

Mashed Po Sculpture (1)

When Veronika was finished with lunch, I spooned a huge heap of this onto her tray. She looked instantly delighted!

Mashed Po Sculpture (3)

Set out a few props to encourage the artistic process. Veronika received a measuring cup and spoon, and soon was scooping, digging, and poking holes in it.

Mashed Po Sculpture (8)

I showed her how to make a few “sculptural” elements, including round balls and little snakes.

Mashed Po Sculpture (4)

I tried for a little mashed potato snowman, but Veronika didn’t let him last long!

Mashed Po Sculpture (7)

And of course she discovered that little bites of the stuff was delicious. Eager fingers kept digging in for more, both to eat and to play!

Mashed Po Sculpture (5)


Rotini with Bolognese Sauce

Rotini Bolognese (2)

Serve this easy vegan bolognese with whole wheat pasta or any of the new chickpea or lentil pasta on the market. It’ll pack a big protein punch for little eaters.

Ingredients:

  • 2 tablespoons olive oil
  • 2 tablespoons Earth Balance butter
  • 1/2 Vidalia onion
  • 1 celery stalk
  • 12 ounces meatless crumbles (such as Lightlife)
  • 1 (15-ounce) can tomato sauce
  • 2 tablespoons tomato paste
  • Rotini pasta
  • Vegan Parmesan sprinkles
  1. Heat the olive oil and butter in a large saucepan over medium heat.
  2. Dice the onion and celery and add to the pot; cook for 5 minutes.
  3. Add the meatless crumbles; cook for 4 minutes.
  4. Stir in the tomato sauce and tomato paste; cook for a final 3 to 4 minutes, until heated through.
  5. Meanwhile, cook your favorite rotini pasta according to package directions. Serve the sauce over the pasta, and sprinkle with the Parmesan to taste.

For little ones who are Baby Led Weaning, you can serve piles of the sauce next to pieces of cooked pasta for a more deconstructed version.

Rotini Bolognese (1)


Vegetable Barley Casserole

Veg Barley Casserole (3).JPG

Cooking barley in the oven, almost like an oven-baked risotto, makes a no-brainer out of this warm fall casserole.

Ingredients:

  • 1 bunch kale
  • 3 and 1/4 cups water, divided
  • 3 carrots
  • 1/2 small onion
  • 1 vegetable bouillon cube
  • 1 cup pearl barley
  1. Wash the kale and remove the stems from the leaves. Place the leaves in a blender, along with 1/4 cup water, and pulse until you have a paste. Set aside.
  2. Peel and dice the carrots. Dice the onion.
  3. Meanwhile, bring the remaining 3 cups water to a boil in a saucepan. Add the bouillon cube and stir until it dissolves.
  4. Combine all of the ingredients in a 3-quart casserole dish. Cover with foil and bake at 350 degrees F for 75 minutes, until the liquid is absorbed.

Veg Barley Casserole (2)

The kale will have formed a green layer on top; give it a big stir and reveal the perfectly cooked barley underneath. Yum! If you want to add a little extra protein, stir in cooked and chopped Gardein chick’n strips.

Tofu Avocado Spread

Tofu Avocado Spread

Tofu can be too dry for babies if just cubed or sauteed in oil. This avocado spread is the perfect way to make it creamier. You’ll sneak in protein, potassium, calcium, and more!

Ingredients:

  • 1/4 cup firm tofu
  • 1/2 ripe avocado, mashed
  • 1/4 teaspoon low-sodium soy sauce
  1. Combine all ingredients in a bowl, and mash with a fork until desired consistency is reached.

Toddlers might enjoy this best spread on whole wheat toast. My baby prefers to pick up big handfuls of it plain!

Yogurt Berry Parfaits

Yogurt Parfait

If your kids wants a novel twist on yogurt for breakfast, try these easy fruit-filled parfaits! We like them best with almond milk yogurt. Wheat germ adds an extra healthy kick.

Ingredients:

  • 1 (5-ounce) vanilla non-dairy yogurt
  • 1 teaspoon wheat germ
  • Mixed berries to taste
  1. Stir the wheat germ into the yogurt in a small glass.
  2. Spoon berries on top to taste, and serve!

Note: You can also alternate layers of yogurt and berries, for a pretty presentation.

Jiggly Rainbow Cups

Jiggly Rainbow (8).JPG

Here’s a cute way to “taste the rainbow”, as the old slogan goes! You’ll need jel dessert in all colors of the rainbow. Jell-o of course comes available in everything from red to purple but is not vegan. Instead, I prepared a big batch of Lieber’s clear unflavored jel dessert. We divided it among 5 cups, and used food coloring to make:

  • red
  • yellow
  • green
  • blue
  • purple

This was a great refresher on color mixing, since I only had food coloring in primary colors!

Jiggly Rainbow (2)

I also had Simply Delish’s orange flavored jel dessert, so we used that for the orange layer.

Jiggly Rainbow (1)

Now you’ll need to layer your dessert. We spooned a layer of purple into a cup and placed in the freezer for about 15 minutes to speed up the setting process.

Jiggly Rainbow (3)

Continue adding layers and freezing briefly until you have a full rainbow.

Jiggly Rainbow (4)

Unfortunately our three dark layers (purple, blue, green) and three light layers (yellow, orange, red) sort of blended in with one another. Shining a flashlight helped reveal the distinction!

Jiggly Rainbow (6)

Meanwhile Travis thought this was just the best dessert ever. Of course there was the obligatory poking and squishing that must happen with jel desserts.

Jiggly Rainbow (7)

Then it was time to spoon through the layers, and he kept me updated on his progress: “Mom, I’m up to the yellow!”

Jiggly Rainbow (9)

A super fun way to play with rainbows.

Hawaiian Sweet Potatoes

Hawaiian Sweet Potatoes

This two-ingredient recipe will introduce your baby to a taste of the tropics!

Ingredients:

  • 1 sweet potato
  • 1 cup pineapple chunks
  1. Peel the sweet potato and cut into wedges. Arrange in a small baking dish.
  2. Cover the sweet potato with the pineapple chunks and drizzle with any juice from chopping.
  3. Bake at 375 degrees F for 50 minutes, until the sweet potato is tender. Best served warm!

Tic-Tac-Yum

Tic Tac Yum (3)

Here’s a novel way to play tic-tac-toe… and to have a healthy snack. Winner takes first bite!

To set up the game, wind yarn around a flat mirror until you’ve divided it into 9 squares like a tic-tac-toe board. Secure on the back with tape.

For the Os, cut celery hearts into slices in the shape of a C. For Xs, cut chunks of non-dairy cheese and then make a slit so each piece looks like a V.

Tic Tac Yum (2)

Once arranged on the mirror, Travis was delighted to find the C was now an O and the V was now an X!

Tic Tac Yum (1)

I challenged him to a match…

Tic Tac Yum (4)

…but it wasn’t long before the Vs began disappearing as a snack. Tic-tac-yum indeed!

Tic Tac Yum (5)