Yarn Ornaments

Yarnaments (1)

These pretty homemade ornaments are easy enough for even preschoolers to help put together. The resulting gift-shaped decorations also make – hint hint – a great gift for friends or relatives!

To start, cut squares out of cardboard (which is also a great way to reuse boxes from holiday deliveries). You could also cut out different shapes like circles or stars, but I found that the squares were the easiest for Veronika to help wrap, whereas stars were a bit tricky.

Yarnaments (6)

Use a glue stick or glue dot to make the center of each square sticky, then simply begin wrapping with yarn. We found a pretty one that changed from shades of red to pink to white and back again, which made us think of holiday candy canes!

Yarnaments (4)

Keep wrapping until the squares are thickly covered and the cardboard doesn’t show. Use a second strand of yarn to tie a bow around the center, a neat little gift ready to go under the tree! Or in this case, on it.

Yarnaments (3)

A final loop of yarn works perfectly to hang these from the nearest bough.

Yarnaments (2)

Yarn-Wrapped Vase

This quick toddler-friendly craft makes a beautiful vase to keep around the house, or would also be a nice gift for Mother’s Day.

To start, you’ll need an empty plastic bottle. (Preschoolers or older kids could alternatively use a glass bottle). Because the bottle was already a bit sticky from where I had peeled off the label, our first strand of yarn adhered nicely. I added a piece of tape just for extra security, then showed Veronika how to begin twisting the yarn around the bottle.

We have a great skein of yarn that changes colors every few inches, so she was able to make a multi-colored vase with no effort at all! If you have single colors of yarn, simply snip off strands and knot them together every time you switch colors.

Veronika’s little toddler hands grew tired when the bottle was about this full…

…so I filled in the gaps with additional yarn. When the bottle is covered, simply tuck the final thread under another strand to hold it tight. I then made a second version on a small glass jar, which meant we could have a neat multi-height arrangement of flowers on our Mother’s Day table. All the vases need now is to be filled with special flowers to make any gift recipient smile.

Giant Connect the Colors

Giant Connect the Colors (1)

Here’s a fun way for toddlers to learn colors on a BIG scale. The only limit to this game, really, is how many cans of food you have in your pantry!

I happened to have seven cans which worked well since I didn’t want to overwhelm Veronika by using more than 2 or 3 sheets of paper for each color. Older kids, though, might have a blast setting up a maze of colors that covers a whole living room if your pantry has enough supplies!

Giant Connect the Colors (9)

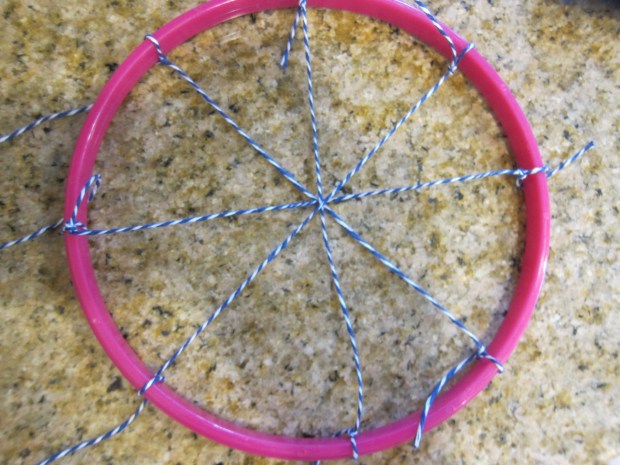
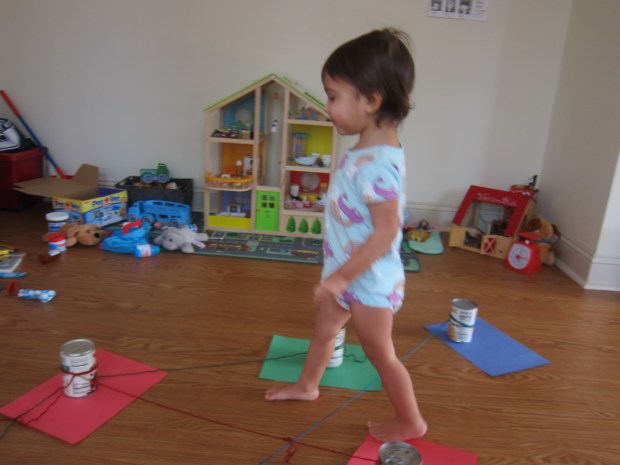
To set up, I picked three colors (blue, red, and green) and set down two to three pieces of construction paper for each one. I topped each sheet with a can. These cans have dual purpose: to hold the paper down and to wrap yarn around in the next step.

Giant Connect the Colors (2)

I then set out lengths of yarn in colors corresponding to the sheets of paper. Wrap the end of each color around one can. Your child’s job is to take that yarn and connect it to all the cans sitting on the same color (so red yarn stretching to all the red pages, green yarn to all the green pages, and so forth).

When I first brought Veronika over to the set-up, I worried I had made a mistake and she was too young for the activity. She was very excited by the cans (“It’s beans!”) and distracted by checking them out. When I asked her what color the paper was, she only wanted to tell me what color the food item was.

Giant Connect the Colors (3)

But then we had a breakthrough. She correctly identified that the paper underneath the can was red. Could she hold the yarn and find another pieces of paper of the same color. “I think you see it!” I told her.

Giant Connect the Colors (4)

“I see it!” she responded, and trotted to the second piece of red paper. I showed her how to wind her red yarn around this can.

Giant Connect the Colors (5)

Time for a round of green yarn!

Giant Connect the Colors (6)

“I see it!” She trotted over…

Giant Connect the Colors (7)

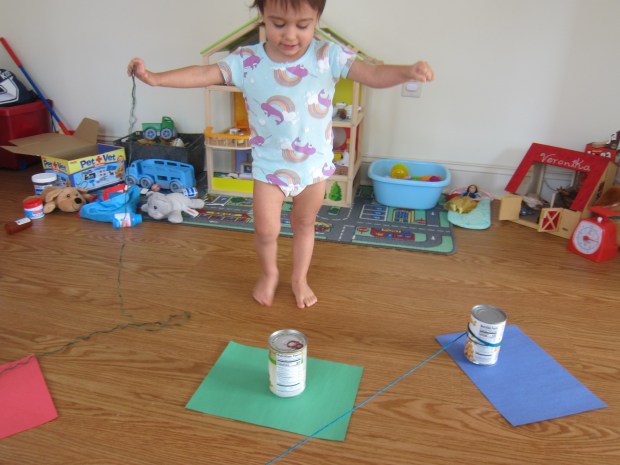
…and proudly looped the green yarn around.

Giant Connect the Colors (8)

Once we were finished attaching all the yarn and cans, we had a neat maze along the floor. “It’s a spider web,” she said with excitement, and wanted to play and jump over the yarn maze for quite some time.

Giant Connect the Colors (10)

So we accidentally got in our gross motor skills for the day, too!

Giant Connect the Colors (11)

Spider’s Web Discovery Basket

Spider Web Discovery (8)

This activity for toddlers isn’t technically Halloween-themed, but certainly there’s a connection between spiders and the spooky holiday so it felt like the right time of year to play! Of course you could also do this activity any time of year.

To set up, I wound long strands of white yarn in and out of the holes of the laundry basket until they made a messy crisscross web shape.

Spider Web Discovery (2)

I originally considered adding only bug stuffed animals, but decided this might hit too close to home (Veronika is sometimes scared of webs). Instead, I added lots of small stuffed animals of every variety, including forest creatures like foxes and chipmunks, as well as a puppy and kitty.

Spider Web Discovery (5)

She discovered the web first thing in the morning!

Spider Web Discovery (4)

Could she figure out how to reach in and free the stuffed animals? After a little demonstration and some trial and error, she soon had a knack for it.

Spider Web Discovery (6)

She also loved putting animals back in the web!

Spider Web Discovery (10)

I’m not sure she entirely understood that the yarn was meant to look like a spider’s web, but either way, she enjoyed the challenge and the play.

Spider Web Discovery (12)

String Painting

String Painting (6)

We’ve used string to help spread paint lately, but for this craft, yarn actually becomes the bristles of a brush. These long wobbly “paintbrushes” are sure to delight any toddler. Just one note of caution: there is a high probability that paint is going to splatter! In other words, it’s an activity best done in an old t-shirt and diaper.

To make the brushes, I cut about 5 strands of yarn per brush, and taped them securely to the end of a craft stick. Your yarn can be all one color, but I have a multi-hued ball of yarn that gave us some fun rainbow pop.

String Painting (1)

Place out a big sheet of craft paper and paints (Veronika requested yellow) and you’re ready to go!

At first Veronika was going to dip the handle end of her craft stick in the paint, but I quickly showed her how to dip in the strands of yarn instead.

String Painting (2)

She loved it! The yarn creates beautiful stringy lines, and she enjoyed seeing the results of her work.

String Painting (5)

As you paint, the yarn will start to clump together. This means you’ll get thicker lines, plus color mixing if you have more than one color of paint set out in front of your child.

String Painting (8)

As with a recent pumpkin painting activity, Veronika sat in the middle of the paper while she worked, so I loved watching the string marks appear all around her.

String Painting (9)

Needless to say, the yarn was fun for her to splat down on the paper, which sends drops of paint flying. But again, plan ahead, dress for the mess, and the messiness becomes half the fun!

String Painting (7)

Cardboard Weave

Cardboard Weave (5)

I’ve been working with Travis on weaving this summer, which is not only great for fine motor skills, but also the perfect craft for Camp Mom. Here’s another version that’s very easy for beginner fingers. The trick? Instead of a tiny needle, your child will weave with a stick!

I cut a small square of cardboard from an old delivery box, and wound yarn around it a few times, taping on the back.

Cardboard Weave (1)

Now we took a stick (you can use one from a recent nature walk, if you like!) and wrap a second color of thick yarn around it a few times.

Cardboard Weave (2)

Begin threading over and under the yarn on your cardboard.

Cardboard Weave (3)

Travis was able to do this with no assistance, unlike more delicate weaving projects. He liked the way the stick pulled through at the end of each row.

Cardboard Weave (4)

That said, he did still tire out quickly, so his final product was only a small scrap. Snip the yarn from the cardboard down the middle of the back, and tie the loose ends together. Chances are Travis can find a way to feature this weaving in games with his action figures!

Cardboard Weave (6)

Wave Bottles, Three Ways

Wave Bottle (8)

Summer means lots of empty sparkling water bottles in our house, and before recycling them I wanted to turn a few into fun sensory bottles for Veronika. There are so many ways to do this, and here were three I put together as a set this morning. She loved going back and forth between them all day!

For version number one, I filled a bottle 1/3 of the way with water. Add a drop or two of food coloring, then some fun items to swirl around; we used large glitter and small pony beads. Fill the rest of the way with baby oil. Seal the cap with hot glue.

Wave Bottle (1)

She loved this one, immediately delighted by the colors and shine.

Wave Bottle (2)

“Look at the beads!” she said, watching things swirl around.

Wave Bottle (3)

For version number two, I used a larger 1.5 L bottle. Fill the bottle 1/3 of the way with water. Add a few spoonfuls of tempera paint (we used red), then add 1/3 cup dish detergent. Seal the lid with hot glue. Shake it up and watch the colored bubbles!

Wave Bottle (4)

She loved how bubbly this one was.

Wave Bottle (5)

It was also fun to roll it on the floor and give chase!

Wave Bottle (6)

For the final version, I snipped a few pieces of brightly colored yarn to about 6 inches in length. Add to an empty bottle, add water, and seal the cap with hot glue. Now the yarn lengths dance and swirl in the bottle. They almost look like jellyfish!

Wave Bottle (7)

She loved watching this one. The more you swirl it, the better the yarn “dances”. I loved watching her move the bottles around all day, sometimes rearranging them on shelves, or shaking them, or just picking them up in her playroom and looking at them. A great way to fill those summer hours!

Wave Bottle (9)


Circular-Loom Woven Trivets

Woven Trivet (7)

I intended for this old-school camp activity to help fill a Camp Mom morning at home, but it required more dexterity than Travis could master as a six year old. Still, both kids adapted the materials involved to play in their own way, keeping us all busy for an hour! I guess that makes it a Camp Mom success.

For this camp-inspired weaving project, you’ll need an 8-inch embroidery hoop. Separate the two pieces, and tie 6 pieces of string to the inner hoop so they form a starburst. Replace into the outer hoop and tighten.

Woven Trivet (1)

Now start at the center and begin weaving yarn, alternating over and under your starburst threads. I realized right away that this would have been a) quicker and b) much easier with a chunky thick yarn. So after Travis tried his hand at it a few times, I told him I would take over. Our thin yarn took quite a long time to fill up the hoop!

Woven Trivet (2)

But while I was busy weaving, Travis took the leftover ball of yarn and created an imaginary game involving monsters with tentacles, and pieces of yarn snipped all over the floor.

Woven Trivet (4)

Meanwhile little sister Veronika loved pretending her doll was dressed up in extra strands of yarn! So everyone was happy.

Woven Trivet (3)

To finish the project, keep weaving yarn, in alternating colors, until your trivet reaches desired size. Every time you switch colors, simply leave the loose threads hanging out the back.

Place the finished trivet over a piece of felt and trace. Cut out the felt, then use hot glue or fabric glue to attach to the back of your trivet, tucking in any loose pieces of string.

Woven Trivet (5)

Cover with parchment paper and a heavy book until the glue has dried completely, then snip the trivet from the strings holding it on to the inner hoop.

Woven Trivet (6)

Ours turned out to be just the right size for either a small pot or tea mug!

Passover Goblet

Passover Goblet (6)

Passover began yesterday, and although we don’t celebrate the holiday, we have friends and family who do. Travis enjoyed learning a bit about the holiday and making these goblets, which are traditionally placed on the Seder table to symbolize hope. The message of hope certainly felt appropriate in this Covid-19 era in which we suddenly live! You’ll need plastic goblets for the craft, which you can find at craft stores or party stores.

Passover Goblet (1)

Dab tacky glue over only half of a plastic goblet, to avoid getting fingers messy, and wind colorful yarn around that half. Let dry, then repeat with the bottom half of the goblet.

Passover Goblet (2)

We left the stems free of yarn, but you can cover completely, if desired.

Passover Goblet (3)

Once dry, we added a few pom poms for a final flourish!

Passover Goblet (5)

You could also add name tags for the prophets Miriam and Elijah, if truly celebrating a Seder this week. Travis loved the way these looked, and was so enamored of the goblets that he made sure the family drank water all day from leftover ones.


Yarn Snowballs

Yarn Snowballs (5)

These fun indoor “snowballs” are a larger version of homemade pompoms Travis and I recently made for finger puppets. We found this larger version to be much easier than the little fork version!

Cut a U-shape from cardboard (ideally a stiff box cardboard, but even a manila folder worked in a pinch).

Yarn Snowballs (1)

Begin winding white yarn around the U until you have a nice fluffy pile. Wrap a piece of yarn around the center, going through the notch of the U, and double-knot securely. Slide off of the U, then snip all the loops and fluff out.

Yarn Snowballs (2)

Once we had 6 “snowballs”, it was time for a battle.

Yarn Snowballs (3)

For extra amusement, we even set up pillow forts and then had at each other.

Yarn Snowballs (4)

Then Travis wanted to have batting practice against the snowballs, saying this was his defense against my attacks.

Yarn Snowballs (9)

We laughed and dodged and pelted each other for ages with this game! (Thank goodness there wasn’t the icy sting of real snowballs, as we would have been covered in snow).

Yarn Snowballs (8)

Action shot!

Yarn Snowballs (7)

This was one of the best mother-son activities we’ve done to date, and that’s saying a lot.