Homemade Potato Man

Homemade Potato Man (2)

We don’t own a classic Mr. Potato Head doll, but the toy is great for so many reasons. Of course there’s the pure silliness of mixing and matching the facial features, but Mr. Potato is also a teaching tool for the names of facial features and for emotions. With an extra potato in the fridge, today I made Veronika this silly homemade version!

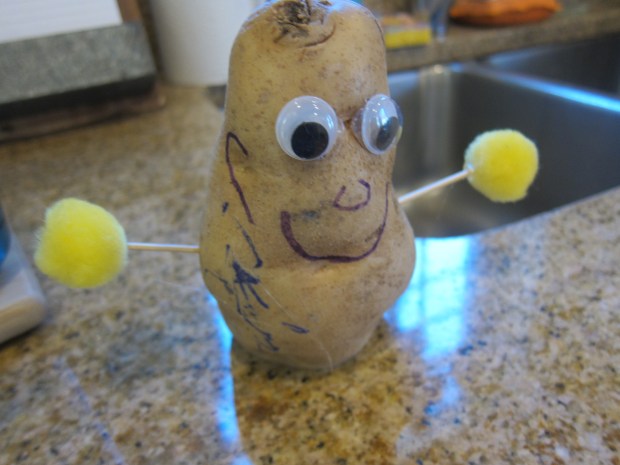
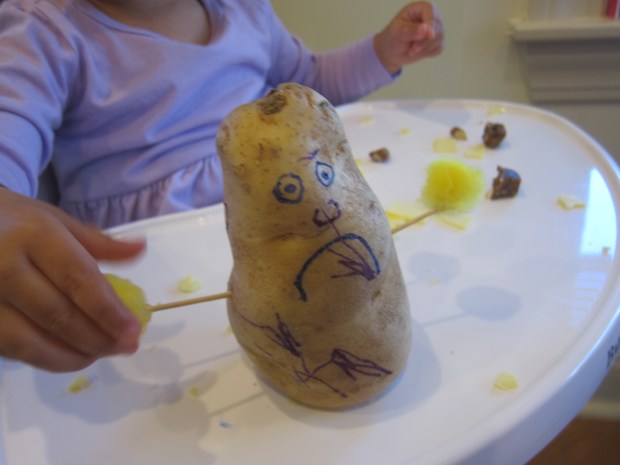
To start, I drew two faces on the potato with permanent marker: one side of his face was happy and the other was sad. Veronika wanted to add a few pen marks of her own.

Homemade Potato Man (1)

Poke two toothpicks into the sides of the potato as arms, then use hot glue to add pom poms to the tips, covering up the sharp points. You can also add pom poms or even buttons on top for a hat! Two wiggle eyes completed the look.

Homemade Potato Man (3)

If you want to get more detailed, draw other features with permanent marker, too. Finally, I sliced a bit off the bottom so Mr. Potato could stand upright. Now I presented him to Veronika, and she was smitten!

Homemade Potato Man (5)

She loved that his expression changed whenever she turned him around, and this was a great way to talk about emotions. “Mr. Potato is feeling sad,” I told her… and oh no she pouted her lip in sympathy until we turned him to his smile.

Homemade Potato Man (4)

We also pointed to all his features, rattling off a vocab list of eyes, nose, mouth, and ears. She loved finding these and then touching the corresponding part on me.

Homemade Potato Man (6)

And then she just loved playing with him as an “action figure”! Have you ever made toys out of food? Please share in the comments!

Homemade Potato Man (7)


Cling Wrap Painting

Cling Wrap Painting (9)

Veronika loves to smoosh her fingers through paint, and today I found a way to make that smooshing a part of the process, minus the mess!

To start, cover your work surface and lay down sheets of white paper. Set out plastic cups filled with paint, and add a plastic spoon in each cup.

Cling Wrap Painting (1)

I showed her how to use the spoons to dribble paint onto the paper. Veronika liked making both big blobs and using the edge of the spoon more like a paintbrush.

Cling Wrap Painting (3)

When each page was filled with enough splotches and blobs (and just when her hands were itching to get messy in the paint!) I laid a piece of cling wrap over the paper. Make sure the paper is completely covered.

Cling Wrap Painting (5)

Now use your hands to smooth over the paint.

Cling Wrap Painting (7)

The blobs will squish and flatten in a fun sensory way. You’ll get some color mixing, too! I pointed out to her where our blues and yellows had made green, or where red and blue had mashed together for purple.

Cling Wrap Painting (6)

Lift up the cling wrap and set the painting aside to dry completely before displaying your little one’s art.

Cling Wrap Painting (8)

This was a novel painting method, and her hands even stayed (mostly!) clean.

Cling Wrap Painting (2)

Blob Painting

Blob Painting (4)

Veronika is so into painting these days, but all too often she drops the brush and decides to smear with her hands instead. I wondered if using a few novel tools might distract her from doing so!

For this project, you’ll need anything your toddler can squeeze paint out of. We used two versions: an old infant medicine syringe (for pushing) and an empty cosmetic bottle (for squeezing).

I filled each with a little paint, and showed Veronika how to either squeeze or squirt blobs of paint onto the paper. As it turned out, both methods were a little advanced for her muscle development, but she loved seeing the blobs that appeared!

Blob Painting (1)

I folded the paper in half over the blobs we had made, then opened back up to show her a big smeary picture. As an alternative version, place another piece of paper over your blobs, rub firmly, and then lift up.

Blob Painting (3)

She loved the way both versions came out!

Blob Painting (2)

We continued squeezing and blobbing the paint, and she started to use the medicine syringe tip more like a paintbrush.

Blob Painting (8)

For extra fun, we tested out blobbing onto different surfaces, like coffee filters or paper towels.

Blob Painting (6)

Did this project keep her from painting with her hands?

Blob Painting (7)

Not entirely, but it definitely mixed up the art experience around here!

Blob Painting (9)

Spring Flowers Craft

Spring Flowers (7)

These sweet handmade flowers make the perfect bouquet for Mother’s Day, whether to give to a mom or grandma in person, or to share over Zoom!

Ideally, we would have used green straws as flower stems, but because we’re a bit limited on craft supplies (thanks coronavirus), we settled for painting white straws green. I also painted white cupcake liners yellow.

Spring Flowers (1)

Once the paint dried, we were ready to assemble our flowers! Travis helped make four kinds:

Daffodil: Trace a three-pointed petal shape on each of 3 yellow cupcake liners. Align them so they make a 9-pointed circle and glue together. Trim a fourth (white) cupcake liner down, and glue into the center. Glue a small yellow pom pom in the middle, then tape to a green straw as the stem.

Spring Flowers (4)

Calla Lily: Cut blue construction paper into an equilateral triangle. Tape a green straw so that it points up at one of the triangle corners. Wrap the other sides of the triangle tightly around the straw, and tape into place. Fold a yellow pipe cleaner in half, and insert down through the “flower” into the straw.

Spring Flowers (5)

Daisy: Cut three strips out of white construction paper. Glue each in half to form loops, then glue the loops one atop another.

Spring Flowers (3)

Cut a circle from yellow construction paper and glue in the center. Tape to a green straw for a stem.

Poppy: Cut six circles from red tissue paper, then trim around the edges to resemble the petals of a flower. Glue the pieces one atop another.

Spring Flowers (2)

Cut a circle from black construction paper and glue in the center of the tissue paper. Poke the end of a yellow pipe cleaner through the black circle and then all the way through the tissue paper layers; thread the pipe cleaner down into a green straw.

Spring Flowers (6)

Gift your flowers to someone special. Happy Mother’s Day!

Spring Flowers (8)

I Hear Thunder

I Hear Thunder (1)

We’ve had crazy weather lately, including unseasonable May snow today. It had me thinking about weather songs to sing with Veronika, and this one has always been a favorite.

First, I simply sang the words for Veronika:

I hear thunder. I hear thunder.

Hear it roar. Hear it roar.

Pitter patter raindrops,

Pitter patter raindrops.

I’m all wet. I’m all wet.

The second time through, we added actions. You can just use your body at first: stomp feet on the floor for thunder, flutter your fingers through the air for rain, and give a big shiver at the end.

I Hear Thunder (6)

The shiver in particular made Veronika laugh every time!

I Hear Thunder (5)

Then we added props. Drums made the perfect thunder of course.

I Hear Thunder (3)

And shaky instruments like maracas and rain sticks were great for raindrops.

I Hear Thunder (4)

Veronika chimed in (literally!) on the triangle.

I Hear Thunder (7)

This all made for fun musical play on a windy cold morning.

Dress-Up Box

Dress Up Box (7)

Veronika has played dress-up with tot-sized clothes in the past, but sometimes it’s even more fun just to raid mommy’s closet!

Today, I pulled out items that were either old or that I simply didn’t mind Veronika playing with, and we set everything out on the ground for easy access.

Dress Up Box (1)

In no time, she was trying on old bathrobes and sports jerseys (which looked more like adorable dresses on her!).

Dress Up Box (5)

Add accessories like hats, purses, and shoes, and the mixing and matching can begin!

Dress Up Box (2)

For added fun, we decided our dress-up trunk (really just an old box) needed some sprucing up.

Dress Up Box (9)

Big brother joined in to help paint the sides of the box in multiple colors. This got pretty messy pretty quickly, but there’s no time like a chilly May morning to make a mess indoors!

Dress Up Box (10)

We left the pile of clothes out pretty much all day, and every time she went over to it, Veronika selected something new.

Dress Up Box (8)

Do your kids have a favorite dress-up item? Please share in the comments!

Dress Up Box (11)


Kindergarten Home School Week 8: Friday

Home School 39 d

There was very little schoolwork today because it was… National Field Day! We did start out with a few pages in Travis’s workbook, the first of which involved drawing a map of his neighborhood. Which meant instead of starting with circle time, we headed outside on a walk!

Home School 39 a

8-9: Geography. It was a crisp spring morning and Travis had so much fun walking and discussing our neighborhood that we walked for a full hour! When we returned, he was ready to draw his map on the corresponding workbook page.

Home School 39 b

9-9.30: ELA. Travis worked quickly on a workbook page about letter E and did about 10 minutes on Lexia, and that ended the academics for the day. (Baby sister kept busy with glue!)

9.30-10: Snack.

10-11: Field Day. Let the games begin! Travis and I picked 4 of the 20 suggested activities, and tackled the following:

Backboard Bank It: Roll up pairs of socks into balls, and place a laundry basket against a wall. Aim the socks at the basket, making sure they hit the “backboard” before landing. See how many you can get in 1 minute!.

Home School 39 c

Clothes Relay: Start at one cone and run to a second cone where an over-sized shirt is waiting. Put on the shirt and run back to the first cone to put on a hat. You can also include a stop at a cone with over-sized shorts, but Travis didn’t want to wear those. Time yourself!

Home School 39 g

Flip Your Lid: Start with a Tupperware lid lying right-side up on a table. Use a spatula to flip the lid, and count the number of times it lands upside down in 1 minute.

Home School 39 i

Tennis Shoe Tower: Pile a whole bunch of sneakers (or any shoes!) in the center of a room. Divide into teams (Mommy versus Travis!). Players run to take one shoe from the pile and run it back to their home space. Continue returning for another shoe and adding to your tower, until all the shoes have been used. Player with the most shoes wins!

Home School 39 k

That was the end of our Field Day. The afternoon included social time with a friend online and a music class for baby sister, and I confess there was some extra screen time thrown in since it was a bit of a lazy TGIF. Story time included a read of Martin’s Big Words: The Life of Dr. Martin Luther King, Jr.

Improv Games, 3 Ways

Improv Games (2)

Travis and Veronika were playing dress-up this afternoon and I seized on the opportunity to introduce a few improv games. It was a reminder that Travis is missing out on such play, now that his acting class is cancelled for the season, and it felt good to have silly fun!

First, we warmed up with a round of “Zip Zap Zop”. Point your hands at another person (ideally you’ll want three or more people, although Travis and I made do just the two of us) and slide them against each other, saying “Zip!” The next person says “Zap!” and then on to a third person (or back to the original first), who says “Zop!” Repeat and get faster and faster until everyone is hopelessly giggling.

Improv Games (1)

You’re warmed up!

Next we played “Yes, Let’s!” I demonstrated for Travis how to say, “Hey everyone, let’s all…” after which you choose an action. First we rode on broomsticks! Travis predictably had us marching like Darth Vader.  We also hopped like frogs, at which point baby sister wanted to join in.

Improv Games (3)

For the final game, we played “World’s Worst”, i.e. a firefighter who decided to chill out instead of fighting a fire.

Improv Games (7)

We were world’s worst construction workers dropping things or world’s worst weight lifter, too weak to lift a beach ball. Travis really got into these!

Improv Games (6)

It was great to have pure silly fun together.

Italian Beans & Farro

Italian Beans and Barley

This hearty dish comes together quickly, thanks to canned ingredients. If you can’t find farro, use barley instead.

Ingredients:

  • 1 cup uncooked farro
  • 3 cups water
  • 2 tablespoons olive oil
  • 1 minced garlic clove
  • 2 cups chopped green beans
  • 1 (15-ounce) drained and rinsed can chickpeas
  • 1 (15-ounce) can diced tomatoes
  1. Combine the farro and water in a saucepan. Bring to a boil, then cover, reduce heat, and simmer for about 20 minutes, or until the farro is tender. Drain any excess water and transfer to a large bowl.
  2. Meanwhile, heat the olive oil in a saucepan over medium-high heat. Add the garlic; cook for 2 minutes. Add the green beans and cook for an additional 5 minutes.
  3. Add the green bean mixture to the farro, along with the chickpeas and tomatoes, stirring to combine.

Color Match

Color Match (7)

Veronika is showing great interest in colors now. She knows all the words of the rainbow, but adorably gets them all wrong. “Yellow!” she’ll say with confidence, holding a blue crayon. “Purple!” she calls out, to just about anything. So today we played this little game to help associate each color with the correct word.

I set out pairs of construction paper and crayons, sticking with only four colors so as not to overwhelm her. We used: blue, red, yellow, and green.

Color Match (5)

For each color, I showed her the crayon and said (for example), “Yellow. Can you find me the yellow paper?” I then directed her to the right sheet so she could draw yellow on yellow.

Color Match (2)

Repeat with the remaining colors, or reverse it: “Here is blue paper. Can you find me the blue crayon?”

Color Match (3)

After she’d scribbled for a while, I wrote the name of each color on the paper, using black crayon.

Color Match (6)

Don’t expect your toddler to get this “right” on the first try, of course, as that’s not the point. These early color games are all about introducing the concept.

Color Match (4)

And of course she loved just scribbling.