Arctic Animal Experiment

Arctic Animal (4)

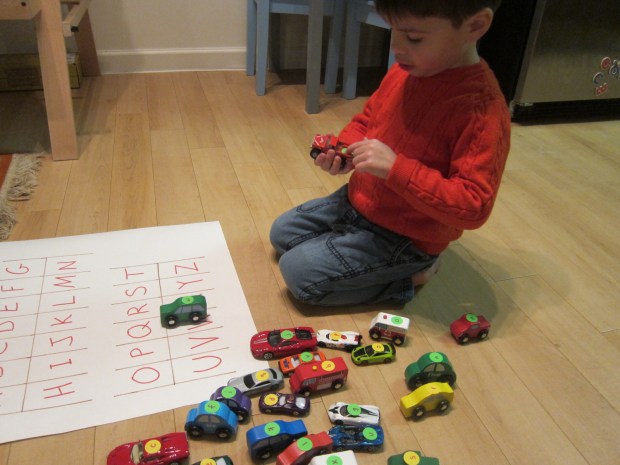
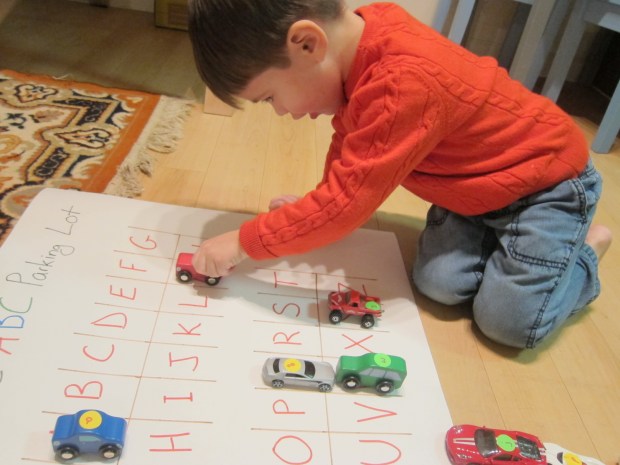
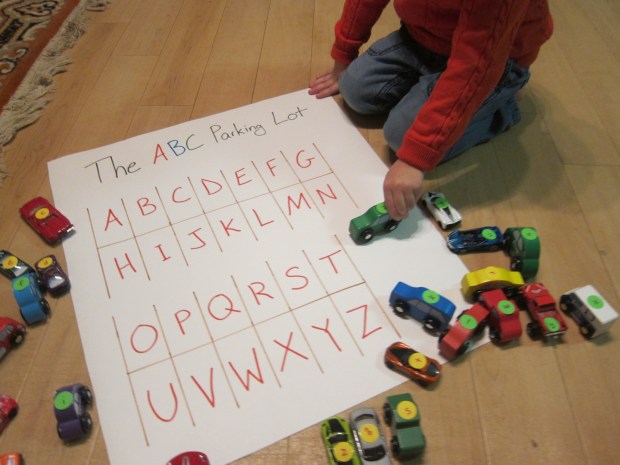
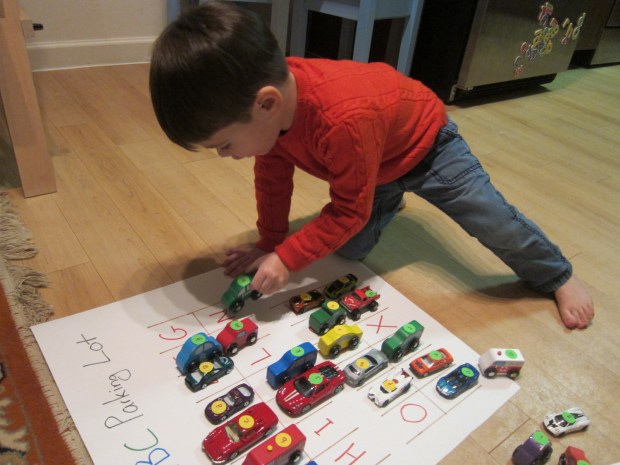
Following up on fun and icy magnetic play, we wanted another way to play with ice indoors. Recent reading about arctic animals such as penguins and seals was the perfect launching off point. I posed the question to Travis: How do arctic animals stay warm in icy water? The answer of course lies in their blubber, the thick layer of fat under their skin. To illustrate this for your child, get messy with this silly experiment!

First, give your child a bowl of water with ice cubes, and encourage them to plunge their hand in – if they dare! Travis cautiously dipped a finger. Brr!

Arctic Animal (1)

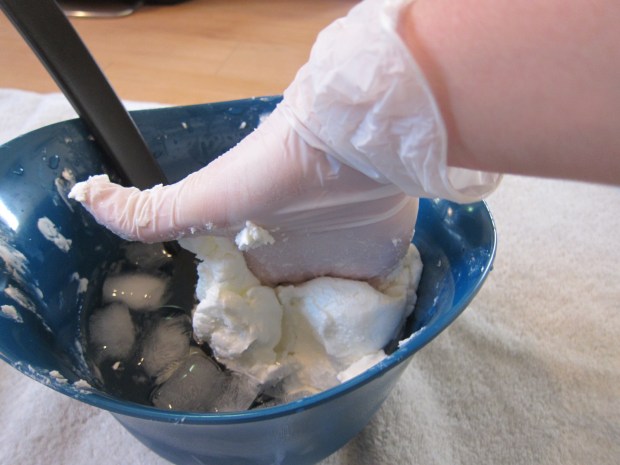
I promised him we could keep his hand warm in the icy water with a few simple steps. First add a latex glove. This layer alone won’t do the trick, of course, but we tested just to be sure.

Arctic Animal (2)

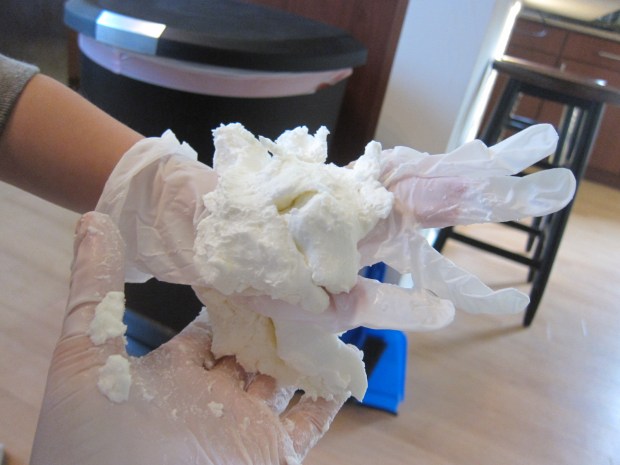
Next, dip your child’s glove-covered hand in a big vat of vegetable shortening (if you’re looking for a vegan and organic option, try Spectrum Organics). It will make a huge mess as you get your child’s hand covered front and back in the shortening (let alone take pics in the process!) but we mostly managed. Next time I would wrap the shortening-covered hand in plastic wrap to seal in all the mess.

Arctic Animal (3)

Now it was time to dip in. To be honest, Travis was significantly less impressed than I was, but he did notice that the fat-sealed hand didn’t flinch away from the cold ice cubes. I took a turn after, just to feel the difference.

Yup, here’s mama, just hanging out with her hand in icy water.

Arctic Animal (5)

Truly, you could keep your hand immersed this way for quite some time and not be bothered by the cold. If I’m ever crazy enough to do a polar bear swim, I’ll be layering up in shortening first.

Magnetic Ice Science

Ice Magnet (2)

This easy game is such a neat winter-time twist on magnet play!

To prepare, simply place small magnetic items in the compartments of an ice tray, and cover with water. Think small pieces of pipe cleaner, paper clips, metal rings, and similar small items. Freeze overnight.

Ice Magnet (1)

The next morning, I popped the ice cubes out into a baking dish, and invited Travis to see if he could pick up the frozen ice cubes with strong magnets from our magnet set.

Ice Magnet (3)

The results turned out to be so interesting, and lasted us the better part of a half hour! A few items, where the metal poked through the ice already, worked right away. The paper clips were remarkably strong even through a layer of ice.

Ice Magnet (4)

Travis loved discovering what would stick to his magnet already and what needed a wait, for the ice to melt somewhat.

Ice Magnet (7)

For some additional fun – under close supervision! – prop the baking dish between two stools and run your magnet wands underneath; Travis loved watching the magnets slide as if by magic from his wand under the tray.

Ice Magnet (8)

As we played, it became clear that the pipe cleaners were the real puzzle. The slightest bit of water was enough to get in the way of the thin metal strip inside the fuzzy layer.

Travis was the one who suggested we chisel away at our ice cubes to get to them – the perfect idea!

Ice Magnet (9)

We really had to work for that pipe cleaner; the pieces wouldn’t stick to our wand until only the tiniest shards of ice remained.

Ice Magnet (10)

Success at last! Overall, great icy and scientific fun, and Travis enjoyed playing with the magnetic items and wands even once the ice had melted.

Ice Magnet (11)

Snowman Stacking Cups

Snowman Stack (5)

There are so many uses for these easy little snowman figures, from competitive stacking games to imaginative play. All you need are 12 Styrofoam cups and you’re ready to go.

The game couldn’t be easier to set up. First, we cut circles from adhesive-back black felt for the eyes. Whoops – at this point they looked almost like ghosts. Wrong time of year!

Snowman Stack (1)

Orange carrot noses and little dotted mouths helped set things right. Now they looked like snowmen.

Snowman Stack (2)

For older kids, you can stage great stacking games to see which formations you can come up with…

Snowman Stack (3)

…or who can stack them the fastest. Travis had a hard time getting the snowmen into a pyramid, but he loved running the stopwatch and timing while I tried! Note of caution: static electricity can make things especially funny and interesting when it comes to stacking Styrofoam.

Snowman Stack (4)

After that we used our cups more as a playful prop. Travis set all the snowmen up for a picnic with a campfire.

Snowman Stack (7)

We decided snowmen would melt if they had a hot campfire, so made it out of… shredded coconut snow!

Snowman Stack (8)

Nothing wrong with stealing a nibble.

Snowman Stack (9)

Again, for Travis as a preschooler, stacking into complicated arrangements wasn’t interesting. He preferred to pile the snowmen atop one another into one big stack.

Snowman Stack (11)

But big kids (and moms and dads!) can heat up the snowman stacking competition to see who goes the fastest, or who comes up with the best stacking arrangement.

Snowman Stack (10)

What games will you play with your snowmen cups? Please share in the comments!

Molasses Muffins

Molasses Muffins (1)

I probably don’t need to sing the praises of molasses to most vegans – we’re all familiar with this powerhouse of B vitamins and iron. I try to keep molasses on hand – it’s great in smoothies! – but had just a little bit left in a jar that I wanted to use up. Enter this perfect little recipe that only yields a half dozen muffins. It’s exactly right for when you only have a little bit of an ingredient on hand or don’t need to feed a crowd!

Ingredients:

For the topping:

  • 1 and 1/2 tablespoons Earth Balance butter
  • 1/4 cup flour
  • 1/4 cup sugar
  • 1/4 teaspoon cinnamon
  • Pinch of ground ginger

For the muffins:

  • 1/4 cup molasses
  • 6 tablespoons applesauce
  • 1 tablespoon canola oil
  • 3/4 cup + 2 tablespoons flour
  • 2 teaspoons baking powder
  • 1/8 teaspoon cinnamon
  • 1/8 teaspoon ginger
  • 1/2 cup raisins
  1. To prepare the topping, melt the butter and place in a large bowl. Add the remaining topping ingredients, combining with a fork; set aside.
  2. In a bowl, whisk together the molasses, applesauce, and oil. Set aside.
  3. In a large bowl, combine the flour, baking powder, cinnamon, and ginger. Stir in 1/3 cup of the topping mixture, along with the molasses mixture, and the raisins, stirring just until combined.
  4. Divide the muffins evenly among 6 muffin cups coated with cooking spray. Sprinkle evenly with the remaining topping mixture.
  5. Bake at 350 degrees F for 20 minutes – a wooden pick inserted in the centers should come out clean. Cool on a wire rack, or serve warm.

Molasses Muffins (2)


Glow-in-the-Dark Constellation Cards

Constellation Cards (6).JPG

This project is such a neat update on simply sticking glow-in-the-dark stars on your child’s wall or ceiling as décor. Turn it into a mini astrology lesson – as well as an art project! – and you have homemade constellations.

First, we needed to find images of constellations as inspiration. I’m no artist, so relied heavily on the ones we found in our Usborne Book Big Book of Stars and Planets.

Constellation Cards (1)

Set out dark paper and glow-in-the-dark paint and recreate the star patterns. Older kids can draw the outlines and stars themselves. Younger kids may be happier filling in the dots if you draw circles where the stars go first.

Constellation Cards (3)

In fact, Travis was happy painting his own invented “constellation” while I did the more meticulous detail of recreating what was in the book – just fine for a three year old!

Constellation Cards (4)

A couple pointers: If you have dark cardstock instead of construction paper, use that. The paint will show up better. If you’re relegated to porous construction paper like we were, make sure your star dots are quite thick, or the paint won’t show up once it’s lights out.

Constellation Cards (2)

We let the paint dry, then I connected the stars with white crayon. I added the name of each constellation in crayon as well.

Constellation Cards (5)

Note: If you prefer, you can also paint the lines between stars with glow-in-the-dark paint, but I liked the idea that Travis would see just the stars in the dark, and the constellation lines by day.

Next up was mounting the cards on the ceiling – uh oh, could mama reach that high? Thanks to a stool, she could! I positioned them directly above the lamp in Travis’s bedroom so they could “charge.”

Constellation Cards (7)

At lights out, we saw the best starry night sky! My camera could barely capture it, but do you see the glow?

Constellation Cards (8)


Recycled Jet Pack Costume

Jet Pack (12)

We’ve been having fun with empty cereal boxes lately. Combine that with Travis’s current interest in the moon and space exploration, and what better item to turn our cereal container into than a jet pack?

To start, cut the ends of two toilet paper tubes and fold them outward; they’ll look almost like little octopuses.

Jet Pack (1)

Wrap the tubes in foil, then duct tape them to the ends of the cereal box.

Jet Pack (2)

Note: Ideally you’ll have silver duct tape. Unfortunately, I only had yellow duct tape on hand… but it was nothing that a little silver paint couldn’t solve in a pinch!

Jet Pack (4)

Next, wrap the cereal box in aluminum foil, and tape the edges with duct tape. (Add your silver paint to cover any duct tape, if needed, at this point).

Jet Pack (5)

It’s up to your little explorer how they want to decorate the jet pack. Travis always needs lots of glue of course.

Jet Pack (7)

We added construction paper buttons and glitter glue, because of course a project this silver needs glitter glue.

Jet Pack (8)

Use hot glue to attach ribbon or string onto the top and bottom corners of the box; these will be the shoulder straps.

Jet Pack (13)

Our jet pack couldn’t launch without flames, of course! A few strands of tissue paper glued into each tube solved that problem.

Jet Pack (9)

And now we’re ready to fly.

Jet Pack alt

What else might you make from empty cereal boxes? I’d love to hear ideas in the comments!

Jet Pack (10)

Cereal Box Racetrack

Cereal Racetrack (9)

The next time you polish off a box of cereal, think twice before tossing it into the recycle bin. Cereal boxes make for fantastic upcycled crafts! Proof? This easy car racetrack.

To start, begin cutting down the long side of the box, about two inches in from the edge. Continue to cut all the way down, around the bottom, and back up the other side.

Cereal Racetrack (1)

Now snip the corners where the sides meet the bottom, so the piece lies flat. Repeat this step on the other side of the box, again two inches in from the edge. Join those two pieces together and you’ll have one long track. We did this with two cereal boxes, so the image below shows the resulting tracks from both boxes.

Cereal Racetrack (3)

Line your race tracks with colored duct tape to create the perfect racing surface.

Cereal Racetrack (4)

You can add embellishments such as pipe cleaner hoops for your cars to travel through.

Cereal Racetrack (5)

Later, we were feeling especially fancy and cut construction paper into decorative “flames,” which we then taped onto the pipe cleaner hoops.

Now ladies and gentlemen, start your engines!

Cereal Racetrack (8)

Travis got the hang of giving his cars a push (rather than keeping a hand on them) quite quickly, and in fact his cars beat mine in many races!

Cereal Racetrack (7)

A super easy and super fun way to race inside on a winter day.

Cereal Racetrack (6)

Breakfast Nachos

Breakfast Nachos (2)

As the name of this recipe suggests, this twist on nachos is just right for starting the day before kids head off to school. Of course, nothing wrong with serving the nachos for dinner, either! Check your tortilla chip bag for the suggested serving size, which will depend on the size of the chips and particular brand. Generally “one serving” makes the right-sized base for the rest of these ingredients. The portion below will serve two little tots, or one hungry big kid (or grown-up!)

Ingredients:

  • 1 serving tortilla chips
  • 1/3 cup scrambled tofu (store-bought or homemade)
  • 1 tablespoon guacamole
  • 1 tablespoon salsa
  • 1/4 cup shredded Daiya cheddar
  1. Arrange the tortilla chips in a pile on a foil-lined baking sheet.
  2. Top evenly with the tofu scramble, guac, salsa, and cheese.
  3. Bake at 425 degrees F for 5 minutes, just until the cheese melts.

Breakfast Nachos (1)

Letter Match Parking Lot

Parking Lot (11)

This game is by far the best way yet I’ve found to get Travis excited about matching upper and lower case letters. He knows his upper case with no trouble, but still mixes up some of the lower case toughies, like d and b, n and u, or p and q. Start your (toy) engines and your little ones will be matching all their letters in no time!

To prepare the parking lot, we first needed to make sure we had 26 cars in the house. I thought we might be a few short, but it turns out we had more than enough – where do all these cars come from? Travis was thrilled when he saw them all lined up.

Parking Lot (1)

Write out the lower case letters on stickers, and apply one to each car; set aside.

Parking Lot (2)

Next I set up the parking lot, drawing 26 spaces on a big sheet of poster board.

Parking Lot (3)

You can use a ruler if you want your lines to be nice and neat. Label each parking space with capital letters, A through Z.

Parking Lot (4)

Now it was time to drive our cars in. Travis has dragged his heels with other letter matching games but to my delight, he thought this was just about the best game in the world. Each car received a driver’s name, and drove proudly to its assigned spot.

Parking Lot (6)

I was happy I only had to correct him a couple of times, on some of those tricky mirror image ones mentioned above. Little m finds a spot!

Parking Lot (8)

He found it a little difficult to locate the right capital letter a few times, especially when the lot was empty at the beginning. It was helpful to sing the ABC song together, so he knew whether the letter would be near the top row or bottom.

Parking Lot (5)

Because you can’t have a game without a hefty dose of preschooler imagination thrown in, he soon decided that it was a snowy parking lot, and all of the cars would need to shovel out.

Parking Lot (10)

No sooner did we park them all than he wanted to do it again!

Parking Lot (12)

What’s your favorite way to match capitals and lower cases with your preschooler? Please share in the comments!

Penny Toss

Penny Toss (6).JPG

On the heels of our Mouse Hole Roll, Travis and I added a penny toss to our indoor circus and carnival games!

To start, we needed three different colors of construction paper and round items to trace. You can turn this into a hunt for circular items around the house if your kids are learning their shapes. Records were perfect for the middle and smallest circles, but I had to free-hand the largest circle since we didn’t have anything round that was quite that big.

Penny Toss (1)

Glue the circles together and let dry.

Penny Toss (2)

Colored-in clown templates add a nice decorative touch.

Penny Toss (4)

Then it’s time to play!

Penny Toss (5)

Travis wasn’t quite as into the penny toss as he was with the mouse hole game, but we got in some good tosses.

Penny Toss (7)

His first few attempts bounced quite far off the circles, which I could see surprised him. So it was good motor skills practice to learn more precise aim.

Penny Toss (8)

Bullseye!