Mouse Hole Roll

Mouse Hole (8).JPG

Travis and I made a bit of an indoor circus over the long holiday weekend, including a few cute carnival game ideas we spotted online. The first we put together was a mouse hole rolling game.

To start, you’ll need any box; cut off the flaps and set one flap aside for decoration later. Discard the remaining flaps.

Mouse Hole (1)

The box doesn’t have to be huge, but the one we had on hand was a fairly good sized. This ended up being great though – it is by far the largest surface Travis and I have ever painted together, and he was gleeful, deciding it was almost like being a house painter.

Mouse Hole (2)

We slathered three sides and the top in blue paint.

Mouse Hole (4)

We also painted the remaining flap, then set both aside to dry (safely in the bathroom where little boys and cats wouldn’t bump into them and become covered in wet paint!)

Mouse Hole (3)

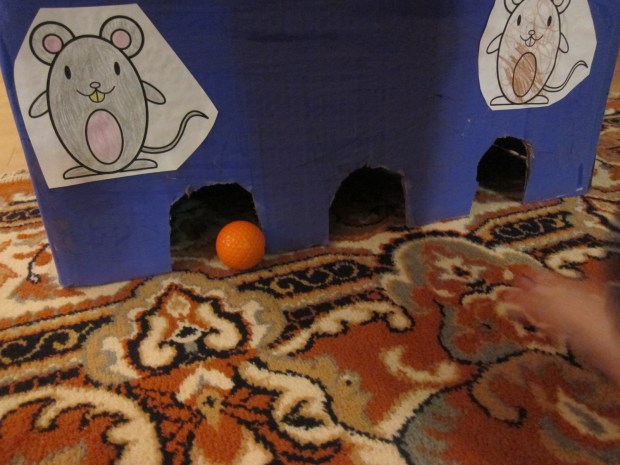
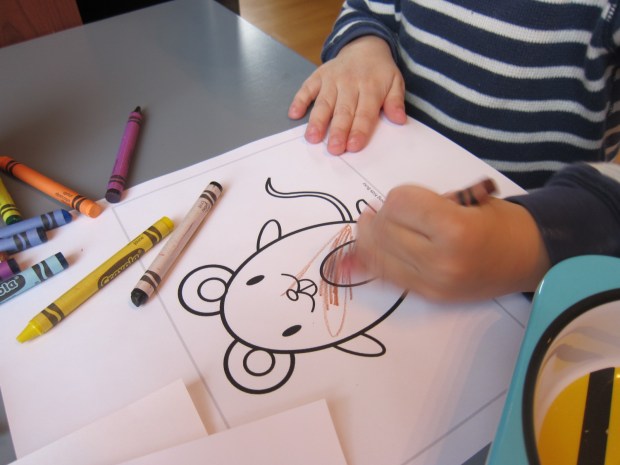
Once dry, our game needed a few final touches. Adults: cut three holes from the bottom to be the mouse hole goals. Kids can then color in mouse templates (we found ours online) and glue on.

Mouse Hole (6)

Dot markers and the name of the game adorned our cardboard flap, which I then hot glued to the top of the box.

Mouse Hole (7)

To play the game, simply take turns rolling golf balls or ping pong balls at the target, and see who can get the most little mice into the holes!

Mouse Hole Roll (10)

Feet work too, of course.

Mouse Hole Roll (9)

Needless to say, this game was a big hit.

Mouse Hole Roll (11)


Frozen Soap Bubbles

Frozen Bubbles (3)

Here’s the perfect game to turn cold (and I mean truly freezing!) weather to your advantage. Believe it or not, I used to hate winter and cold weather. As a mom, I now found myself gleeful when I saw the 10 degree forecast since I knew it meant our frozen bubble solution was definitely going to work.

To prepare the bubble solution, pour a little dish soap into a container, and add a few drops of vegetable glycerin. Notice Travis’s eager hands by the countertop there – he was very curious what I was up to.

Frozen Bubbles (1)

We wanted to test our solution indoors before venturing outside and realized we had no bubble wands around the house! Fret not: cut a few straws in half, gather into a bundle, and secure with a rubber band for the easiest homemade blower ever.

Why pop bubbles with your fingers when you can use a sword?

Frozen Bubbles (2)

Ok, the next step was to bundle up and face the chill. The longer you’re in the cold, the more interesting this will be. The bubbles don’t pop when they hit the ground, but instead float down in big clumps and freeze to the grass.

Frozen Bubbles (5)

Perfect for popping with that sword, of course.

Frozen Bubbles (4)

If you pop them with a finger, they become almost stringy, instead of disappearing straight away. Popping them left what looked almost like white frost on the ground, and Travis adored it!

A note to all those of you feeling cabin fever: Travis was initially hesitant to go outside, but he had so much fun that he was soon demanding we make more bubble solution – and I was the one who had to say our pink noses meant it was time to head back inside. So give those kiddos a nudge and get out there to enjoy! Easily the most magical 10 minutes of our day.


Celebrating the International Kite Festival

Kite Fest (4).JPG

I love introducing Travis to international holidays and festivals, and this cute idea popped up in Little Passport’s blog to mark the International Kite Festival or Uttarayan. Celebrated January 14 and 15 in Gujarat, India, we joined in the fun with a quick homemade kite. This project wasn’t anywhere near as involved as the plastic bag kite we crafted some time back (nor did it truly fly), but it was great fun to flutter about!

To make the kite, cross two wooden skewers into an x and tie at the center with string.

Kite Fest (1)

Cut a long piece of string, and wrap around the tip of one skewer. Stretch to the next tip and wrap. Continue until you’ve stretched and wrapped around all four tips, creating a square frame.

Kite Fest (2)

Cut a square from tissue paper slightly larger than your frame. Fold the edges of the tissue paper over the frame and secure with tape.

Kite Fest (3)

For the tail, add a long piece of string and tie on additional strips of tissue paper for bows.

As mentioned, the kite didn’t fly so great (it has no spool of string to launch it, for one thing!), but Travis loved running with it behind him and having it flutter all over the apartment.

Kite Fest (6)

We watched a video about the celebration so Travis could further appreciate what we were making. Add in some friendly insect kites we had at home, and we had a nice little indoor Uttarayan of our own.

Kite Fest (5)

One additional note: If you are anywhere near an actual celebration of the kite festival, please avoid using kites where the strings have been treated with glass (a common practice). This can cause serious injury to birds who fly into the strings. Have a happy and humane Uttarayan!

Egg Carton Boat

Egg Boat (5).JPG

Travis has been having so much fun with the foam and cork canoe we crafted a few weeks back that we decided to add to our upcycled bathtime collection!. Half of an egg carton from my in-laws’ house was the perfect base for our boat.

Cut an egg carton in half; save the remaining half for another use.

Egg Boat (1)

Decorate the carton with markers or paints. Markers will probably work fine on a cardboard egg carton, but since ours was Styrofoam, we used dot markers. Travis loved making each tip of the boat a different color.

Egg Boat (2)

I cut a triangle from white paper, which we decorated as well, then taped to a wooden stick. Voila! A sail.

Egg Boat (3)

Stick your mast into the base of the boat, and it’s time to set sail.

Egg Boat (4)

Use any toy figures you have, such as Duplo people, to be your sailors. Ahoy mateys!

Egg Boat (6)

The verdict is that this boat didn’t last very long (the sail is toast the minute it gets wet), but Travis had so much fun with it that bath was double its normal length in time! I don’t post bathtime pictures, but needless to say there was lots of capsizing, splashing, rescue games, motor boats running out of gas, storms at sea, and more.

Egg Carton Penguins

Egg Penguin (6)

We don’t buy eggs, but I do confess that egg cartons from my in-laws’ house make for fantastic up-cycled crafts. We got the idea to make these cute figures after a feature on penguins in our first issue of Ranger Rick Jr. We quickly decided we needed some adorable toy penguins around the house!

Egg Penguin (1)

Cut an egg carton into indiviaul compartments and paint with black tempera paint. Since the carton was originally pink Styrofoam, it took two coats of paint before we hid the color underneath.

Egg Penguin (2)

Next we made sure to gave them white bellies!

Egg Penguin (5)

I cut out orange hearts to be the feet and orange triangles to be the beaks from a sheet of orange felt, and Travis helped glue these on.

Egg Penguin (4)

Googly eyes were the finishing touch!

Egg Penguin 8)

Now we have adorable penguins to march around and bring our magazine story about the animals to life!

Egg Penguin (3)

Upside-Down Mini Banana Muffins

Upside Muffin c

These inverted muffin bites couldn’t be cuter – or tastier! A few of them make a great breakfast or snack.

Ingredients:

  • 24 teaspoons Earth Balance butter
  • 24 teaspoons brown sugar
  • 1 cup flour
  • 1/3 cup brown sugar
  • 2 teaspoons baking powder
  • 3/4 teaspoon cinnamon
  • 1/3 cup canola oil
  • 2 Ener-G eggs
  • 1/4 cup non-dairy milk
  • 1 and 1/2 teaspoons vanilla extract
  • 1 banana
  1. Place 1 teaspoon butter and 1 teaspoon brown sugar in each of 24 mini muffin cups. Bake at 375 degrees F for 5 minutes; let cool slightly.
  2. Meanwhile, combine the flour, 1/3 cup brown sugar, baking powder, and cinnamon in a large bowl; set aside.
  3. In a second bowl, whisk together the canola oil, Ener-G eggs, milk, and vanilla. Add the wet ingredients to the dry ingredients, stirring until combined.
  4. Thinly slice the banana into 24 slices, and place 1 banana piece over the melted brown sugar in each muffin cup. Divide the batter evenly among the muffin cups and bake for an additional 12 minutes, until set. Let cool slightly in the pan before transferring to a wire rack.

Upside Muffin b

Happy Apple Discs

Happy Apple Discs (1)

What is it about a cored apple cut into circles that just makes you feel happy as you eat it? I remember a far-from-gourmet dinner from my childhood called Happle Apple Bagels, (a round sliced apple on a bagel with melted cheese, enough said!) and certainly that was all it took to make us happy for dinner. These Happy Apple Discs are fantastic for an after school snack or a protein boost first thing in the morning.

Ingredients:

  • 2 Granny Smith apples
  • 4 tablespoons non-dairy cream cheese
  • 1/4 cup creamy peanut butter
  • 1/8 teaspoon cinnamon
  • Non-dairy chocolate chips (such as Enjoy Life)
  • Shredded coconut
  1. Core the apples and cut each into 8 thin slices; set aside.
  2. In a bowl, stir together the cream cheese, peanut butter, and cinnamon until blended.
  3. Spread the peanut butter mixture evenly over the apple slices. Serve as is, or add mini chocolate chips and shredded coconut as toppings, if desired!

Happy Apple Discs (2)

Glowing Snowman Luminary

Glowing Snowman (10)

I wanted to make these adorable glowing snowmen to light up a dark blizzard afternoon recently. It turns out Travis wasn’t at all interested in putting the craft together (hey, sometimes it happens!) but he did love the end result. The snowman is another way to add a cozy glow to winter’s dark nights.

For best results, you’ll need an empty Pom juice bottle to create a nice curvy snowman. I couldn’t find Pom at the store, but did snag a kid-sized Evian bottle that worked just as well.

Glowing Snowman (1)

Paint your curvy bottle with two coats of white paint on all sides (but not the bottom), letting dry thoroughly after each coat.

Glowing Snowman (2)

You know that pesky tendency kids’ socks have of disappearing one from each pair? Use that to your advantage here!

Glowing Snowman (3)

Cut up any old or mismatched socks to make hats and scarves. For a hat, cut the toe off a sock. Tie with a string near one end, and snip those ends into strips to make a “pom pom.”

Glowing Snowman (4)

Cut a long, thin rectangle from another spare sock, and tie around the middle of the bottle as the snowman’s scarf.

Glowing Snowman (5)

To finish the snowman, we used sticky-back felt cut into circles for eyes, a nose, and buttons (which Travis finally acquiesced to sticking on!)

Glowing Snowman (7)

What a dapper fellow!

Glowing Snowman (8)

When you’re ready to make your snowman glow, simply place him atop a battery operated tea light and illuminate the night.

Glowing Snowman (9)


Ice Lanterns

Ice Lanterns (9)

This is a beautiful project to showcase finds from winter nature walks! It’s a multi-day project, requiring two separate rounds of freezing, but kids will love the final glowing result.

First you’ll need those winter treasures – think holly leaves, little berries, pinecones, and pine needles.

Ice Lanterns (1)

Arrange some of the items in a plastic container (or multiple containers, if you have enough nature items), and fill halfway with water. Freeze overnight.

Ice Lanterns (2)

The next day, Travis was very eager to check out the layer of ice we’d created.

Ice Lanterns (3)

Add a second layer of winter finds over the ice, and also place a glass jelly jar inside. Add water to the top of the plastic container, and freeze again overnight.

Ice Lanterns (4)

Note: If the weather is cold enough, you can even do the freezing outside!

For the final lantern, you need to release the glass jelly jar, leaving behind a hole for a candle. Fill the jelly jar with warm water just for a minute or two, and it should slip out.

Ice Lanterns (5)

Now run water around the outside of the plastic container, and release your whole ice lantern.

Ice Lanterns (6)

Note: Because our pinecone extended past the middle of our container, our jelly jar wasn’t centered. This didn’t present a problem; it just meant that our final ice lantern wasn’t going to glow as evenly! You can see in the above photo how our candle hole is on one side of the lantern, instead of directly centered.

Finally, place a battery operated tea light inside, and watch the lantern light up the winter night!

Ice Lanterns (7)

You can leave these outside, or take them inside for a warm winter glow.

Ice Lanterns (8)

Mexican Mac ‘n’ Cheese

Mexican Mac

This south-of-the-border spin on kids’ perennial favorite will help spice up mac ‘n’ cheese night! For the tortilla chips, I like to serve the white bean chips from Beanitos for a little nutritional punch.

Ingredients:

  • 1 package vegan mac ‘n’ cheese mix (such as Annie’s)
  • 1/2 cup jarred salsa
  • 1 cup black beans
  • 1 cup canned corn
  • Crushed tortilla chips
  1. Prepare the mac ‘n’ cheese according to package directions.
  2. To the saucepan, add the salsa, black beans, and corn, stirring to combine.
  3. Crumble the tortilla chips and serve on top to taste.