Croquet for Crawlers

Croquet Crawlers (7)

Stuck inside with your baby on a rainy day? Look no further than this indoor game of “croquet”, perfect for crawlers, to keep the little one entertained.

Cut the square ends off a shoebox and discard; you’ll be left with a rectangle.

Croquet Crawlers (1)

Cut the remaining rectangle into pieces so you have 3 to 4 “wickets”.

If you’re using an adult-sized shoebox, tennis balls work great for this game. Because I used a child-sized shoebox, the tennis balls were too large but some balls we have from a shape sorter were just right.

Croquet Crawlers (2)

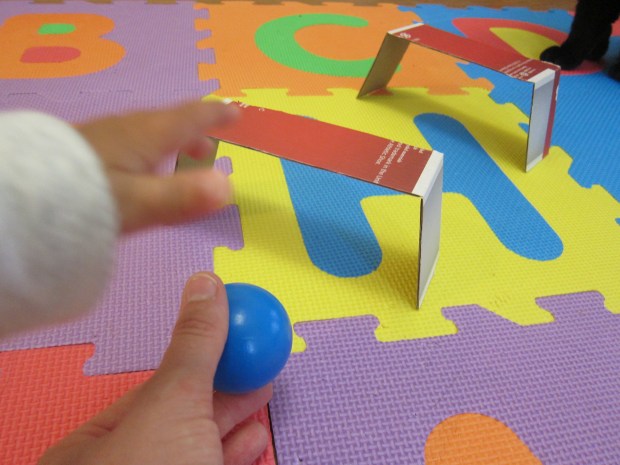
I lined the wickets up in a row and showed Veronika how to roll the ball through them. She immediately gave her ball a little half-roll half-push.

Croquet Crawlers (4)

She loved both watching me roll balls and taking her own turns. (Plus see the cat waiting to catch the ball? Everyone was entertained!).

Croquet Crawlers (5)

After we had played with the wickets in a row, I set them up more free-form and encouraged her to roll balls back and forth and all around, crawling between wickets all the while.

Croquet Crawlers (6)


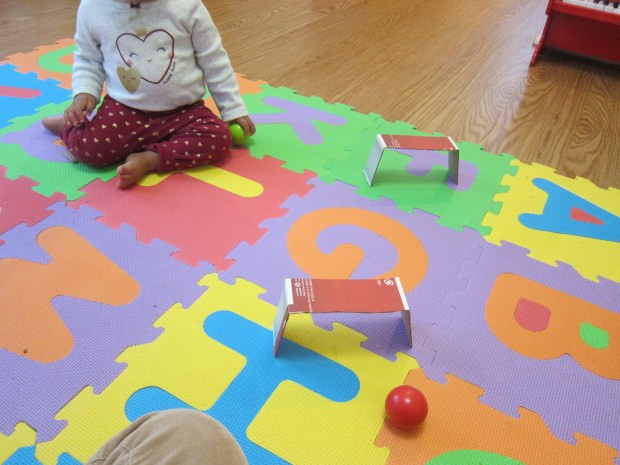
Picking up wickets was half the fun, of course.

Croquet Crawlers (8)


In sum, she loved this little game!


Croquet Crawlers (9)

Silly Hats

Silly Hats (3)

At 11 months old, you’ve probably noticed your baby has quite the sense of humor. So play it up with some silly “hats”!

I collected a pile of items, none of which were actually hats: a colander, a soft book, a pair of shorts, beach buckets, and a box.

Silly Hats (1)

One by one they went on my head. You can see from her expression that she knew mom was being silly. Here’s a big grin for the book.

Silly Hats (2)

She tried it on next, to lots more giggles. Oh Mom you’re so silly: there’s a bucket on your head!

Silly Hats (4)

The colander was a favorite.

Silly Hats (7)

She kept handing me this one over and over, as if demanding a repeat performance. But wasn’t so sure she wanted it on her own head…

Silly Hats (8)

The shorts got lots of laughs…

Silly Hats (9)

…as did a soft purple box.

Silly Hats (5)

She even seemed to want me to pile objects one on top of the other (because we all know moms wear many hats). What else could be a silly hat in your house? A tambourine?

Silly Hats (10)

Something even sillier? Have fun with this one!

Silly Hats (6)


Display Shelf

Display Shelf (7)

It’s hard to believe, but my baby girl is almost 1 year old! That makes this a nice time to take stock of what’s in her room, the treasures she’s accumulated in one year, and to set up a surface that can become her sort of personal “museum” moving forward.

First, I just sat down to go through a few special items with Veronika. Everything from baptism gifts…

Display Shelf (2)

…to music boxes…

Display Shelf (1)

…to heirlooms from grandparents and even great-grandparents.

Display Shelf (4)

It was a trip down memory lane for me, too, remembering back to her first few weeks and visitors. Meanwhile, Veronika just seemed delighted by all the items as I talked with her about them.

Display Shelf (3)

Up on the shelf they went for display. My goal is to add to the shelf over time, including special framed pictures of Veronika and things that she’ll make or find over the years.

Display Shelf (5)

What would go in your baby’s “museum”? Please share in the comments!

Make a Story Time Fort

Story Fort (8)

It’s hard to get Veronika to sit still with a book, especially at bedtime when we try to fit in a story between dinner and bath.

But not so when I made this fort! She was content inside for ages with a pile of books.

To make the fort, move your sofa from the wall to create a space large enough for you and your little one (alternatively, you can make the fort under a dining room table). I layered the floor with cozy blankets and pillows.

Story Fort (1)

Drape a sheet over the back of the couch and secure with shoes or books. Then head inside!

Veronika scooted it in and was immediately delighted.

Story Fort (2)

I gave her a pile of books, and soon she was thumbing through them and “reading” to herself.

Story Fort (4)

Of course then it was time to join her and read a few books for real.

Story Fort (3).jpg

You can even add a flashlight to highlight pages or words. Once the book was through, I retreated to the side of the fort and let her take over, crawling on the pillows, enjoying her books, and reaching up for the beautifully draped ceiling.

Story Fort (7)

We probably would have stayed in longer except the cat eventually ruined the “roof”!

Story Fort (6)

Light Chaser

Light Chaser (2)

Here’s a final cute game I’ve found to play with Veronika using a flashlight, just before bed.

After her bath tonight, I simple shined a flashlight on the floor. Veronika was instantly intrigued with the spot of light on the floor.

Light Chaser (1)

Now drag the flashlight in a line or zig zag around the room. This game will be great for encouraging early crawlers, plus amusing for any already-fast crawlers! I shined the light in a path along the floor, and Veronika had to go chase it.

Light Chaser (3)

Almost there…

Light Chaser (4)

Caught ya! Babies will marvel that they are touchign the light but not feeling anything in their hands. The game is also a great way to engage older siblings in baby’s bedtime. Travis loved running the light around the room for her, admittedly sometimes too fast.

Light Chaser (5)

Food Faces

Foodie Faces (1)

If you find that your 10-month-old is still playing with food more than eating it, you’re not alone; pediatricians point out that until age 1, any solids count as practice, with the main source of calories still coming from breast milk or formula. So practice away!

Now is the time for food to be fun, and today, I gave Veronika two “faces”, one at breakfast and one for a snack.

The breakfast face had a banana smile, strawberry nose, grape eyes, and raisin pupils (soak the raisins in water first, so they are less of a choking hazard). I pointed out each feature to her before she began smearing and picking up portions.

Foodie Faces (2)

At snacktime, I laid out another silly face: cooked noodles for the mouth, cooked carrot for the nose, cherry tomatoes as eyes, corn as pupils, and shredded Daiya cheese as the hair.

Foodie Faces (3)

Again I pointed and named each feature, but soon her brother wanted to eat the cheese, which Veronika thought was hilarious. I added a pile of extra noodles and it turned into sensory play. Now that’s foodie fun!

Foodie Faces (4)

Finger-Paint Art

Finger-Paint Art (9)

I’m getting braver when it comes to Veronika and art, but as a safety measure, it’s still a good idea to keep art materials contained or edible at this age. This edible finger-paint is a cinch to whip up!

To make the paint, combine 4 tablespoons boiling water and 4 tablespoons cornstarch, mixing well with a whisk.

Finger-Paint Art (1)

Continue to add boiling water just until the paint looks like heavy cream. Divide among 4 cups and add food coloring. Let cool completely.

I stripped Veronika down to her diaper and taped a large piece of craft paper to the table (precautions are still necessary to avoid a huge mess) and sat down with Veronika on my lap.

Finger-Paint Art (2)

I showed her how to dip her fingers or whole hand into the cups of paint, and then press onto the paper. She seemed hesitant at first…

Finger-Paint Art (4)

…but soon was smearing away!

Finger-Paint Art (3)

My hope had been to get some nice finger- or handprints that could be transformed into little pictures. Alas, most of hers were too messy, so I made a mommy handprint and turned it into a little turkey with markers.

Finger-Paint Art (8)

Drawing flowers or bugs or any other creation would be cute, too! Another fun idea was dipping some fabric into the paint, and then smearing this all over our paper.

Finger-Paint Art (5)

Once we had lots of nice blobs, I folded the paper in half and then opened back up again to introduce the notion of symmetry.

Finger-Paint Art (11)

And then the art lesson was done and it was time for clean up and new clothes!

Finger-Paint Art (7)

Classic Beating on Pots & Pans

Classic Pots (8)

Today I needed to keep Veronika occupied while baking banana bread, so I pulled out an old classic: a kitchen percussion set made from pots and pans.

For novelty, though, I made today’s focus less about the musical element and more about sensory play. I provided her with several different types of baking ware: a saucepan, a muffin tin, and a loaf pan. We started out drumming with bare hands, and I drew her attention to the sound this made.

Classic Pots (3)

Then I set out a variety of implements to be drum sticks, everything from spatulas to wooden spoons to cookie scoops.

Classic Pots (5)

Look for a variety of materials in your kitchen; we had soft silicone, wood, metal, and more. I sat with Veronika and asked her about the different sounds she was hearing. She grinned up at me and tested them all!

Classic Pots (4)

When I showed her how to swirl the whisk in a muffin cup or saucepan, she was an eager mimic.

Classic Pots (7)

You can also make piles and see how this changes the sounds around. If the loaf pan was on top of the muffin pan, it sounded different (more metallic) than when it sat alone on the floor.

Classic Pots (6)

Once our little sensory lesson was done, Veronika kept busy by herself as mommy finished up the banana bread. A win-win!

Classic Pots (2)

Cruise Control

Cruise Control (7)

Veronika loves pulling up these days, anywhere and everywhere, and is making those first moves towards walking. To safely encourage those first few steps, one great practice area is a cruising station!

I lined up a few child-sized chair in our kitchen, with the backs securely against a cabinet so they couldn’t tip. I started Veronika at one end and placed a tantalizing toy on the other end, hoping to encourage her to side-step.

Cruise Control (1)

It turned out she was way more interested in the circular back of the chair where I had started her than in the toy!

Cruise Control (2)

So thinking quickly, I reversed her and started her on the other end. Now she had incentive…

Cruise Control (3)

She moved her hands…

Cruise Control (4)

…and then her little feet followed. Soon she had the gist of it, and arrived at her goal so proudly.

Cruise Control (5)

Success!

Cruise Control (6)

Eventually, I did put the toy back on the other chair, and this time she knew how to side-step on over.

Cruise Control (8)

This game was a fantastic success for gross motor development, and enjoyable to boot.

Cruise Control (9)

I Spot

I Spot (3)

Recently I played a fun game with Veronika just before bed flashing colors through scarves. Tonight, we put the flashlight to a different use!

Simply walk around and shine the light on various objects in your child’s room (or elsewhere in the house). For each item, say in a soft voice, “I spot a…”

I spot the light switch.

I Spot (5)

I spot a treasure box.

I Spot (1)

And so on. Sometimes, Veronika wanted to hold the flashlight and help. I spot a clock.

I Spot (2)

Sometimes she wanted to reach out and touch, and sometimes just look. I spot an apple.

I Spot (4)

This can easily become a cherished routine; if you repeat items nightly, it will reinforce the names of familiar and treasured items, and can also help lull your baby. Veronika loves it!

I Spot (6)