Easy Bird Feeders

Easy Bird Feeder (14)

Here are a few easy ways that even a toddler can help make bird feeders! It’s never too early to teach compassion for feathered friends.

I set out a tray with all of our materials: o cereal, sunflower seeds (make sure to buy them unroasted and unsalted), pine cones, a toilet paper tube, pipe cleaners, and yarn.

Easy Bird Feeder (8)

For the first version, show your toddler how to thread the o cereal onto either yarn or a pipe cleaner. The pipe cleaner turned out to be much sturdier for Veronika’s little fingers.

Easy Bird Feeder (2)

Not to mention the o cereal turned out to be more fun as a snack than for threading, which was just fine!

Easy Bird Feeder (1)

To complete this bird feeder, simply loop the pipe cleaner or yarn at the ends, and it’s ready to hang.

Easy Bird Feeder (5)

For the next version, I gave Veronika a plastic spoon to spread peanut butter over the toilet paper tube. Punch two holes near the top to thread a pipe cleaner handle, then roll in the sunflower seeds. (Note: You can also use commercial bird seed, but I liked that sunflower seeds kept the project completely edible for Veronika… just in case!).

Easy Bird Feeder (6)

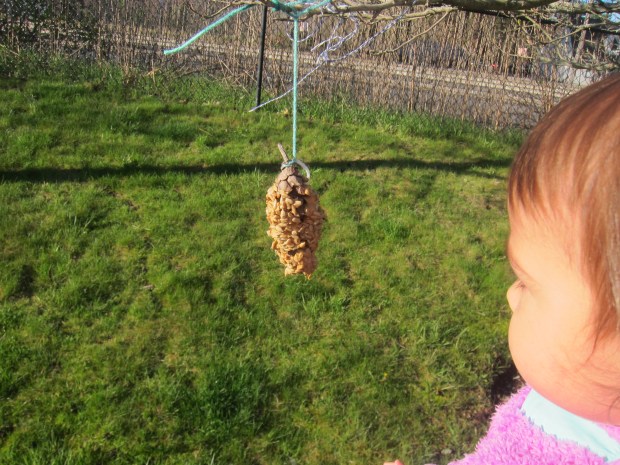
We used a similar method for the third version, except using pine cones. Smear with peanut butter, and then roll in sunflower seeds.

Easy Bird Feeder (7)

Make sure to use a pine cone with a stem long enough to knot a length of yarn on. Knot the other end of the yarn to a tree branch.

Easy Bird Feeder (13)

We had so much fun popping outside to hang these in the branches, in early morning sunshine!

Easy Bird Feeder (11)

Sure enough, we had visitors very soon, although one of the pine cones was soon stolen by an adorable and hungry brown squirrel!

Giant Puddle Paint Brush

Giant Puddle Brush (1)

When life gives you rain… go paint with puddles! After two days of gray skies, the sun broke through in the late afternoon, and I hurried the kids into rain coats and out into the sunshine. The rain had stopped, but left behind warm puddles on the sidewalk, making it the perfect moment for puddle stomping… and puddle painting.

A note to parents on this activity: Your kids are going to get wet and you’re just going to have to be okay with that. As a result, you probably want to play during warm rain rather than cold rain, so no one starts shivering. Then just be ready with towels and dry clothes when you head inside.

With that preamble aside, the fun outside is gorgeous! I showed the kids how to draw with chalk on the sidewalk right next to puddles. Either dip the chalk in the water to wet it, or draw in a saturated spot of pavement for deep, rich colors.

Giant Puddle Brush (3)

Then we used a child-sized broom as our “paintbrush”. Sweep across the chalk with water from a puddle, and you’ll get a gorgeous smeary effect.

Giant Puddle Brush (2)

Veronika loved sweeping over my drawings, or adding her own.

Giant Puddle Brush (4)

Big brother Travis loved making big swirls of color in the deepest part of the puddles and then sweeping through it (he called these “ghosts”).

Giant Puddle Brush (5)

We left positive messages for the neighbors, too, since we’re all social distancing!

Giant Puddle Brush (8)

Older kids might want to get really artistic with this and younger ones will probably just make doodles.

Giant Puddle Brush (7)

Either way, it’s fantastic rainy day fun.

Giant Puddle Brush (6)

Shaving Cream and Colored Sand

Shaving Cream Colored Sand (6)

Is there much educational value to this sensory tray? No. But is it fantastic messy fun? Yes! And sometimes that’s all you need with a toddler.

I originally intended to use sand for the craft, but didn’t have any. In a pinch, I made colored salt! I first put coarse salt into small zip-top plastic bags and added a few drops of food coloring to each. Seal and knead to disperse the color. (Meanwhile, you can also use colored sand from a sand art kit or add your own food coloring to sand at home).

Shaving Cream Colored Sand (2)

Now squirt a generous layer of foamy shaving cream onto a shallow tray – the more the better! If you prefer, you could do this activity right on a craft table, but I liked containing it (somewhat!) on the tray.

Shaving Cream Colored Sand (3)

Sprinkle with the colored sand or salt. I added a few plastic spoons to facilitate things, but Veronika immediately had her hands in the mixture without any encouragement. She liked scooping it onto the floor in big dollops…

Shaving Cream Colored Sand (4)

…and also enjoyed testing how it felt with her fingers. The contrast of smooth creamy shaving cream and very coarse salt is of course the point here, and she seemed fascinated by this mix of textures.

Shaving Cream Colored Sand (5)

I thought she might just spoon through it, but soon her little toy figures were in the shaving cream. Once they were messy, she couldn’t quite decide if this was funny or if she was worried about them! I rinsed the toys off before she got upset.

Shaving Cream Colored Sand (8)

In retrospect, I would have done this project at bedtime, rather than early in the day. That way I could have stripped Veronika down to a diaper and plopped her into a bathtub right after. As it was, I felt bad cutting things short before the mess got out of control, once I realized she was walking around with shaving cream all over her hands, feet, and legs.

Shaving Cream Colored Sand (7)

But she still got in a good twenty minutes or so of fun.

Bottles and Lids

Bottles and Lids (1)

For about a week, I saved up every plastic bottle we finished in our kitchen (think: juices, peanut butter jars, mini spice jars) and set them aside. Today, I simply presented Veronika with the collection!

I had all the jars and lids apart, with the challenge for her to find the right lid for each jar.

Bottles and Lids (2)

Beyond that, though, she was interested in playing with them in ways I hadn’t anticipated. First, she showed her understanding that these containers used to contain food, because she tried to “drink” from them; the orange juice might have still smelled like juice!

Bottles and Lids (3)

Then she loved piling them back into a bag and toting them around the apartment.

Bottles and Lids (4)

After a while, she did get more into the puzzle of jars and lids, testing out various combinations.

Bottles and Lids (6)

She looked so proud when she could twist them on and off again.

Bottles and Lids (5)

For extra fun, we took the collection up to bath time!

Bottles and Lids (8)

Not only did she continue the challenge of lining up bottles and lids here, but the bottles were perfect for squirting and pouring.

Bottles and Lids (7)

You can even take the same collection outside for water play on a warm day!

Bottles and Lids alt


Drawer Knobs & Screws

Drawer Knobs (10)

In the on-going search for household items that keep little hands busy, today’s installation features… drawer knobs! I have a set that I’m saving for one of those “someday” projects, but I realized today they had a current use keeping Veronika occupied.

I twisted off the tiny pieces first (nuts, washers), leaving her with just the screws, the drawer knobs, and the decorative metal backplates. These three components seemed too large to be choking hazards, although I do recommend supervising play like this since even the blunt screws could be a hazard if stepped on or chewed on.

Drawer Knobs (4)

The idea was for Veronika to line up the screw with the hole of each knob, and she was so proud – and delighted! – that she could do so.

Drawer Knobs (2)

Sometimes she had the screw turned the wrong way, which meant it didn’t fit into the hole. I showed her how to turn it around for a big smile of success.

Drawer Knobs (6)

At one point, she did throw a tiny tantrum over it. She threw the items on the floor, and discovered they made fantastic noises! Then she was back to screws and knobs.

Drawer Knobs (9)

She liked the way the knobs spun around on the screws.

Drawer Knobs (5)

When she experimented with the backplate on the screw, she discovered that it made a great jangling noise. Almost like little baby cymbals!

Drawer Knobs (7)

This activity was great for her fine motor skills, but again you can’t quite call it toddler busy play since you’ll need to supervise.

Cylinder Pictures

Cylinder Pictures (7)

Veronika loves to scribble these days, and one of the easiest ways to occupy her when I need a few minutes is to let her loose with a box of jumbo crayons and a few blank sheets of paper.

Cylinder Pictures (3)

As is probably the case with your toddler, though, she has a tendency to fill up one portion of the paper and to leave the rest of it completely blank. So here’s a fun way to display your child’s early masterpieces while hiding that blank space.

Cylinder Pictures (1)

Trim the paper if needed (for example in sections that are completely white), then wrap the remaining paper around itself into a cylinder.

Cylinder Pictures (6)

Tape shut and set on a mantle or windowsill. Even a little one’s scribbles look so artistic this way!

Cylinder Pictures (4)

These drawings truly were all Veronika’s doing, except when she asked me to draw her stars on one sheet.

Cylinder Pictures (2)

If your child wants to take the cylinders down to play with then, that’s fine too. Just think of it as “process art”!

Cylinder Pictures (8)

Michelangelo’s Bathroom

Michaelangelo's Bathtub (3)

Just as the ceiling of the Sistine Chapel is designed to make grown-ups look up, here’s a trick to tilt up your little one’s head! This little “art” project can help your child tip his or her head up during hair washing if they are otherwise fearful or reluctant to do so. It works like a charm!

You can cut up any pictures for the project, including old magazines or even old calendar pages. We had an old book of nursery rhymes that’s become tattered over the years, but I love the illustrations. So I snipped out a few, and began to tape them to the tub walls.

Michaelangelo's Bathtub (5)

I deliberately chose images of Veronika’s favorite things, including cats, chickens, and stars.

Michaelangelo's Bathtub (2)

And she has some unexpected favorites, like umbrellas!

Michaelangelo's Bathtub (4)

She loved watching as I hung the pictures, oohing and aahing as if she were in an art gallery. Come bath time, I was so pleased when my trick worked. “Where is the sheep?” I asked. Her little neck craned up, and water poured over her head without any getting in her eyes.

Michaelangelo's Bathtub (6)

Success! I intend to mix up the pictures on occasion so our “art show” stays fresh.

Michaelangelo's Bathtub (7)

Colored Stacking Cups

Colored Stacking Cups (12)

Here’s a twist on a recent game I played with Veronika, in which I simply presented her with a stack of plastic cups to pile and nest any which way.

This time, I had a pack of pretty cups in see-through pastels: think spring greens and rosy pinks, and daffodil orange.

Colored Stacking Cups (1)

I gave Veronika the cups in hopes of not just stacking and nesting but also so we could play around with light and shadow. Veronika is so into her shadow these days (“Hi shadow!” she says on our walks), so I knew she would love this.

Sure enough, first she was just interested in the cups as…cups.

Colored Stacking Cups (5)

To my amazement, she quickly had them in one huge pile!

Colored Stacking Cups (7)

Lest I think this was just an accident, she then moved the cups out of her big pile and created another, off to her other side.

Colored Stacking Cups (6)

But the real magic happened once the sun was at an angle, streaming into our living room. I showed her how the rings of the cups showed up as a circle shadow on our rug.

Colored Stacking Cups (2)

“Hi shadow!” she said. You can then play around with how the shadow changes depending where the cups are stacked, or even just at different angles to the sun.

Colored Stacking Cups (8)

Needless to say, they were just gorgeous to play with in the window.

Colored Stacking Cups (4)

Although the building of complicated structures is beyond Veronika at eighteen months old, I loved showing her the dazzling effect.

Colored Stacking Cups (14)

She loved adding the finishing touch!

Colored Stacking Cups (13)

And when the sun goes down, you can just go back to regular cup towers.

Colored Stacking Cups (10)

Toothpick Drop

Toothpick Drop (5)

This game couldn’t be easier, but is fantastic for developing fine motor skills. It sounds almost too simple to be true, but I promise it will fascinate your toddler. Are you ready for the easy instructions?

Dump a pile of toothpicks on the floor, preferably in a variety of colors:

Toothpick Drop (3)

Give your child an empty spice jar (or any lid with small holes) and show him or her how to drop the toothpicks through the holes.

Toothpick Drop (4)

All cleaned up? Remove the lid, dump out the toothpicks, and start all over again!

Toothpick Drop (2)

If you have colored toothpicks, the game is a great way to talk about various colors as well, or make a game of finding a blue one, etc. Do make sure to supervise this one closely, since toothpicks are sharp!

Toothpick Drop (6)

Witch’s Brew

toddler 29 (1)

My sister and I used to have a game we called “witch’s brew,” which basically just meant taking all the ingredients in the kitchen and making the most repulsive concoction we could come up with (peanut butter and ketchup were featured ingredients). This game is sort of the toddler version of that!

On a less yucky level, kitchens are full of learning and playing experiences for tots. I’m so excited for Travis to learn about food and how it’s prepared: how to spoon and scoop and pour, the concept that multiple ingredients can combine together so that the result is greater than the sum of its parts.

So while I was busy prepping lunch over the weekend, I set him up with a few ingredients that I didn’t mind “wasting,” as well as measuring cups and spoons.

Well the very first thing that happened is that he upended the baking powder all over the floor! I didn’t let this “oops” moment deter the fun, but made sure to redirect his attention to pouring the remaining ingredients into a bowl.

Travis was only mildly interested just mixing flour and oil, but he loved the look of his concoction once we dumped in red chili powder.

toddler 29 (3)

Suddenly he was mimicking the things I say as I make a recipe. “We need milk!” he cried. “We need… [pause to think, little brain working] bread!”

toddler 29 (4)

He was so enthusiastic that I confess a fair amount of sacrificial food followed. “We need applesauce!” he insisted. “We need… We need bananas!”

toddler 29 (6)

Super messy fun, but so worth it!