Window Painting

Window Painting (6)

Spring weather has beckoned us outside all week, and that means we wanted to move our arts & crafts outdoors, too. There are two fun parts to this particularly toddler project. First, the painting, then the clean-up!

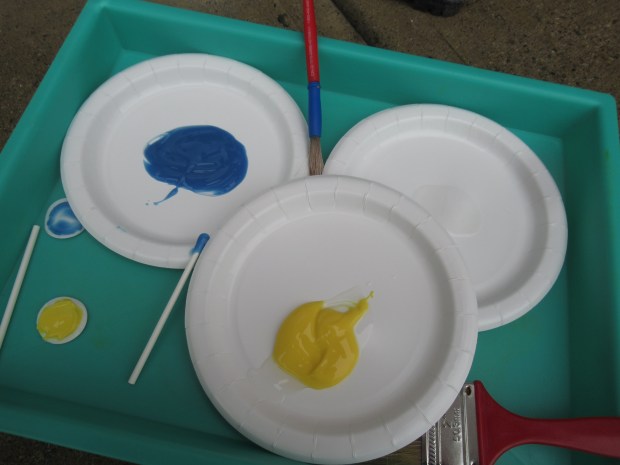
To start, I set out plates of fingerpaint. Mix a little squirt of dish soap into each color, which will make clean-up easier on the flip side.

Window Painting (1)

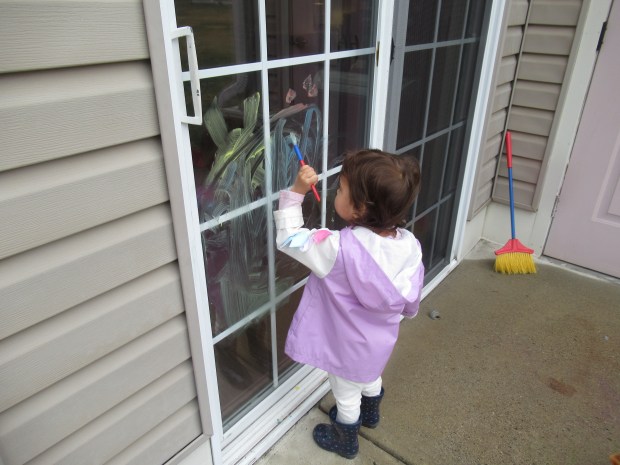
I told Veronika that we were heading outside to paint the patio door! At first she was surprised, but then she was remarkably good about it, understanding that she could paint the glass but not the wooden door frame or screen door.

Window Painting (3)

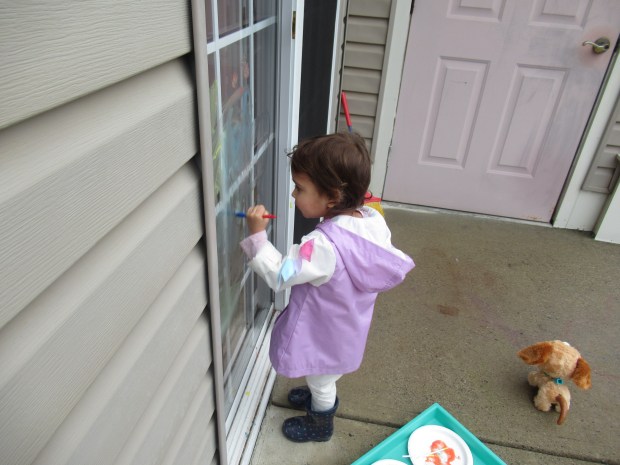
I demonstrated by painting a yellow sun and green grass, but truly Veronika needed no direction. She tested out painting up high…

Window Painting (4)

…and down low. She practiced making big swirly circular brush strokes, or sometimes jabbed the bristles against the glass which made what looked like orange footprints. When I asked her if she was finished, she said quite firmly, “No, I’m still painting”.

Window Painting (7)

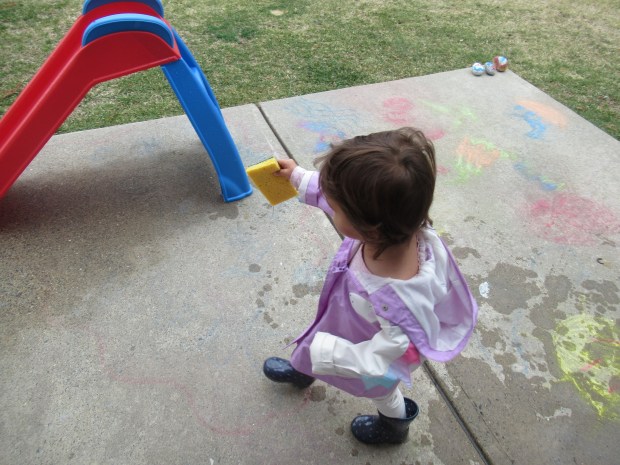
She did finally tire of the project and we left the paint to dry. But the fun had only just begun! The second half of this activity is to wash off the paint. I filled a bucket with warm water and we headed back outside with our bucket and sponge.

Window Painting (9)

She loved helping dip the sponge in the water and washing all over the window. And yes thanks to that dish soap, it really does come off in a heartbeat.

Window Painting (8)

Well, Veronika hadn’t had enough fun yet; she decided the patio needed to be sponged off, too! Overall, this turned into a gorgeous afternoon-long project outside.

Window Painting (10)

Tin Foil Easter Egg

Tin Foil Easter Egg (6)

Here’s a simple and lovely way for toddlers to make Easter egg art, with the extra thrill of getting to use permanent markers!

You’ll need a cardboard base as the backing for each “egg”, and I find that thin cereal box cardboard is much easier to work with than cutting through old boxes. Cover each egg shape with aluminum foil, making sure it is flat and smooth on the side you’ll be decorating.

Tin Foil Easter Egg (2)

I set out sharpie markers, and Veronika and I each took an egg. She surprised me at first by making quite a few perfect circles! I hadn’t even known she could do that.

Tin Foil Easter Egg (3)

Then she began scribbling and drawing quite earnestly, telling me all about the colors she was using.

Tin Foil Easter Egg (5)

Meanwhile, I made designs on my foil egg with patterns in alternating colors, to show her how decorated Easter eggs can look. As with a recent “animal portrait” craft, I loved that one of these eggs was my grown-up example and one was purely her own toddler creation.

Tin Foil Easter Egg (8)

Dream Playground

Dream Playground (8)

When I was in elementary school, I came up with the idea for a “trash playground”, imagining a mini playground crafted from leftover trash. For a brief moment, I was sure this idea would a) save planet Earth and b) make me famous. Imagine my delight, then, when I spotted the same idea in a recent Parents magazine: have kids raid the craft bin or recycle bin and turn the odds and ends into a playground for toys!

This project was great because it engaged both of my kids, but for different parts. First, Travis helped me design the playground. He loved mapping out elements like a giant slide (an empty paper towel tube taped to stacked plastic cups), a seesaw (a wood scrap balanced atop craft sticks as the fulcrum), and more.

Dream Playground (1)

He decided that the slide should lead into a “ball pit” (made from pom poms and lollipop sticks).

Dream Playground (3)

Then we needed a trampoline, which was crafted from playdough lined with more lollipop sticks.

Dream Playground (4)

We left the glue to dry overnight and in the morning it was time for our expert toy tester (a.k.a. little sister Veronika) to test it out.

Dream Playground (6)

Her bunnies loved the slide!

Dream Playground (9)

Not to mention the seesaw and the tunnels to crawl through. She had fun in this miniature playground for ages!

Dream Playground (7)

What will your child put in a mini playground? A jungle gym? Monkey bars? Swings? We’d love to hear in the comments!

Coffee Filter Bunny

Coffee Filter Bunny (6)

Easter comes early this year (April 4), which means Veronika and I are turning our attention to all things Easter crafts even though it’s still March. This adorable bunny craft was a great one to make as we talked about the Easter bunny.

Coffee Filter Bunny (1)

To start, set out white coffee filters and let your toddler decorate with dot markers. These are perfect for toddlers because the bright bold colors appear with just a little tap.

Coffee Filter Bunny (3)

While she was dotting, I traced bunny shapes onto brown cardstock. You’ll need a circle with two long ears for the bunny’s head, as well as four ovals for paws.

Coffee Filter Bunny (4)

Veronika loved seeing the design once it was laid out against white paper. “He has paws!” she said with delight. She helped use a glue stick to secure the little bunny down.

Coffee Filter Bunny (5)

Draw on a few final features and your Easter bunny is ready to hop! I did this part for Veronika, but preschoolers can use markers to make color on the faces and ears by themselves.

Tissue Paper Baby Chick

Tissue Paper Chick (6)

Our fun with spring chicks continues, and Veronika has loved exploring the different materials from our craft bin as we make each version to mark the season. This time, she got to have fun with tissue paper!

First, you’ll need lots of squares of yellow tissue paper. You can invite your child to help rip up pieces, or preschoolers can use the opportunity for scissor practice instead. Next, I traced a circle onto white paper and cut out, and then Veronika helped smear it with a glue stick.

Tissue Paper Chick (1)

All she had to do was cover it with tissue paper. This is such a forgiving material for toddlers, since it takes very little glue to make tissue paper stick. In short order, we had a fluffy yellow chick.

Tissue Paper Chick (2)

To make the legs, twist a small piece of orange pipe cleaner around a larger piece of pipe cleaner, such that it forms three toes.

Tissue Paper Chick (4)

All that was left to do was to glue down two wiggle eyes and an orange paper beak.

Tissue Paper Chick (7)

Fruit Dips

Fruit Dips (1)

Veronika doesn’t like to eat yogurt off a spoon, but here’s a fantastic way to introduce the flavor to little ones who might otherwise be hesitant: turn it into a dip!

In general, toddlers love to dip food and this snack plays right into that desire. I set out a plate for her with a variety of cut up fruits, including strawberries, nectarine, oranges, green grapes, apple, banana, and pineapple. I wasn’t aiming for a full rainbow (although you could!), but we did hit nearly every hue from ROYGBIV.

Fruit Dips (2)

Next, I cut plastic straws into short pieces and then poked a straw piece into each fruit cube. Spoon a little vanilla non-dairy yogurt directly into the center of the plate. Time to dip!

Fruit Dips (3)

Veronika loved that she was in charge of this snack. Sometimes she would dip a fruit piece in and eat fruit and yogurt together. Sometimes she used the fruit more like a spoon for the yogurt, scooping it up and licking off. Apple pieces were her favorite for this particular method.

Fruit Dips (5)

I had one very happy little snacker.

Fruit Dips (6)

Contact Paper Chick

Contact Paper Chick (4)

We already have one cute spring chick up on our doorway to celebrate the season, and here was a second toddler-friendly version to join the first!

To start, I cut out a piece of contact paper in roughly the shape of an Easter egg, then taped it down to a piece of white paper with double-sided tape. The sticky side of the contact paper should be facing up.

Contact Paper Chick (1)

Next I set out a tray full of feathers for Veronika. All yellow would have been ideal for a chick, but we had a mix of reds, yellows, and oranges, which worked just as well.

Contact Paper Chick (3)

She loved picking which feather to use, plus the discovery that the contact paper was sticky and grabbed on to the delicate feathers.

Contact Paper Chick (2)

Once the egg shape was filled in, we transformed it into a chick with just a few final details: Two wiggle eyes, a beak cut from colored paper, and two legs drawn on with orange marker. Peep peep!

Pretend Airplane and Rocket Play

Set up Airport (2)

We’re marking the one-year anniversary of the COVID-19 pandemic, and still searching for novel ways to fill long days indoors. Here’s a simple twist on couch cushion play to keep things novel!

I pulled out all the couch cushions and simply told the kids it was an airplane, a little bit of imagination required; two long pillows formed the body and the two back pillows jutted off to the sides as the wings.

Set up Airport (1)

From there, the imaginative play was up to them! They added stuffed animal passengers, and got a kick out me taking on the role of pilot to make landing and takeoff announcements. (Depending how many times your children have traveled by air, you’ll likely need to model this for them before they pick up the lingo).

Set up Airport (5)

My passengers’ favorite part? Not just having a snack when the “concession cart” came along, but being naughty and eating snack on the wings!

Set up Airport (3)

If your kids are familiar with airports, they can make a much bigger game of this. Ticket counters? Security check?

Set up Airport (7)

Veronika has never seen an airport, but she latched right on to the idea of baggage claim. We packed up a little suitcase with some of her summer clothes and I placed it on the edge of the couch for her to claim.

Set up Airport (6)

She quickly ran over and was soon busy unpacking!

Set up Airport (8)

Why stop at the limits of Earth’s atmosphere? A little more imagination and a quick switch-up of the pillow configuration, and it swiftly became a rocket instead.

Trip to Space (1)

Here goes Veronika on a space walk!

Trip to Space (2)

We made pictures of the planets so we could decide which one we were zooming to.

Trip to Space (3)

This little astronaut needed her space suit on!

Trip to Space (4)

Again, your kids might want to get much more detailed with the game, especially if they’re older. Moon boots? Buttons and command controls inside the space ship? Experiments on board? We’d love to hear your how imaginative play goes, in the comments!

Spring Flower Pretend Play

Spring Flower Pretend (6)

Spring has sprung, the grass is ris,

I wonder where the flowers is.

This has always been one of my favorite lines of poetry, and it always rings so true. Today, we welcome spring, but the flowers are still several weeks away! To fill the interim, Veronika played with fake flowers in two ways today.

I had purchased bunches of fake flowers on sale at the craft store and then used a wire cutter to snip them into individual segments instead of big bouquets.

Spring Flower Pretend (1)

First, Veronika got to be a florist! Plastic cups and colanders were perfect for toddler-safe vases and making “arrangements”.

Spring Flower Pretend (3)

The colander is great because your little one will need to poke the stems down into the holes, which is excellent for fine motor skills.

Spring Flower Pretend (2)

She also loved just holding the flowers, peeling back the layers of petals to peer inside and talk about the colors of each, including great vocab like “lavender” and “peach”.

Spring Flower Pretend (4)

When this game was done, we made things even more realistic… with a potting soil sandbox! Potting soil makes a great alternative to sand as an indoor sandbox. I poured some into a tray with the pretend flowers on the side. Make sure you cover the floor underneath with newspaper!

Potting Soil Sandbox (4)

Veronika trotted over to help “plant” the flowers.

Potting Soil Sandbox (2)

She also loved scooping dirt between two containers, using a beach shovel as her gardening spade.

Potting Soil Sandbox (5)

Or picking up bandfuls to see how the dirt felt, and then letting it sprinkle down.

Potting Soil Sandbox (6)

Overall, what beautiful flower play to tide us over for a few more weeks!

Spring Flower Pretend (7)

Egg Carton Animal Portraits

Egg Carton Animals (6)

We spotted this adorable idea for animal “portraits” on artist Nylah Khan’s Instagram, and had to try our hand at the craft. Bonus points: I found Easter decorations that came in an egg carton, meaning there was no need to purchase a chicken’s egg carton.

I cut apart the segments of the carton and each one could now be the face of a separate animal. Paint accordingly! You can plan ahead and choose your colors (i.e. pink for pigs), or just let your child choose the colors and see what animals match up. We ended up with one pink face and one yellow.

Egg Carton Animals (2)

I used hot glue to secure these segments to a rectangle of cardboard as a background. Now paint on more features! If you want to get silly, add a human body for the animal. My “pig” was wearing a pink suit and blue tie, as an example for Veronika to follow.

Egg Carton Animals (3)

Veronika loved painting features on the yellow one, telling me she was adding eyes and more. I let her painting dictate the direction this particular creature went.

Egg Carton Animals (5)

A long streak of yellow paint made it look like a giraffe!

Egg Carton Animals (4)

Once the paint dried, we hung these up for an art gallery in the playroom. I loved that one of these creations was purely a toddler’s, while the other hewed closer to Khan’s original portrait idea.

Egg Carton Animals (7)

What animals will your child make? Please share in the comments!