Pretend Play Vet Clinic

Pretend Vet (5)

The kids have enjoyed several different scenarios of imaginative play lately, which I love not just because it gets them playing together so well, but also that it breaks them out of playing with the same old toys. So today we tested a third pretend game: a vet clinic!

I set out the various pieces of a toy vet set on the table, including thermometers, stethoscopes, creams, and medicines. But to up the fun factor, Travis and Veronika got some real medical supplies today too, including gauze pads, an ace bandage, and band-aids.

Pretend Vet (2)

As the final touch, I printed out a patient checklist from Mess for Less, so the kids could register each animal that came to the clinic. Now we just needed patients! I lined up several of their stuffed animals along the couch as the “waiting room”. You could even use a small chair for each separate animal if you have several in your home!

Pretend Vet (4)

Brother and sister both rushed over to see what was going on. Veronika immediately took to the task quite seriously. She loved administering shots and testing out the thermometer.

Pretend Vet (8)

She also thought it was so fun to “fill out” the forms, circling the animal species and scribbling notes. (Hey, she already has doctor handwriting!).

Pretend Vet (11)

Her favorite, though, was the real band-aids, and she was soon covering boo-boos and wiping animals with the gauze with such care.

Pretend Vet (7)

Travis, meanwhile, was very into the forms and particularly liked recording high temperatures for all his sick patients.

Pretend Vet (10)

Pretty soon, he took the game in a whole different direction: it turns out action figures need band-aids, too!

Pretend Vet (9)

This had them imagining and playing together so well, making it a big win for a cold winter morning.

Pretend Vet (12)

Swimming Letters Sensory Bag

Swimming Fish (7)

Here’s a fun way for toddlers to practice tracing as they starting out in letter recognition. Bonus points: the activity doubles as a sensory bag!

To set up, fill a large zip-top plastic bag with liquid. I made two versions of this, although neither was quite right. The first one had corn syrup and a little blue glitter, but this was a touch too thick. The second one I filled water with a little blue glitter glue, but this was too… watery. I think hair gel would be the perfect in-between solution, and I’ll aim for that next time! Regardless, once you’ve added your liquid and glitter, you’ll need to add the best part: drop in a plastic fish toy.

Swimming Fish (2)

Seal the bag tightly and secure with duct tape. Next, write letters of the alphabet on pieces of construction paper, ideally with a blue background, although I only had purple. Once I had colored the letters in with green marker, they sort of looked like waving seaweed!

Swimming Fish (3)

If you want to, you could go through all 26 letters for your child. Today, I focused on two letters: V for Veronika and T for big brother Travis. Place the fish sensory bag over one letter at a time and show your toddler how to “swim” the fish along the lines to trace it.

Swimming Fish (4)

It’s hard to tell if Veronika really picked up on the learning, or whether she just loved the activity because she was enamored with the fish. She loved making it swim so wasn’t necessarily following the lines, but she could tell me whether she was looking at a V or T.

Swimming Fish (9)

Overall, I loved the idea behind this activity and may return to it when she’s a little older!

Swimming Fish (6)

Glowing Lava Lamp Sensory Bags

Glowing Colors Bag (7)

We’ve played with plenty of sensory bags in daylight, but this one is meant for after dark!

To set up, I poured a generous amount of baby oil into a large zip-top bag. Since we wanted to make two bags and I was out of baby oil, cooking oil worked in a pinch for the second bag. Squirt some glow-in-the-dark paint into each bag. Ideally I would have used watercolor paints, but even glow-in-the-dark fabric paint worked for this. Veronika absolutely loved the bright neon colors, even as we set this up during the day.

Glowing Colors Bag (1)

But the real fun came once the sun went down. You can simply look at the bags in the dark, but for added effect, I recommend switching on a black light. The kids were immediately squealing with delight at how the colors looked, so bright and glowing.

Glowing Colors Bag (4)

Encourage your kids to squish, squash, and watch how the bubbles of color move through the oil (a little bit like a lava lamp). If you have more than one color in each bag, as we did with a pink-and-blue version, see if the colors can mix together.

Glowing Colors Bag (6)

For sensory bag gets high marks for novelty.

Sticky Sheep

Sticky Sheep (5)

In like a lion, out like a lamb, or so the saying goes, and this adage of March has certainly been true this year. Needless to say we’re looking forward to the docile lamb weather to come. While we wait, Veronika and I decided to make our own woolly lamb inside! This activity combines farm animal play with tactile play in a very cute way. First, I printed out the face and leg templates for a sheep found at No Time for Flash Cards.

Next, I cut out almost a cloud shape from a large piece of contact paper, then attached this to the wall with clear tape and peeled off the backing. If you have white paper that is large enough, you could place the contact paper on the white paper such that you’re left with a white rim.

Sticky Sheep (1)

Attach the head and legs, and your sheep is ready. I brought Veronika over and immediately she said “baa baa” to the sheep. I invited her to touch the contact paper, so she would realize it was sticky.

Sticky Sheep (2)

Now, I told her that the sheep was cold and we needed to help him find his wool! I set out a tray of cotton balls, and she immediately got to work. She was so proud that she could help the sheep: “We’re making him so woolly!” she exclaimed.

Sticky Sheep (3)

Once or twice she tried to stick a cotton ball on the wall where there was no contact paper and was so surprised when the cotton fell to the floor. This was a very teachable moment, and she realized she needed to stay within the lines of the contact paper.

Sticky Sheep (4)

She proved remarkably adept at finding even tiny holes that needed to be filled with cotton until we had one very woolly sheep. “It’s like stickers!” she said with delight at the way that the cotton balls stayed on.

Sticky Sheep (6)

When your toddler is done, you’ll have an adorable (and tactile!) piece of artwork on the wall. We plan to keep this up until March goes out like a lamb.

Sticky Sheep (9)

Play Dough Boredom Busters

Play Dough Boredom (3)

We’re getting a touch of cabin fever around here as cold weather lingers, and lately play dough seems to be Veronika’s favorite indoor toy to bust the boredom. So today we played with it in a few novel ways!

First up, since she was playing with an alien stuffed animal, we decided to make play dough aliens! These could be monsters, aliens, or just funny faces, whichever version your child wants to create. To help her imagination, I set out items from the craft bin like large wiggle eyes, feathers, and pipe cleaners, and showed her a few examples for how the creations could look.

Play Dough Boredom (1)

Pipe cleaners proved to be much easier for her if I snipped them into small pieces first, although she tested out big pieces, too!

Play Dough Boredom (2)

Next we added in a little learning with play dough letters! You can use cookie cutters in letter shapes if you have them, but I simply rolled these by hand for her. Preschoolers and kindergartners will benefit from shaping each letter by themselves.

Play Dough Boredom (5)

For Veronika, it was more about shape recognition. I was thrilled when I asked her what letter we needed for Veronika, and she immediately knew it was a V. Before I could even ask she said, “Mom, can you make a T for Travis?” Happy to oblige!

Play Dough Boredom (7)

Next up, we put on our engineering caps and tried to build towers. I showed her how to use playdough as a base to stick in toothpicks, and then we tried to build the structure as high as three layers.

Play Dough Boredom (10)

When our 3-D towers toppled down, she enjoyed connecting two toothpicks together with a sticky ball of play dough as “glue”. This was a great method to make flat shapes like squares and triangles. She kept the play going long after I stepped away to get some work done. I overheard her talking about making “drums” and adding “ears” and all sorts of other imaginative games with just a ball of orange play dough and leftover toothpicks. “And then he lost his ears!” she exclaimed.

Play Dough Boredom (9)

Squishy Button Sorting Bag

Color Sort Buttons (3)

This cute twist on a regular squishy sensory bag adds the concept of sorting into the mix! Squishing buttons through the hair gel inside will be an absolute delight for toddlers and preschoolers alike.

To set up, I drew two circles on a large zip-top plastic bag with sharpies, using colors that corresponded to buttons in our craft bin. Next, squirt in a generous amount of hair gel, then add buttons in at least two colors. (Note: You can make this harder for preschoolers with additional colors). Seal tightly, adding duct tape to the seal if you worry your child might want to open the bag.

Color Sort Buttons (2)

First I just let Veronika experiment with how the bag felt. She loved squishing the buttons through the gooey insides of the bag…

Color Sort Buttons (4)

…or pressing her hands down firmly on top of it.

Color Sort Buttons (6)

Once she’d had time to explore, I showed her that she could nudge the buttons deliberately, each one toward the correctly colored circle. She picked up on the idea right away, although occasionally I had to help her with the fine motor skills needed to scoot a button in the right direction.

Color Sort Buttons (5)

To mix up the activity, I then showed her how the bag looked with the buttons completely sorted. Then it was up to her to scatter them! In sum, this was a nice variation on an idea that never gets old.

Color Sort Buttons (7)

Look with Me Panda Crate

Panda Look alt

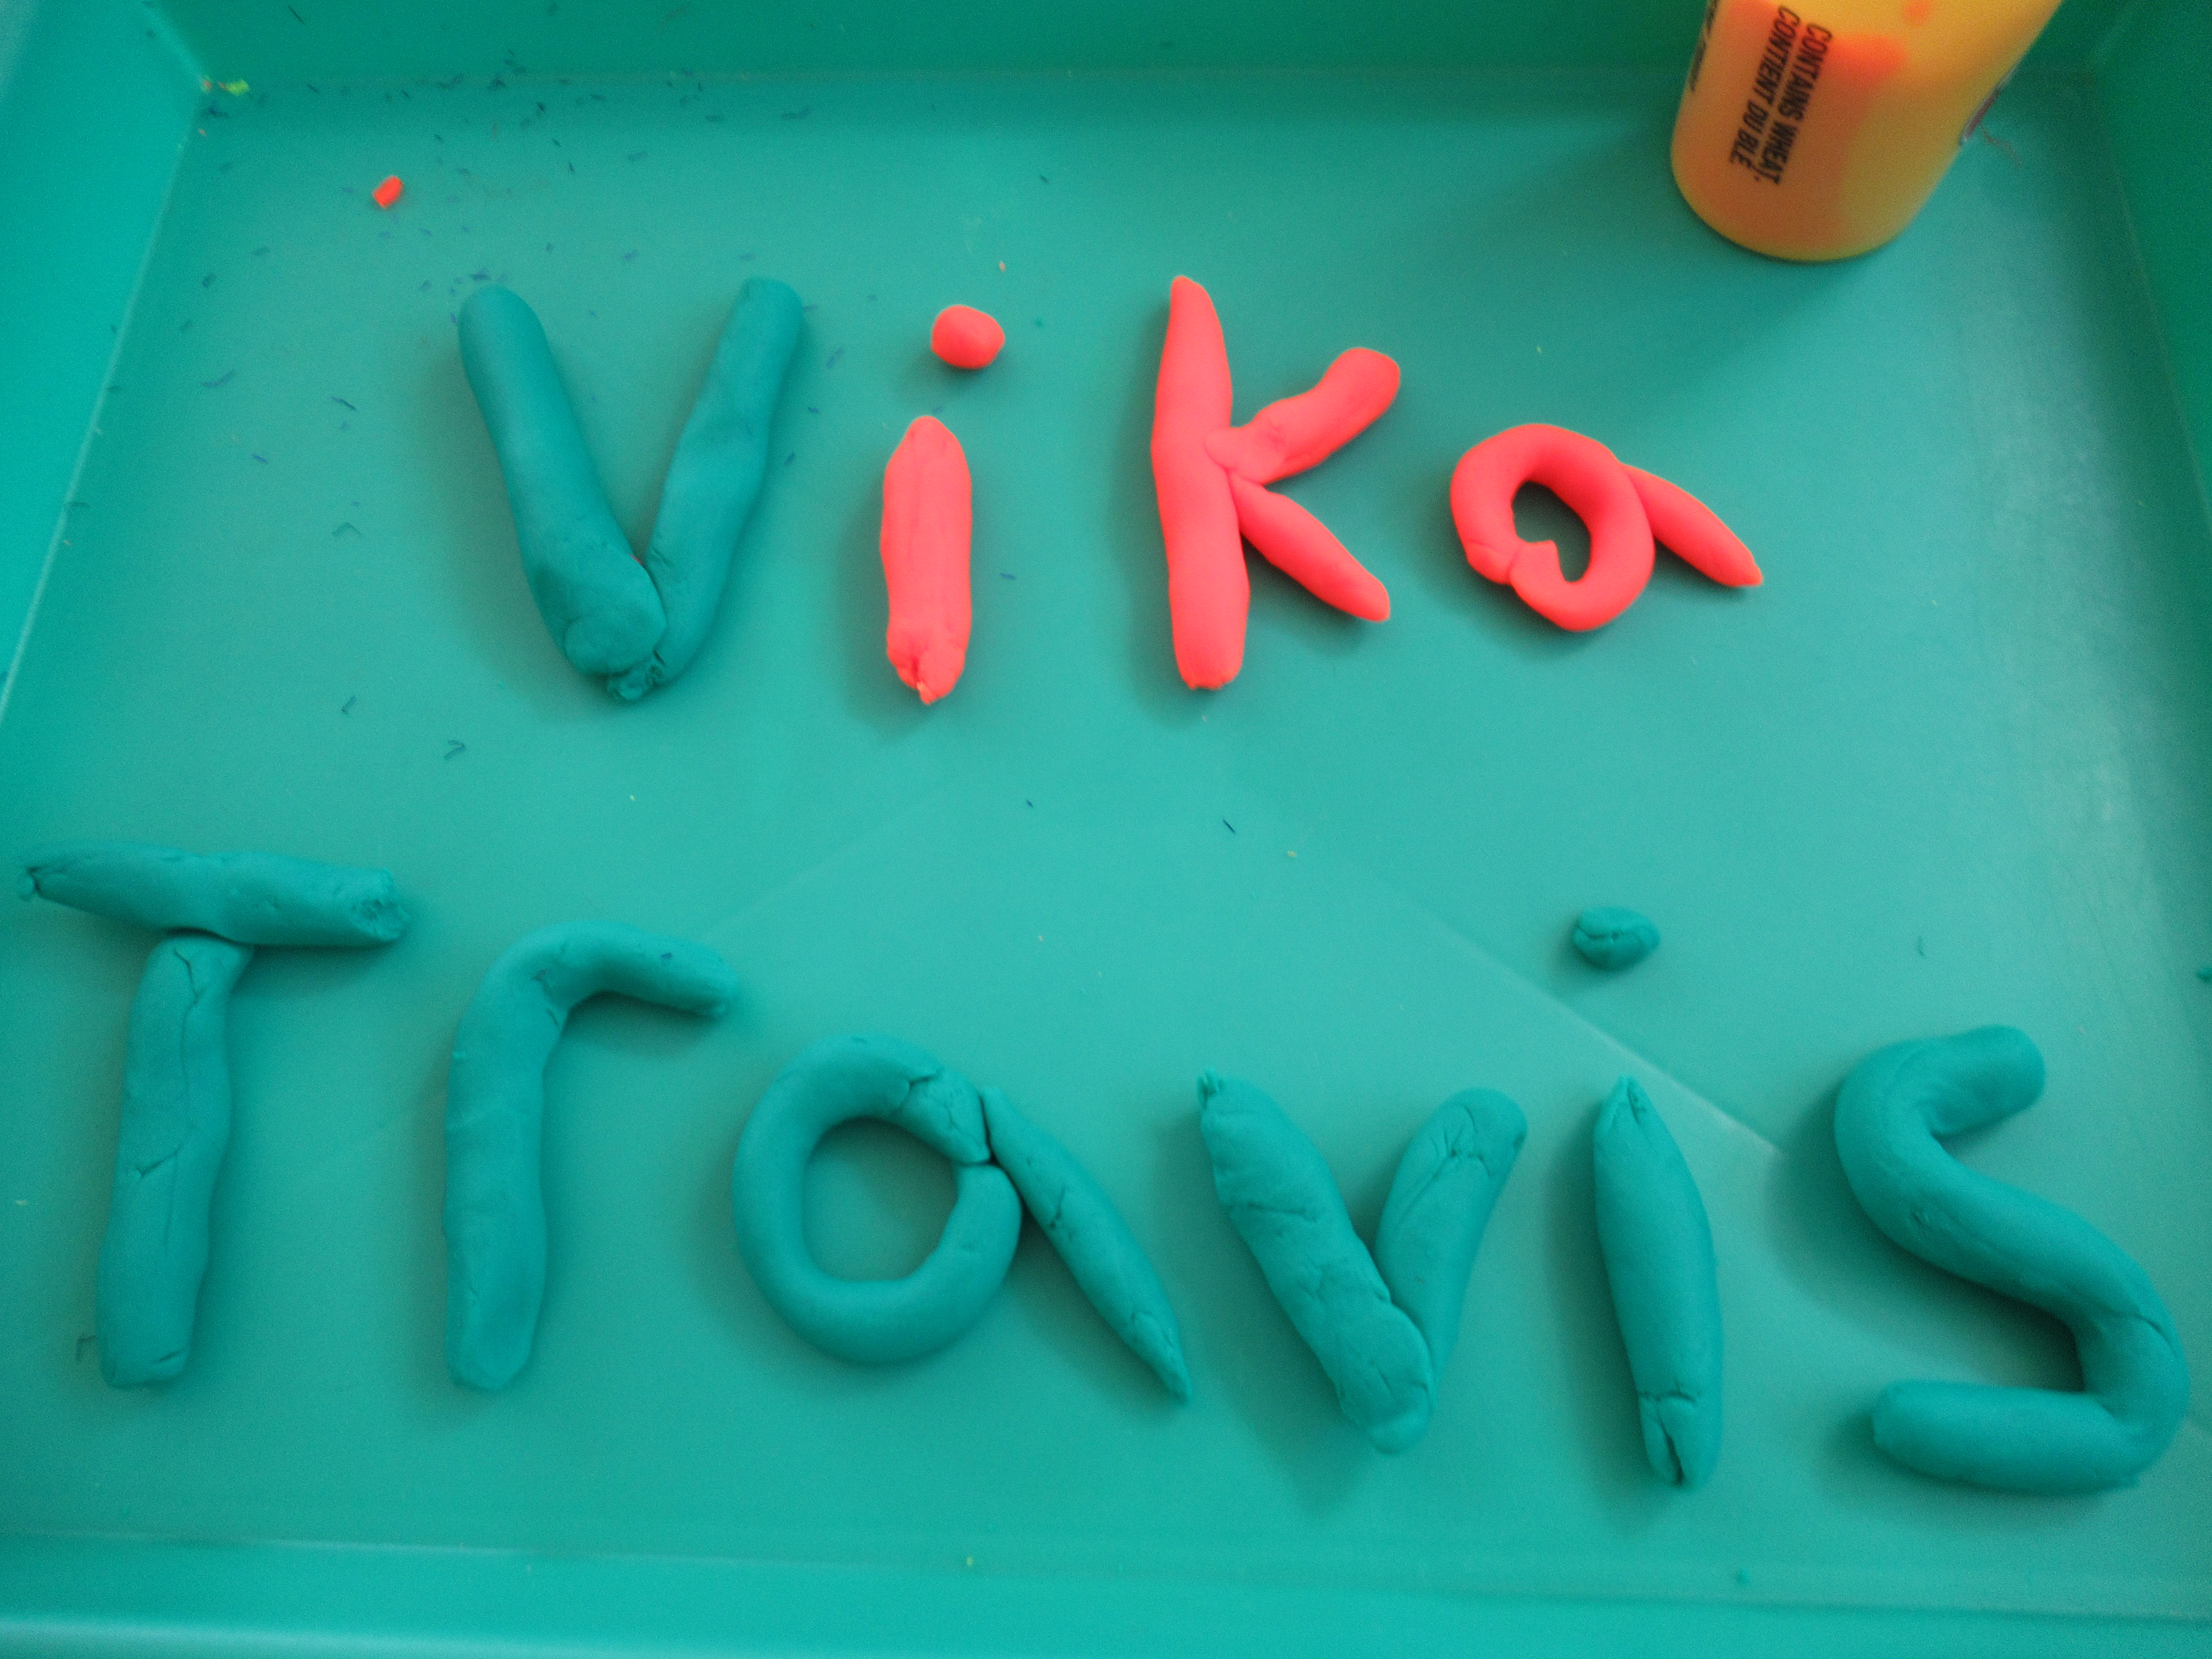
Veronika’s latest box from Panda Crate was about the way toddlers learn hand-eye coordination, as well as visual tracking skills, visual discrimination, and more. In other words, there are so many ways to learn to use our eyes! I would recommend this crate for toddlers aged 22 months and up.

One: Wood Rainbow

The first item was a beautiful 3-D puzzle of three interlocking pieces that formed a rainbow. First, we placed it on the ground and I encouraged her to trace the smooth arced shape. It was easy for her to fit the pieces together lying flat…

Panda Look (1)

…but could she do so once they were upright? She could!

Panda Look (2)

It’s fun to sing any rainbow song you know as your toddler makes it all come together. You can also talk about bigger and smaller, with regards to the various arcs. Veronika invented her own way to play with the pieces, too, building little forts and houses for her toy figures, and I loved seeing her imagination at work!

Panda Look (5)

Finally, there is a wooden ball in the crate and she could bowl this at the rainbow and knock the pieces over for some classic cause-and-effect.

Panda Look (6)

Two: Spin-and-Slide Board

This was a busy board in miniature, and let me first say that it is perfect for car rides and I give Panda huge props for it! One side features a scene with a bird and pinwheels, and the reverse had a caterpillar and ladybug, all with gears that spin and knobs that slide.

Panda Look (13)

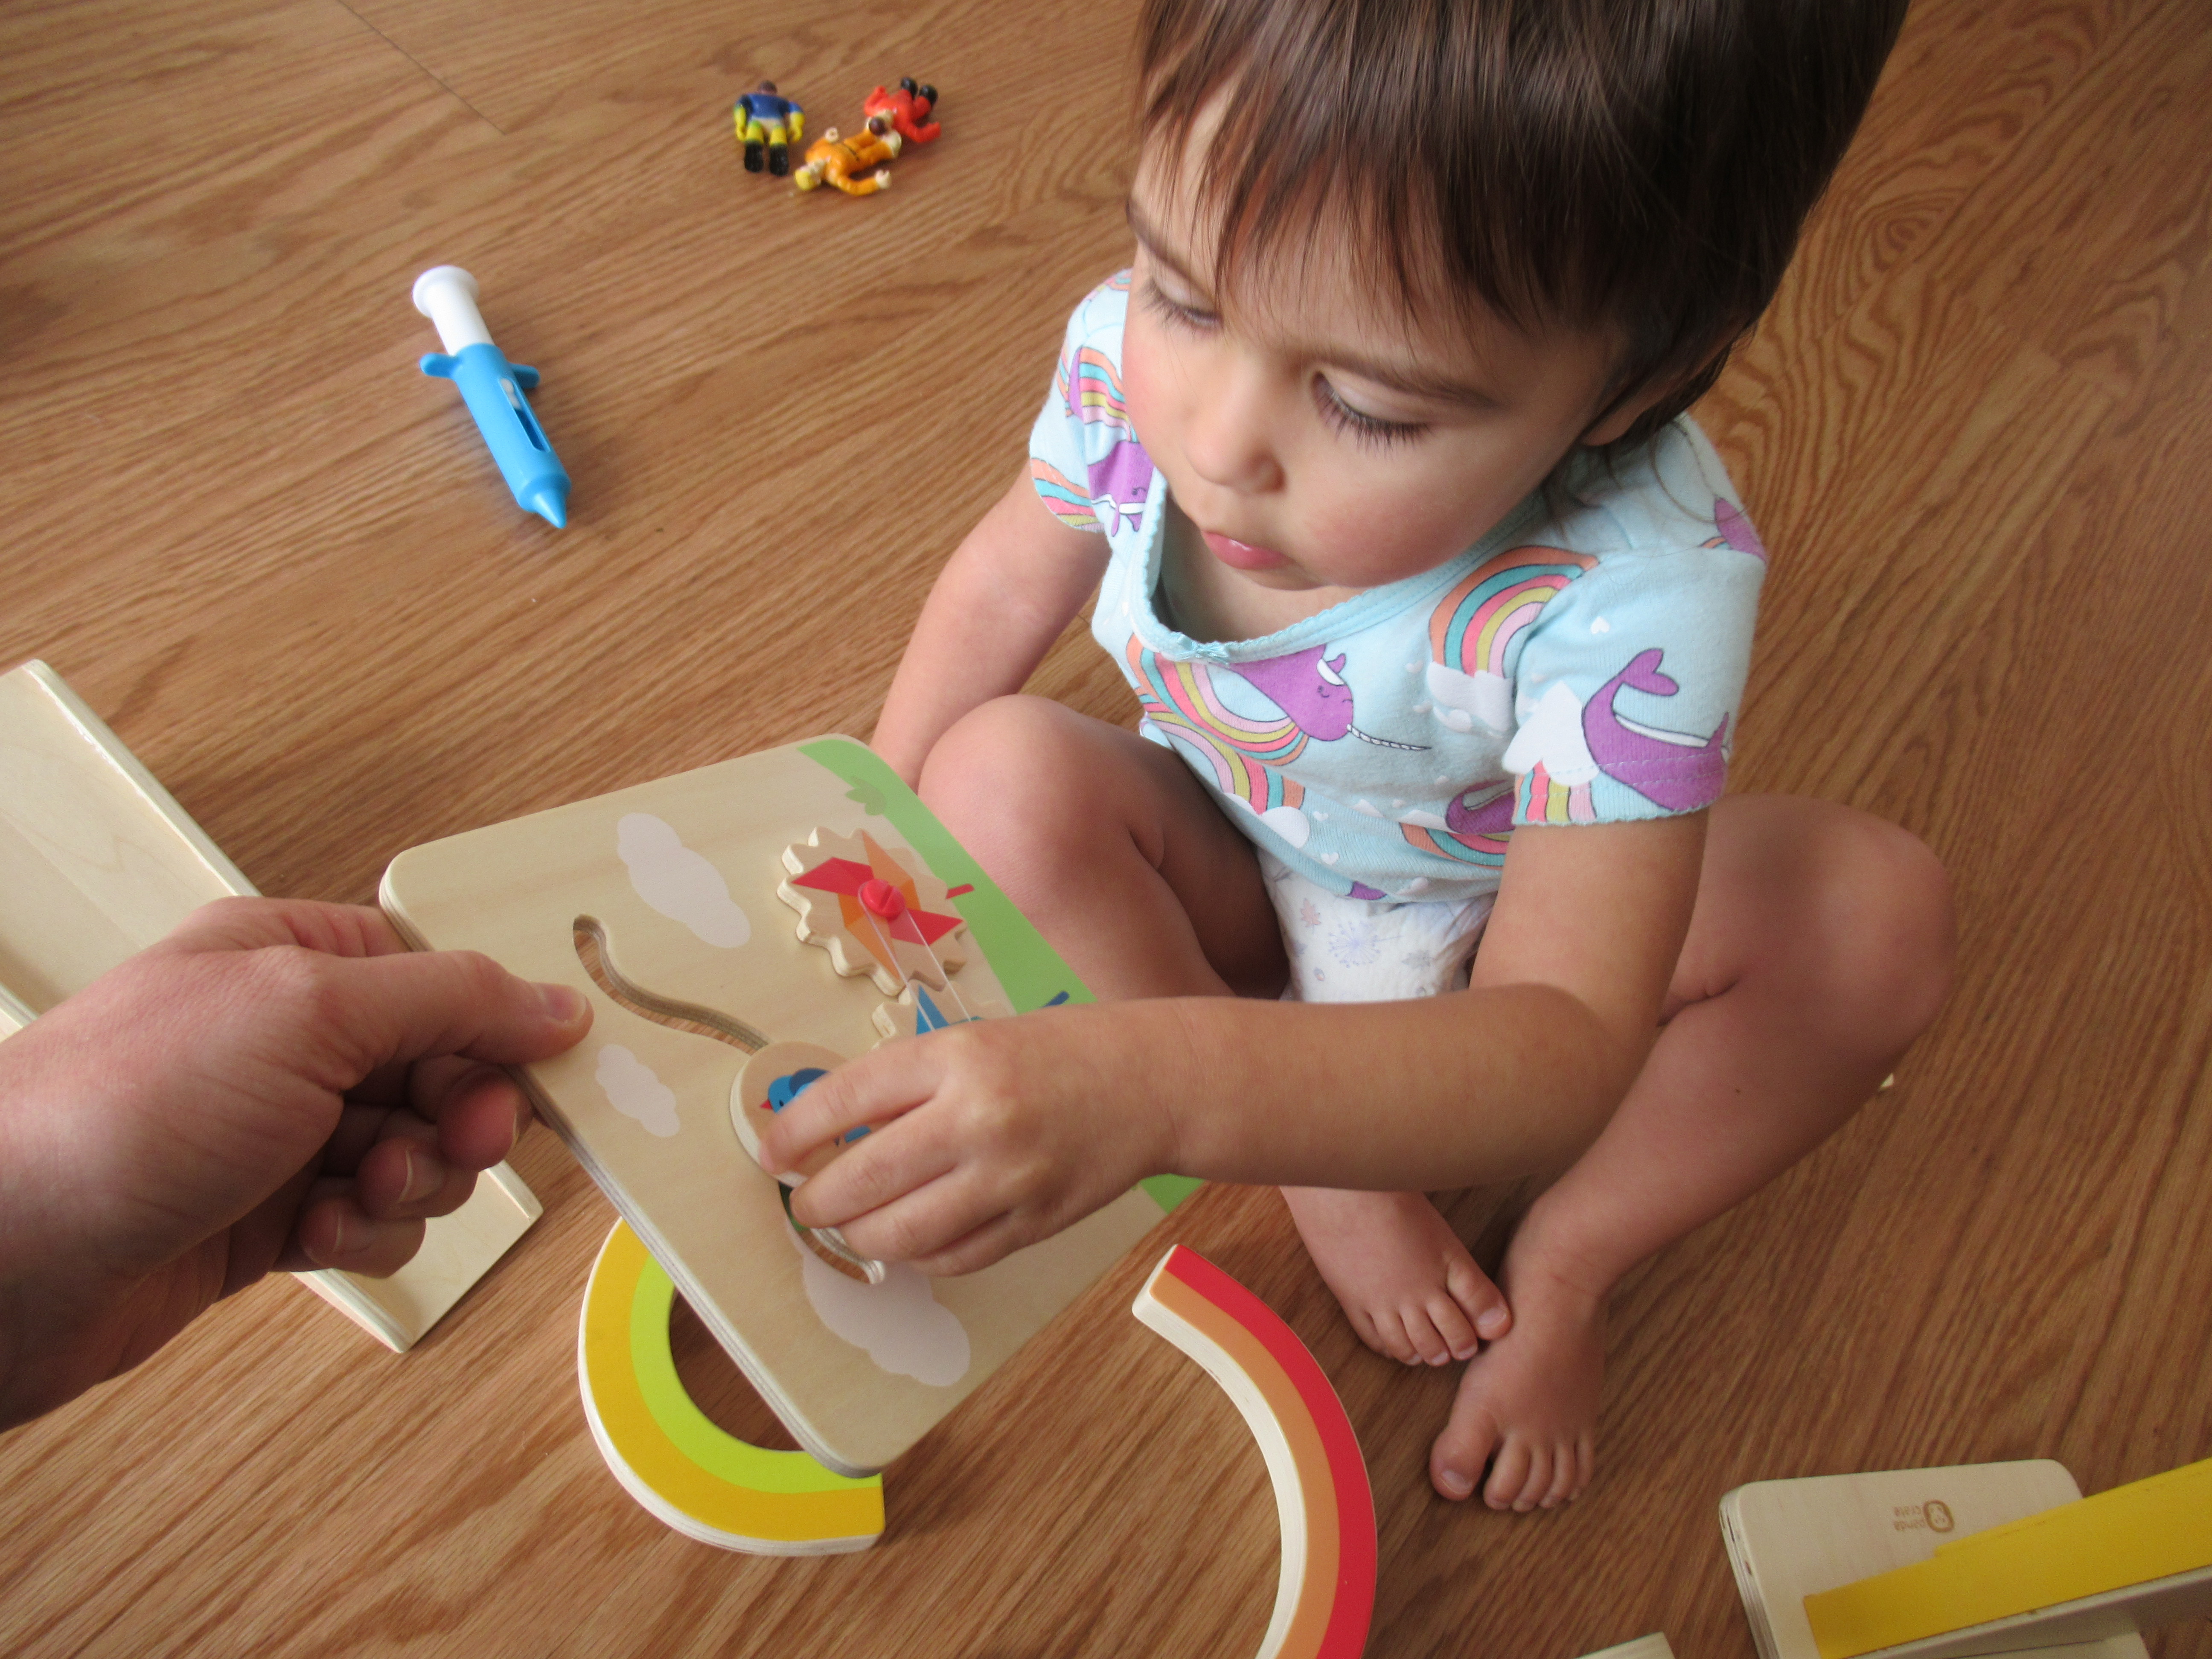
Veronika was enamored with the images, which were great for counting (1 bird but 2 pinwheels) or playing “I spy”. This is going to be in the diaper bag for car trips from now on!
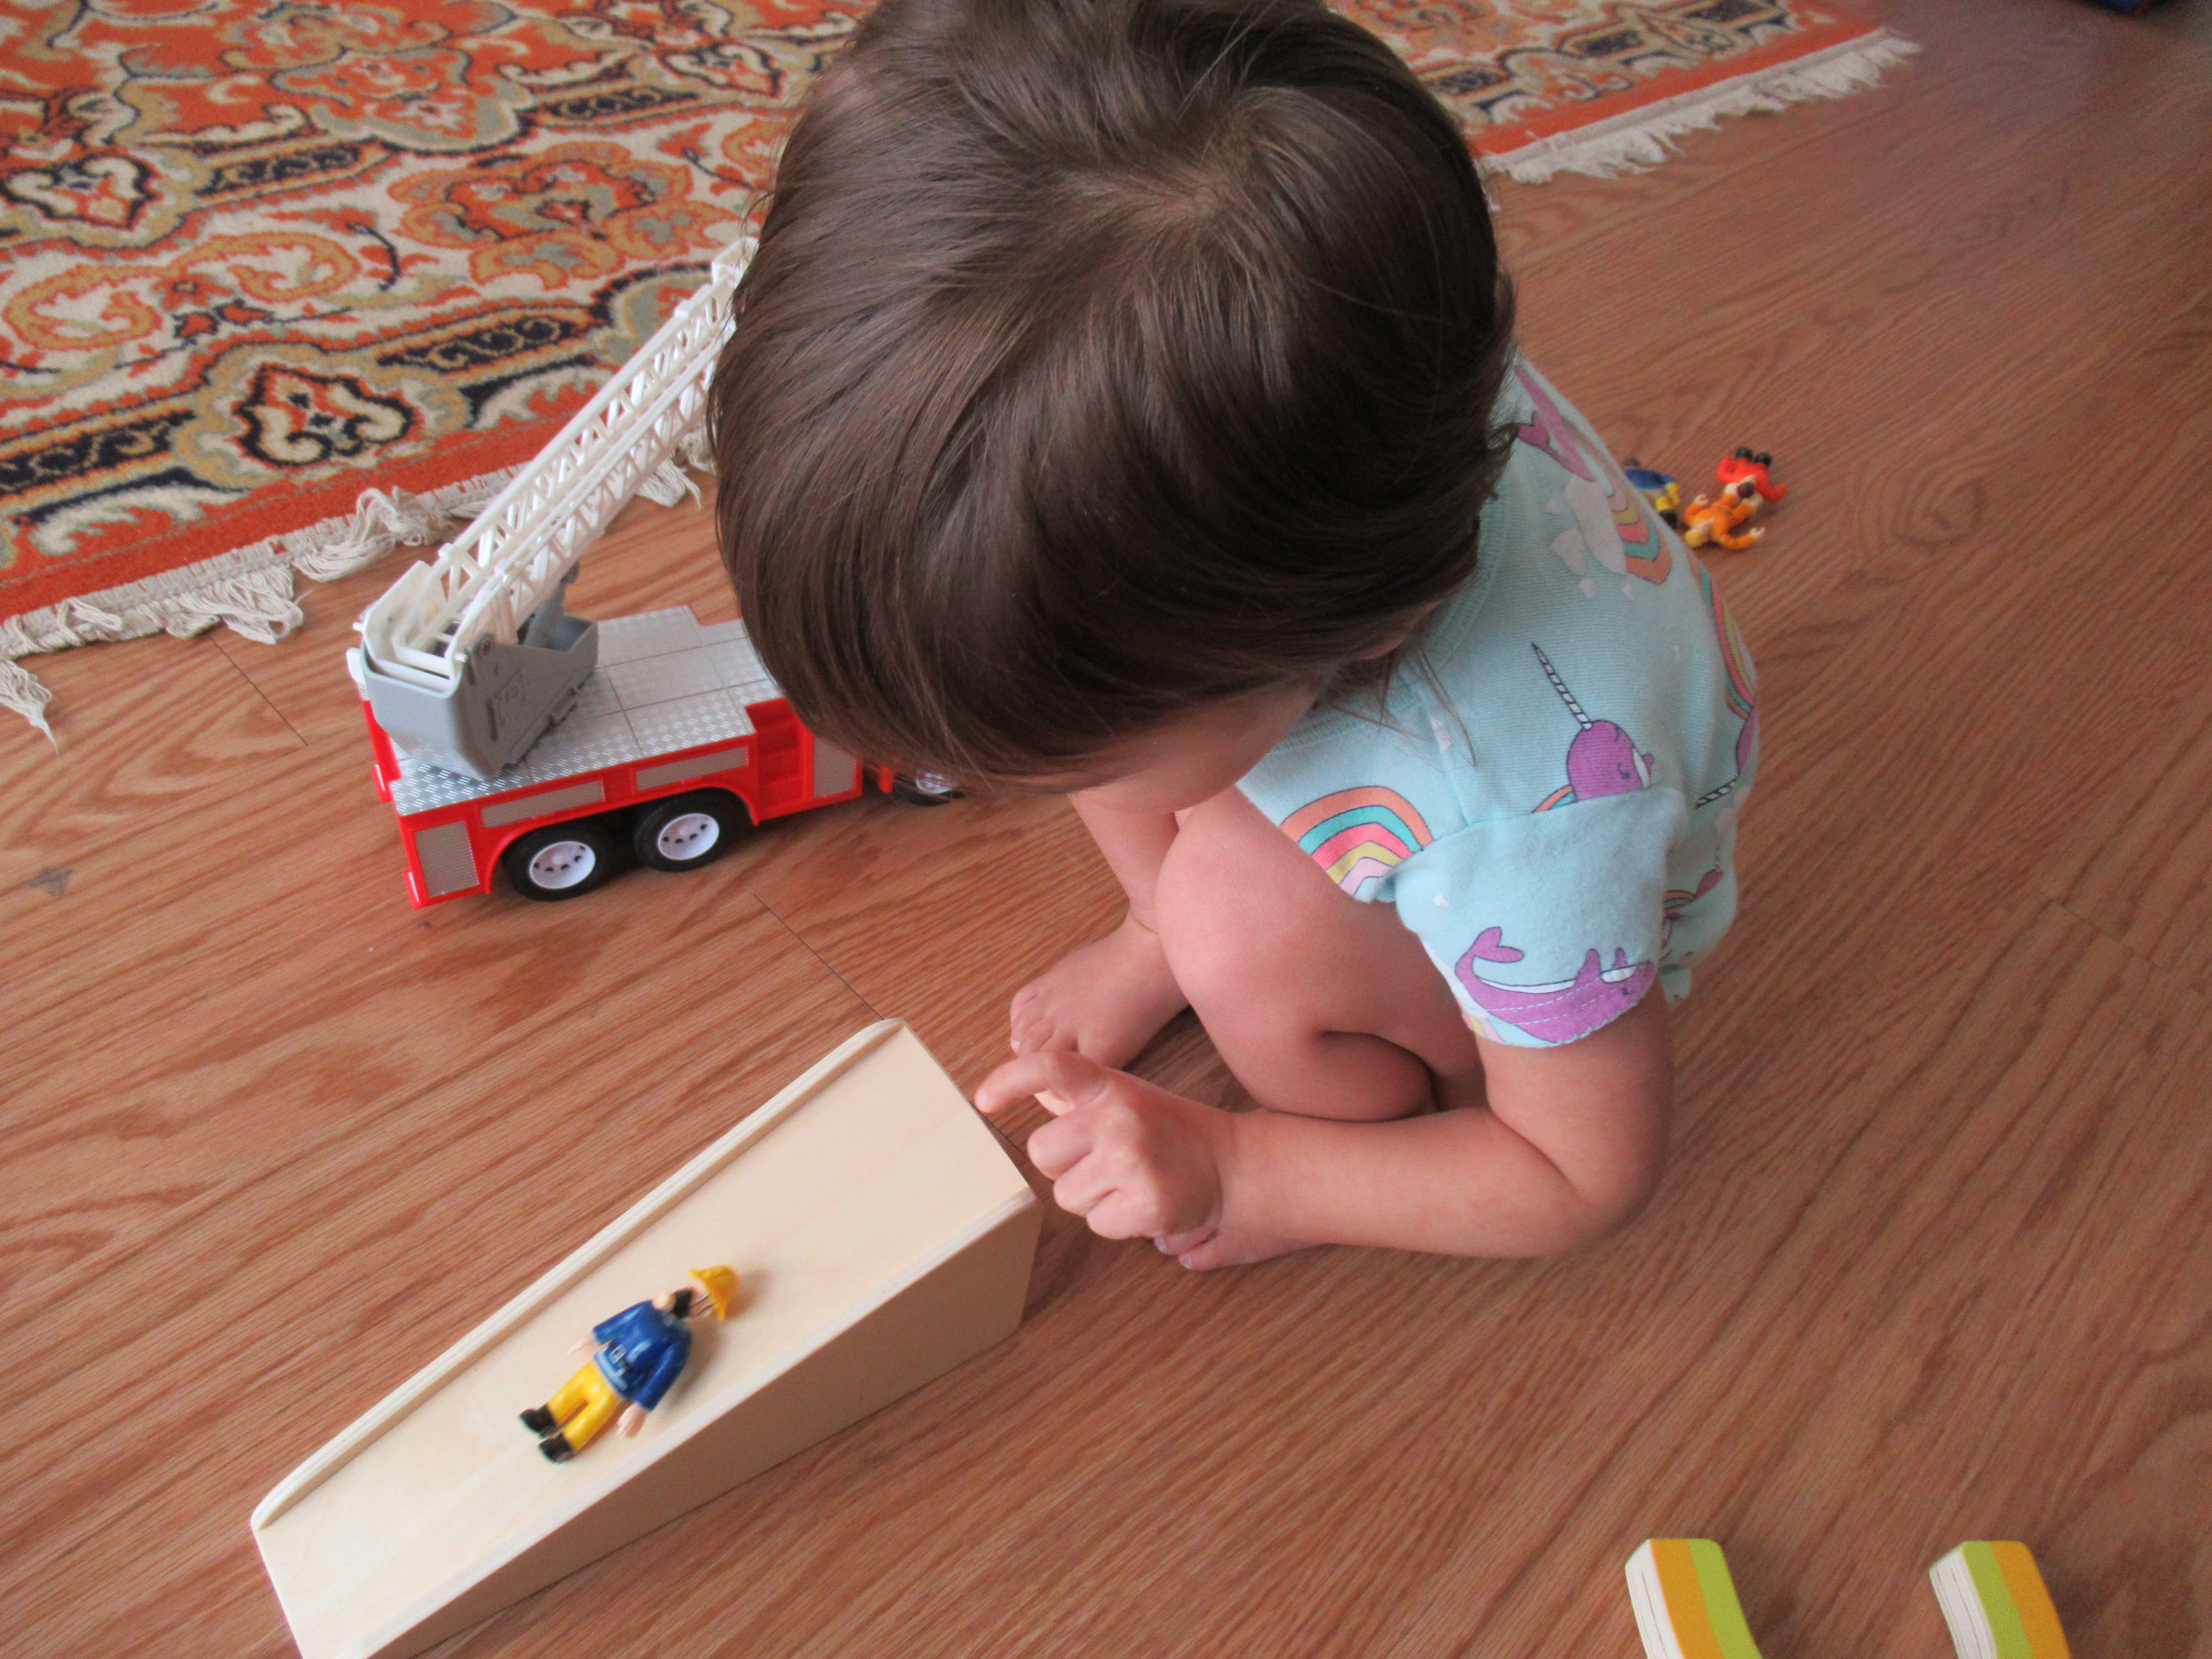
Panda Look (15)

Three: Ramp Racer

Back to that wooden ball; it also paired with a wooden ramp in the crate. Your toddler can simply have fun rolling the ball down, or aim it at a tunnel made of the rainbow puzzle pieces. Next, Veronika practiced rolling the ball up, or rolling it on different surfaces (rug vs. smooth floor) for an early lesson on big concepts like friction.

Panda Look (11)

She loved using it as a playground “slide” for toy figures, too!

Panda Look (14)

Four: Butterfly Drop

This item was a fast favorite, and I was so glad to see it included because it was a mini at-home version of an activity she loves at our local children’s museum.

Panda Look (7)

Toddlers drop the provided wooden butterfly into the frame and watch it bounce down on the pegs. Of course those toddler eyes are honing their visual tracking skills, while mesmerized! I challenged her to catch the butterfly at the bottom, to insert it right side up or upside down, and more.

Panda Look (8)

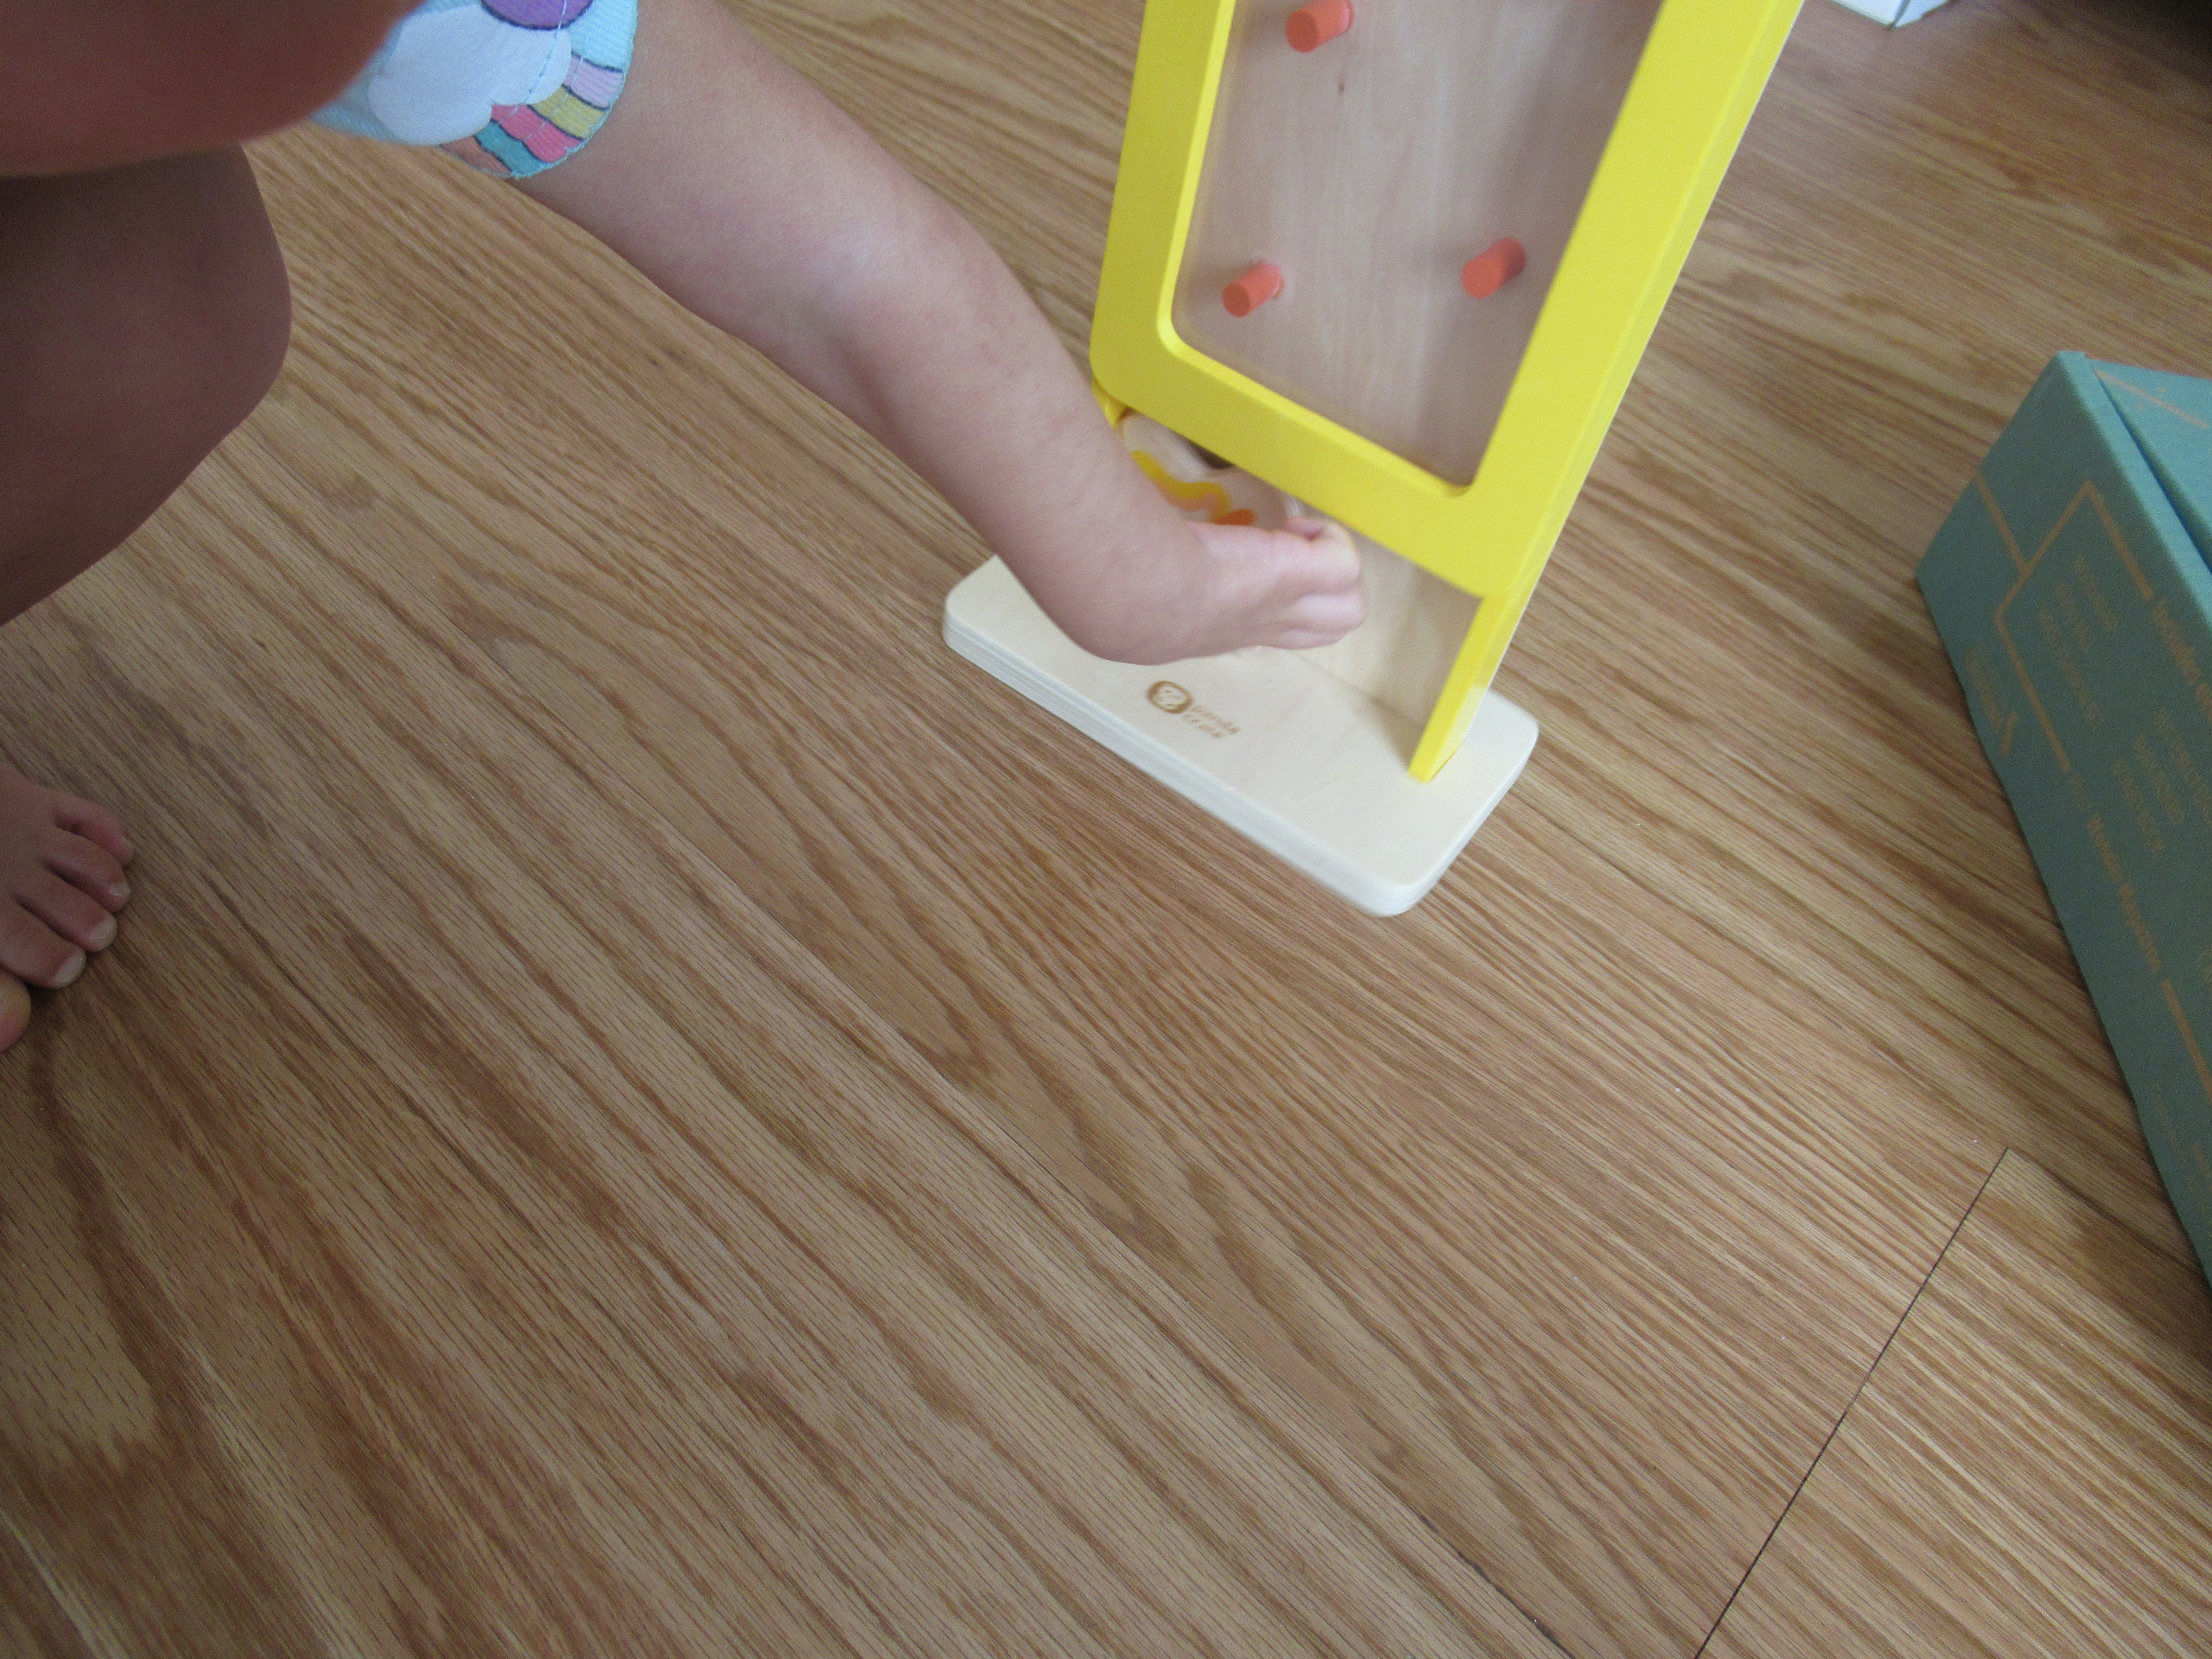
Plus we talked about the great noise it made on the pegs: plunk plunk plunk!
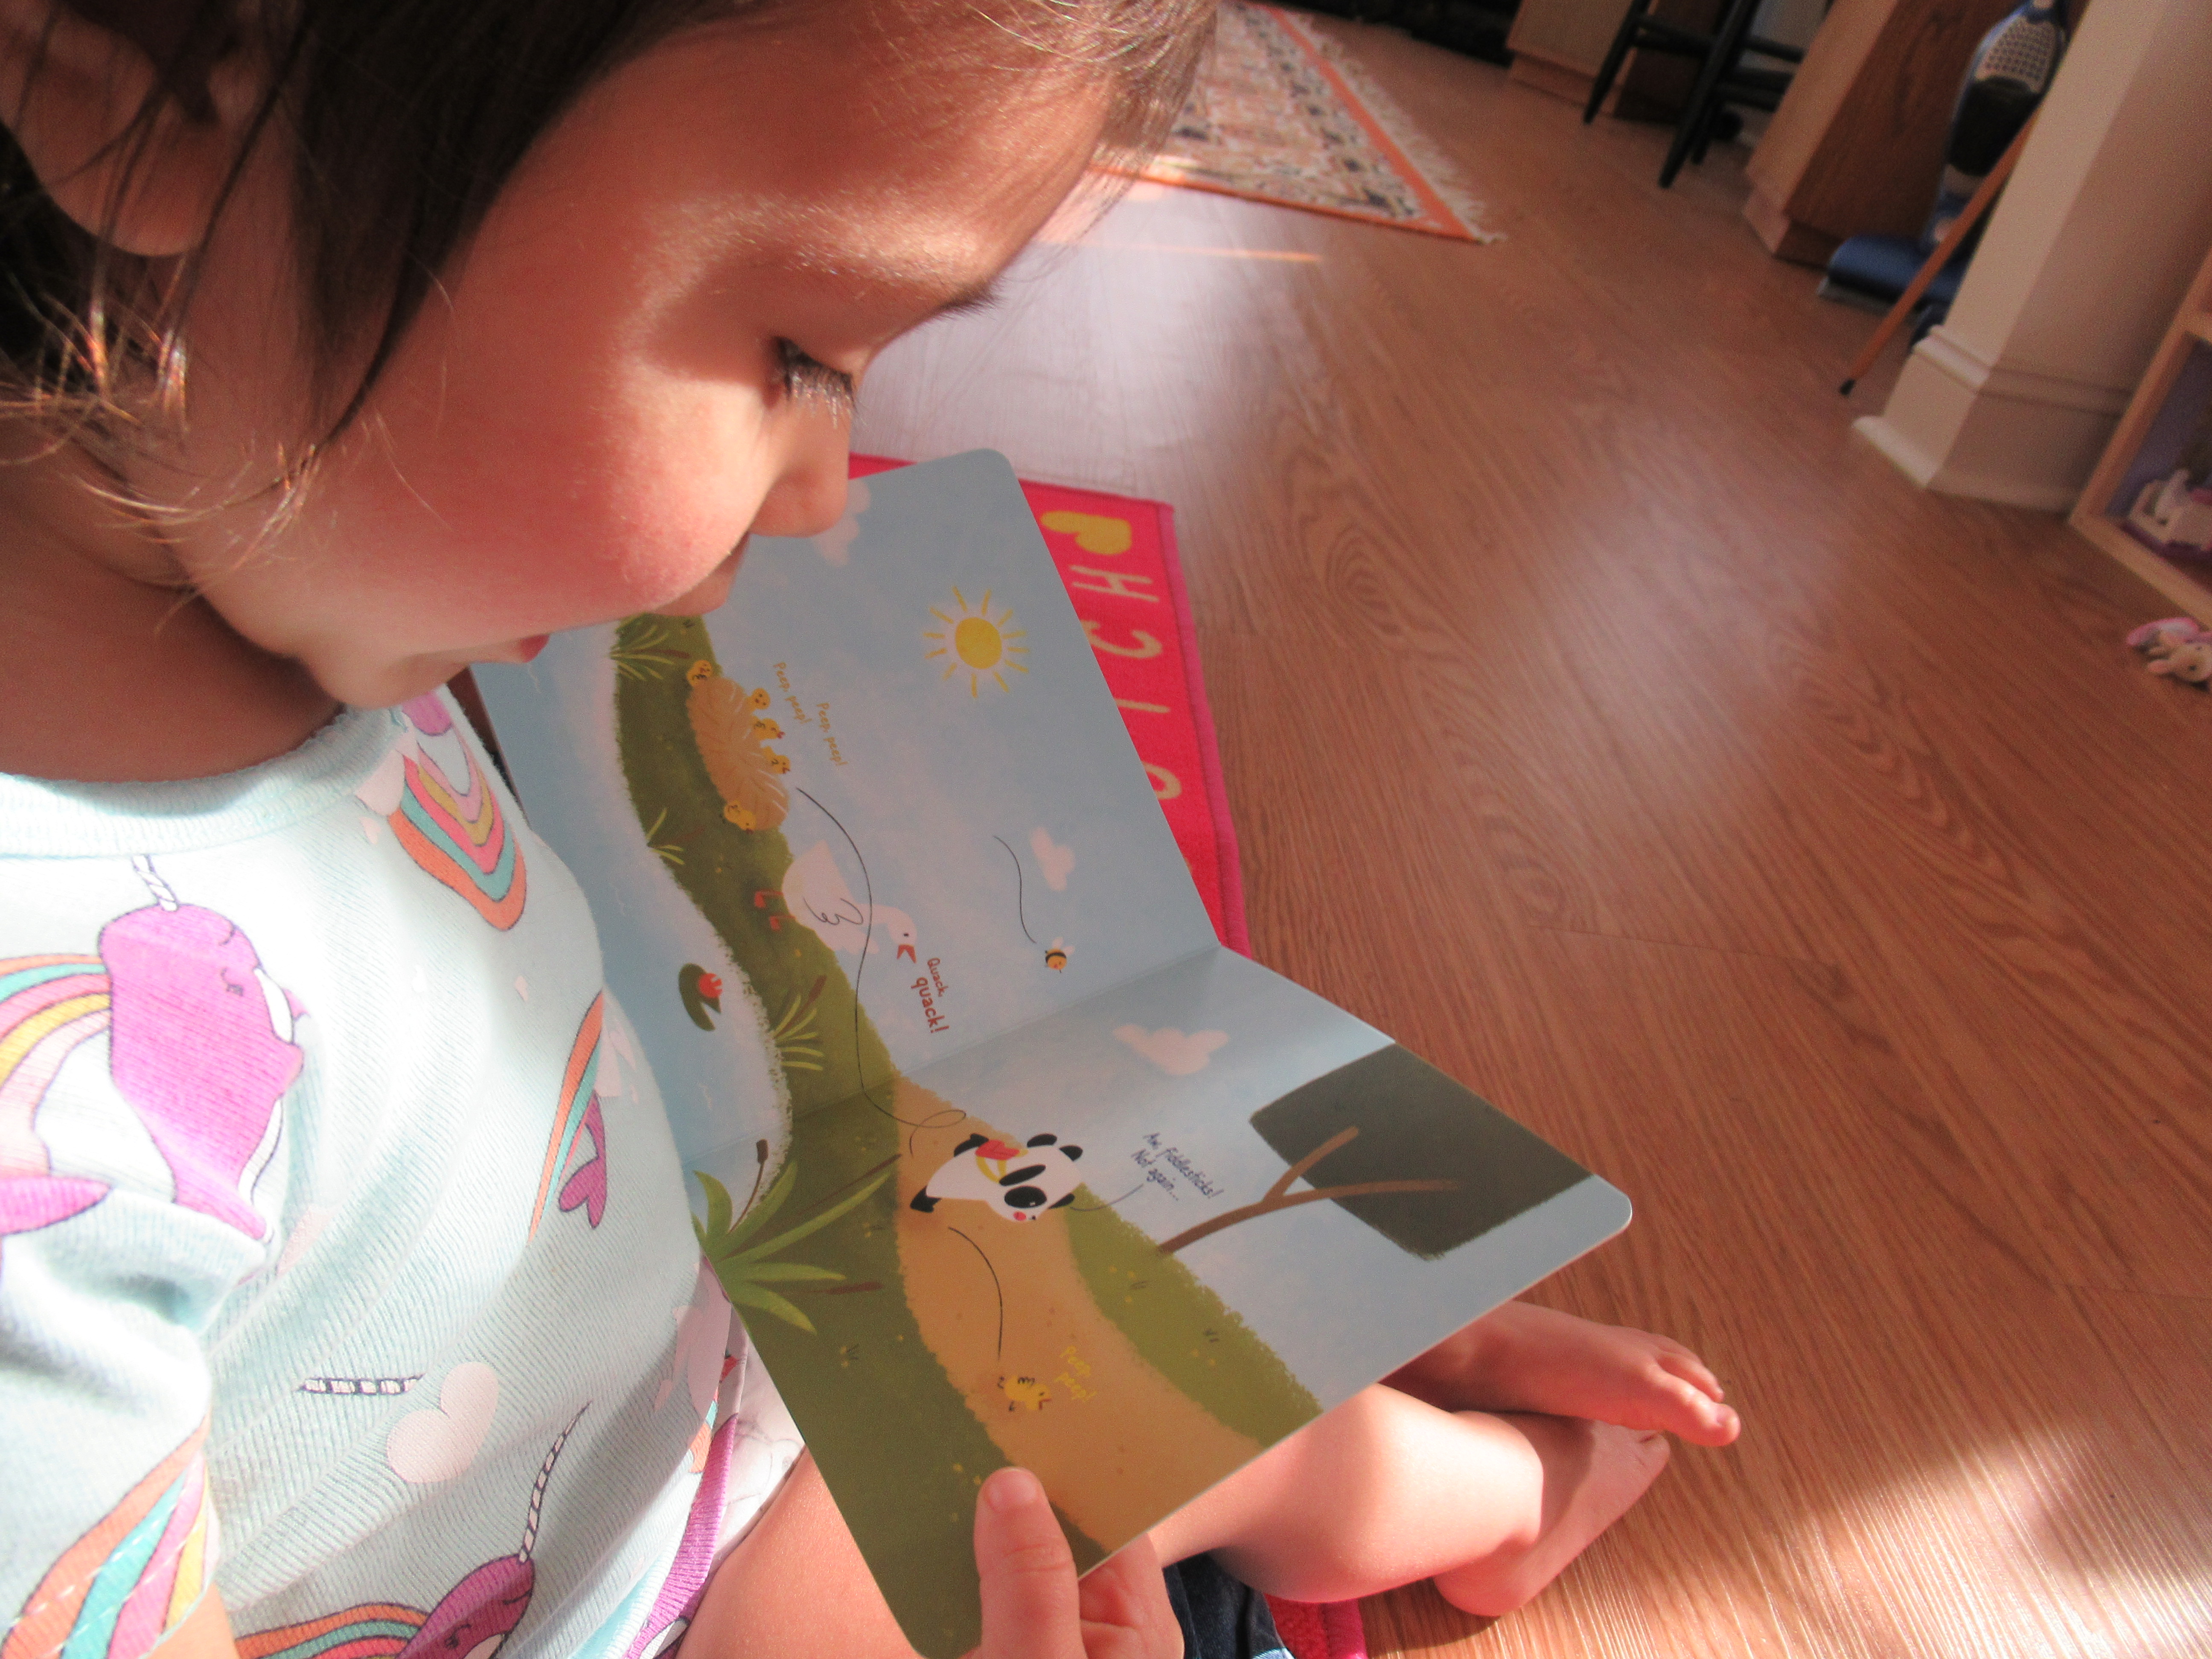
Panda Look (9)

Five: Board Book

The book this month featured Poppy Panda giving chase to a duckling. Veronika loved the story, demanding many reads and reading it solo, so I can’t complain!

Panda Look (17)

The Wonder booklet featured lots of helpful parental info, like playful ways to hone visual tracking (think: trains on tracks, ramps, balloons, and threading), and pediatric advice on children and glasses.

We followed up with a few Beyond the Crate activities:

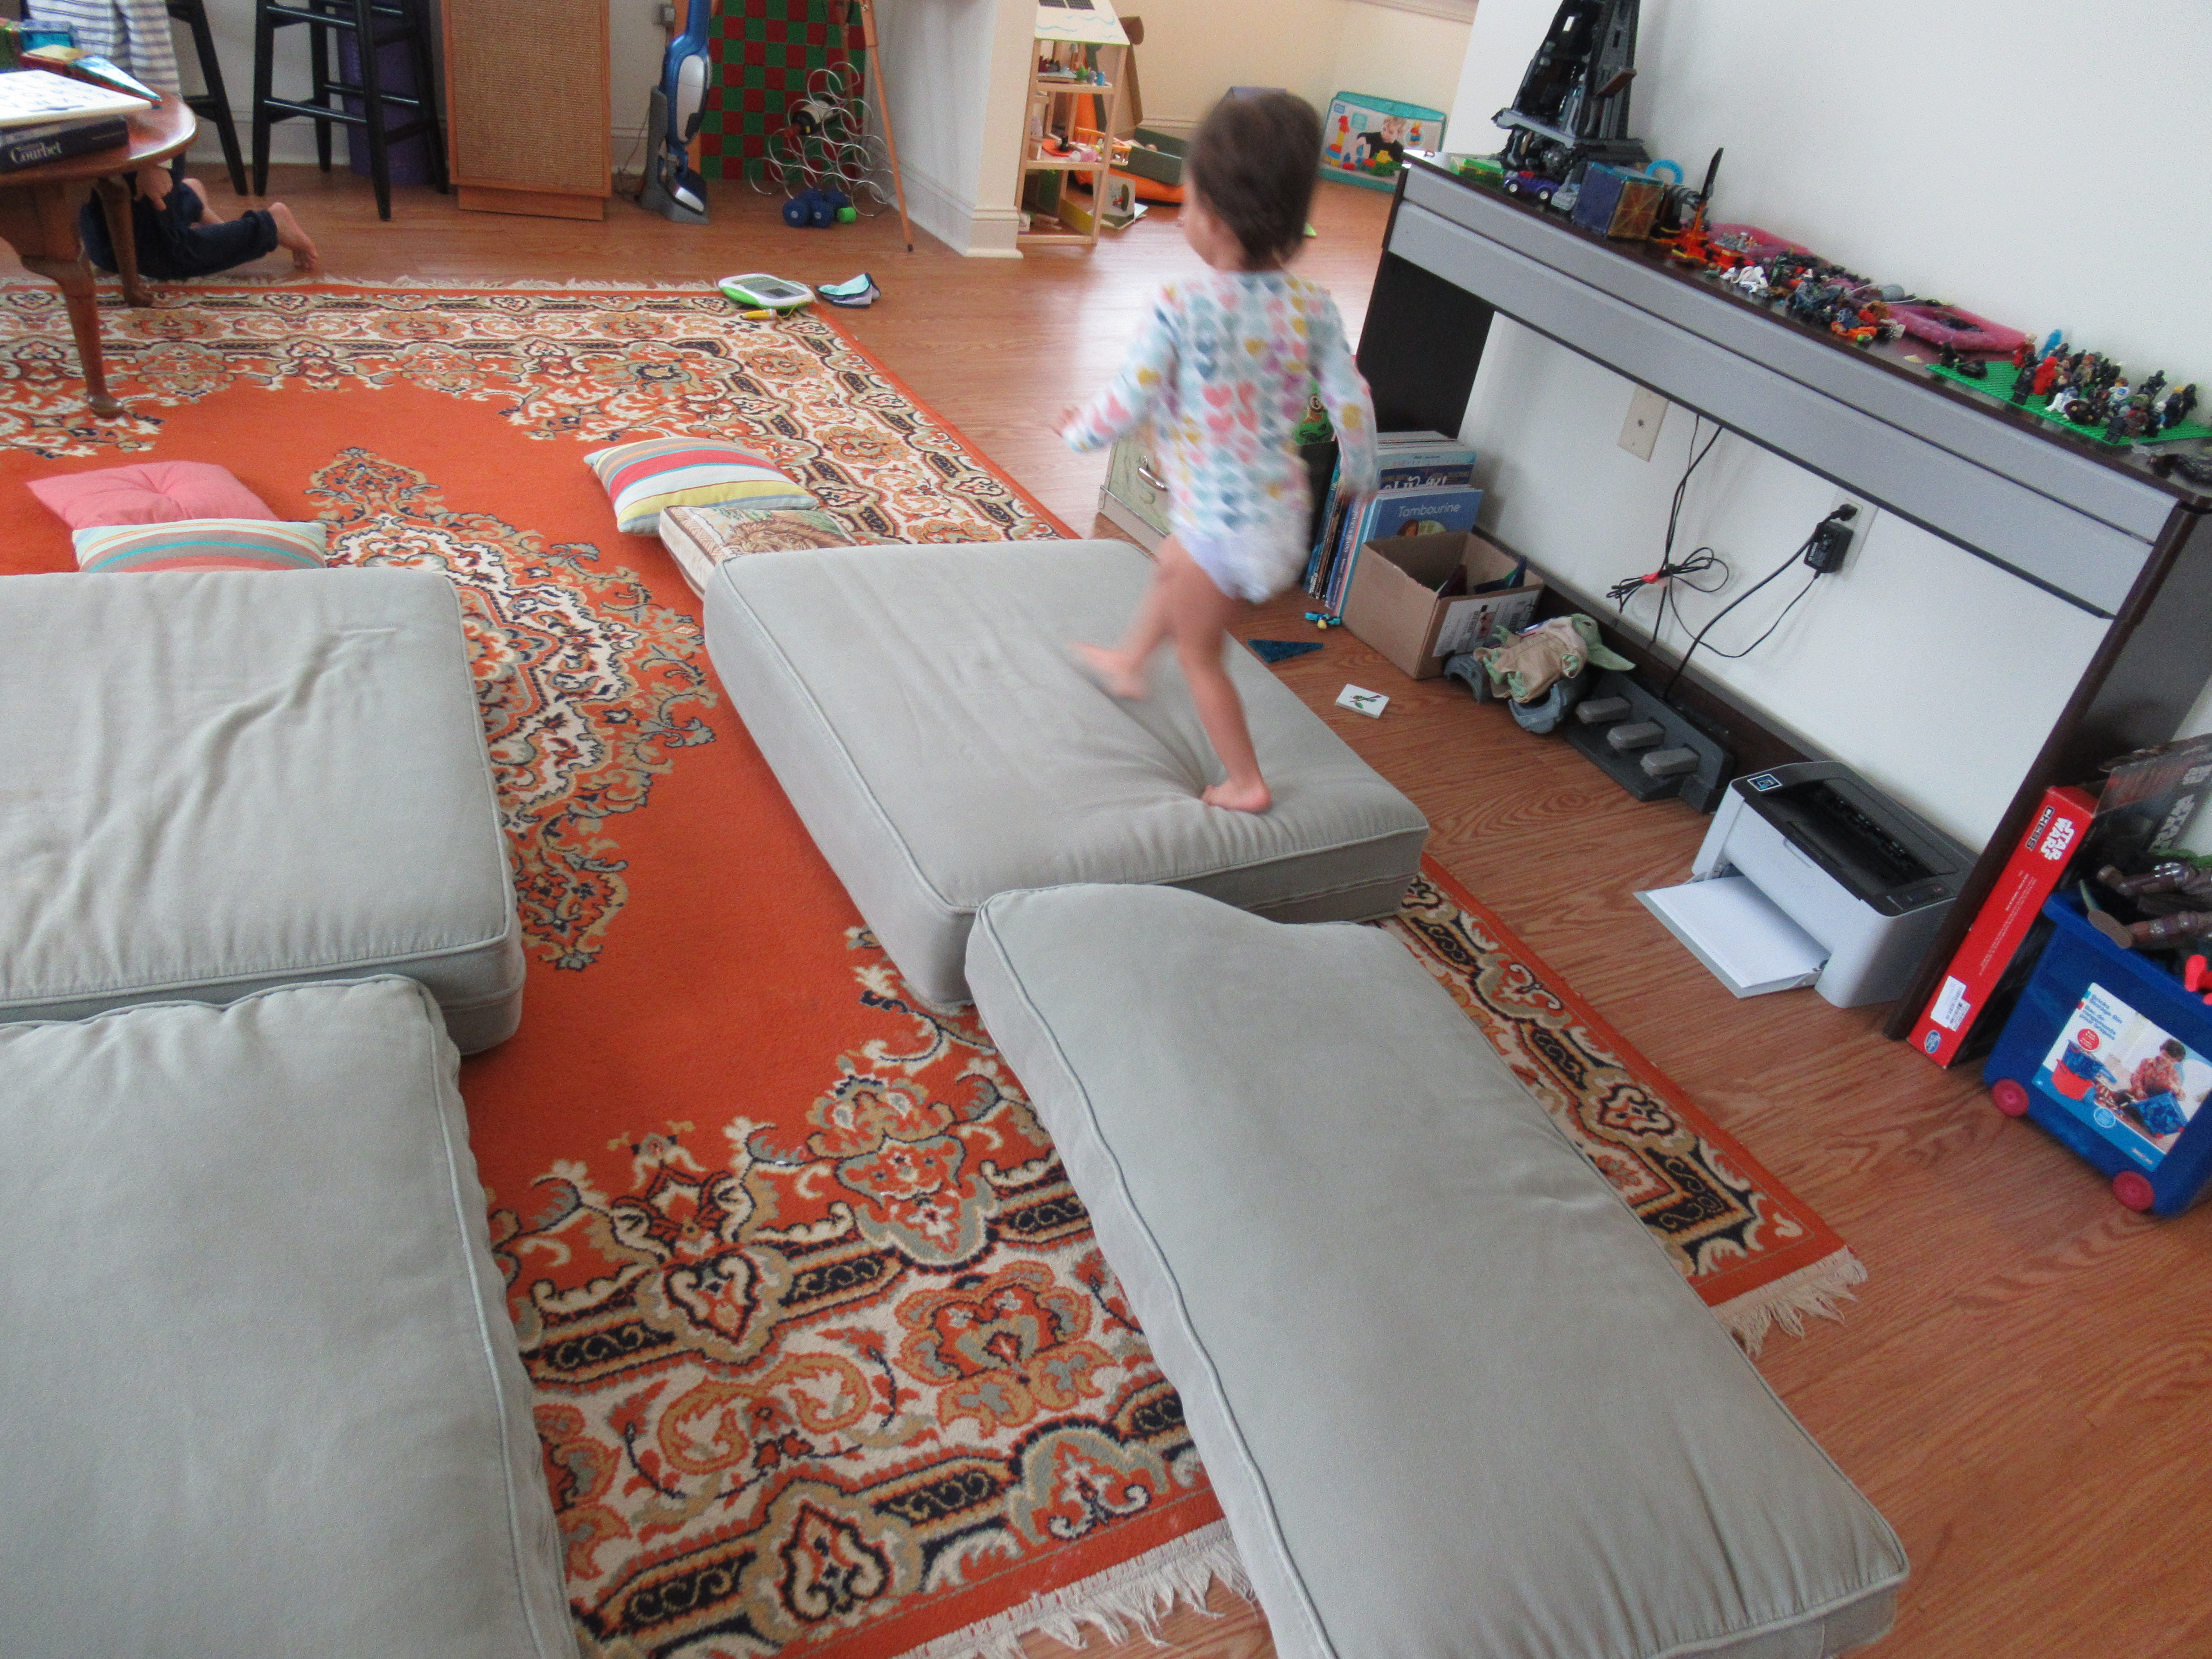
Pillow Path: This classic way to build a toddler’s gross motor skills and spatial awareness never gets old. I lined up our couch pillows in two lines with an empty “corridor” between and held her hand as she ran through.

Panda Look (21)

For more of a challenge, next she walked on top of the pillow bumpers! Of course then she wanted to play on the pillows and roll around for quite a while.

Panda Look (23)

Bubble Burster: Bubbles also never grow old!

Panda Look (19)

To tie in with the Look theme of the crate, this time we focused on tracking the bubbles with our eyes and popping them with fingers.

Panda Look (20)

On a Roll: This suggestion was exactly like a recent rolling game Veronika and I played; we made a diamond with our feet and rolled a ball back and forth.

Panda Look (18)

The sing along this month was a shortened version of Five Little Ducks, an old favorite. Act it out and pretend to be ducks: your toddler is the duckling and you give chase, or vice versa!

Feel with Me var

To round out the fun with books all about looking and noticing, we read:

Busy Firehouse by Rebecca Flynn

I Spy Little Book by Jean Morzollo

I Can Play by Betsy Snyder

Short and Tall Tubes

Short and Tall (5)

Here’s an easy hands-on way for toddlers to hone their concept of short and tall! I saved up toilet paper tubes and paper towel tubes for about a week, then cut the collection into varying lengths so we had six sizes ranging from shortest to tallest. You can invite your toddler to decorate these with markers, or do as I did and cover in pretty patterned paper.

Short and Tall (1)

First, I simply set out the tubes for Veronika to observe and play with. When I asked her to find me the shortest…

Short and Tall (3)

…she could! Likewise for the tallest.

Short and Tall (2)

For added fun, we read a favorite book about height (Usborne Book’s Taller and Shorter), which compares the heights of animals. Veronika and I pretended each tube was an animal and lined them up in a row as the story went on!

Short and Tall (8)

When I asked her if she could sort all six tubes from shortest to tallest, the concept was clearly too advanced for her, so much so that she sort of tuned out the question.

Short and Tall (7)

That said, she was able to tell the comparative size between two tubes easily (which was shorter, which was taller), and we’ll work up to the next step eventually!

Short and Tall (6)

Rope Games

Rope Games (6)

Over the summer, we used a long rope simply as a boredom buster, and games with it filled almost an entire morning. Today I tailored rope play specifically to my toddler while big brother was in school. Any jump rope will work for this activity, or even just a long piece of regular rope.

First, I wanted to see if it she could walk across it like a balance beam. Easy-peasy!

Rope Games (2)

But could she follow the rope if we made it zigzag? This was definitely more of a challenge, but Veronika worked hard to get one foot in front of the other along the twists.

Rope Games (3)

Next, I challenged her to cross the rope using her body in different ways. She could hop over it, step across it, or even crawl on it.

Rope Games (1)

From here, she found her own ways to play with the rope. She thought the handles looked like microphones and wanted to sing into them.

Rope Games (5)

Then she began dragging the rope around like a snake or a puppy leash. When it tangled at her feet, she gave a jump over it, almost a precursor to jumping rope!

Rope Games (8)

She also loved holding both ends and pretending she was a butterfly, fluttering the strands in each hand.

Rope Games (9)

I loved that she came up with her own gross motor ways to use a rope, including some I never imagined!

Picture Box

Picture Box (5)

Here’s a riff on an activity Veronika and I have done before, the first time making her a big book of pictures to look through. The big pages proved too hard for her to turn, however, so this mini version had two advantages: the pictures are smaller and they are all kept inside a special box, which meant double the fun!

I had an old recipe card box with a flip-top lid that was perfect for the game. As I surmised, Veronika was enamored with the lid, and that alone might have occupied her most of the morning!

But the fun was just getting started. We went through old nature catalogs and cut out pictures of animals, including bears, rabbits, owls, bobcats, and more. I loved hearing her name each one while we sat together to cut them out and then glue down onto index cards.

Picture Box (1)

Insert into the recipe box and it’s ready for storage and play!

Picture Box (2)

Veronika kept so busy with this little set of cards by herself. As I mentioned, she loved the lid and was so proud as she opened and closed it.

Picture Box (3)

Then there was the surprise each time she opened it to see what picture was waiting for her. She would shuffle through the cards, take them all out, put them back in, and then start all over again.

Picture Box (6)

I hope to add to this collection over time!

Picture Box (8)

Want to make this activity more portable? Put the pictures in a mini photo album instead of a recipe box and you’ll have the prefect take-along version for the car.

Picture Box (7)