Paper Clip Challenge

Paperclip Challenge (8).JPG

Travis and I took the day off from tracing, but I challenged him with this activity that hones fine motor skills and sorting skills – two great things to work on in the summer before kindergarten!

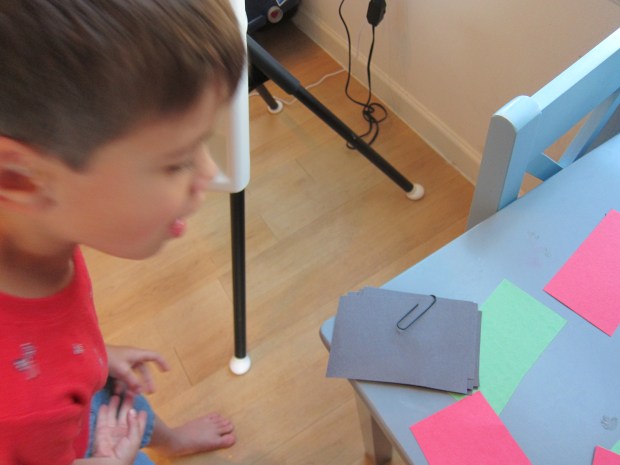
First, I cut construction paper into squares using four different colors. Each color corresponded with a colored paper clip.

Paperclip Challenge (1)

The goal was to gather all the paper slips of one color, and affix them together with the corresponding paper clip.

Paperclip Challenge (2)

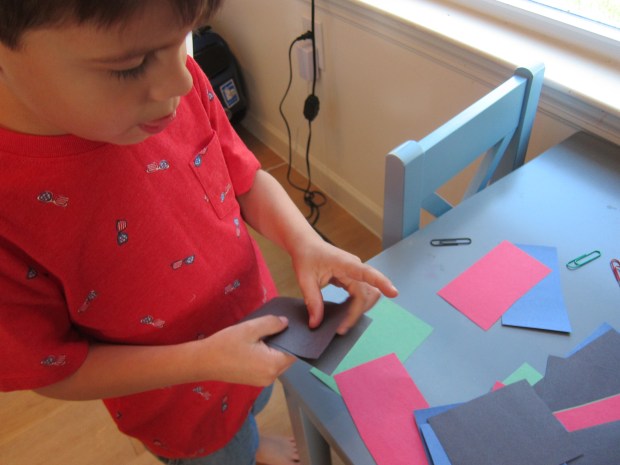
He was an avid participant, combing through the pile of papers to make sure he didn’t miss a single one.

Paperclip Challenge (3)

When it came time to clip on the paper clip, I realized he’d never used one before! I showed him how the end with two loops will naturally slip over a stack of paper, one loop in front, one behind, and hold them together. This was like magic to my 5 year old!

Paperclip Challenge (4)

Needless to say, he eagerly began searching for the next color. “You have all the green,” I said, pointing toward the green paper clip. “Nope, missed one!” His eyes are better than mine!

Paperclip Challenge (5)

At the end, he had four neat stacks.. .and loved the task so much that he wanted to play with the paper and clips for some time after.

Paperclip Challenge (7)

Make an M

Make M (5).JPG

Travis has a hard time tracing M, so I wanted to make today’s lesson a little silly for him. After tracing, I challenged him to make an upper case M – with two pairs of paints!

He really struggled with how to form the letter off of paper.

Make M (2)

I suggested he position the pants in front of himself like a person was facing him and wearing them, but even this was tricky.

Make M (3)

We discussed the motion he makes on paper when tracing M: up, down, up down. Could he see that pattern in the pant legs? Aha!

Make M (1)

Moving on to little m, I made things simpler; I piped glue along an outline of m on construction paper and he only had to make the m by gluing down beads.

Make M (4)

We’ll be back for N soon!

Rock ‘n’ Roll

Rock and Roll (5)

Veronika is so close to crawling, but her arms still aren’t quite strong enough yet to propel forward. You can build those arm muscles by placing a bolster under your baby’s belly; think of this as 8 month old tummy time!

IMG_0001.JPG

I rolled up a beach towel tightly and positioned her with arms over it and legs behind.

Rock and Roll (2)

Now lift your baby’s legs. The weight will transfer to their arms, and hopefully he or she will “walk” the hands forward.

Rock and Roll (4)

Veronika was delighted! Mom, she seemed to say, I’m doing it!

Rock and Roll (1)

You can roll baby forwards a little ways – just make sure you are on a smooth surface, and not a carpet.

Rock and Roll (3)

After I let go of her legs, I let Veronika hang out this way for a while. She kicked her feet, and shifted her torso side to side to check out the towel, so she was still getting in quite a little workout.

Rock and Roll (6).JPG

DIY Burlap American Flags

Burlap Flags (7)

We have little American flags for Travis and Veronika to wave at tomorrow’s Fourth of July parade, but with a roll of burlap in our craft bin, we thought it would be fun to bring homemade ones along as well.

Cut burlap into little flags; these can be square, rectangular, or triangles, whatever your little crafters would like!

Burlap Flags (1)

I set out red, white, and blue paints, and Travis jumped right in.

Burlap Flags (3)

First he smeared lots of blue over his flag, but then remembered to include the other two colors from Old Glory as well. By the end, his flag was a pretty mix. Meanwhile, I made a sort of reverse-color American flag for him.

Burlap Flags (4)

Once the paint dries, hot glue onto dowels. You can leave the dowels plain, but we decided to paint those blue as well!

Burlap Flags (6)

Long L

Long L (1)

L is an easy letter of the day for Travis to trace and we used some equally easy ways to form it today.

After tracing upper case L, I asked Travis to show me L with his left hand. He paused a moment to remember which is his left, but then flashed me an L.

Next he traced lower case l. We lined up all his crayons and I asked him to show me the longest crayon. It was a close call between pink and white, but white one.

Long L ((2)

Using this long crayon, I asked him to make me lower case l – just a long line!

Long L ((4)

History of the Flag

History of the Flag (1)

In anticipation of the 4th of July, Travis and I had a lesson about the American flag today, thanks to our Backyard BBQ unit from Raddish Kids. Recipes will follow soon, but for today, we had fun learning about the flag’s history and getting creative. Read on!

First I gave Travis a riddle: “I’m red, white, and blue, and starry too. What am I?” He had peeked (little cheater!) so knew I meant the flag. It’s fun at this point if you have a little flag that your child can examine and hold.

We made a chart known as a K/W/L graph with three columns: Things I Know; Things I Want to Know; What I Learned.

I asked him what he knew for starters, and he rattled off facts: the colors, the inclusion of stars and stripes, and that it’s our American flag, not another country’s.

History of the Flag (2)

Then we discussed what he wanted to know. I encouraged him to go deeper: why are there thirteen stripes or fifty stars, for example; why do we fly the flag. Now it was time for videos suggested by Raddish!

IMG_0001

We looked through a few flag books, as well, for further facts. It was useful to have a world map handy so I could point out where other flags were from.

IMG_0002

Now he could fill in the final L column. I was so proud that Travis had learned about the thirteen colonies, for example, or nicknames for the flag like Old Glory.

History of the Flag (3)

So now for the crafty part: designing his own country flag. Being only 5 years old, Travis’s grasp of the project was limited; his was a very fantastical flag for a “snake country.”

History of the Flag (4)

We used cardstock as the background, and of course a coiled yarn snake needed to be in the center. Using stencils was an artistic way to add “symbols”. Big kids can go more in depth into which symbols exist on real flags, and why.

History of the Flag (5)

A tin foil canton (vocab word)!) in the top corner added shine, though soon this was embellished with an old train ticket and construction paper.

History of the Flag (7)

I loved watching his creativity even though his final result was quite busy for a flag. Please share about your own kids’ creations in the comments!

History of the Flag (6)

In and Out Games

In Out Games (2)

Babies just seem to love containers, especially finding one with various items inside and dumping them out. Contain that natural inclination with these variations on in and out games!

For the first version, I simply filled a shoebox with a few toys, trying to make them novel for Veronika; we had a few new squishy balls, empty So Delicious yogurt containers, and some favorite soft toys.

In Out Games (1)

The entire goal of the game was for her to reach in and pull things out, then fill the box back up and start all over again. She was up for it!

In Out Games (5)

The shoebox proved to be a little too big for her to lift and dump, so I eventually transferred everything to a small toy bin. I showed her how to upend this.

In Out Games (3)

What a fun game, mommy!

In Out Games (4)

For the next version, I got a little more technical with language learning. Use a plastic bowl instead of a box (just to mix things up!) and add different toys.

Pop beads are a fun burst of color for babies; just be sure you have these joined in secure loops, since the individual beads can pose a choking hazard.

In Out Games (8)

This time, I first said, “Put in,” and encouraged her to place items in the bowl.

In Out Games (9)

Then we reversed it: “Take out,” I said, each time she reached in a hand to grab out an item.

In Out Games (7)

Note: ‘take out’ happened a lot more than ‘put in’, which I expected! But repeating the words each time will help your baby learn the concepts.

In Out Games (10)

I also encouraged her to hand toys to me, using an open-hand gesture and language.

In Out Games (6)

This is a great game to play on repeat as your little one nears that exciting moment of first words!

Indoor Sandbox Edible Sensory Bin

Edible Sandbox (3)

As a follow up to her first edible sensory tray, today I put together this easy indoor edible sandbox for Veronika… complete with snacks sprinkled in!

Fill a shallow bin with oats, and scatter in a few teething biscuits or toddler cookies (Veronika loves the organic Letter of the Day cookies from Earth’s Best).

Edible Sandbox (1)

Add a few cups or scoops and the bin is ready to go!

Edible Sandbox (2)

Veronika immediately got her hands in, and when she found the first cookie, her look was one of pure delight. Yum!

Edible Sandbox (8)

She kept digging through and loved scattering the oats around.

Edible Sandbox (6)

And she was intrigued when I showed her how she could scoop the mixture into the cups and shake them around, or pour them out.

Edible Sandbox (4)

Big brother wanted in on the action, too!

Edible Sandbox (9)

I loved watching the two of them have fun with this one together.

Edible Sandbox (10)

And because the oats are dry, this sensory bin is remarkably easy to clean up! Have a blanket underneath your baby that you can simply shake into the trash, and anything left behind will sweep up in a pinch.

Edible Sandbox (7)

Chalk K

Chalk K (3).JPGFor today’s tracing letter, Travis and I only used one material, and one that ended with the letter’s sound rather than began with it: chalk, that is!

First he traced upper case K and lower case k on paper. Travis has a difficult time remembering where the two diagonal lines exit out from the straight line, so I knew our 3-D version would be very beneficial today.

I set out three pieces of chalk: 1 long and 2 short.

Chalk K (1)

I challenged him to make big K, angling the chalk pieces correctly. After just a brief pause, he mastered the upper case.

Chalk K (2)

Now for the real trick: could he convert it into lower-case k, moving the chalk pieces only slightly?

He didn’t miss a beat! Kudos, Travis!

Chalk K (4)

Animal Craft Challenge

Animal Challenge (6)

Travis loved this month’s craft challenge from Highlights magazine: to make an animal using nothing more than an empty egg carton, pipe cleaners, pom poms, and googly eyes.

I was thinking something cute and fluffy, but Travis immediately knew he wanted a snake! Pipe cleaners were the obvious choice for the body.

Animal Challenge (1)

We twisted several lengths together to make long snakes. He wanted to attach eyes next, but I asked him if he thought the eyes would affix well to the pipe cleaners. He decided no, and realized an egg carton piece could be the head!

We poked holes through the egg carton segments to attach heads to bodies, and glued on the eyes.

Animal Challenge (2)

With leftover egg carton portions all around him now, he toyed around with gluing pom poms and eyes to single segments, but this didn’t work very well. Could we use the bigger, lid portion of the carton we wondered, for a body?

Animal Challenge (3)

Now Travis knew what he wanted: a spider! We threaded four pipe cleaners through from one side to the other, to make 8 legs. He wanted to glue on 8 eyes, but we only had room for 5 eyes to march across.

Then Travis decided it needed to be furry with pom poms – a tarantula! He was so thrilled with this spider that he couldn’t wait for the glue to dry.

Animal Challenge (4)

What a wonderful craft challenge, thanks Highlights!

Animal Challenge (5)