Handprint Cookies

Handprint Cookies (8)

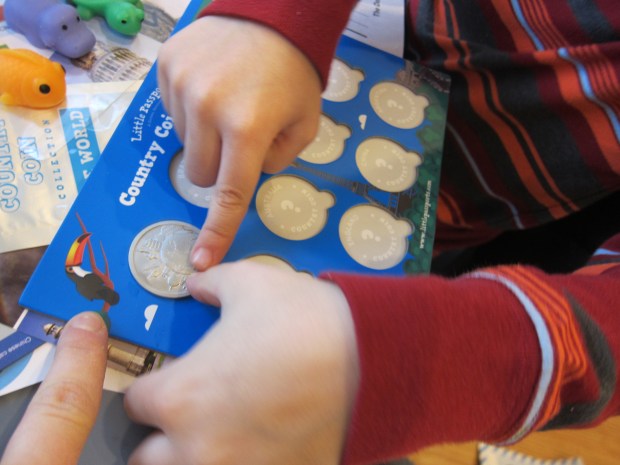
Part baking project and part bonding activity, these sibling handprint cookies are absolutely adorable. I can think of no better way to spend these cozy days of social distancing than creating strong memories for the kids, despite the scary news in the outside world.

So first things first, we needed cookie dough! I knew the dough needed to chill for a while, so whipped up a batch first thing in the morning.

Ingredients:

  • 1/2 cup coconut sugar (or brown sugar)
  • 1/2 cup Earth Balance butter
  • 2 Ener-G eggs
  • 1 teaspoon vanilla almond milk
  • 2 and 1/2 cups flour
  • 2 teaspoons baking powder
  • 1/4 teaspoon salt
  1. Cream together the sugar, butter, Ener-G eggs, and almond milk in a stand mixer. Add the flour, baking powder, and salt, mixing at low speed just until combined.
  2. Gather the dough into a ball and chill for at least 3 hours.

When it was time to make the cookies, I sat Veronika in her high chair with one portion of dough, and Travis stood at the counter to help me roll out the rest.

Handprint Cookies (2)

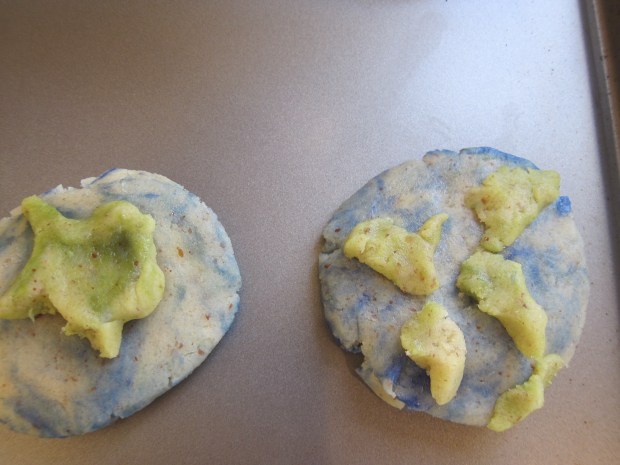
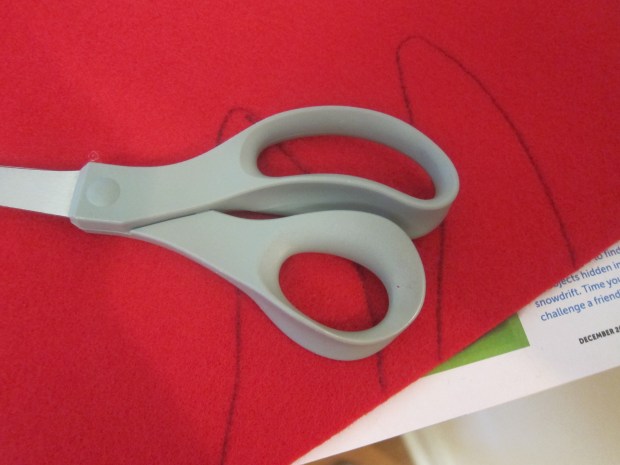
Press a child’s hand to the dough and trace with a butter knife.

Handprint Cookies (1)

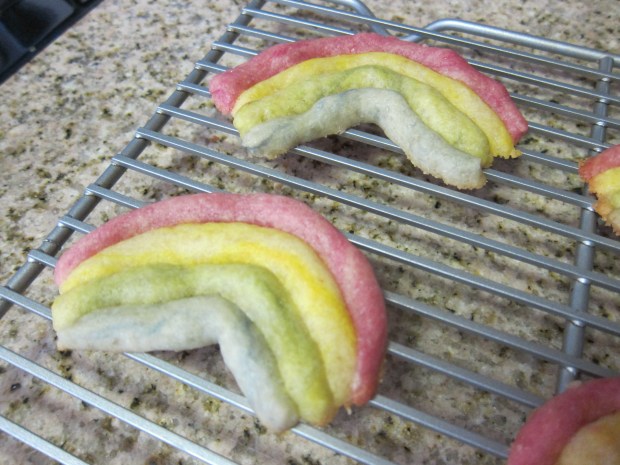
Travis was able to hold his hand still for a realistic approximation on his cookie. I had to use a little more creative license with wiggly toddler Veronika, as expected! Then we gathered the scraps and re-rolled the dough for heart and star cookie cutter shapes.

Handprint Cookies (3)

As a sweet touch, they pressed their thumbprints into a few cookies.

Handprint Cookies (5)

Let the kids decorate them however they want!

Handprint Cookies (4)

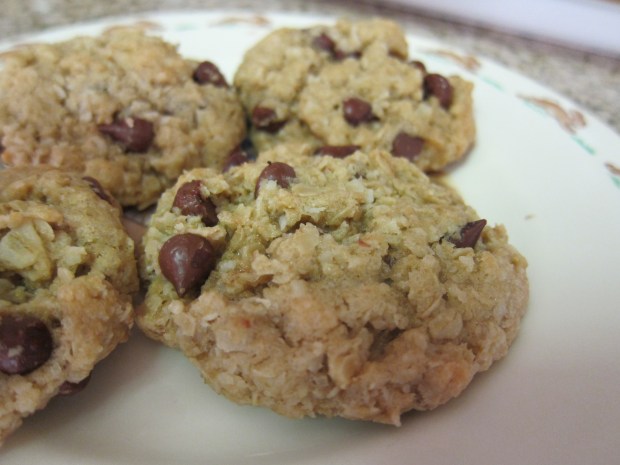
I stepped back and let them choose, which meant our cookies had a cinnamon-sugar sprinkle and Dandies marshmallows in the center.

Handprint Cookies (6)

Bake at 375 degrees F for 8 minutes, until lightly browned.

Handprint Cookies (8)

Then half the fun is eating them of course!

Continent Cookies and Pen Pals

Passports World (1)

Travis has a new subscription to the World Edition of Little Passports, having graduated from Early Explorers. With this big kid subscription, he’ll now get to explore a specific country each month instead of a worldwide theme.

The starter kit contained everything he’ll need moving forward, including: a suitcase; a letter from our guides “Sam and Sofia”; a first luggage tag; a passport; a world map; and a coin chart that he’ll fill in each month.

Passports World (2)

The activities in his first booklet are great for early elementary school age, including simple addition, mazes, and word scrambles.

As an activity to kick start things, we made the suggested Continent Cookies. Prepare sugar cookies according to your favorite recipe (full disclosure: we used a mix!).

Divide the dough into thirds. Tint one third with about 10 drops of green food coloring; this will be your land. Tint the remaining two-thirds dough with about 10 drops of blue food coloring; this will be your ocean.

World Passports (4)

Pull off about 2 tablespoons of the blue dough and press into a disk. We followed along with Little Passport’s handy instruction sheet and tried to shape pinches of the green dough into the shapes of the continents. Travis enjoyed this challenge, and also made up his own pretend continents.

World Passports (5)

Our full world didn’t turn out too badly!

World Passports (6)

Bake according to recipe instructions, then enjoy a taste of the world – literally!

For some final fun, we checked out extras online like how to say hello in multiple languages.

World Passports (8)

We also printed out a pen pal template and decided to start a correspondence with his cousin, who lives a few states away.

World Passports (9)

Your kids might even have friends or relatives in another country to write to! We’re excited to see what arrives in the first country kit next month.

Lemon-Glazed Sugar Cookies

Lemon Sugar Cookies (3).JPG

It’s not Christmas until you’ve made cut-out sugar cookies! This recipe was more of a mommy project, not a kid recipe like some others in our kitchen this holiday season, but kids will love helping to decorate the cookies in the final step.

Ingredients:

For the cookies:

  • 2 and 3/4 cups all-purpose flour
  • 1/2 teaspoon baking powder
  • 3/4 teaspoon salt
  • 3/4 cup Earth Balance butter, softened
  • 2/3 cup sugar
  • 1 tablespoon ground flaxseed
  • 3 tablespoons water
  • 1 teaspoon vanilla extract

For the glaze:

  • 2 cups powdered sugar
  • 2 tablespoons + 2 teaspoons lemon juice
  • 1 teaspoon grated lemon zest

To decorate:

  • Chopped pistachios
  • Sprinkles
  1. To prepare the dough, combine the flour, baking powder, and salt in a bowl. Set aside.
  2. In a stand mixer, beat the butter and sugar until fluffy, about 2 minutes. Whisk the flaxseed into the water to make 1 flax egg. Add to the stand mixer, along with the vanilla, and beat until combined.
  3. Beat in the flour mixture at low speed until a dough forms.
  4. Shape the dough into a disk and roll between two sheets of parchment paper to 1/4-inch thick. Use holiday cookie cutters to cut out shapes of your choice. Transfer to 2 parchment-paper lined baking sheets.Lemon Sugar Cookies (1)
  5. Chill the cookies for 15 to 20 minutes, then bake at 350 degrees F for 11 minutes. Let cool on the baking sheets.
  6. To prepare the glaze, whisk together the powdered sugar, lemon juice, and zest. Spread over the cookies and return to the baking sheet. Immediately sprinkle with desired toppings.

Lemon Sugar Cookies (5)

Let dry completely, and then it’s time for pretty packaging! To gift the cookies, transfer them to wax paper bags and fold over the top. Add a holiday cupcake liner. Use a hole punch to punch through all the layers, then secure with a brad.

Lemon Sugar Cookies (6)

Of course don’t forget to save some for your family… And a few for Santa!

Lemon Sugar Cookies (4)


Peppermint Candy Box

Peppermint Candy Box (5).JPG

It was all about holiday gifts in our home over the weekend. When we spotted these decorated cookie tins in Travis’s Highlights magazine, we knew we’d found the perfect gift for his kindergarten teachers!

Wrap a store-bought cookie tin in white felt.

Peppermint Candy Box (1)

Use hot glue or tacky glue to adhere securely. We wrapped only the lids, since the bottom of our tins were already printed in holiday pictures, but you can wrap the whole box if desired. Cut out red pieces of felt to mimic the red swirls of a peppermint candy and glue these to the lid.

Peppermint Candy Box (2)

Fill the tin with your favorite holiday cookies or other treats, of course!

Peppermint Candy Box (3)

To finish the presentation, wrap in plastic wrap (or clear cellophane) and secure with green ribbon on each side so it looks like a peppermint candy waiting to be twisted open.

Peppermint Candy Box (4)

Super Healthy Cookie

Healthy Cookie (5)

Much like the Oatmeal Energy Balls we made a few weeks ago, these cookies are designed to give your kids a boost! They’re perfect for after school or after sports practice.

Healthy Cookie (1)

Ingredients:

  • 3 ripe bananas
  • 1/4 cup melted coconut oil
  • 2 cups rolled oats
  • 2/3 cup flaxseed
  • 1 cup shredded coconut
  • 1/2 teaspoon cinnamon
  • 1/4 teaspoon salt
  • 1 teaspoon baking powder
  • 1 (6-ounce) bar dark chocolate
  1. First comes the fun part: place the bananas in a bowl and mash with a potato masher until very smooth.
  2. Add the coconut oil, oats, flaxseed, shredded coconut, cinnamon, salt, and baking powder.
  3. Chop the chocolate bar into pieces, and stir in.
  4. Drop the dough by tablespoons onto baking sheets. Bake at 350 degrees F for 20 minutes, until lightly browned on the bottom.

Healthy Cookie (4)


Flu Fighter Cookies

Garlic Medicine (8).JPG

We tend to think of ourselves as a healthy family, but somehow this winter has been one mild case of the sniffles after another. At least it was never more serious than that, but we’re happy warm weather is on the horizon. And we’re fighting off any lingering germs with this recipe. Okay, these cookies won’t really cure the flu, but they do contain good-for-you foods like ginger, cinnamon, walnuts, and more.

Ingredients:

  • 2 and 1/4 cups all-purpose flour
  • 1 and 1/4 teaspoons baking powder
  • 3/4 teaspoon baking soda
  • 1 teaspoon ground ginger
  • 3/4 teaspoon ground cinnamon
  • 1/2 teaspoon ground nutmeg
  • 1/8 teaspoon ground cloves
  • 1/8 teaspoon salt
  • 1/2 cup Earth Balance butter
  • 1 cup brown sugar
  • 2 Ener-G eggs
  • 1/4 cup molasses
  • 1/4 cup vanilla non-dairy yogurt
  • 1/2 cup old-fashioned oats
  • 1 and 1/4 cups dried cranberries
  • 1 and 1/4 cups chopped walnuts
  1. In a large bowl, combine the flour, baking powder, baking soda, ginger, cinnamon, nutmeg, cloves, and salt. Set aside.
  2. Cream together the butter and brown sugar in a stand mixer. Add the Ener-G eggs, molasses, and yogurt; beat until combined.
  3. Fold in the oats, cranberries, and walnuts.
  4. Drop the dough by heaping tablespoonfuls onto baking sheets lined with parchment paper. Bake at 375 degrees F for 12 minutes. Transfer to a wire rack to cool.

Host a Cookie Swap

Cookie Swap (7)

Travis doesn’t know it yet, but he’s about to receive a subscription to Raddish Kids as a gift this holiday season. Having gotten a sneak peak, I’m already impressed with the company. A suggested further activity from his upcoming December package was a holiday cookie swap. I instantly knew I wanted to make this happen, but it had to be quickly, even before he opens up his first box on Christmas morning. Could we pull off a cookie swap in just a few days? Yes!

First, we decided on a date for the party, then downloaded the invitation template and sent off to a few buddies. Come to Travis’s cookie party!

Cookie Swap (16).JPG

The day of the party, we set our computer to play holiday tunes…

Cookie Swap (2)

…and added festive decorations around a cookie table, including garlands, pinecones, and various crafts we’ve made this holiday season.

Cookie Swap (5)

We offered 4 kinds of cookies to our guests:

Classic Thumbprints

Peppermint Chocolate Brownie Cookies

Caramel Cracker Bark

and Snowball Cookies

Cookie Swap (10)

Now it was time for guests to arrive, each bearing their own plate of cookies!

Cookie Swap (6)

I recommend keeping things manageable – 3 to 8 friends, depending on your child’s age and the size of your home. Older kids may want to do an organized tasting, sitting down and rating each cookie. Little kids just loved running around and occasionally stopping to chomp a cookie! Meanwhile grown ups got to sit around, enjoy sweet treats, and chat.

As a couple of extras, we also added gingerbread men ice cubes to fruit punch for the kids, and I provided gift bags for everyone to take home the cookies they wanted.

Cookie Swap (14)

This was an absolutely perfect afternoon – I’m so thankful to Raddish for a suggestion I’d never have come up with otherwise, and can’t wait to see what Travis receives in his official first December kit. You can be sure there will be a blog post about it!


Classic Thumbprints

Classic Thumbprint (2).JPG

This classic Christmas cookie is the perfect recipe to make with little kids: an easy dough that comes together with few ingredients, plus the magic of shaping the cookies with the best instrument of all – your child’s thumb!

Classic Thumbprint (1)

Note: to make Ener-G egg yolks, use 1 tablespoon powder in 2 tablespoons water. For other vegan egg substitutes, aim for a similar volume.

Ingredients:

  • 2/3 cup Earth Balance butter, softened
  • 1/2 cup sugar
  • 2 Ener-G egg yolks
  • 1 teaspoon vanilla extract
  • 1 and 1/2 cups flour
  1. Beat the butter in a stand mixer until creamed. Add the sugar and beat until combined.
  2. Add the Ener-G and vanilla; beat until combined.
  3. Gradually beat in the flour. Shape the dough into a ball and wrap in plastic wrap. Chill for 1 hour.
  4. To bake the cookies, roll into 1-inch balls and place on cookie sheets. Press your thumb into the middle of each cookie.
  5. Bake at 375 degrees F for 11 minutes. If the thumbprint starts to puff up during baking, press back down with the back of a teaspoon.
  6. Let cool on wire racks before filling as desired. For

For a uber-classic version, use strawberry jam. We updated ours with a carrot cake jam filling!


Oatmeal Chocolate Coconut Chewy Cookies

Oatmeal Coconut Cookies (2)

These cookies are absolutely loaded with yummy ingredients, a few of which you can feel good about (rolled oats, shredded coconut), making it a treat you won’t mind giving your kids. You could also add 1 cup walnuts or raisins to the mix, if desired.

Ingredients:

  • 1 cup Earth Balance butter
  • 1 and 1/4 cups brown sugar
  • 1/2 cup sugar
  • 2 Ener-G eggs
  • 2 tablespoons plain non-dairy milk
  • 2 teaspoons vanilla extract
  • 1 and 3/4 cups flour
  • 1 teaspoon baking soda
  • 1/2 teaspoon salt
  • 3 cups rolled oats
  • 2 cups non-dairy chocolate chips
  • 1 cup shredded coconut
  1. In the bowl of a stand mixer, cream together the butter, brown sugar, and sugar. Add the Ener-G eggs, milk, and vanilla; beat until combined.
  2. In a large bowl, combine the flour, baking soda, and salt. Add the flour mixture to the sugar mixture and beat until combined.
  3. Stir in the oats, chocolate chips, and coconut.
  4. Roll the dough into balls of about 1 tablespoon, and bake in batches at 350 degrees F for 12 to 14 minutes, depending on desired crispness. Let cool on the pans for 1 minute before transferring to a wire rack to cool completely.

Oatmeal Coconut Cookies (1)


Rainbow Sugar Cookies

Rainbow Cookies (8).JPG

Kids are all too often over-scheduled these days, and I’m as guilty of it as the next parent. That’s why I love the afternoons that I deliberately keep wide open for my son and me. It’s the perfect excuse just to play or, one of our favorites, to bake! This cooking project is messy, that’s for sure, but so worth the smiles.

To start, we made a basic sugar cookie batter. In a bowl, cream together 2 sticks (1/2 pound) Earth Balance butter and 1 cup sugar using a wooden spoon or fork. Travis loved this step! Usually we use our stand mixer, and it was so fun to get in there with muscle power.

Rainbow Cookies (2)

Add 2 Ener-G eggs and 2 teaspoons vanilla extract, stirring until combined.

Carefully stir in 2 and 1/2 cups flour just until blended. Travis pretended he was a stand mixer on “slow” setting for this step. Loved it!

Rainbow Cookies (3)

Now for the messy part. Divide your dough into about 4 or 5 portions on a floured surface. Working with one portion at a time, knead in colors of the rainbow. We didn’t make a full rainbow, but soon had red, yellow, green, and blue portions, using the all-natural food coloring from Watkins.

Rainbow Cookies (4)

You’ll notice Travis took a moment to steal some leftover batter!

Rainbow Cookies (5)

Wrap each portion of dough individually in plastic wrap and place in the fridge for at least 1 hour (longer is fine).

Rainbow Cookies (6)

When it’s time to bake, coat a baking sheet with cooking spray. Pinch off a section of each color and roll into a long worm, then make rainbows on the baking sheet.

Rainbow Cookies (7)

Bake at 375 degrees F for 7 minutes. Transfer the cookies to a wire rack and repeat with the remaining dough until gone. (Note: we made two batches today, and the dough easily freezes for future rainbow-making).

Rainbow Cookies (9)