Mirror Pattern Gloves

Mirror Socks (10).jpg

This project is a fun intro-to-sewing for little kids, and also helped drive home some recent lessons on mirror imagery that Travis and I have talked about lately.

To make the gloves, you’ll need a long pair of socks. I had Travis put his forearms at the ends, and traced a wide L shape where his fingers and thumb would go.

Mirror Socks (1)

Cut off and discard the sock above this L.

Mirror Socks (2)

Fold the sock inside-out and do a basic running stitch (in, out, in, out) to attach the two sides, up to where the thumb is. Honestly, I am no seamstress: here is my hack job of a running stitch.

Mirror Socks (4)

But Travis loved helping thread a plastic needle and make a few practice threading motions.

Mirror Socks (3)

Put the sock right-side out again and try it on for size! Repeat with the other sock to make your second glove.

Mirror Socks (5)

We wanted to decorate our “mirror image” gloves with felt stickers but the only ones I had were Christmas-themed! So perhaps he can pull these out to wear around the holidays.

Mirror Socks (6)

As he placed each sticker, he thought hard about what would make a mirror image. Should the blue sticker go to the left or to the right?

Mirror Socks (7)

He quickly got the hang of it. And loved wearing the fingerless gloves once the project was complete!

Mirror Socks (8)

Symmetrical Art


Symmetrical Art (10)

Travis has done so many crafts at camp that it felt like a while since we’d sat down just to paint together. We amended that this morning with a craft intended to follow up on recent fun with symmetry.

First he folded a piece of paper in half, very importantly made a nice crease, and opened it back up again.

Symmetrical Art (6)

I squirted out big blobs of paint near the center crease, according to his preference. “Red, and orange, and blue!” he instructed.

Symmetrical Art (1)

He smeared them all together, noting the way the blobs ran together, made new colors (purple!), and got super smeary.

Symmetrical Art (2)

Now we folded the paper over again, smooshing the paint inside. We opened it back up for a neat symmetrical reveal. “I made a footprint!” he said.

Symmetrical Art (3)

He loved it so much that he immediately requested to use the second piece of paper I’d folded. This time he chose a different set of colors, including light blue, yellow, and black.

Symmetrical Art (4)

Blob blob blob and smoosh smoosh smoosh and we opened it up again.

Symmetrical Art (5)

He thought this one looked like Darth Vader’s mask – even cooler!

Symmetrical Art (7)

Proportional Pie

Proportion Pie (6)

Much like the magnetic hearts that Travis and I crafted today, this project is a fun way to teach kids about symmetry… With the added bonus that it’s edible!

Unlike linear symmetry, this project shows circular symmetry. You can point out to your child things in nature that show symmetry in a circle like this, including starfish and spider webs.

For the ready-to-eat equivalent, bake a pre-made pie shell according to package directions and let cool. (Note: A convenient vegan go-to is Wholly Wholesome).

Spoon a thick layer of non-dairy yogurt into the pie.

Proportion Pie (1)

Set out plates of berries or other fruits for your child to use as decoration and score the top of the yogurt so the pie is divided into 4 equal portions.

Proportion Pie (2)

(Note: Bigger kids might want to do this with six portions, but four seemed easier for my kindergartner to handle).

I placed a strawberry in one quarter of the pie. How many strawberries should each of the other three sections receive? Travis quickly added 1 strawberry to each.

Proportion Pie (3)

Next I placed two blueberries in one section. At first he placed his blueberries any which way, but I showed him how to place them not just in the right quadrant, but also the same place.

Proportion Pie (7)

“Is it ready to eat?” he wanted to know. Almost!


Proportion Pie (4)

We added just a few more blueberry and strawberry decorations to help him see the symmetry, and then it was time to scoop into the pie. What delicious fun!

Magnetic Hearts

Magnetic Heart (10).JPG

This quick craft not only teaches about the topic of symmetry, but is also a fantastic way to explore the properties of magnets!

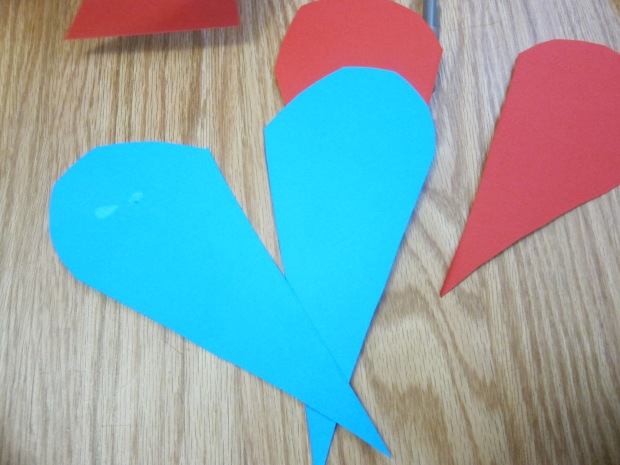
To cut out symmetrical hearts, fold cardstock in half and draw half a heart; cut out.

Magnetic Heart (1)

I thought to only have Travis help cut out the accompanying two long rectangles we would need from each color of cardstock, but he insisted on cutting out the heart himself – great practice along curves!

Magnetic Heart (2)

Open up the paper to reveal a symmetrical heart, then cut it in half.

Magnetic Heart (4)

Fold the rectangular strips you’ve cut out accordion style to form 5 pleats.

Magnetic Heart (5)

Fold this strip around itself to form a square and use tape or glue to adhere shut.

Magnetic Heart (6)

Tape a magnet to one side of the square, facing towards the center of your heart.

Magnetic Heart (7)

Tape down onto the heart and repeat on the other side.

Magnetic Heart (8)

Now, your two heart halves will snap together!

Magnetic Heart (9)

The other fun way to do this is to deliberately set up the magnets to repel each other. Travis loved chasing halves of hearts around the play room this way!

Magnetic Heart (13)

As you play, have a quick talk about attraction and repulsion in magnets, and you’ll have thrown a little learning into the fun.

Magnetic Heart (12)


Starburst Symmetry

Starburst SYmmetry (10)

This quick project was a fantastic way to show Travis circular symmetry, slightly different from symmetry with two halves as we’ve explored late in symmetrical socks and paper doll projects. There was a lot of need for precision with this activity, so I was proud of Travis’s concentration level.

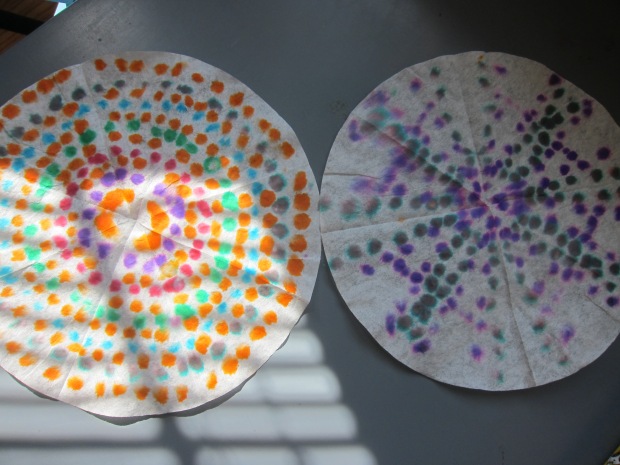
To start, fold a coffee filter in half. Then in half again, then in half again! Travis took the task of folding and making a good crease each time quite seriously. At the end, your filter will be the shape of an ice cream cone.

Starburst Symmetry (1)

Next he spritzed the filters with water until damp on each side, but not soaking.

Starburst Symmetry (2)

Use marker to make dots all over the filter, counting to three for each dot. This was a great little lesson in patience and also not scribbling (as he’d done recently for a different type of coffee filter project).

Starburst Symmetry (3)

Flip the filter over – wow! His pattern was waiting there on the other side.

Starburst Symmetry (4)

I showed him how to go over his dots again – slowly and carefully – to make the final result a little more clear.

Starburst Symmetry (5)

Now he opened it up for a big reveal. “Wow!”

Starburst Symmetry (6)

He wanted to know how the pattern had gotten there, but understood once I explained that the marker went through all 6 layers of the filter, resulting in perfect symmetry in all 6 segments.

Starburst Symmetry (8)

I loved how his pattern made a purple diamond, unintentinoally.

Starburst Symmetry (11)

These are beautiful hung on the wall or fridge once they dry!

Starburst Symmetry (9)

Paper Doll Chain

Paper Doll Chain (6)

In a continuing unit on symmetry, today I thought Travis might like to see an old-fashioned paper doll chain. Making it was good fun… but even more so was the interesting way he created to play with it!

First, cut a piece of construction paper into two long rectangles. Travis helped with this part, which was great for scissor practice.

Paper Doll Chain (1)

Fold the paper in half three times. Pencil in a person, making sure the arms and legs extend all the way to the crease.

Paper Doll Chain (2)

I let Travis cut along the straight lines through all those thick layers of paper – even better scissor practice! I helped out on the trickier bits, like around the head.

Paper Doll Chain (3)

Extend the chain of people out and you’ll see perfectly symmetrical dolls! We did a review of what this means to have symmetry, and he understood that they were all the same because of the way we’d folded the paper.

Then to my amusement, the dolls were lined up in battle formation, a little phalanx to join his action figure battle games!

Paper Doll Chain (5)

Silly Symmetrical Socks

Symmetrical Socks (6).JPG

Travis has been learning about symmetry lately, but this was the first time I challenged him to make something symmetrical without a template to follow. He was gamely up for the challenge!

I folded a piece of paper in half and drew a sock. How many socks did I have? I asked him. One, he guessed.

Symmetrical Socks (1)

I unfolded the paper to reveal… two socks! He thought this was a neat trick.

Symmetrical Socks (2)Now it was time to add silly decorations. For each one, fold a piece of paper in half and cut out shapes or designs. Travis loved discovering each time that he had duplicates of each shape.

Symmetrical Socks (3)

I helped Travis ponder where on the socks each shape needed to go to keep them symmetrical. At first he had things a little reversed (the heel of one sock and the toe of the other, for example) but as he worked, he got the hang of it!

Symmetrical Socks (5)

This is a simple and quirky project that will give a great visual about symmetry to little learners.

Symmetrical Socks (4)

Symmetry Kiwi Crate

Kiwi Symmetry (9)

Kiwi Co dubs Travis’s latest kit the Kaleidoscope Puzzles crate, but more broadly, it was all about symmetry. It was more helpful for me to present it to Travis that way, and he loved the projects and lessons involved!

First, there were two versions of a kaleidoscope to make (which, I explained to him, is a devise that reflects materials in a pattern). The standard Spinning Kaleidoscope was up first. Travis peeled the backing from the rectangular mirrors, folded up the provided cardboard tube, and inserted the mirrors.

Kiwi Symmetry (1)

I helped him to make sure that the three mirrors were angled the right way and he peeked inside – it already had a cool effect!

Kiwi Symmetry (3)

Next we covered the provided clear wheels with stickers, and saved a few stickers to decorate the outside of the tube.

Kiwi Symmetry (5)

Line up one of the sticker-covered circles with the hole in the viewing tube, then insert a brad and a foam bumper to hold it all together.

Kiwi Symmetry (7)

Travis peeked inside and was awe struck!

Kiwi Symmetry (8)

We had fun spinning it and handing it to each other for quite some time. “Look at this pattern, Mom!” he said in excitement, handing it over. Because the brad easily unfastens, you can switch back and forth between your two sticker-covered wheels.

Kiwi Symmetry (6)

Next we tackled the Standing Kaleidoscope. This relies on a mirror placed at different angles to make patterns from whatever is reflected below. Travis again peeled the backing from the mirrors (square ones this time) and inserted them into the mirror book.

Kiwi Symmetry a

This book then slots into the mirror base, which is helpfully labeled with the number of the angle – good math practice!

Kiwi Symmetry b

We slipped one of the provided pieces of patterned paper under the mirror book and immediately saw that it turned into a six-figured reflection.

Kiwi Symmetry c

Moving it out to 90 degree angle meant we only saw the pattern repeat 4 times – neat!

Kiwi Symmetry e

We tried it with a toy just for fun. “There are three cars!” Travis laughed with delight.

Kiwi Symmetry g

Your child might enjoy doing this with any number of small toys or coins, and playing around with various angles. The kit also includes lots of extra paper to color in your own patterns, which kept Travis happy for quite some time.

Kiwi Symmetry f

I reminded him to use lots of color for maximum effect.

The third project was to put it all together in Kaleidoscope Puzzle Games. The kit included foam shapes and puzzle cards, with the challenge to match the design on the card.

Kiwi Symmetry h

Travis being on the very young age-range for Kiwi Crate needed my assistance with this, but he definitely got the concept. It was easiest for him to think in terms of color, since the shapes were doubled on the puzzle cards (a triangle becomes a diamond, a trapezoid becomes a hexagon etc). But if I prompted him by color, he realized where he needed to lay down an orange piece, a blue piece, etc.

Kiwi Symmetry i

He was thrilled each time we flipped over the card to reveal the solution. Parents take note: some of these are tricky even for grown-ups!

Kiwi Symmetry j

Finally, there is a handy travel pouch to store all the pieces, meaning this would make a great game for car trips or vacations! The Explore magazine was full of fascinating tidbits about symmetry in nature (butterflies, zebra stripes).

We also checked out the suggested books, Let’s Fly a Kite by Stuart J. Murphy, and a coloring book on math and patterns (Patterns of the Universe) that he has been incredibly into, insisting we color one page before bed each night!

Kiwi Symmetry books.JPG

I was so proud of Travis tackling this intro to a tricky math concept.

Kiwi Symmetry k