Holiday Card Circuits

Holiday Card (4)

Need to celebrate a birthday with someone from afar during COVID-19? Or planning on sending cards for Passover or Easter (or whatever the closest holiday might be?). In this age of social distancing, here’s a card that will literally shine through, even over Zoom!

This card works on the exact same circuit principle as the graphite circuit Travis made recently. But first we needed to make a pretty card! Since ours was a birthday card, we chose heart-print scrapbook paper and glued a felt heart to the front. Make sure you cut a hole where your LED light will shine through.

Holiday Card (1)

Of course you could go in so many directions with this card, whether one for Easter (a light-up chick or egg?) or just a fun theme to say hello like a UFO beam or fire truck siren. You can use stickers or cardstock cut-outs for the decorations.

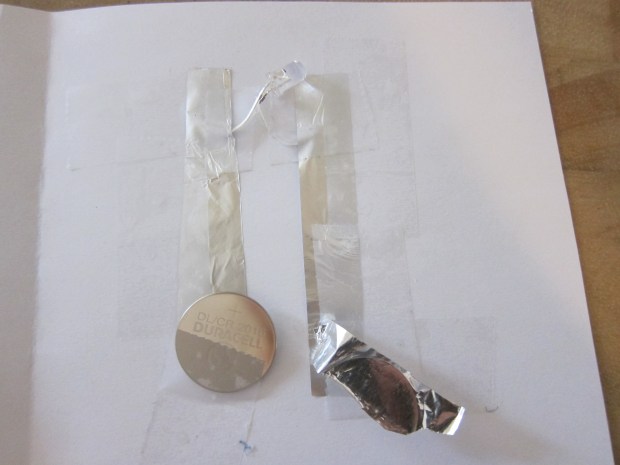
Inside, make a rectangle from three strips of aluminum foil and tape down, leaving one corner that still flaps open. Also leave a gap at the top where the LED light will go. Tape down the legs of the LED, one to each side, making note of where the positive and negative sides are (Hint: the positive leg is longer).

Holiday Card (2)

Now tape down a 3V battery in the corner where you’ve left the foil loose. When the flap of aluminum foil folds down, the circuit is complete and the card lights up!

Holiday Card (3)

Here’s mom’s amazement, even if it was a little old-hat for Travis.

Tube Slide

Tube Slide (8)

If you find yourself with a leftover cardboard tube (think from wrapping paper, or a craft paper roll, or even cardboard mailing tubes), don’t head to the recycle bin! These tubes are the perfect item to entertain a toddler.

Tube Slide (3)

Today I wanted to make the best ball slide for Veronika using the tube from a gift wrap roll. It took three tries before I got it right! For the first version, I set the tube at an angle from the couch so it dangled over a laundry bin.

Tube Slide (1)

She tried a few rolls, but was more interested in just tossing balls into the bin from the floor. So not the best version!

Tube Slide (2)

Then I tried dangling it from the end of the stair railing with tape. Again, the landing point was a laundry basket.

Tube Slide (5)

But it was impossible for her to reach the tube without me holding her, and I wasn’t comfortable letting her toddle up the stairs to try it solo, so this version lost her interest quickly. (You’ll notice she preferred to sit in the laundry basket).

Tube Slide (4)

Thinking fast, I taped the tube to the wall just above her toy bin, which she could safely scamper onto like a stool.

Tube Slide (6)

I showed her how to roll the balls through the shoot from here.

Tube Slide (7)

And she had the perfect advantage of height now to see them land in the laundry bin.

Tube Slide (9)

We have a winner folks! This third version made the best tube slide for this particular toddler. Which version does your child like best? Please share in the comments!

Tube Slide (10)

Kindergarten Home School Week 3

Home School 11 a

You’ve likely noticed that I paused on posting daily home school updates, as I didn’t want to overwhelm people’s inboxes. Starting next week, Travis’s school will be sending actual lesson plans, rather than suggestions, so I may go back to daily posts. Either way, the week had its ups and downs, some days where we felt on top of home school, some that were a struggle. This post can’t really capture all that, but here’s a run-down of activities from our third week home schooling for COVID-19.

Please stay safe everyone!

Math:

  • Computer games through a school program, all focused on concepts of greater than/less than or addends to 10.
  • Stuffed animal counting. We had fun making up silly equations, like “3 animals are having a tea party, and one more joins in. 3+ 1 = 4.”Home School 14 b
  • April weather graph, with predictions for what we’ll see most (rain) and least (snow).

ELA: 

  • Reading a story and then retelling it in your child’s words. We chose ‘Corduroy‘ for this activity, and I then asked him to imagine what might happen next. He said they’d go back to the store and buy a new stuffed animal friend, a giraffe!
  • A book ‘scavenger hunt’, in which Travis had to find things like the title, author’s name, count the words in a sentence, locate a question mark, etc. When we finished the book (Click, Clack Moo), he went back to tell me what had happened in the beginning, middle, and end.
  • Workbook pages
  • Letter tracing pages (G, H, I, J, K)
  • Online story time with his teacher
  • Writing a sentence with a sight word. Travis’s sentence included several (I, am, the): “I am swinging on the swings”. I loved his picture!Home School 12 b
  • Online read-through of Puff the Magic Dragon, followed by drawing a dragon in an online paint program.
  • Writers’ Workshop. Travis really stuck with it this this week, thinking abut a story instead of his latest Star Wars movie. His tale featured skeleton pirates, and he drew a boat to go with it!Home School 12 b
  • Sight word rainbow writing, using a different color for every sight word.Home School 12 a


Social Studies:

  • Community helper video. Travis drew himself as a doctor (which was more about his latest fascination with skeletons and bones).
  • Discussion of why a society might have rules.

Science: 

  • A BrainPop video about making and testing a hypothesis, after which we tested out what would float and what would sink.Home School 11 h
  • An online video about plants, followed by a nature walk to find plants.

Recess:

  • Spring walks!Home School 12 d
  • Chalk! Travis drew pictures of pirate skeletons and we also wrote some sight words.Home School 11 c

Specials:

  • Library:
    • Going through his shelf to sort fiction from non-fiction.Home School 12 d
    • Online video of I Am Yoga – with poses, too!Home School 12 f
  •  Art:
    • Travis drew a self-portrait on a big piece of craft paper, and little sister joined in!Home School 11 e
  • Spanish:
    • Online video with food words
    • Zumba dancingHome School 11 f
  • Gym:
    • An online P.E. video from Mr. Joe. Loved watching him do this one!Home School 11 i
    • Sock Toss: Place a target on one side of the room and make balls out of pairs of socks. Every time he made a goal, Travis had to take a step back.Home School 11 j
  • Music:
    • His teacher sent a full 15 minute class video to follow along! This was super appreciated.

Mental Health:

  • The school counselor sent a link for a three hour loop of relaxing sounds!

Family activities:


Super Silly Animal Sounds Activity

Silly Animal (5)

Veronika loves animal sounds and has a good 20 or so animals in her repertoire now. This was a fun way to keep the learning novel. We were able to go over old favorites and learn a few new ones, too!

I placed a bunch of animal toys into a small brown paper bag. Plastic animals worked best for the game, though we had a few stuffed animals inside, too.

Silly Animal (3)

I presented her with the bag and it was up to her to reach in. As she pulled out an animal, I chanted (for example):

Pig, pig, hey hey hey.

Pig, pig, what do you say?

After which, we oinked!

Silly Animal (1)

The rockin’ rhythm and tapping of the beat on our laps definitely got her attention, a nice change of pace from singing Old Macdonald.

Silly Animal (2)

We went through the whole bag this way. Sometimes instead of reaching in, she would peer inside the bag and say (for example) “quack”, so I would pull out the duck for the chant:

Duck, duck, hey hey hey.

Duck, duck what do you say? 

Silly Animal (4)

Then we played in reverse. Can you put frog back in the bag? Ribbit ribbit! Can you put lion back in the bag? Roar roar!

Silly Animal (7)

We added a few animals that she’s less familiar with, like turkey gobbling and donkey hee-hawing, for a little variety.

Silly Animal (6)

Feel free to reinforce the game by reading an animal sounds book, just after!

Silly Animal (8)

Although much too advanced for a 17-month-old, I jumped at the chance to introduce the idea of letter sounds with this same method. She liked the little chant so much that I filled the bag next with our set of magnetic letters and pulled one out at time.

Ess, ess, hey hey hey,

Ess, ess, what do you say?

Ess says ssss.

Silly Animal (10)

She even repeated some of these back to me! I wasn’t surprised though that she lost interest in this variation quickly.

Silly Animal (11)

This is a great learning game that you could tailor in all kinds of ways beyond animals and letters.

Surprise Tins

Surprise Tins (9)

I was in a pinch to keep Veronika occupied while Travis had home school this morning. Thinking fast, I pulled out a few old cookie tins from the cupboard. I had a set of three nesting ones, which was especially great since they moved from largest to smallest and we could talk about size as she played with them.

Surprise Tins (1)

I filled the biggest one with a set of magnetic letters. I filled the medium one with wooden blocks. As a bonus, the blocks are magnetic, so they could stick to the lid or side of the cookie tin.

I filled the third with various bottle caps, jar lids, and applesauce pouch tops that I’ve saved up for just such an occasion. Now I gave Veronika all three tins (with the lids loose so as not to frustrate her) and set her busy hands to work.

Surprise Tins (2)

The smallest tin, with the caps, was the instant favorite. She loved going through all the different varieties, and even said, “applesauce!” when she recognized the twisty cap.

Surprise Tins (3)

She tapped them together, sorted them into and out of the tin, and of course practiced taking the lid off and on.

Surprise Tins (5)

Eventually she moved over to the other tins, finding fun in the letters…

Surprise Tins (10)

…and the blocks.

Surprise Tins (8)

But those little bottle caps were definitely the favorite! When she returned to the game, that was instantly her go-to tin.

Surprise Tins (7)

I am going to keep this set tucked away in the cupboard to pull out whenever I need them. You can even mix up the items inside so the “surprise” is different each time and the game never grows old.

Surprise Tins (4)

Handprint Cookies

Handprint Cookies (8)

Part baking project and part bonding activity, these sibling handprint cookies are absolutely adorable. I can think of no better way to spend these cozy days of social distancing than creating strong memories for the kids, despite the scary news in the outside world.

So first things first, we needed cookie dough! I knew the dough needed to chill for a while, so whipped up a batch first thing in the morning.

Ingredients:

  • 1/2 cup coconut sugar (or brown sugar)
  • 1/2 cup Earth Balance butter
  • 2 Ener-G eggs
  • 1 teaspoon vanilla almond milk
  • 2 and 1/2 cups flour
  • 2 teaspoons baking powder
  • 1/4 teaspoon salt
  1. Cream together the sugar, butter, Ener-G eggs, and almond milk in a stand mixer. Add the flour, baking powder, and salt, mixing at low speed just until combined.
  2. Gather the dough into a ball and chill for at least 3 hours.

When it was time to make the cookies, I sat Veronika in her high chair with one portion of dough, and Travis stood at the counter to help me roll out the rest.

Handprint Cookies (2)

Press a child’s hand to the dough and trace with a butter knife.

Handprint Cookies (1)

Travis was able to hold his hand still for a realistic approximation on his cookie. I had to use a little more creative license with wiggly toddler Veronika, as expected! Then we gathered the scraps and re-rolled the dough for heart and star cookie cutter shapes.

Handprint Cookies (3)

As a sweet touch, they pressed their thumbprints into a few cookies.

Handprint Cookies (5)

Let the kids decorate them however they want!

Handprint Cookies (4)

I stepped back and let them choose, which meant our cookies had a cinnamon-sugar sprinkle and Dandies marshmallows in the center.

Handprint Cookies (6)

Bake at 375 degrees F for 8 minutes, until lightly browned.

Handprint Cookies (8)

Then half the fun is eating them of course!