Hammering Golf Tees

Hammering Golf Tees (11)

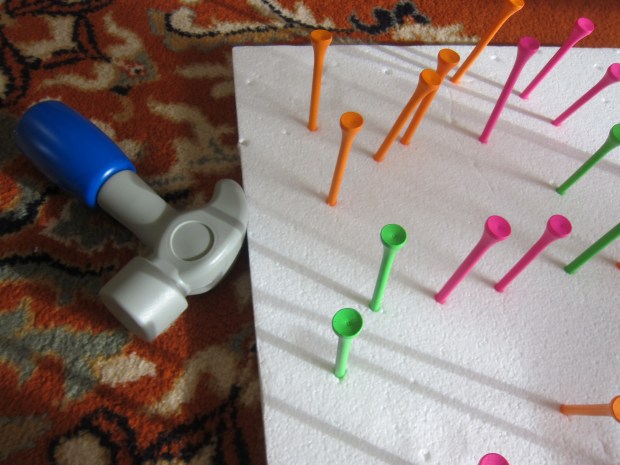
Here’s a safe way for a toddler to take a first try at using a hammer and nails, just like the grown-ups! Simply use a Styrofoam board as a base and large colorful golf tees as the “nails”.

I set out the board and first showed Veronika how to poke the tips of the tees in. This took a surprising bit of strength, and after her first few popped back up, she was soon an expert at it!

Hammering Golf Tees (8)

Next I showed her how to use her toy hammer to hammer the tees in the rest of the way. She quickly picked up this step of the game, too.

Hammering Golf Tees (6)

Truly you can just let your toddler have fun with all the items from here. If you want to guide the play a little bit more, try forming a few simple patterns from different color tees (“Green, orange, pink!” she noticed), or name the colors as you hammer them, or count each tee as your toddler hammers.

Hammering Golf Tees (5)

Mostly, I let her play solo. It turned out Veronika was way more interested in taking the tees in and out of the Styrofoam, and less interested in the hammer, but that was fine too.

Hammering Golf Tees (7)

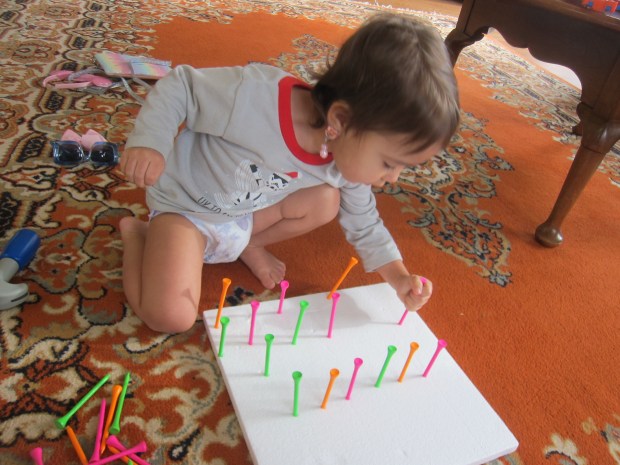
It took quite a bit of her concentration and strength, so I was proud watching her!

Hammering Golf Tees (9)

When she tired of that, leftover tees were fun to play with (under supervision) or tap together like rhythm sticks for a little music play.

Skating Party

Skating Party (2)

When ice cubes melt against a slippery surface like metal, they start to naturally slip and slide around. Turn that little scientific fact into a “skating party” by freezing small plastic animals in the ice ahead of time!

I filled an ice cube tray with water and then after about 2 hours, when the cubes had started to set but weren’t frozen solid, I pressed a toy animal into the top of each. A set of arctic animals fit nicely with the icy winter theme. I wish I’d had a few penguins to include, too! Let freeze completely overnight.

Skating Party (1)

At first I set these out on a plastic tray, where Veronika was immediately delighted to see favorite animals in the ice. But it quickly became apparent that we needed a metal cookie sheet for them to “skate”.

Skating Party (3)

The ice started to melt almost immediately once we made that switch, and just a gentle tap of the finger sends your animals “skating”.

Skating Party (5)

Veronika’s favorite was the snow hare, which she hopped and skated all about. Travis loved making the animals take wild skating spins across the tray.

Skating Party (6)

He also wanted to try freeing them from the ice, another oldie-but-goodie ice game.

Skating Party (7)

And we all laughed at the way the ice animals could spin and move.

In sum, a fun quick activity before even heading off to school!

Skating Party (9)

Book Busy Box

Book Busy Box (3)

Yes, a book box can keep a toddler busy, even if he or she is not reading yet! To wit, we love taking books for “picture walks” in our household, and today I set up this little bin to keep Veronika occupied while I got a few things done.

I included some of big brother Travis’s early chapter books because she loves the pictures of Star Wars characters (she knows them all by name!) even if she doesn’t understand the story.

Book Busy Box (1)

I also included more age-appropriate favorites, like her Hello magazine and favorite board books. It’s a good idea to use books that you’ve read to your child many times so he or she is familiar with the story, even if you’re too busy to read it.

Finally, I included a set of magnet tiles that tell the story of The Very Hungry Caterpillar. This was a nice way to give her something to manipulate with her hands, in addition to just books. Now I set out the bin on a comfy orange chair as a sort of invitation, and she jumped right in!

Book Busy Box (5)

The Star Wars books caught her eye right away.

Book Busy Box (4)

Soon she was leafing through a favorite board book, narrating the pictures and words to herself.

Book Busy Box (6)

This is the kind of bin you can leave out all day for your toddler to return to whenever the mood hits.

Book Busy Box (7)

What would be in your toddler’s book box? Please share in the comments!

Book Busy Box (2)

Teach Your Child To… Tie Their Shoes

Tie your Shoes (6)

January is a great time to introduce the idea of a New Year’s resolution, and to help your kid focus on learning a new skill. When Travis overheard a classmate say their resolution was to learn to tie their shoes, I seized on the opportunity to tackle this big kid skill!

We tried two methods, and here’s what worked best for Travis:

First, he sat in my lap so we were both facing the laces in the same direction. Cross one lace over the other to form an X and tuck one lace through the hole; pull tight. So far so good!

Tie your Shoes (2)

Now make one bunny ear, and pinch closed with your fingers over your child’s. Wrap the other lace around and push through the hole until it makes a second bunny ear. Now pull the ears tight. We called the loose ends the “whiskers” to stick with the bunny theme!

Tie your Shoes (3)

Travis could do this method from my lap, but not once he tried it solo. So it was time for two bunny ears. Instead of forming just one, form two “bunny ears”, then cross them into an X and tuck one bunny ear through the hole. Pull tight.

Tie your Shoes (5)

Little sister Veronika might not be ready to tie her laces, but she sure wanted to try on the shoes!

Tie your Shoes (1)

Which method works best for your child: one bunny ear or two? Please share in the comments!

Winter Star Sensory Ice

Winter Star Sensory Ice (3)

This ice activity is really just good old-fashioned ice exploration, but with a winter twist to give it the guise of something new!

To make our sparkly “winter” ice, ideally use a star or snowflake ice cube mold and freeze overnight. Lacking such a mold, I used winter-themed cookie cutters instead (a pine tree, snowflake, star, and heart). This was a bit trickier because I had to lift the cookie cutters from a larger dish after the water started to freeze, but before the cookie cutters were frozen solid! I also sprinkled star-shaped glitter into the water before freezing for extra winter sparkle.

Winter Star Sensory Ice (1)

When we took the ice out of the freezer the next morning, Veronika was delighted. “It’s a little snowflake!” she said, spotting this shape.

Winter Star Sensory Ice (2)

We used our senses to explore them, and she carefully touched her fingers to the ice. “Ooh, that’s cold!” she said.

Winter Star Sensory Ice (6)

Then we placed them in a little dish of water to see what would happen. The small shapes melted almost instantly. Good thing our larger star shape lasted much longer.

Winter Star Sensory Ice (5)

She loved picking this one up and transferring it in and out of the water, testing how cold it was each time.

Winter Star Sensory Ice (8)

This was a fun winter twist on early STEM exploration of liquids vs. solids. With older toddlers, you can delve more into how water can come in three states (solid, liquid, and gas); test sprinkling salt on the ice cubes to melt them faster; or see if the ice shapes melt faster inside or outside.

Winter Star Sensory Ice (4)

Bubble Prints

Bubble Prints (6)

The original plan with this project was to make art, but the kids were way more into the process than the final product. Which was just fine with me, since they were having fun!

To make bubble paints, pour a little liquid food coloring (or liquid watercolor) into the bottom of plastic cups, and add a little dish soap to each.

Bubble Prints (1)

Blow into the cups through a straw to produce lots of bubbles. Travis made a face and was worried he would get bubble solution in his mouth, but I showed him how to huff out of the straw over a piece of watercolor paper, splattering the “paint” down.

Bubble Prints (2)

We tried a few rounds of this, but then truly the kids lost interest in any painting and just wanted more bubbles!

Bubble Prints (5)

They thought it was so fun to watch them rise to the top, or to see how high the pile of bubbles could go before they bubbled over.

Bubble Prints (8)

Hint: they can go very high.

Bubble Prints (9)

The sticky soap substance was so neat to pop with fingers. Veronika loved scrubbing it all over her hands!

Bubble Prints (7)

If we pressed the bubbles from two different cups together, they would stick! This got big laughs.

Bubble Prints (10)

Eventually we did stop all that bubble play long enough to fill our square of watercolor paper with the paints. I had originally planned to give the kids fish stickers (in keeping with a bubbles-and-ocean theme), but Veronika preferred bug stickers. Alternatively, you could cut fish shapes from black construction paper and glue down.

Bubble Prints (11)

These are lovely pieces of artwork in their own right, but would also make pretty gift cards or stationary.

Jump and Match Snowflakes

Jump and Match Snowflakes (6)

Here’s the perfect way to get some indoor exercise on a cold morning, plus sneak in a learning game, too!

I tailored the game so it would be a challenge for both my 6-year-old and my 2 year-old. First, I printed a snowflake template on cardstock showing 6 pairs of snowflakes, each with a match. Attach these to a door frame in your home so they are just high enough for kids to jump and touch the pairs.

Jump and Match Snowflakes (1)

Because I knew matching up snowflake pairs with subtle differences would be beyond Veronika’s ability, I also color-coded the game; each pair of snowflakes dangled from the same color string.

Jump and Match Snowflakes (2)

Travis proved to be an expert at spotting twin snowflakes (quicker than I would have guessed!) and loved jumping up to grab them.

Jump and Match Snowflakes (8)

Veronika was able to jump by color when I asked her to find both yellow strings, for example.

Jump and Match Snowflakes (4)

She’s just learning to get her feet off the ground in a jump, so this was great practice!

Jump and Match Snowflakes (3)

We also later played a quick game down on the floor where I showed her mismatched snowflakes followed by an identical pair, so she could be exposed to this more subtle version of a match.

Jump and Match Snowflakes (9)

Beyond the matching and jumping, simply having all those snowflakes dangling turned out to be lots of fun. Veronika thought it was a hoot to run under the strings so the snowflakes just brushed her head.

Jump and Match Snowflakes (5)

She also loved jumping her dolls up toward the dangling strings! This was a great way to burn some energy on a cold morning.

Icy Winter Scene Salt Paint

Icy Winter Scene Salt (4)

You only need two items to make a toddler happy on a slow morning: white glue and Epsom salts! To wit, Veronika made a winter artwork of “ice and snow” with just these two ingredients.

I set out one cup full of white glue and another with the Epsom salts, along with a sheet of construction paper. We chose blue as a background to evoke the bluish light of winter.

Icy Winter Scene Salt (1)

I thought she might want to paint the glue on with a paintbrush, but she was so interested in the cup of salt that she wanted to dip her brush back and forth between that and the glue. This meant her brush was quickly too gunky to spread the glue around on the paper.

Icy Winter Scene Salt (2)

Instead, I helped her pour the cup of glue right over the paper! Then I showed her how to pour the salt on top. There’s no need to worry about a mess because as you tilt the paper to tap off any excess salt, the rest will stick in the puddles of glue.

Icy Winter Scene Salt (3)

It looked like sparkly snow and ice to us!

Basic Cereal Threading

Basic Cereal Threading (3)

This easy threading game is a great intro to the activity for toddlers. All of the items involved (play dough, cereal, and dry spaghetti) lend themselves to solo toddler play either before or after the activity, too, meaning you’ll get double-duty from one game.

To set up, we first rolled a few balls from different colors of play dough. Veronika loved helping with this step.

Basic Cereal Threading (1)

I then speared a strand of dry spaghetti into each mound of play dough. We were working on a craft tray, so I simply poured out some o-shaped cereal right onto the tray. If you’re doing this activity in a high chair, give your toddler a bowl of the cereal instead.

I showed her how to thread one cereal piece at a time onto the spaghetti. After a few misses, she was quickly a pro at the activity!

Basic Cereal Threading (2)

I loved watching her work with great care, not only looping the cereal over the top, but then holding onto it as she guided it all the way down to the play dough base.

Basic Cereal Threading (5)

Don’t be surprised if there’s some snacking involved, too, with all the cereal around!

Basic Cereal Threading (6)

Sweet Potato Cakes

Sweet Potato Cakes (3)

There’s a lot going on in this recipe, and it’s a great way to introduce foods or flavors that your kids might never have tried before, such as red lentils or pumpkin seeds.

Ingredients:

  • 1 cup red lentils
  • 3 cups boiling water
  • 2 tablespoons olive oil
  • 1 cup chopped red onion
  • 4 slices vegan bacon
  • 2 cups peeled and shredded sweet potato
  • 1/2 cup chopped pumpkin seeds,
  • 4 Ener-G eggs
  • 1 cup shredded non-dairy cheddar
  1. Place the lentils in a bowl and cover with the boiling water. Let stand for 20 minutes, then drain and return the lentils to the bowl.
  2. Meanwhile, heat the olive oil in a large skillet over medium-high heat. Add the red onion and bacon; cook for 6 minutes.
  3. Stir in the shredded sweet potato, followed by the softened lentils, pumpkin seeds, Ener-G eggs, and cheddar.
  4. Line a 13×9-inch baking dish with parchment paper and spoon in the lentil mixture. Cover with foil and bake at 350 degrees F for 30 minutes. Uncover and bake a final 10 minutes.
  5. Cool completely, then cut into squares or fun shapes with cookie cutters! We tried circles and hearts for a little bit of whimsy at dinner.

Sweet Potato Cakes (2)