Tea Party Dough

Tea Party Dough (6)

Veronika adores her two dollies these days (or as she happily says, “Baby!”). So I thought today I’d set up a tea party for her and the dolls. This super-sugary dough can really be eaten, adding a new dimension to the pretend party!

To prepare the dough, stir together 1 cup almond butter (or peanut butter), 1 cup corn syrup, 1 and 1/2 cups powdered sugar, and 1 and 1/2 cups powdered milk. For a vegan alternative to the milk, I used a bag of vanilla protein powder I had on hand, which worked perfectly as a substitute. The dough comes together great, neither sticky nor gooey!

Tea Party Dough (!)

I set out tea cups and plates and made sure to serve everyone.

Tea Party Dough (3)

Veronika immediately leaped into the pretend play, helping to feed the dollies.

Tea Party Dough (2)

She was quite pleased when she realized the dough tasted delicious.

Tea Party Dough (4)

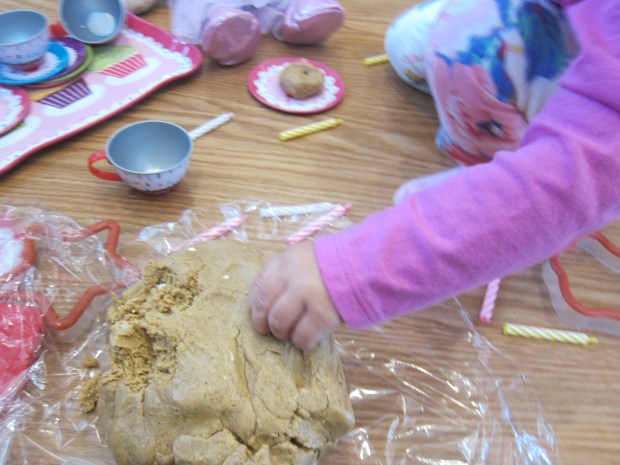
Candles were a wonderful addition to our play. I showed her how she could put them in the dough. It was far more fun to pull them out, of course.

Tea Party Dough (8)

And she tried to feed the candles to the dollies as little treats!

Tea Party Dough (7)

We also used cookie cutters, pressing fun shapes into the dough.

Tea Party Dough (5)

In sum, I love that she’s now at an age where sensory play and imaginative play are starting to intersect.

Bucket of Balls

Bucket of Balls (6)

While big brother and I were playing math games with balls, I tailored some ball play to Veronika. The set-up? Just grab a bucket and fill it with a variety of balls; that’s it!

From there, I had no agenda for her (like past games that worked on gross motor skills or vocab) but was interested instead to see what she would be inspired to do with this simple set-up.

Bucket of Balls (1)

First she dug through, pulling out the balls in turn. Then it was so much fun to upend the bucket and watch the balls go rolling.

Bucket of Balls (2)

I helped her scamper after the balls so we could add them back in one at a time with a “plink”!

Bucket of Balls (4)

Of course the bucket itself was a toy, too.

Bucket of Balls (3)

As she played, I did chime in with a few words about the texture of each ball. Some were squishy, some were hard, and there was lots of color variation to discuss, too.

The bumpy one on her belly was the most fun of all!

Bucket of Balls (5)

Have a Ball with Math

Ball with Math (1)

Travis has shown a keen interest in numbers and basic math lately. So today we had a ball (literally!), playing games that played around with numbers and worked his gross motor skills.

First up, we played backwards toss. Toss a ball back and forth, but instead of counting up each catch, count down. This is a great way to introduce the idea of subtraction, even before a child is ready for equations. Touchdown!

Ball with Math (2)

Next we returned to counting up, but used skip counting. He loved grasping how the numbers went from 5 to 10 to 15 to 20 and so forth up to 100. Plus I noticed improvement in his hand-eye coordination even over the course of a few rounds!

After school, we played a kicking game. I cut three holes in a piece of cardboard, each hole worth different points, again using skip-counting by 5s.

Ball with Math (3)

Travis was in charge of the tally!

Ball with Math (5)

I showed him how to make tally marks in bundles of 5, which we then totted up to find out our final scores.

Ball with Math (4)

Score one for the math team!

Chick’n Salad

Chicken Salad

This easy, creamy vegan chick’n dish is super easy, and super versatile.

Ingredients: 

  • 9 ounces Gardein chick’n
  • 1/2 cup fresh blueberries
  • 1/4 cup vegan mayonnaise
  1. Cook the chick’n according to package directions; finely chop or shred.
  2. Stir together the chicken, blueberries, and mayo in a large bowl.

Note: You can also use freeze-dried blueberries in the recipe, as I did with a later variation. Sprinkle in about 2 tablespoons instead of 1/2 cup fresh.

Chickn Salad alt

You can serve a dollop of the salad plain, or tuck it into a pita pocket for a quick lunch.

Chicken Salad var

Or spoon it into soft, cooked celery sticks for a variation on ants on a log.

Chicken Salad bis

My 1 year old and 5 year old love it best served alongside circle crackers!

Chicken Salad (2)

Chocolate Crackles

Chocolate Crackles (2)

These sweet small treats are great if your kids need an afternoon pick-me-up: sugary enough to taste decadent, but with a few “good for you” ingredients thrown in.

Ingredients:

  • 2 cups rice-crisp cereal
  • 1/2 cup powdered sugar
  • 3/4 cup shredded coconut
  • 1/3 cup cocoa powder
  • 1/2 cup + 2 tablespoons coconut oil
  1. Combine all the ingredients except the coconut oil in a large bowl.
  2. Melt the coconut oil and drizzle over the dry ingredients, then mix well.
  3. Divide the mixture evenly among 30 mini muffin cups (alternatively, just press into mini cupcake liners and place on a tray). Refrigerate for 30 minutes to set.

Chocolate Crackles (1)


Mark and Erase Pictures

Mark and Erase (5)

Veronika loves to color now, especially whenever she sees her older brother doing coloring book pages. As a result, we’re quickly running out of white printer paper, as I give her sheet after sheet to scribble on. Here’s a great way to let your toddler draw over and over, without the waste!

I drew shapes and easy lines to follow on a few sheets of white paper, then slipped them into plastic lamination pouches.

Mark and Erase (2)

Veronika immediately began using markers on the plastic pouches. It fascinated her that there were already colors and shapes there to see, as she scribbled busily over them.

Mark and Erase (4)

I demonstrated how she could follow along over my easy shapes, either with the same color or a different one. Obviously she’s way too young for this kind of pen control, but you can introduce the concept now, and then it becomes a game that will grow with your child.

Mark and Erase (3)

When the pages were filled with her scribbles, I simple wiped clean with a damp paper towel. Now the fun could begin all over again, no wasted paper! I’m definitely going to bring along a couple sheets like this the next time we’re in a restaurant, too.

Mark and Erase (6)

DIY Lift the Flap Book

DIY Lift Flap (7)

If your toddler is at all like Veronika, then a) any lift-the-flap books you have in the house are dearly loved and b) the flaps have all been torn apart! Here’s a simple hack to make your own lift the flap book. All you need are post-its and board books.

Any kind of “First Words” book works particularly well for this game since there are lots of individual pictures to cover up. Technically, though, you could play it with any book on your child’s shelf!

DIY Lift Flap (1)

For variety, I left some of the post-it notes as full squares, and cut others into smaller squares or rectangles.

DIY Lift Flap (2)

Now simply let your child turn the pages (working those fine motor skills) and talk about the pictures he or she discovers as each post-it is ripped off (working those language skills)!

DIY Lift Flap (9)

A note of caution: You might want to avoid books that make noises. Veronika was so sidetracked by a cat meowing that she lost interest in the flaps for a while!

DIY Lift Flap (5)

But once she discovered the post-it notes could be pulled off, they were a hit.

DIY Lift Flap (3)

Plus she figured out they could double as “stickers“.

DIY Lift Flap (8)

This was a simple and novel way to engage a reluctant reader at storytime, and I highly recommend it.

DIY Lift Flap (6)

Drive Home Reading

Drive to Reading (5)

This activity is the advanced version of an alphabet parking lot I made for Travis back when he was in pre-school! Now he’s fast learning his sight words in Kindergarten, and I was so proud watching him drive up to the “parking spaces” I created today.

Lay out a long sheet of craft paper and draw rectangular parking spaces. I filled the spaces with common sight words, using only about ten words to start. I set out an assortment of Travis’s cars and called him over.

Drive to Reading (1)

“I love this game!” he said, remembering the alphabet version. I took over as the announcer, asking, “Can the orange car drive to the parking spot that says ‘in’ please,” and so on.

Drive to Reading (4)

It only took him a moment to scan through and find each word, which showed me he’s growing quite comfortable with these sight words.

Drive to Reading (2)

Of course we needed to park a silly Lego in the final space.

Drive to Reading (6)

He loved it so much, he immediately asked, “Can we play again!” So I quickly created a second parking lot adjacent to our first.

Drive to Reading (7)

He very seriously drove all the cars over. I added a few slightly tougher words, now, including “down” and “here”. That didn’t slow Travis down here in the slightest!

Drive to Reading (9)

Soon every car was parked. He even wanted a third round, which I didn’t have time for! I promised him a new lot, soon.

Seashell Sensory Bag

Seashell Sensory (4)

Veronika has never been to a tropical island, but chances are she’d be longing for a trip to one right now if she knew what she was missing! In a day that dipped down to 0 degrees, I brought some tropical warmth to her sensory play.

For this fun variation on a squishy bag, fill a gallon-sized zip-top bag with any blue goo from the drug store (blue hair gel, blue aloe vera, whatever you can find that has a nice aqua tint to it).

Seashell Sensory (1)

I added a handful of seashells from the craft store, sealed the bag, and simply mushed everything together.

Seashell Sensory (3)

The contrast of the hard seashells versus the gooey gel will fascinate your toddler, and the shells will mush around nicely in the goo if you don’t overfill the bag.

Seashell Sensory (5)

Those seashells might make you feel like you’re briefly on vacation, too!

Seashell Sensory (2)

Citrusy Rice Salad

Citrusy Rice Salad

This salad makes a nice introduction to citrus fruits for toddlers. Veronika hesitantly asked “Apple?” when I spooned some onto her tray. Close but not quite!

Ingredients:

  • 1/4 cup fresh-squeezed orange juice
  • 1 teaspoon agave nectar
  • 1/4 cup olive oil
  • 1/4 cup chopped green beans
  • 1/4 cup chopped orange
  • 1/4 cup chopped pineapple
  • 2 chopped green onions
  • 2 cups cooked brown rice
  1. To prepare the dressing, whisk together the orange juice, agave, and olive oil in a large bowl. Set aside.
  2. Meanwhile, steam the green beans for about 6 minutes, or until tender.
  3. Add the green beans to the bowl with the dressing, along with the remaining ingredients, stirring to coat.