Gallant Challenge: Secret Agents of Kindness

Agent of Kindness (1)

Travis was introduced to “Goofus and Gallant” in his welcome issue of Highlights magazine, a feature my husband remembers from his own childhood! For those who don’t know, Goofus is always messing up or erring on the side of rudeness, while Gallant always does the right thing. Each issue will feature a Gallant Challenge, and Travis was up for the first one – to do a secret and kind deed for a neighbor!

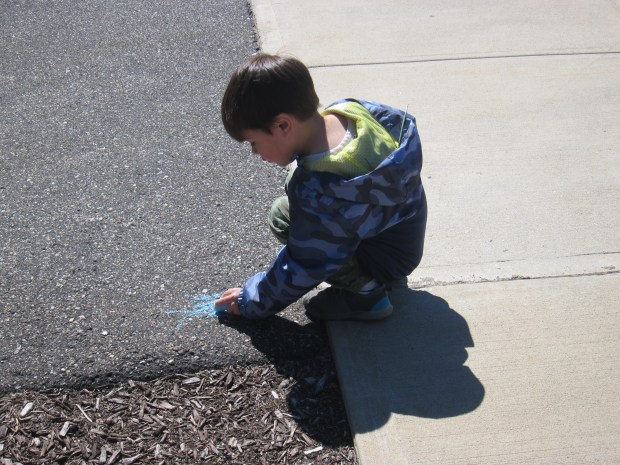
We talked about some nice things you can do (such as leaving cookies at someone’s door, or helping an elderly neighbor carry mail or groceries) and decided that today our task would be to make people smile – with cheerful chalk messages!

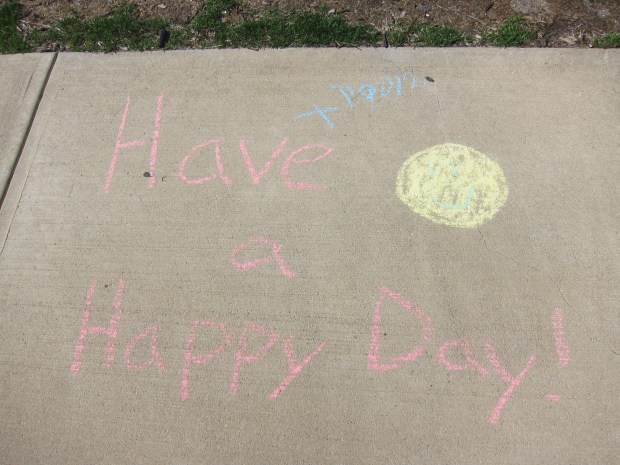
At various entrances around our apartment complex, Travis helped me think of kind messages to write, and I chalked them in (bigger kids can, of course, do this step themselves). Travis added scribbles and drawings around my messages, and loved signing his name at each stop, too!

Agent of Kindness (2)

Soon we had left behind happy missives like “Happy Spring!”

Agent of Kindness (3)

“You are wonderful!”

Agent of Kindness (4)

and “Life is Good!”

Agent of Kindness (5)

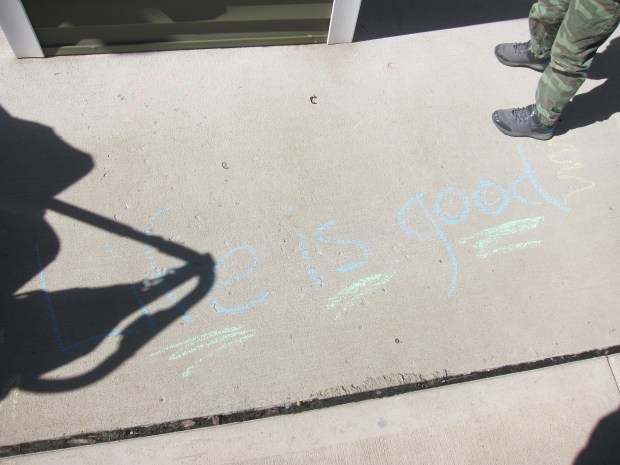
Near this last one, Travis decided to make X’s, which he said meant he was crossing out any bad days that people were having. I loved how into the project he was!

Agent of Kindness (6)

Some other suggestions included:

  • Bringing in trash cans
  • Leaving the newspaper at a neighbor’s door
  • Cleaning up trash

Whatever action your kids choose, the key is to do it in secret. Then hide and see if you can watch a person’s surprised and pleased reaction! How do your kids spread kindness? I’d love to hear in the comments.


Tickly Toes

Tickly Toes (2).JPG

Ok, spring has only just begun, but today I tantalized Veronika with a hint of the summer to come… With sand, that is! No matter what time of year you play this game, sand is a fantastic tactile and sensory play ingredient.

Since you don’t want sand anywhere near a baby’s hands or mouth, this is strictly a foot game for a five month old.

I poured some sand into a shallow baking tray, and sat with Veronika on my lap. I dipped her toes into the sand for a little feel. She seemed intrigued, although also confused.

Tickly Toes (1)

Swirl baby’s toes around or press gently into the sand. You can also pick up a little handful of sand and trickle it down over the toes – this will both feel good and look exciting!

Tickly Toes (3)

Once she tired of her toes in the sand, I took some time to pour sand from a cup for her, so she could further enjoy watching the sand sparkle. It won’t be long before this girl is at the beach!

Tickly Toes (4)

All Fall Down

All Fall Down (2)

Try this adorable game to improve your baby’s hand-eye coordination, as well as skills like concentration or cause and effect. It also introduces a love of playing with boxes, something that’s sure to continue throughout the toddler years.

Small boxes are ideal for this game, to fit a baby’s small hands. We had a variety pack of cereal boxes that were just right for the job. I taped the empty boxes shut so no edges poked up.

First, I simply let Veronika hold and explore one. She was instantly drawn to it – probably because of that grinning cute tiger!

All Fall Down (1)

Stack a few of the boxes together, just out of baby’s reach. This was a bit tricky, since Veronika is just learning to hold herself upright in a seated position, and she wanted to lunge for the boxes. Concentration, being built!

All Fall Down (5)

Once I had a tower, I let her take a swing. Bam! We all fall down.

All Fall Down (7)

If your baby doesn’t seem interested in the boxes themselves, you can set a toy on top of the tower as enticement.

All Fall Down (6)

Once baby reaches for the toy… Boom!

All Fall Down (8)

The boxes fall.

All Fall Down (9)

But honestly Veronika was so eager to get her hands on the cereal boxes, the toy was a moot point.

Once we’d had enough of sitting and knocking down, I set the boxes up for tummy time.

All Fall Down (10)

She also had fun with them while she played on her back. As always, boxes make excellent toys.

All Fall Down (12)

Art of the Color Wheel

Color Wheel (9)

A gray day seemed like the perfect chance to bring color inside. To combat all the dark rain clouds, Travis and I explored different ways we could make a color wheel. This project was part lesson, part craft – and all fun!

First, we did a quick review: I showed him paintings that use yellow, red, and blue as the dominant colors, including Piet Mondrian’s Broadway Boogie Woogie and Mark Rothko’s Untitled (Yellow, Red, and Blue).

Color Wheel (1)

Take the time to ask your child what he or she thinks the pictures are about, or how they make him or her feel. He told me Rothko’s made him “happy happy sad.” When I asked him to explain, he said the red and yellow were happy, but the blue was sad. Then remind your child these are the three primary colors.

Color Wheel (2)

Now it was time to make color wheels! We started with the most basic version using crayons. I filled in yellow, red, and blue on a paper plate divided into 6 portions. His job was to figure out which secondary color went where.

Color Wheel (3)

The next version was a little messier. We made three blobs of paint in the primary colors, and he used a paintbrush to drag these together. Soon we had a color wheel!

Color Wheel (4)

I encouraged him to make a version with hand prints, but he didn’t want to get that messy. Using my hand and fingerpaint, I  showed him an example, pressing together yellow and blue prints. Your kids might want to have goopy fun with this and make a full handprint color wheel!

Color Wheel (6)

Finally, it was water mixing time! We filled three cups with water, and added our primary colors (now in the familiar red, yellow, and blue) with food coloring.

Color Wheel (7)

Use a pipette (which means you’re sneaking in fine motor skills, too!) to make a few drops of each color on a plate. Then mix and match to form the secondary colors.

Color Wheel (8)

Travis enjoyed this version the most, and soon was experimenting with making a big plate of brown.

Color Wheel (10)

All of this was prompted by a Raddish Kids lesson, so we also watched some of the recommended videos to further our exploration. There’s lots more you can do to go further in depth with older kids: check out fine art books at the library, or head to a gallery for a primary and secondary color scavenger hunt!

Messy Play

Messy Play (5)

Veronika’s old enough now for her first messy sensory play, and this little game is a baby’s first introduction to ooblek!

As a reminder, “ooblek” is a fantastic substance that acts like a liquid in some circumstances, and a solid in others.

To make a very basic version, combine 1 cup cornstarch and 1/2 cup water in a bowl. Add just a few drops of natural food coloring.

Messy Play (1)

I sat Veronika down in her high chair – with sleeves rolled up and bib on! – and got ready for the mess.

Messy Play (2)

Drip some of the mixture onto the highchair tray. It will drip like a liquid, but solidify once on the tray. You can run your finger through it, and leave neat designs.

Messy Play (3)

She seemed hesitant at first, which surprised me; this is a girl who loves to get her hands in her food. But soon, her little fingers were squishing through the mixture.

Messy Play (6)

I very gently spooned some right into her fist. She squished and squeezed!

Messy Play (4)

Ooblek is fun!

Messy Play (7)

What sensory play does your baby like? Please share in the comments!

Boomerang Toy

Boomerang (2)

Veronika hasn’t spent much time playing on her back lately; as soon as she learned how to roll, that was it… My little girl likes tummy play! As a result, I dismantled her play gym, and she spends most of her time playing on her belly.

But today, I wanted to focus on her grabbing skills and hand-eye coordination, so we made this cute boomerang toy.

Simply cut open a strong rubber band and attach to any soft small toy. (Make sure this is tied very securely, so the rubber band doesn’t become a choking hazard).

Boomerang (1)

While your baby lies on his or her back, bounce the toy above them. Pull down so the rubber band snaps back. Well wouldn’t you know, Veronika went wild for it!

Boomerang (5)

Her eyes were wide with delight, and she loved grabbing for it.

Boomerang (6)

Gotcha!

Boomerang (3)

And kicking it with her feet.

Boomerang (7)

When I made a silly “boing” sound, she began cackling and giggling.

Boomerang (8)

What an absolute delight it was to watch her joy.

Boomerang (9)

You can also purchase toys that mimic this rubber band bouncing. We have an old stroller toy from when Travis was a baby that retracts on a string. This one also elicited lots of giggles and grabbing.

Boomerang (10)

She got it!

Boomerang (11)

Here’s a quick clip of that great laughter.

Bedtime Tape

Bedtime Tape (1)

Back in the day, this activity would have required a tape recorder and cassette player. Now all you need is the voice recorder on your smart phone, and you can make recordings for your baby – songs, books, favorite nursery rhymes, you name it.

These little audio clips are great to have on hand when you can’t be there for bedtime. Pass along the files to grandparents or other caretakers, and your little one can hear your voice even when you’re gone!

First, I read through one of Veronika’s favorite bedtime books. As I recorded, she sat in my lap and looked at the pictures, cooing and gurgling.

Bedtime Tape (2)

It makes the audio even more special that she’s on it!

Next I recorded a short lullaby, while she listened with wonder.

Bedtime Tape (4)

She seemed to be asking why I was singing the song during the day!

Bedtime Tape (5)

In fact, don’t feel like you need to save these clips for babysitting nights; Veronika liked listening to the book recording while she played.

Bedtime Tape (3)

The clips are also great for car trips – it’s exactly like having a book on tape, except one that you made, instead of one you need to purchase.

Bedtime Tape (6)

Pesto Chick’n Pizza

Pesto Chicken Pizza.JPG

This pizza recipe looks gourmet, so shh! Don’t tell the kids that it’s ridiculously easy to put together.

Ingredients:

  • 1 pound whole wheat pizza dough
  • 1/3 cup vegan pesto
  • 1 cup shredded Daiya mozzarella
  • 1 package Gardein chick’n strips, cooked and shredded
  • 2 plum tomatoes, sliced
  1. Pat the pizza dough to the edges of a pizza pan coated with cooking spray. Bake at 450 degrees F for 10 minutes.
  2. Pat the dough with a spatula anywhere it has puffed up, then spread with the pesto and sprinkle with the cheese.
  3. Top evenly with the chick’n and sliced tomatoes. Return to the oven and bake a final 7 minutes.

Pesto Chicken Pizza alt

Exercise Outdoors

Exercise Out (2).jpg

Veronika was born just before the cold of winter set in, and all winter I couldn’t wait for fresh, spring weather. Not just so my baby girl could feel warm sun on her skin, but also because it means I get to exercise outdoors!

There’s no need to do anything fancy, but today, make a point of getting some exercise in the fresh air. You can find an easy walking or running trail near you – just make sure you have a true running stroller, if you’re going to be moving fast. Veronika loves the change of scenery when I do my power walks around the lake in our park, including a chance to see ducks and geese.

Exercise Out (3)

For something a bit more organized, check out your local Stroller Strides. Veronika gets to check out the silly moves that mom does from nestled in her stroller, plus interact with the other babies! Our class has been indoors all winter, but I can’t wait for it to move out to the park once May rolls around.

Exercise Out (1)

What’s your favorite way to exercise with baby outside? Please share in the comments.

Exercise Out (4)

Who’s That Baby?

Who's Baby (4).JPG

With babies, it’s sometimes fun to return an activity at one month intervals or so. So much change occurs in their brain and their development in that short time!

To wit, today it was back to mirror play for Veronika. Although we’ve played mirror games before, to point out her name or facial features or emotions, today was the first time she really seemed excited by the baby in the mirror.

She’s also sitting up now, which makes a big difference. To make things novel, I sat her in front of the bathroom mirror. Hello baby!

Who's Baby (1)

She was really intrigued to see the “other” baby’s hand reach out when hers did.

Who's Baby (2)

Then we used a child-safe mirror at tummy time to point out features again. The other baby had a mouth and eyes…

Who's Baby (3)

…and a great big smile!

Who's Baby (5)

Your child will love getting to play with “another” baby while you do this activity.