Butterfly Art

Butterfly Art (7)

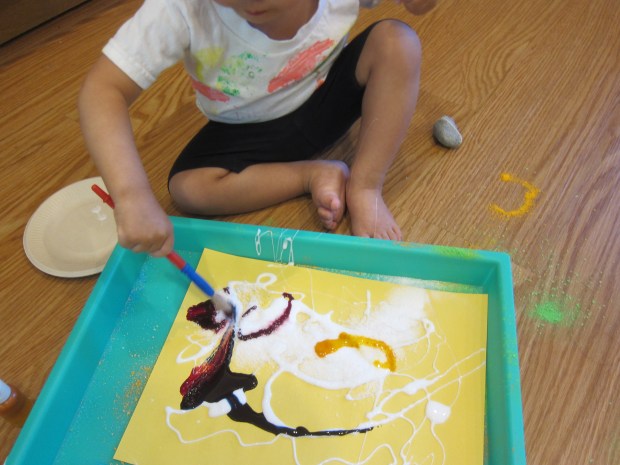
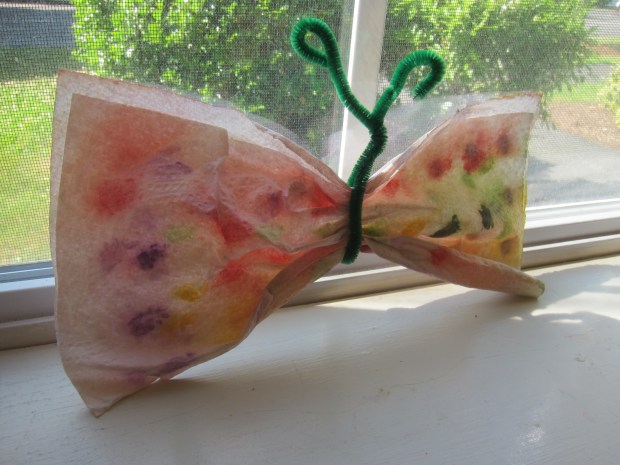
You and your toddler can make one of these beautiful paper towel butterflies, or a whole bunch of them to hang on walls or windows. Younger toddlers will probably need to use a paintbrush, but consider using an eye dropper with older toddlers; it’s a great tool to hone fine motor skills.

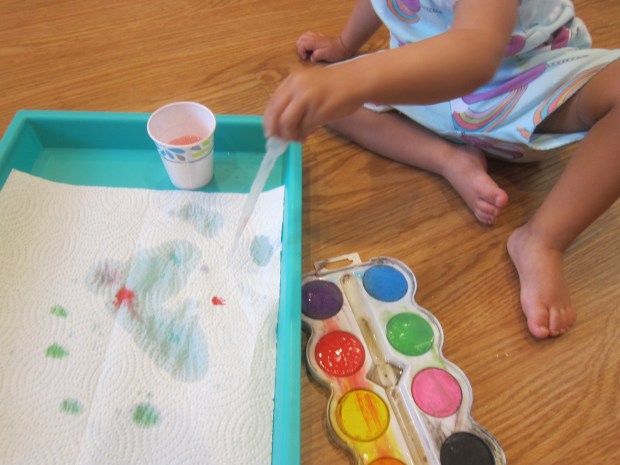
To start, I set a piece of paper towel down on a craft tray, along with watercolor paints and a cup of water.

Then I showed Veronika how to dip the brush in the water, into the watercolor, and finally onto the paper towel to decorate her butterfly. “Dot dot dot!”

Butterfly Art (3)

I also wanted Veronika to practice with the eye dropper variation, but didn’t want to use liquid watercolors because they can stain. Instead, I mixed some of the watercolor paint with a little water in a cup so Veronika could practice dipping and squeezing that way.

Butterfly Art (1)

It was the first time she mastered the art of squeezing to release water from the dropper. She loved watching the color come out!

Butterfly Art (2)

Then she proved that she still loves to be impish, and upended the cup of water all over the paper towel. That made for one very wet butterfly!

Butterfly Art (4)

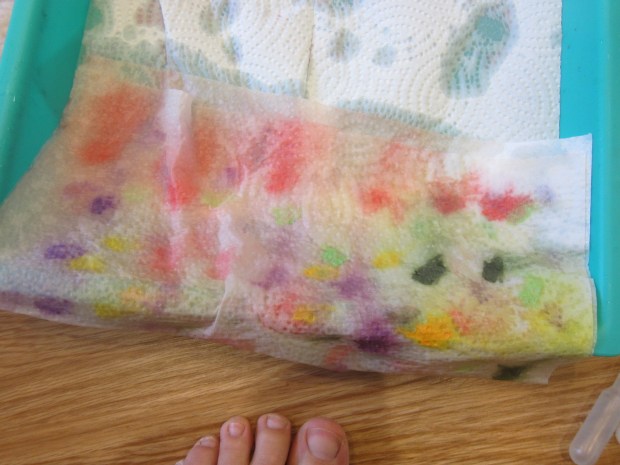
Luckily I knew it would dry eventually.

Butterfly Art (6)

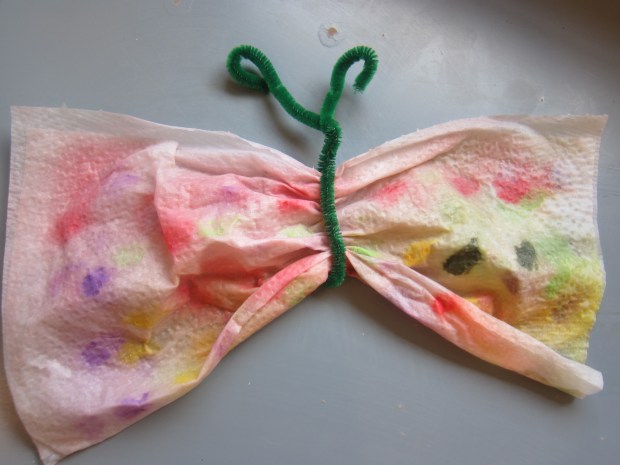
As the finishing touch, fold the paper towel in half, then gather up in the center and wrap a pipe cleaner around the middle; bend the extra pipe cleaner on top into antennae. Our butterfly looked so pretty fluttering about the kitchen!


The Gift of Gab

Gift of Gab (4)

Veronika’s at that exciting age where she has enough words in her vocabulary to string together proper sentences. I had forgotten how thrilling it is to watch a child move from noun-noun to subject-verb-noun!

To nourish this milestone, I’m remembering to speak in clear full sentences for every point throughout her day. “What are you drawing?” I might ask her for example, and she comes back with a full, “I’m drawing a heart!”

Gift of Gab (1)

Or “Vivi [Veronika] yellow dress,” she might say. “Yes, you’re wearing your yellow dress,” I reply a bit more completely. “I’m wearing yellow dress!” she repeats. A full sentence!

Gift of Gab (2)

I love seeing her full sentences spill over into her solo play, too. She’ll speak to her dolls and other toys, sometimes still in gibberish, but mostly in words I can decipher. “Daniel and Baby! Daniel is falling, oh no!”

GIft of Gab (3)

Be sure to listen carefully for your child’s words. Often, only a parent can recognize the particular phonemes or syntax at this age, but the words are there if you’re attuned to them.

And you might just find they are in full sentences!


Tub of Delights


Tub of Delights (8)

We love to make indoor sandboxes and have played with multiple variations on the idea. This one was particularly fun because we combined three materials for the “sand” base: oatmeal, cornmeal, and rice.

Tub of Delights (2)

The other change I made today was using a larger, deeper bin (a storage bin from under the bed). The high sides meant easier clean-up at the end, and less mess on the floor!

As I layered in each of the three ingredients, I paused to talk about its texture with Veronika. Oatmeal was soft on our fingers. The cornmeal was finer and dusty, and the rice was smooth and pointy at the edges.

Tub of Delights (1)

Then we added scoops and funnels! Veronika loves to scoop and pour, whether with a measuring cup…

Tub of Delights (3)

…spoon…

Tub of Delights (4)

…or just her fingers!

Tub of Delights (5)

As you can see, the three ingredients didn’t stay in separate piles for long. For added fun, we then buried toys. I decided to make it a jungle theme and added wooden monkeys and a plastic giraffe and elephant. These were so fun to bury and then unearth. “Oooh, monkey!” Veronika said with true surprise each time she found one hidden under the cornmeal mix.

Tub of Delights (9)

I wouldn’t consider this an edible sensory bin, since the rice isn’t cooked, but at least you don’t have to worry if curious little mouths take a taste. Veronika quickly realized the texture wasn’t yummy after a little sample.

It all looked like so much fun that big brother Travis joined in!

Tub of Delights (7)

I loved watching them scoop and pour and imagine together. In sum, a great way to keep kids busy, and the high sides of the storage bin meant clean-up was a breeze.

Tub of Delights (6)

Watermelon Squish Bag, Two Ways

Watermelon Squish (7)

Summertime just begs for watermelon in all its forms, and today we decided to use watermelon as a theme not just to eat but to play!

I made two watermelon sensory bags for Veronika and although these didn’t turn out exactly as I hoped, she still had lots of fun.

The first was a true watermelon bag. Using leftover chunks from a big watermelon we sliced into for snack, I placed cubes of fruit in a zip-top bag. Seal with green duct tape to prevent your toddler from opening (and to look like a watermelon rind!). Then squish!

Watermelon Squish (1)

Veronika loved using this bag with her hands, crushing the soft cubes between her fingers. She also smashed at it with a toy hammer.

Watermelon Squish (2)

Then we made a pretend watermelon in a second zip-top bag. Fill the bag with clear hair gel and add a touch of red food coloring for a pink tint. Unfortunately my red turned out to look more purple, so next time I would color it with pink tempera paint.

Watermelon Squish (8)

As a result, the fact that we were trying to replicate a watermelon was lost on Veronika. Still, I added a few black seeds from the real watermelon, and she loved moving these around with her fingertips. Initially she thought they were bugs, but then she started saying “seeds!” as she squished at them.

Watermelon Squish (5)

Arguably, she liked this “failed” squishy bag better, holding it, squeezing it, and occasionally even draping it on her head.

Watermelon Squish (6)

So if the goal of a sensory bag is to keep a toddler busy, then this one was a winner.

Watermelon Squish (3)


Play Dough Suncatcher Craft


Playdough Suncatchers alt

You can never go wrong with a morning of play dough play, but to add a fun twist when I pulled out all the colors for Veronika this morning, I thought it would be fun to make suncatchers.

Playdough Suncatchers (1)

I showed Veronika how to press small pieces of color into an empty yogurt container lid.

Playdough Suncatchers (2)

She loved to help mush them in, which was great for fine muscle development!

Playdough Suncatchers (3)

Even more, though, she loves to tear play dough into tiny pieces.

Playdough Suncatchers (4)

That meant she unwittingly created the perfect size pieces for me to gather up and arrange in the lids, alternating colors as much as possible.

Playdough Suncatchers (6)

We filled two lids this way!

Playdough Suncatchers (7)

In order to hang them once complete, I cut two pieces of string and made a loop for each suncatcher, securing with an additional blob of play dough.

Playdough Suncatchers (9)

Let the play dough harden and dry overnight, and then you can hang these the next day to catch the morning sunlight.

Playdough Suncatchers (8)

At first I suspended them in the plastic lids. But then I realized the play dough had set enough that I could pop them out from these molds and simply hang in the window. Even prettier!

Playdough Suncatchers var


Tea Scented Ice Sensory Play

Scented Ice Play (7)

We’ve been busy with ice lately during a heat wave, and today we added an olfactory element to the fun: ice cubes scented with tea! You’ll want strongly scented teas for the best results with this activity. Think flavors like cinnamon, maple, ginger, mint, or other bold scents.

Scented Ice Play (1)

The night before, I brewed strong cups of 3 tea varieties, using 3 or 4 tea bags for each mug of hot water. Let cool and then pour into the compartments of an ice cube tray.

Scented Ice Play (2)

Partly to add a visual sensory element to the game and partly just so I would remember which cube was which, I also color-coded the three different teas with food coloring. Yellow was for peppermint, red for cinnamon apple, and blue for maple ginger.

In the morning, it was HOT out on our patio and the ice was frozen solid, the perfect combination.

Scented Ice Play (3)

The ice cubes came out of the tray within moments. I held each different scent up to Veronika’s nose in turn. Look how happy the maple ginger made her!

Scented Ice Play (4)

She loved leaning in for a big whiff of each, asking for “more more” insistently since at first the cubes were too cold for her to touch and lift.

Scented Ice Play (5)

Then she wanted to take a lick! She loved the peppermint best.

Scented Ice Play (6)

As the ice melted, the yellow, blue, and red coloring began to trickle off. I couldn’t decide if I was glad I’d used color or not. The kids were more into the smells and tastes anyway, not the sensory look of the colors, and it just meant messier fingers. But oh well!

Scented Ice Play (8)

And then they discovered that the ice on the hot patio melted in a matter of seconds.

Scented Ice Play (9)

I guess this disproves the theory that watching ice melt is dull!

Scented Ice Play (11)

Both kids loved smelling the tea and swirling the cubes and tasting until the last drop of ice had melted.

Scented Ice Play (10)

A perfect sensory experience for a hot morning.

Shaving Cream Fingerpaint

Shaving Cream Fingerpaint (11)

There’s more to this activity than just the sensory fun of shaving cream or the artistic fun of colors and “painting”; half the fun was doing the activity right on the tabletop!

I squirted about half a can of shaving cream onto the kids’ table, which immediately piqued everybody’s interest, Veronika and big brother alike.

Shaving Cream Fingerpaint (1)

The curiosity grew once I added drops of food coloring throughout.

Shaving Cream Fingerpaint (2)

Now it was time for the real sensory fun to begin! I demonstrated for Veronika that she could put her hands right in the mixture, either to swirl the colors around or just to get messy.

Shaving Cream Fingerpaint (3)

Interestingly, she was hesitant at first, but soon a little finger dipped in. Foamy!

Shaving Cream Fingerpaint (4)

The sensation must have made her quite happy because it merited a little swirling dance.

Shaving Cream Fingerpaint (8)

After that, though, I couldn’t quite tell if she liked the shaving cream or was a little afraid of it. She did lots of delicate dabbing, but never got as messy as I had anticipated.

Shaving Cream Fingerpaint (9)

Big brother Travis tried his hand gladly and liked creating “animal footprints” through the shaving cream.

Shaving Cream Fingerpaint (7)

Veronika preferred just having some of the shaving cream on her palms. She smooshed her hands together and admired both the creaminess and the color left behind. Then it was time to wash! And the shaving cream mixture wipes off of the table like a dream.

Shaving Cream Fingerpaint (10)

Overall, this wasn’t the best version of fingerpainting we’ve done as far as producing art. But it was still a great sensory experience.


Salt Painting, Two Ways

Salt Painting (6)

Today Veronika made art with salt! We tried two variations on this project, and I definitely preferred the former. But test them both out and see which one your child enjoys more!

For the first, you’ll need small empty spice containers, or any similar container with small holes in the lid. In each jar, I combined a little bit of salt with a little bit of powdered paint. Put the lid on securely and shake to combine.

Salt Painting (1)

Veronika then helped squeeze glue onto dark construction paper. Squeezing glue bottles is great for strengthening little hands, so resist the urge to help out too much!

Salt Painting (2)

Once we had a nice gluey canvas, I showed her how to shake the containers. Not only did they make a great noise, but she loved watching the colored salt sprinkle down.

Salt Painting (5)

She liberally poured, but it was easy to tip the paper and shake off the excess when it was time to set her masterpiece aside to dry.

Salt Painting (10)

Now on to version number two! This time, we made big blobs of glue on the paper. Instead of colored salt, we poured on regular salt.

Salt Painting (7)

Then we added little pools of food coloring for her to swirl through with a paintbrush.

Salt Painting (8)

Unfortunately this project got goopy very quickly. I would use less glue and less food coloring next time! But she enjoyed the messy process, and seemed very curious about the thick mixture tangled in the bristles of her paintbrush.

Salt Painting (9)

Which one did your family like best? Please share in the comments!

Feather Painting

Feather Painting (4)

It’s fun to give toddlers something other than a paint brush to paint with, whether a cotton ball, an ice cube, or even just their fingers. Today, Veronika got to try painting with feathers, plus a few other items from nature!

I had some brightly colored feathers from the craft store that were perfect for this activity. To set up, I filled three cups with different colors of paint and added a little glue to each, making the mixture slightly sticky.

Feather Painting (1)

Veronika loved dipping the tips of the feathers in the cups…

Feather Painting (2)

…and then transferring over to her paper. She loves to say “dot dot dot!” as she paints and watches the color appear. The feathers themselves fascinated her, too.

Feather Painting (3)

Whenever one became too limp and saturated with paint, we simply added it to the painting and grabbed a fresh “brush”. As the gluey paint dries, the feathers will stick and become part of the final masterpiece.

Feather Painting (8)

We then decided to try the activity with other items, this time truly from nature and not a craft store. In the yard, we found “brushes” from pine needles and leaves.

Feather Painting (6)

Time to repeat the process! Dip the edges in the paint, use them as your brush, and whenever one gets too painty, it becomes part of the artwork!

Feather Painting (7)

These turned out so pretty! I loved that the tactile feel of the different nature items was just much a part of the activity as the paint was.

Feather Painting (9)

Washing Toys Water Activity

Wash Toys (4)

Here’s one of the simplest yet best ways to keep a toddler happy: washing his or her own toys. Yup: between water, favorite toys, splashing, and imitating you the grown-up, this activity has it all!

And it couldn’t be easier. This morning while I needed to keep Veronika busy, I simply set out two basins, one with clean water and one with a tiny bit of soap added, along with a towel underneath to catch inevitable sloshing.

Then I added a few favorite toys that can get wet, including trucks, animals, and a dinosaur. Plus her unicorn, otherwise known around here as Sparkly Neigh.

Wash Toys (1)

She immediately fell to washing them. I had given her a tiny bristles brush meant to clean out straws, and this was a perfect for giving cow and sheep and Neigh a good scrubbing.

Wash Toys (2)

In between washing the toys, she also just loved splashing her hands in the water.

Wash Toys (3)

When she seemed about to tire of the game, I handed her a cloth, and she lovingly fell to drying everyone off!

Wash Toys (6)

Beyond just the fun of cleaning the toys, toddlers love games like this where they can feel like a little helper. As long as you don’t mind a little water on the floor, this is a great way to keep your toddler busy.

Wash Toys (5)