Easy Winter Sensory Bin

Easy Winter Sensory Bin (1)

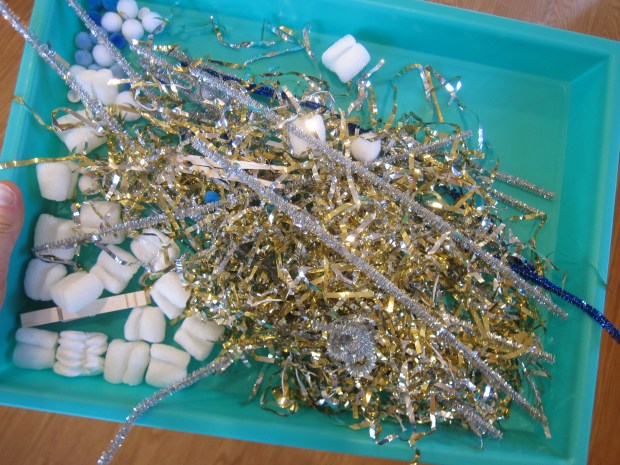
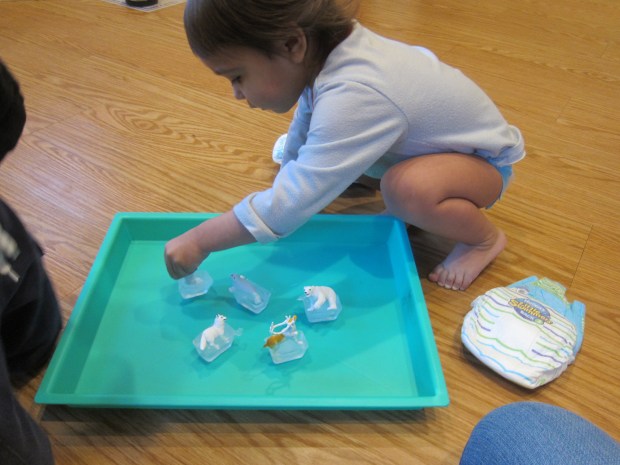
If you need to occupy a toddler on a cold winter day, simply throw a few items that seem “wintry” onto a tray and call it a winter sensory bin!

Yes, this really was as simple as that, just some odds and ends to keep Veronika busy for a short while. I raided the craft bin for items that fit the theme and ended up using: packing peanuts for their snowy white color and puffy texture; sparkly silver and gold ribbon; white and blue pom poms that were like mini snowballs; and some sparkly silver and blue chenille stems that seemed like icicles.

Easy Winter Sensory Bin (2)

The mix of textures, sizes, and shapes turned out great! Veronika could pretend she was sifting through snow with the packing peanuts and pom poms.

Easy Winter Sensory Bin (4)

For a little fine motor work added in, I also set a couple of spring-type clothespins on the tray and encouraged her to pinch some of the items.

Easy Winter Sensory Bin (3)

She proudly lifted a pom pom! The crinkly ribbon, meanwhile, made a wonderful sound and was great fun to lift up and then let “snow” down.

Easy Winter Sensory Bin (6)

Her bin was a mess by the end, the sure sign that she’d had some tactile wintry fun.

Easy Winter Sensory Bin (7)

No-Bake Banana Cookies

No-Bake Banana Cookies (4)

These sweet treats aren’t actually cookies at all, but sugary bananas are a wonderful secret imposter in many desserts. This particular sweet treat is so easy that your toddler can help with every step!

To start, I poured about 1/2 cup Annie’s bunny grahams into a zip-top plastic bag ((or use regular graham crackers) and showed Veronika how to tap with a rolling pin until crushed.

No-Bake Banana Cookies (1)

Next, we added slices of ripe banana to the bag. Seal the bag and shake shake shake!

No-Bake Banana Cookies (2)

Arrange the bananas slices on a plate and your “cookies” are ready. Even better, there’s no wait for the oven required!

No-Bake Banana Cookies (5)

Sock Puppets

Sock Puppets (4)

Stuck inside on a rainy day? Then it’s time to make silly sock puppets!

Sock Puppets (5)

We always seem to have extra pairs of socks (no thanks to indoor playrooms that require them even in flip flop weather!), so we simply grabbed a pair and set to work.

Sock Puppets (1)

First up was adding facial features with fabric markers. I folded the toe of the sock down toward the heel so Veronika could visualize where the head would be, but mostly she just scribbled any which way.

The fabric markers were a little frustrating for her, too, since they tend to catch in the fabric, but I assured her that any markings at all looked great!

Sock Puppets (2)

Once we had decorated the bodies, I also used hot glue to add pom pom eyes. Time to slip on those socks and put on a show! Veronika giggled just seeing the sock on her hand or my own.

Sock Puppets (3)

She laughed even harder once the socks “talked to her”.

Sock Puppets (6)

And it turns out that sock puppets like to go on toes, too!

Sock Puppets (8)

Interrupt Rule

Interrupt Rule (3)

Life is full of Zoom meetings these days, but it occurred to me that this is an opportunity to teach Veronika a few rules about interrupting, and make a little lemonade out of all these virtual lemons!

Yes, even a two year old can learn how to politely ask for your attention. We have two methods now for when Veronika needs me, whether during a Zoom, a random phone call, or just while I’m making dinner!

The first trick is to teach your child the sign for “wait”: Hold up the hands and wiggle the fingers. Interestingly, this is one of the only signs Veronika ever latched onto, and she has used it long past when she dropped all the others. So when she needs my attention, I say, “Show me your wiggle waiting.” And she wiggles her fingers and waits!

Interrupt Rule (1)

Our second method is newer, but seems to be working! I’m teaching her to touch my leg, instead of yelling out for me. Then, I put my hand back on hers to acknowledge that I know she needs me.

Interrupt Rule (4)

The key to making this a success? Don’t make your toddler wait for long! Yes, Zoom participants are usually understanding if you turn aside a moment for your child.

Shaving Cream Marbling

Shaving Cream Marbling (7)

I made shaving cream prints with Travis when he was in preschool, and it was meant as an art project (one that resulted in lovely bookmarks!). For Veronika at age two, this same activity was definitely more about the process and the sensory play. I love when I’m able to tailor big kid activities to my toddler in this way.

To start, we squirted a thick layer of shaving cream into a disposable foil tray. In turn, I placed this inside a second craft tray, because the activity is definitely messy.

Shaving Cream Marbling (1)

Next, we added lots of drops of natural food coloring. You can also use liquid watercolors, but I like the food coloring with a toddler because it doesn’t stain.

Shaving Cream Marbling (2)

I showed Veronika how to swirl the colors through the shaving cream with a dowel. The dowel is great because it’s long enough that you’ll minimize any mess on your toddler’s fingers!

Shaving Cream Marbling (3)

Next, we pressed a piece of watercolor paper over the shaving cream, patting down on it lightly. Veronika loved the patting! Lift up and reveal the pretty marbled colors.

Shaving Cream Marbling (5)

Finally, we needed to scrape off the excess shaving cream, and the edge of a jumbo craft stick works great for this. Repeat as many times as desired!

Shaving Cream Marbling (6)

We ended up with four lovely prints that we can turn into art, but Veronika was still busy with all the materials. We squirted in a second layer of shaving cream, then added lots more food coloring, and did lots more stirring, scooping, and playing for quite a while.

Shaving Cream Marbling (4)

Condensed Milk Edible Finger Paint

Condensed Milk Paint (6)

I love finding new ways to make edible finger paint for toddlers, and this version couldn’t be easier. Just crack open a can of condensed milk, add food coloring, and your little artist is ready to paint! For a vegan version, try the sweetened condensed coconut milk from Nature’s Charm.

I spooned a little bit into each of three plastic cups and put a small toy spoon in each cup. Veronika loves these little spoons, so she was excited to help stir a few drops of food coloring into each one. We used green, blue, and red.

Condensed Milk Paint (2)

Since she already had the spoon in hand, she first used this as her tool to dribble or rub the paint over thick watercolor paper. But I encouraged her to use her hands, and so she curiously dipped in a finger.

Condensed Milk Paint (3)

Then she was brave enough to do some smearing! The condensed coconut milk is very thick and creamy, much more so than regular slippery finger paint, so it was a great new sensory experience for her.

Condensed Milk Paint (7)

She’s been very into Blue’s Clues lately, and discovered that if she pressed her hand down, she left a paw print “clue” just like Blue can!

Condensed Milk Paint (4)

She requested I leave a paw print, too. There’s nothing like playing with your toddler to embrace your inner child and get a little goopy!

Condensed Milk Paint (8)

In fact, Veronika then loved rubbing the paint all over her hands and smooshing her palms together. Needless to say, once her masterpieces of finger paint were finished, we ended with a good hand washing.

Condensed Milk Paint (9)

Interestingly, she never tasted this one, but it was nice to know she could have, had she wanted to.

Nuts and Bolts

Nuts and Bolts (6)

When Travis was in preschool, he had a whole “tool shop” apparatus of screws that pointed up through a wooden board, onto which he could attach all manner of washers, bolts, twist tops, plastic caps, and more. It was fun, but it was also complicated! For pure toddler fun, try this much easier variation to keep little hands busy, using only a few different sizes of nuts and bolts.

This is definitely an activity for older toddlers who are past the stage of putting objects in their mouth. And even so, be sure to supervise play closely.

I gave Veronika several nuts and bolts in two sizes, first just setting them down for her to explore with all her senses. I pointed out the size comparison to her, and we sorted them by big and little.

Nuts and Bolts (1)

Next, I showed her how to twist the little nuts down the ridges of the bolts.

Nuts and Bolts (4)

She quite quickly loved screwing these off and on. At first she thought she could simply push on the nuts, so it was a good lesson in perseverance when she realized that twisting was necessary.

Nuts and Bolts (3)

This mess-free game is great exercise for little fingers, and sure to keep mischievous hands busy!

Nuts and Bolts (2)

Rubber Band Activity

Rubber Band Activity (13)

I spotted this gem of a hand-strengthening and boredom-busting activity over at Hands on As We Grow ages ago and finally decided to see if Veronika was up for it. The activity couldn’t be simpler; you just need lots of rubber bands and a can from the pantry and you’re ready to go.

We have a rubber band ball that is an endless source of fascination for the kids, so Veronika was thrilled when I showed her how to peel a rubber band off of it.

Rubber Band Activity (3)

I challenged her to get one rubber band onto the can. At first she simply stretched it wide, but quickly realized it wasn’t going to get around the full circle of the cylinder like that.

Rubber Band Activity (1)

She’s still young, so she needed my help to loop the rubber band over one side of the can. But from there she could pull it across and over the other side.

Rubber Band Activity (5)

She had fun on our first round using only orange rubber bands, but enjoyed it even more when I pulled out a pack of multi-colored ones. She loved selecting which color to put on next (blue was the favorite today).

Rubber Band Activity (12)

Your kids might want to be really neat and careful as they go about this task; make patterns with different colors; or just pull on as many as they can in an allotted amount of time. Older kids could even make it into a race or a competition.

Rubber Band Activity (10)

Veronika was too young for all that, but when I challenged her to see how many rubber bands she could get on the can, she came up with her own method: Sprinkling them on top! Now that’s thinking outside the box.

Rubber Band Activity (16)

This is sure to be an activity we return to again and again as she gets older.

Rubber Band Activity (14)

Hammering Golf Tees

Hammering Golf Tees (11)

Here’s a safe way for a toddler to take a first try at using a hammer and nails, just like the grown-ups! Simply use a Styrofoam board as a base and large colorful golf tees as the “nails”.

I set out the board and first showed Veronika how to poke the tips of the tees in. This took a surprising bit of strength, and after her first few popped back up, she was soon an expert at it!

Hammering Golf Tees (8)

Next I showed her how to use her toy hammer to hammer the tees in the rest of the way. She quickly picked up this step of the game, too.

Hammering Golf Tees (6)

Truly you can just let your toddler have fun with all the items from here. If you want to guide the play a little bit more, try forming a few simple patterns from different color tees (“Green, orange, pink!” she noticed), or name the colors as you hammer them, or count each tee as your toddler hammers.

Hammering Golf Tees (5)

Mostly, I let her play solo. It turned out Veronika was way more interested in taking the tees in and out of the Styrofoam, and less interested in the hammer, but that was fine too.

Hammering Golf Tees (7)

It took quite a bit of her concentration and strength, so I was proud watching her!

Hammering Golf Tees (9)

When she tired of that, leftover tees were fun to play with (under supervision) or tap together like rhythm sticks for a little music play.

Skating Party

Skating Party (2)

When ice cubes melt against a slippery surface like metal, they start to naturally slip and slide around. Turn that little scientific fact into a “skating party” by freezing small plastic animals in the ice ahead of time!

I filled an ice cube tray with water and then after about 2 hours, when the cubes had started to set but weren’t frozen solid, I pressed a toy animal into the top of each. A set of arctic animals fit nicely with the icy winter theme. I wish I’d had a few penguins to include, too! Let freeze completely overnight.

Skating Party (1)

At first I set these out on a plastic tray, where Veronika was immediately delighted to see favorite animals in the ice. But it quickly became apparent that we needed a metal cookie sheet for them to “skate”.

Skating Party (3)

The ice started to melt almost immediately once we made that switch, and just a gentle tap of the finger sends your animals “skating”.

Skating Party (5)

Veronika’s favorite was the snow hare, which she hopped and skated all about. Travis loved making the animals take wild skating spins across the tray.

Skating Party (6)

He also wanted to try freeing them from the ice, another oldie-but-goodie ice game.

Skating Party (7)

And we all laughed at the way the ice animals could spin and move.

In sum, a fun quick activity before even heading off to school!

Skating Party (9)