Sock Puppets

Sock Puppets (4)

Stuck inside on a rainy day? Then it’s time to make silly sock puppets!

Sock Puppets (5)

We always seem to have extra pairs of socks (no thanks to indoor playrooms that require them even in flip flop weather!), so we simply grabbed a pair and set to work.

Sock Puppets (1)

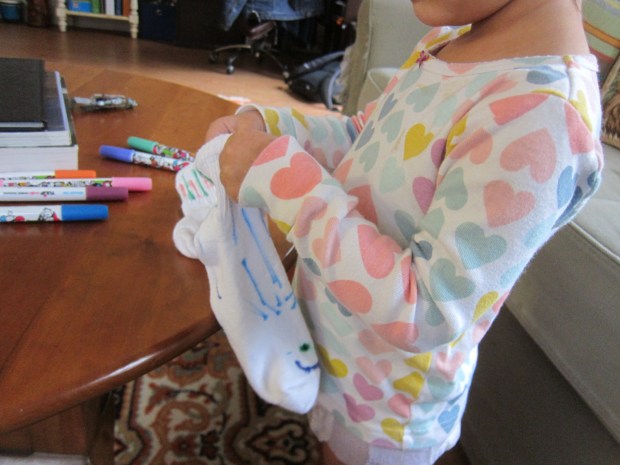
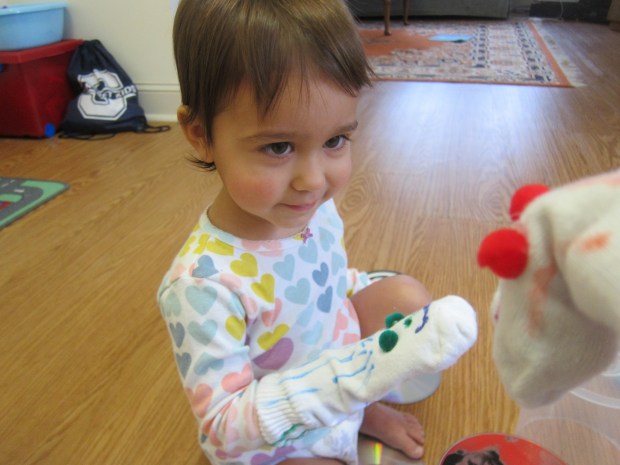
First up was adding facial features with fabric markers. I folded the toe of the sock down toward the heel so Veronika could visualize where the head would be, but mostly she just scribbled any which way.

The fabric markers were a little frustrating for her, too, since they tend to catch in the fabric, but I assured her that any markings at all looked great!

Sock Puppets (2)

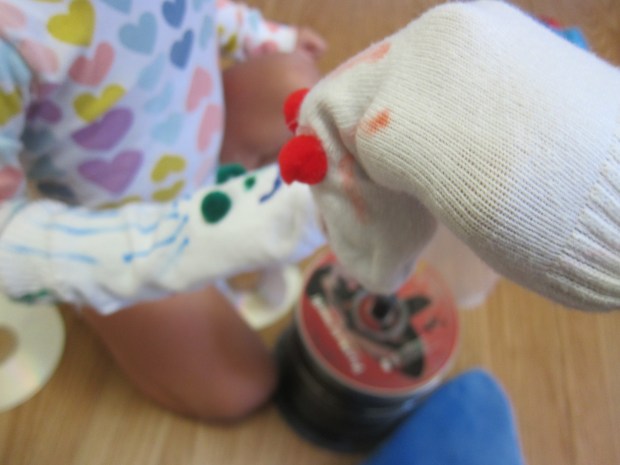
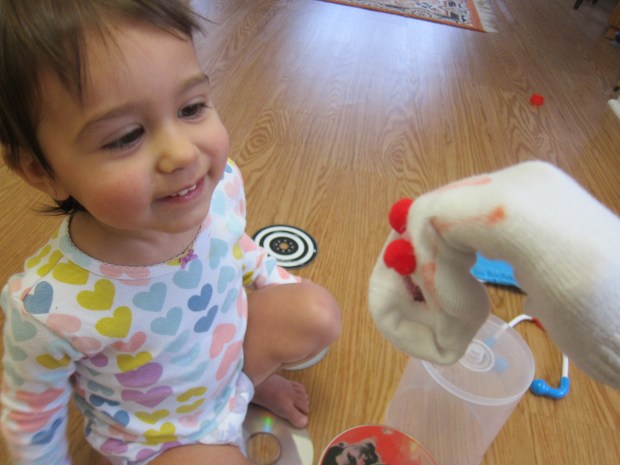
Once we had decorated the bodies, I also used hot glue to add pom pom eyes. Time to slip on those socks and put on a show! Veronika giggled just seeing the sock on her hand or my own.

Sock Puppets (3)

She laughed even harder once the socks “talked to her”.

Sock Puppets (6)

And it turns out that sock puppets like to go on toes, too!

Sock Puppets (8)

Shaving Cream Marbling

Shaving Cream Marbling (7)

I made shaving cream prints with Travis when he was in preschool, and it was meant as an art project (one that resulted in lovely bookmarks!). For Veronika at age two, this same activity was definitely more about the process and the sensory play. I love when I’m able to tailor big kid activities to my toddler in this way.

To start, we squirted a thick layer of shaving cream into a disposable foil tray. In turn, I placed this inside a second craft tray, because the activity is definitely messy.

Shaving Cream Marbling (1)

Next, we added lots of drops of natural food coloring. You can also use liquid watercolors, but I like the food coloring with a toddler because it doesn’t stain.

Shaving Cream Marbling (2)

I showed Veronika how to swirl the colors through the shaving cream with a dowel. The dowel is great because it’s long enough that you’ll minimize any mess on your toddler’s fingers!

Shaving Cream Marbling (3)

Next, we pressed a piece of watercolor paper over the shaving cream, patting down on it lightly. Veronika loved the patting! Lift up and reveal the pretty marbled colors.

Shaving Cream Marbling (5)

Finally, we needed to scrape off the excess shaving cream, and the edge of a jumbo craft stick works great for this. Repeat as many times as desired!

Shaving Cream Marbling (6)

We ended up with four lovely prints that we can turn into art, but Veronika was still busy with all the materials. We squirted in a second layer of shaving cream, then added lots more food coloring, and did lots more stirring, scooping, and playing for quite a while.

Shaving Cream Marbling (4)

Condensed Milk Edible Finger Paint

Condensed Milk Paint (6)

I love finding new ways to make edible finger paint for toddlers, and this version couldn’t be easier. Just crack open a can of condensed milk, add food coloring, and your little artist is ready to paint! For a vegan version, try the sweetened condensed coconut milk from Nature’s Charm.

I spooned a little bit into each of three plastic cups and put a small toy spoon in each cup. Veronika loves these little spoons, so she was excited to help stir a few drops of food coloring into each one. We used green, blue, and red.

Condensed Milk Paint (2)

Since she already had the spoon in hand, she first used this as her tool to dribble or rub the paint over thick watercolor paper. But I encouraged her to use her hands, and so she curiously dipped in a finger.

Condensed Milk Paint (3)

Then she was brave enough to do some smearing! The condensed coconut milk is very thick and creamy, much more so than regular slippery finger paint, so it was a great new sensory experience for her.

Condensed Milk Paint (7)

She’s been very into Blue’s Clues lately, and discovered that if she pressed her hand down, she left a paw print “clue” just like Blue can!

Condensed Milk Paint (4)

She requested I leave a paw print, too. There’s nothing like playing with your toddler to embrace your inner child and get a little goopy!

Condensed Milk Paint (8)

In fact, Veronika then loved rubbing the paint all over her hands and smooshing her palms together. Needless to say, once her masterpieces of finger paint were finished, we ended with a good hand washing.

Condensed Milk Paint (9)

Interestingly, she never tasted this one, but it was nice to know she could have, had she wanted to.

Bubble Prints

Bubble Prints (6)

The original plan with this project was to make art, but the kids were way more into the process than the final product. Which was just fine with me, since they were having fun!

To make bubble paints, pour a little liquid food coloring (or liquid watercolor) into the bottom of plastic cups, and add a little dish soap to each.

Bubble Prints (1)

Blow into the cups through a straw to produce lots of bubbles. Travis made a face and was worried he would get bubble solution in his mouth, but I showed him how to huff out of the straw over a piece of watercolor paper, splattering the “paint” down.

Bubble Prints (2)

We tried a few rounds of this, but then truly the kids lost interest in any painting and just wanted more bubbles!

Bubble Prints (5)

They thought it was so fun to watch them rise to the top, or to see how high the pile of bubbles could go before they bubbled over.

Bubble Prints (8)

Hint: they can go very high.

Bubble Prints (9)

The sticky soap substance was so neat to pop with fingers. Veronika loved scrubbing it all over her hands!

Bubble Prints (7)

If we pressed the bubbles from two different cups together, they would stick! This got big laughs.

Bubble Prints (10)

Eventually we did stop all that bubble play long enough to fill our square of watercolor paper with the paints. I had originally planned to give the kids fish stickers (in keeping with a bubbles-and-ocean theme), but Veronika preferred bug stickers. Alternatively, you could cut fish shapes from black construction paper and glue down.

Bubble Prints (11)

These are lovely pieces of artwork in their own right, but would also make pretty gift cards or stationary.

Icy Winter Scene Salt Paint

Icy Winter Scene Salt (4)

You only need two items to make a toddler happy on a slow morning: white glue and Epsom salts! To wit, Veronika made a winter artwork of “ice and snow” with just these two ingredients.

I set out one cup full of white glue and another with the Epsom salts, along with a sheet of construction paper. We chose blue as a background to evoke the bluish light of winter.

Icy Winter Scene Salt (1)

I thought she might want to paint the glue on with a paintbrush, but she was so interested in the cup of salt that she wanted to dip her brush back and forth between that and the glue. This meant her brush was quickly too gunky to spread the glue around on the paper.

Icy Winter Scene Salt (2)

Instead, I helped her pour the cup of glue right over the paper! Then I showed her how to pour the salt on top. There’s no need to worry about a mess because as you tilt the paper to tap off any excess salt, the rest will stick in the puddles of glue.

Icy Winter Scene Salt (3)

It looked like sparkly snow and ice to us!

Salad Spinner Art

Salad Spinner Art (4)

There’s no need to buy one of those fancy spin art kits at the store; if you have an old salad spinner (or find one cheap at a yard sale), then you’re all set for this art project!

First, Veronika just wanted to play with the spinner when I set it out. She was strong enough to press down the knob on top all by herself, and was rewarded each time she made the basket inside spin.

Next, we placed a small paper plate in the bottom (between the bowl and the basket insert) and squirted a few colors of paint directly onto the plate.

Salad Spinner Art (1)

Replace the lid securely and give that salad spinner a spin!

Salad Spinner Art (3)

She loved watching it in action!

Salad Spinner Art (2)

The big reveal, though, was when we lifted the lid and she saw all the splattered colors. Needless to say, make sure you have several paper plates on hand because your toddler is going to want to repeat this one a few times.

Salad Spinner Art (5)

The result is such pretty art for almost no effort. Just make sure this particular salad spinner lives in your craft bin, not the kitchen cabinet.

Salad Spinner Art (6)

Soap-Powered Boat

Soap-Powered Boats (6)

Here was a neat and quick experiment to continue Travis’s recent exploration of surface tension. Or more properly, breaking the bonds that create surface tension!

First, we crafted two cardboard boats. Cut boat shapes from old cardboard or the lid of a shoebox, then cut a deep V notch in the back of each.

Soap-Powered Boats (1)

Decorate with any favorite art supplies! We used markers, washi tape, and little triangles cut from paper for sails.

Soap-Powered Boats (2)

To power your boats, place them in a shallow bin of clean water. Then, dip a q-tip in a little bit of dish soap and touch it right behind the V in the back of the boat. As the surface tension of the water breaks, the boats propel forward!

Soap-Powered Boats (5)

Unfortunately this experiment isn’t easy to do repeatedly. We had hoped to race our two boats, but once the soap hits the water you can’t repeat it unless you dump, fill with clean water, and start all over.

Soap-Powered Boats (4)

But the boats were fun as Lego rafts once the STEM experiment was done!

Soap-Powered Boats (3)

Watercolor and Painter’s Tape

Watercolor & Painter's Tape (7)

Whether you’re using tape resist painting for holiday projects or just any old day of the week, there’s always a ‘wow’ factor to this painting method. It’s a favorite for my toddler and big kid both!

For toddlers, simply encourage them to lay down strips of painter’s tape any which way on thick watercolor paper. I helped Veronika makes lots of crisscross shapes. You could also experiment with making deliberate shapes, like squares or triangles, if desired.

Watercolor & Painter's Tape (3)

Travis wanted to see if he could make a favorite Lego character show up in tape form, which was admittedly harder to do. I taped out a rough outline, leaving empty space for the watercolor to show through.

Watercolor & Painter's Tape (1)

Time for watercolors! I loved watching brother and sister work side by side for this one.

Watercolor & Painter's Tape (5)

Travis loved choosing the right colors for his character. Veronika sometimes painted on her paper…

Watercolor & Painter's Tape (2)

…and sometimes preferred mixing the watercolors right in the tray. I loved seeing her artistic exploration.

Watercolor & Painter's Tape (6)

Once the pages were covered, we set them aside to dry. Then it was time for the big reveal!

Watercolor & Painter's Tape (8)

Toddler Pouch

Toddler Pouch (3)

If your toddler wants to carry along a little purse just like mommy, all you need to do is put together this simple craft!

To start, Veronika helped decorate some paper plates. Use whatever coloring material your toddler likes best; Veronika jumped right to it with her favorite color crayons (purple and blue), and lots of stickers.

Toddler Pouch (2)

I also drew familiar images on the plates for her like a rainbow and sun.

Toddler Pouch (1)

Cut one of the paper plates in half, and then staple it onto a second paper plate.

Toddler Pouch (4)

Punch two holes at the top of the full plate and thread through with yarn. Now it was ready to sling over her shoulder! Or to be stuffed full of toys and treasures.

Toddler Pouch (5)

She seemed so delighted with this pouch of her very own.

Water-Powered Window Stickers

Water Powered Window Stickers (8)

All you need for this activity are a few sheets of craft foam. And since these “stickers” peel off and on any window as many times as your child wants, they lend themselves perfectly to imaginative stories and play.

We used craft foam in three colors, and started out by tracing cookie cutters to make shapes and people (hint: you’ll want to use a gingerbread man cookie cutter!). Travis quickly wanted all our stickers to have a Star Wars theme, so we traced a few nightlight inserts in favorite shapes like R2-D2 and The Millennium Falcon, too.

Water Powered Window Stickers (3)

Then he decided to draw a few favorite characters free-hand, like Jabba the Hutt! I was impressed with his creativity.

Water Powered Window Stickers (2)

Draw on any details like facial features, buttons, or hoods with permanent marker, then cut each shape out.

Water Powered Window Stickers (4)

All Travis had to do to create a stage for his little characters on the window was to dip them in a dish of water. I set down a bowl of water (and a paper towel to clean up any drips!) and the fun began.

Water Powered Window Stickers (5)

Travis loved the way he could manipulate the characters all over the window, changing the scene and staging battles and rescues.

Water Powered Window Stickers (10)

Because you can layer one foam piece atop another, be sure to add accessories, too. Darth Vader’s mask could go over any of the little people’s heads, for example. You could even make a foam cut-out to look like a speech bubble and add words with permanent marker.

Water Powered Window Stickers (7)

No matter what theme your child has for these stickers, they are sure to be easy and fun.

Water Powered Window Stickers (11)