Puffy Paint Clouds

Puffy Paint Clouds (8)

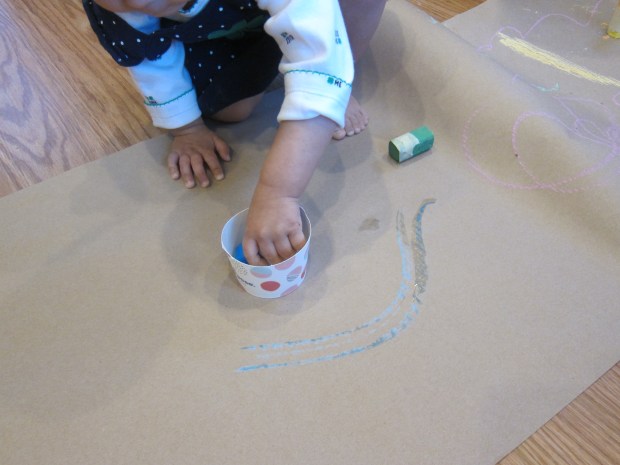
With so much attention going to big brother Travis during the school week, it was nice just to pause with Veronika for some messy art today! Shaving cream paint has so many uses, and today we focused on clouds. Veronika has been using lots of weather words like “rain” and “cloud” lately, and I figured I would seize the moment.

To make the paint, mix up about 3/4 cup foamy shaving cream and 1/4 cup white glue. I was entirely inexact about this, just eyeballing it, but you really can’t get it wrong.

Puffy Paint Clouds (1)

We used blue construction paper as the background for a pretty azure sky. Ideally we would have been dipped cotton balls in our “paint”, but I was all out! In a pinch, we wadded up tissue paper to make the clouds “fluffy”.

Puffy Paint Clouds (3)

If your child likes things neat, you can “paint” the shaving cream mixture onto the paper with a paintbrush and then add crumpled tissues on top. If your child likes to be messy, roll the tissue wads right in the gluey mixture, and then press onto the paper.

Puffy Paint Clouds (4)

We sort of did this both ways!

Puffy Paint Clouds (6)

Veronika was fascinated by the glue mixture, dipping her fingers into it often.

Puffy Paint Clouds (2)

I also sang about clouds as we played to make it a little weather lesson. So the project ends up being equal parts art, sensory play, and science for toddlers.

Puffy Paint Clouds (7)

Artwork Display

Artwork Display (10)

There are many things about my kids that make me sentimental, but I confess their artwork is not one of them. First of all, there is so much of it! And second, it takes up so much space. And let’s be honest: at first you’re amazed by every crayon line, but after a while those crayon scribbles start to look the same.

So here’s a fun way to display your toddler’s art and make them proud, but keep things rotating out the door! Display one piece, but toss it to make room as soon as there is a new one to display.

Artwork Display (1)

The simplest idea is simply to have a plastic frame on the wall where you can insert one drawing, then swap out for the next. Even easier, I like to hang Veronika’s latest artwork on the fridge. To make it feel special, today I helped her design her own artwork holder!

Hot-glue a magnet or magnetic strip to the back of a 12-inch ruler.

Artwork Display (3)

Next, use hot glue to attach spring-type clothespins to either side.

Artwork Display (2)

Now have fun decorating the ruler before you mount it on the fridge. Veronika glued on dried pasta and added marker scribbles.

Artwork Display (4)

I added her name using glue and glitter.

Artwork Display (6)

I didn’t have to wait long before she had her very next masterpiece of marker scribbles. Now I had the perfect place to display it, and will swap it out immediately for the next one that comes along.

Artwork Display (8)

A final idea to manage all that toddler art is simply to keep a digital record. I always take a snap of the kids’ art – no matter how grand or small – before tossing it. Consider staging a picture of your toddler surrounded by a few “masterpieces”, and then you won’t feel so bad tossing the real thing.

Artwork Display (9)

As an alternative, turn scribbles on paper into cylinders and make them works of art on a mantel! How do you deal with all the toddler artwork? Please share in the comments.

Artwork Display (5)

Cylinder Pictures

Cylinder Pictures (7)

Veronika loves to scribble these days, and one of the easiest ways to occupy her when I need a few minutes is to let her loose with a box of jumbo crayons and a few blank sheets of paper.

Cylinder Pictures (3)

As is probably the case with your toddler, though, she has a tendency to fill up one portion of the paper and to leave the rest of it completely blank. So here’s a fun way to display your child’s early masterpieces while hiding that blank space.

Cylinder Pictures (1)

Trim the paper if needed (for example in sections that are completely white), then wrap the remaining paper around itself into a cylinder.

Cylinder Pictures (6)

Tape shut and set on a mantle or windowsill. Even a little one’s scribbles look so artistic this way!

Cylinder Pictures (4)

These drawings truly were all Veronika’s doing, except when she asked me to draw her stars on one sheet.

Cylinder Pictures (2)

If your child wants to take the cylinders down to play with then, that’s fine too. Just think of it as “process art”!

Cylinder Pictures (8)

Drip Pots

Drip Pots (7)

We had two teeny tiny terracotta pots here in the house, and Earth Day prompted me to think of a use for them: they’re the perfect size to grow a few windowsill herbs! Although we don’t have a garden, I loved the idea of showing Travis how we can be responsible for our own food (seasoning at least). You could use this paint method on any size clay pot, though, and plant flowers or succulents instead.

The night before, we painted the pots with a few coats of white acrylic paint and left them to dry overnight.

Drip Pots (1)

In the morning, Travis helped mix up red and blue acrylic paints with a little water. You want the mixture to look like glue.

Drip Pots (2)

Turn the pots upside down and place on a work surface. I showed Travis how to dip a brush in the paint and then hold near the rim of the pot. Let the paint drip down in rivulets. It took him a moment to get the hang of it, but then he loved this new painting method!

Drip Pots (4)

Let dry completely, then add a coat of clear sealer, if desired.

Drip Pots (5)

Then just add your planting and enjoy the greenery!


Drip Pot alt

Nature Earth Craft Challenge

Nature Earth Challenge (6)

Tomorrow is Earth Day, and although we can’t celebrate with others this year, Travis and I talked today about ways we can help the Earth as a family. This month’s craft challenge from Highlights magazine – to create an Earth with items from nature – was the perfect end to the lesson!

First we needed to head outside and gather materials. I challenged Travis to think of what colors the Earth needed: blue and green of course! We looked for tall green grasses and little blue wildflowers (which were hard to find), and came home with our treasures.

Nature Earth Challenge (1)

Travis actually loved the fact that we had more green than blue. He decided our planet was more grass than water, and had so much fun with it.

Nature Earth Challenge (2)

We made a big circle of glue on poster board, and then he was able to sprinkle down handfuls of the grass, or press the blue flowers in more carefully in other parts.

Nature Earth Challenge (4)

As he worked, we read about ways to “step up for Earth” as a family.

Nature Earth Challenge (3)

Our new family goals include: saving water by having the kids bathe together, not separately; and to save on paper towels by buying reusable cloths.

Nature Earth Challenge (5)

Happy Earth Day to all! There are silver linings even in this Covid-19 era.


Nature Earth Challenge (7)

Froot Loop Sand

Froot Loop Sand (10)

This project is a fun way to use up a box of any rainbow colored o-shaped cereal, whether brand name Froot Loops or an organic version.

To start, you’ll need to crush the cereal until very fine, which is half the fun/ Yes you can do this step in a food processor, but I wanted Veronika to get hands-on with it.

Froot Loop Sand (1)

I placed a big batch of the cereal in a large zip-top bag and had her help roll over it (or just whack it at!) with a rolling pin. I helped her out because the finer the “sand” the better the project turns out.

Froot Loop Sand (2)

Next I gave her a glue stick and showed her how to rub all over a piece of construction paper, which she loved!

Froot Loop Sand (3)

Once the paper is really sticky, pour the cereal sand on top. Shake off any excess over a tray, then let dry.

Froot Loop Sand (5)

The colors really do look so pretty! We tried this a second time by pressing a gluey piece of paper down over the cereal sand instead, once it was all in the tray. This didn’t work quite as well, but was a nice variation.

Froot Loop Sand (7)

Of course Veronika was busy with leftover “sand” and a few utensils for quite some time!

Froot Loop Sand (6)

In sum, a great toddler art project.

Froot Loop Sand (8)

Musical Chalk

Musical Chalk (5)

This game is the toddler version of a musical art project I recently did with big brother Travis. This time, I sat Veronika down with a long piece of craft paper on the kitchen floor… the bigger the better! I gave her pieces of chalk and turned on some upbeat music in the background.

Musical Chalk (2)

Then I invited Veronika to make the chalk “dance”. I showed her how to draw big loops and swirls to the happy music. Obviously toddlers will be too young to vocalize how a song makes them feel, but babies have an intuitive understanding of rhythm and will likely take on the tone of whatever is playing.

Musical Chalk (3)

To make chalk less messy on little hands, try wrapping one end in masking tape. This definitely increased the amount of time she was happy to play with it.

Musical Chalk (4)

I set out a little dish of water about halfway through her play. Dipping chalk in water makes for bolder, smudgier colors, and she loved the way this looked.

Musical Chalk (6)

Of course don’t be surprised if your little dish of water gets upended, which is just fine, too.

Musical Chalk (7)

The music kept playing in the background, sometimes faster, sometimes slower. Did she alter her strokes because of it? It was hard to say, but the game was a great intro to emotional learning, while we made messy art in the meantime!

Bunny Ears Craft for Easter

Bunny Ears Craft (6)

If your baby or toddler will tolerate wearing these little bunny ears, it’s pretty much the cutest way to get a young child into the Easter spirit, long before they know who the Easter Bunny is!

To involve Veronika in the craft, I sat her down with construction paper and chalk to decorate the headband portion. Drawing on paper with chalk was novel!

Bunny Ears Craft (1)

Meanwhile, I traced two bunny ear shapes on a separate piece of construction paper, and glued down cotton balls. Stretch the cotton out slightly for a softer look.

Bunny Ears Craft (3)

Older toddlers may want to help with this step, too!

Bunny Ears Craft (2)

Cut your child’s chalk drawing in half to make two strips, then measure around your child’s head and secure to the right circumference with double-sided tape or a stapler. I originally hoped to avoid staples, but they were definitely more durable than the double-sided tape, which gave out pretty quickly.

Bunny Ears Craft (5)

Attach the bunny ears to the sides with additional staples. Next time I would make smaller ears, so they weren’t so heavy and floppy. But my little bunny loved it!

Bunny Ears Craft (8)

Chicken Littles

Chicken Littles (5)

Here’s an adorable craft for your Easter table, even if your gathering is smaller than usual this year due to social distancing. Kids can get involved with several steps, including painting, cutting out shapes for the face, or helping arrange the flowers.

To start, paint empty baby food jars with several coats of yellow acrylic paint. Let dry completely.

Chicken Littles (1)

Cut out triangles for beaks and wedges for feet, whether from felt or construction paper. I would have preferred felt, but paper worked in a pinch!

Chicken Littles (2)

Use a black sharpie to add eyes.

Chicken Littles (3)

Now your chicks just need feathers in their caps, care of little white flowers, of course! These turned out so cute.Chicken Littles (4)

Passover Goblet

Passover Goblet (6)

Passover began yesterday, and although we don’t celebrate the holiday, we have friends and family who do. Travis enjoyed learning a bit about the holiday and making these goblets, which are traditionally placed on the Seder table to symbolize hope. The message of hope certainly felt appropriate in this Covid-19 era in which we suddenly live! You’ll need plastic goblets for the craft, which you can find at craft stores or party stores.

Passover Goblet (1)

Dab tacky glue over only half of a plastic goblet, to avoid getting fingers messy, and wind colorful yarn around that half. Let dry, then repeat with the bottom half of the goblet.

Passover Goblet (2)

We left the stems free of yarn, but you can cover completely, if desired.

Passover Goblet (3)

Once dry, we added a few pom poms for a final flourish!

Passover Goblet (5)

You could also add name tags for the prophets Miriam and Elijah, if truly celebrating a Seder this week. Travis loved the way these looked, and was so enamored of the goblets that he made sure the family drank water all day from leftover ones.