Squish Bags

Squish Bags (2)

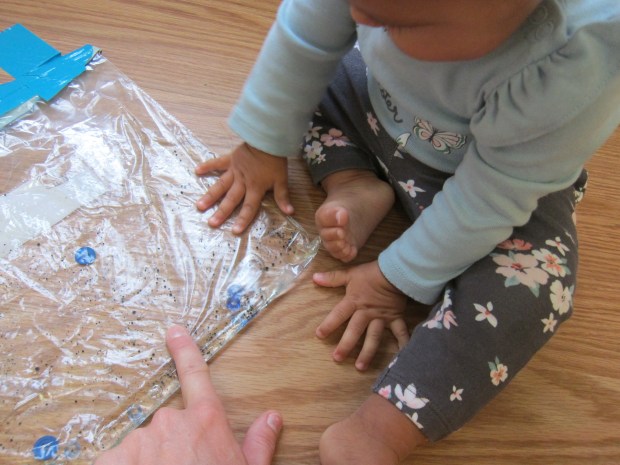
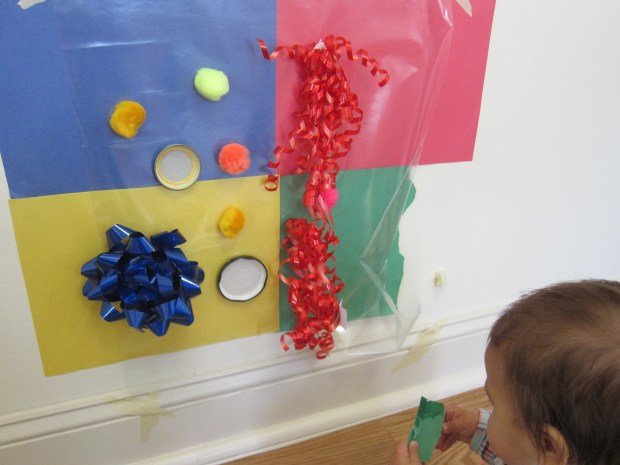
I made a floor sensory bag for Veronika some time back; today I added two twists for a new version of the game!

In the first, I added 1/2 cup water and then various small items from our craft bin: translucent pony beads, buttons, and wiggle eyes all fit the bill. I got the idea after noticing how much she loved a drum with floating beads under the plastic at music class.

Squish Bags (1)

I taped the bag firmly to the floor on all four sides, almost like framing it. Now she could squish the items inside, but not move the whole bag.

Squish Bags (3)

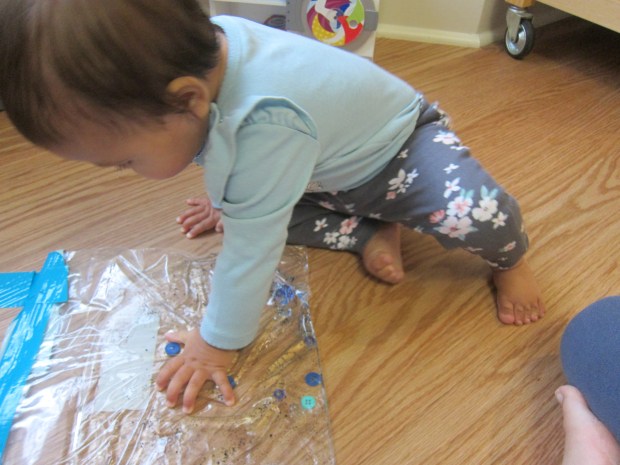
The second version was even squishier! This time, instead of water, I squirted in a generous dose of shaving cream. I sprinkled in even more beads and buttons, using lots so they showed up through the thick cream. This one, too, I taped firmly down on all four sides.

Squish Bags (5)

Veronika loved pressing her fingers in! Or scooching her whole body across.

Squish Bags (7)

She could move beads and buttons with one little finger or a whole hand pressed down, and the visual effect was dazzling.

Squish Bags (4)

If you make these while your baby is still young enough to need tummy time, it’s a sure way to keep them entertained!

Calming Sensory Play

Calming Sensory (4)

Veronika was uncharacteristically fussy this afternoon, so I knew exactly which sensory game to pull out. All you need is a large bin, a bulk bag of rice, and lavender essential oil.

Calming Sensory (1)

Pour the rice into the bin. Add just two to three drops of lavender oil; you really don’t want more than that, as essential oils are quite potent. Be aware, too, that lavender oil can cause skin reactions and stop immediately if you notice your baby having one.

First, I simply let Veronika smell the oil. She seemed calmer already!

Calming Sensory (2)

I put a few cups into the bin and poured the rice back and forth.

Calming Sensory (3)

The scent drifted up to us instantly, and Veronika was hooked. I showed her how to let the rice run through her fingers and she followed suit.

Calming Sensory (8)

She was soon quite busy, digging in her fingers and trying out the cups.

Calming Sensory (7)

Then she discovered that when she picked up a handful of rice and tossed it on the floor, it made a satisfying scattering sound.

Calming Sensory (10)

She continued this with such pleasure that I didn’t mind the mess, and clean-up was an easy matter of using a dust pan once she was through.

Calming Sensory (9)

And at the end, she truly did seem calmer than when we had started.

Calming Sensory (6)


Classic Beating on Pots & Pans

Classic Pots (8)

Today I needed to keep Veronika occupied while baking banana bread, so I pulled out an old classic: a kitchen percussion set made from pots and pans.

For novelty, though, I made today’s focus less about the musical element and more about sensory play. I provided her with several different types of baking ware: a saucepan, a muffin tin, and a loaf pan. We started out drumming with bare hands, and I drew her attention to the sound this made.

Classic Pots (3)

Then I set out a variety of implements to be drum sticks, everything from spatulas to wooden spoons to cookie scoops.

Classic Pots (5)

Look for a variety of materials in your kitchen; we had soft silicone, wood, metal, and more. I sat with Veronika and asked her about the different sounds she was hearing. She grinned up at me and tested them all!

Classic Pots (4)

When I showed her how to swirl the whisk in a muffin cup or saucepan, she was an eager mimic.

Classic Pots (7)

You can also make piles and see how this changes the sounds around. If the loaf pan was on top of the muffin pan, it sounded different (more metallic) than when it sat alone on the floor.

Classic Pots (6)

Once our little sensory lesson was done, Veronika kept busy by herself as mommy finished up the banana bread. A win-win!

Classic Pots (2)

Play Dough Sensory Bag

Playdough Bag (2).JPG

I’ve been on a recent kick of making sensory bags for Veronika, a great way to enable my little imp to play with messy materials that might otherwise end up in her mouth. Safely inside a plastic bag, even the messiest items are a go!

Normally for a ten-month-old I’d whip up homemade play dough for added security, but since it was going in the bag, I used the store-bought kind.

I added a few craft beads in fun flower shapes that she would be able to squish into the play dough. Now it was simply a matter of sealing and watching her squish away!

Playdough Bag (1)

Veronika loved grabbing at the bag.

Playdough Bag (5)

I showed her how to squish the hard beads into the soft dough, talking about texture as we played. The contrast seemed to really interest her.

Playdough Bag (4)

I felt comfortable leaving this one around for her to play with since there was no liquid to spill, even in case of a slight tear.

Playdough Bag (3)

A fantastic way to keep her busy, in sum!

Baby Oil Sensory Bag

Baby Oil Bag (4).JPG

If you’re looking for a safe way to incorporate messy materials into play with the under-one-year-old set, then gallon-sized plastic bags are your perfect solution. To wit, Veronika has “painted” in a plastic bag, and today we used baby oil for a fun sensory experience.

Pour some baby oil into the bag. Add a few blobs of food coloring.

Baby Oil Bag (2)

I went with a blue theme simply because that was what I had on hand, and added blue buttons and blue pony beads as well.

Now all she had to do was squish! The food coloring is fun, because your baby can chase the blobs around in the baby oil, much like blobs in a lava lamp.

Baby Oil Bag (3)

If your baby is as hands-on as Veronika, you’re going to want to duct tape along the sealed closure for extra security.

Baby Oil Bag (5)

It was also helpful to duct tape the bag to the floor, because this focused her play on squishing items around within the bag, instead of picking up the whole bag and smooshing it in her hands.

Baby Oil Bag (6)

What hands-on fun for a weekend morning!

Textured Sensory Wall

Texture Wall (6)

This sensory wall is so easy to throw together, but your baby or toddler will love it! Adjust the height accordingly; for Veronika, I placed the wall low to the ground so she could manipulate items while sitting. For older toddlers, make it chest height so they can cruise along as they practice walking!

I taped four pieces of colored construction paper in a square on the wall to begin: visual stimulation!

Texture Wall (1)

Cover the construction paper with contact paper, sticky side out, and secure with tape. Now you can cover the sticky surface with whatever you like! Large pom poms, curly ribbons, and jar lids were all items that I had on hand that worked well.

Texture Wall (2)

I showed Veronika how to pull an item off and place it back on again.

Texture Wall (3)

She took to it right away, and surprised me with the objects she gravitated towards. I thought she’d love the pom poms, but jar lids were ab igger hit.

Texture Wall (5)

Talk about all the colors with your little one, or the crinkly sounds the riibbon makes, or the different textures.

Texture Wall (4)

Later, I added a few instant camera pictures for her. She loved peeling these off from the sticky surface.

Texture Wall (8)

And even was able to stick them back on!

Texture Wall (9)

Leave the wall up over the course of a day (or more!) and let your child return to it; you might notice him or her interacting with it different ways.

Texture Wall (12)

Create a Sensory Tunnel

Sensory Tunnel (8).JPG

Today, with big brother off to kindergarten (!), I had time for a bigger project than usual with Veronika. Using two old moving boxes from the garage, I opened up all the flaps and then nested them slightly one inside the other to form one long tunnel.

Sensory Tunnel (1)

Hmm, the box was intriguing, but Veronika didn’t head inside just yet.

Sensory Tunnel (2)

Next I poked three holes along the top. I stuffed in three socks, all with different patterns. One sock I left empty, one I stuffed with newspaper for a crinkly effect, and one had a musical rattle inside.

Sensory Tunnel (3)

Interestingly, the empty sock was her favorite. She loved trying to catch it and tug on it.

Sensory Tunnel (4)

She seemed quite determined to pull it all the way from the box, and was amazed every time it sprang back into place (Note: you can knot the socks at the top if needed, to keep them secure).

Sensory Tunnel (5)

I placed a few tantalizing toys inside (balls, cars), and finally that did the trick. In she goes!

Sensory Tunnel (7)

She looked absolute thrilled with her surroundings once inside, her own little fort! If you want, you could even make windows, but my boxes were a bit floppy and I skipped that step so that the tunnel didn’t cave in.

Sensory Tunnel (9)

She did also try lying on her back to kick at the socks, but preferred sitting up to play.

Sensory Tunnel (6)

What a fantastic morning of fun!

Suitcase Sandbox

Suitcase Sandbox (4)

If you’re hesitant to bring your baby to the beach during his or her first summer, then bring the beach to your baby! This little activity is one step up from the sand sensory play I did when Veronika when she was only 6 months old.

This time, I found an old craft suitcase and completely filled the bottom with sand. Any old suitcase with hard sides would work fine for this purpose! I briefly considered that bigger might have been better, but the small one had an added bonus: I could do the entire activity in the tub, making for fantastically easy clean-up.

Suitcase Sandbox (1)

I stripped Veronika down to a diaper and sat her in the sand. Beach day!

Suitcase Sandbox (2)

The most fun was burying her hands and feet and then helping her uncover them. She loved just kicking her legs in the sand, although looked confused by the grittiness, too.

Suitcase Sandbox (3)

I sprinkled some over her upturned palms, but found that in general it was best to keep the sensory play to her feet, so she didn’t eat any sand.

Suitcase Sandbox (6)

After a time, she seemed frustrated by the small box so I moved her to the side.

Suitcase Sandbox (5)

I loved watching her reach in and draw patterns in the sand.

To clean up, simply close the suitcase and save it for next time! Any extra sand that had spilled was simply rinsed down the tub drain.

Suitcase Sandbox (7)

Quick Make & Play Edible Sensory Bottle

Edible Bottle (4)

This fantastically easy sensory bottle is quite possibly my new favorite thing in the world…and Veronika’s, too!

To set up the bottle, save any clear plastic juice bottle with a wide mouth and a lid you can screw on tightly.

I gave Veronika the bottle (which of course is a toy all by itself!) and set out a few easy-to-hold snacks in front of her, including Plum Organics super puffs and Earth’s Best letter of the day cookies (both vegan!).

Edible Bottle (1)

I showed her how to drop some of the snacks into the bottle, making a nice plink sound each time. She soon was following suit, with the added fun that she could nibble as she worked.

Edible Bottle (2)

Once she paused to enjoy the puffs, I filled the bottle a little further and put on the cap.

Edible Bottle (3)

Now it was a sensory bottle to shake!

Edible Bottle (5)

The real beauty of this sensory bottle became apparent as soon as we were on the go. At the grocery store, first Veronika could just enjoy playing with it, shaking it or chewing at the cap.

Edible Bottle (8).jpg

But when she got a little fussy, I unscrewed the cap and surprised her: a snack!

Edible Bottle (9)

She kept handing me the bottle over and over, asking for little puffs with sounds and gestures. I loved watching her enjoy the toy in multiple ways during our shopping trip and I may very well always keep one of these on hand from now on.

Edible Bottle (6)

Baby-Friendly Ice Sensory Activity

Baby Ice (2)

Here’s a way your baby can cool off while fitting in sensory play on a hot day!

I took Veronika outside before the sun was too high in the sky, along with a bowl of ice cubes and a few tools.

Baby Ice (1)

First, I simply wanted to see how she would react to the ice. Some babies may want to grab it and really get in there! Veronika seemed a touch nervous about how cold it was but liked the sensation on her toes.

Baby Ice (3)

For added fun, I buried two shape toys in the ice. She loved reaching in and grabbing them out.

Baby Ice (4)

A wooden spoon added to the fun, too. She could “stir” the ice, or tap against the bowl. I put a few pieces on the hot patio and we watched together how quickly they turned to water.

Baby Ice (7)

You can also use measuring cups as scoops. These were fun for her to reach into the bowl with. Or just nibble on!

Baby Ice (5)

Don’t forget about sound! Put a few pieces of ice in one of the measuring cups and shake it for an auditory sensory experience.

Baby Ice (6)

And when you’re done, clean-up simply means dumping out the ice to melt in the grass!

Baby Ice (8)