Spider Sticky Wall

Spider Sticky Wall (8)

We had our roll of contact paper out this morning, so I thought it would be fun to make a sticky wall for Veronika. And what better theme for an October sticky wall than spiders of course!

For this activity, tape a large piece of contact paper to the wall, sticky side out.

I cut circles from brightly colored construction paper for the spider bodies and then trimmed pipe cleaners into smaller pieces for legs. I wanted each spider to have multi-colored legs so they were silly, not scary.

Spider Sticky Wall (1)

Veronika loved playing with the pipe cleaners while I prepped all our materials! Then we starting hanging up bodies. She immediately latched on to what we were doing, and loved giving each spider its legs.

Spider Sticky Wall (4)

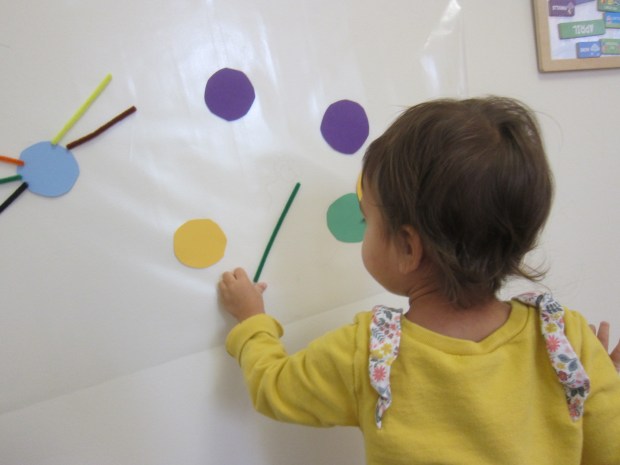
Although I briefly mentioned that real spiders have eight legs, we weren’t really concerned about scientific accuracy today. As a two-year-old, she simply began adding legs wherever she wanted. Also, our pipe cleaners kept falling down (they don’t stick well to the contact paper unless you press really hard on them), which made for lots of spiders who were constantly losing limbs.

Spider Sticky Wall (5)

But that was half the fun! Veronika thought it was so funny when the legs fell, and she narrated her play to herself as she worked. “Let’s give this guy yellow legs. Pink fell down! He needs a green leg!” and on and on for about 20 minutes.

Spider Sticky Wall (9)

Between their bright fuzzy legs and their happy smiles, it’s safe to say we had the cutest spiders in town.

Spider Sticky Wall (7)

Monster Stew

Monster Stew (1)

There were no real monsters in this watery sensory tub for Veronika, just a chance to splash and play in a seasonable way.

To make the broth for our “stew”, I filled a basin with water and tinted it orange with food coloring.

Now we needed to add a few monstrous ingredients! In went lots of items from the dollar store, including skeleton hands, plastic bats, and monster eye rings.

Monster Stew (2)

I had originally hoped to use mini plastic jack o’ lanterns as scoops for her to fill and pour with, but the store was sold out. Instead, I added orange plastic eggs, broken in half, which worked perfectly as little cups.

That was a good thing, because this was definitely her favorite part of the sensory game. She loved to scoop and pour over the rest of the eerie ingredients.

Monster Stew (3)

The skeleton hands were perfect for stirring with.

Monster Stew (5)

It was also fun to reach down to the bottom of the stew and dig out handfuls of bats or eyes.

Monster Stew (4)

In sum, this was simple and spooky sensory play, just right for October. It was a nice way to introduce some of Halloween’s monsters without them seeming too scary.

Monster Stew (6)

Halloween Countdown Day 13: Monster Sensory Tub

Monster Sensory Tub (1)

This activity doubled as the day’s sensory play and a way to tick off a box on our countdown to Halloween. And it couldn’t have been easier!

I filled a tub with purple water beads and water so the beads could grow to full size. The kids were so impatient to play, though, that I handed over the bin when the beads were only half as big as they could eventually get. To add spooky monsters, all we needed were large wiggle eyes.

Monster Sensory Tub (2)

At first the eyes were floating on the surface. But Travis loved burying them as deep under the water beads as he could, and then unearthing the “monsters”.

Monster Sensory Tub (4)

They were so eerie swimming to the surface. Veronika jumped right in to copy him!

Monster Sensory Tub (5)

She also loved scooping up handfuls of the water beads and then letting them trickle back down.

Monster Sensory Tub (6)

Before I knew it, the game changed slightly. Star Wars Stormtroopers needed to escape from the monsters!

Monster Sensory Tub (9)

This kept the kids so busy and happy the entire time I was prepping dinner. A definite spooky win.

Monster Sensory Tub (8)

Halloween Sensory Bottle

October Sensory Bottle (6)

Veronika recently enjoyed a few autumnal sensory bottles, so today I made another version, this one specifically with a Halloween theme. The items inside include both “tricks” and “treats”!

I first filled an empty bottle about three-quarters of the way with water. Next I added faux candy corn. (Note: In a pinch you can add real candy corn, just be aware that it will dissolve over time). These were the treats of course.

Then I added a few spider rings. These were the tricks!

October Sensory Bottle (2)

A little bit of orange-red glitter topped things off. Because Veronika had attempted to unscrew the caps from her fall sensory bottles, this time I judiciously used hot glue on the cap before handing it over.

Knowing she couldn’t open it, she was much more focused on what was inside. She loved shaking it!

October Sensory Bottle (4)

And rolling it. The candy corn and spiders would sort of float to the surface and then settle back to disappear again. Perfectly Halloween spooky!

October Sensory Bottle (5)

She also thought it was a delight to throw it on the floor, and although I wasn’t as big a fan of this version, she was having so much fun that I let it be.

October Sensory Bottle (8)

This sensory bottle is enjoyable for young toddlers or even for babies doing tummy time. Perfect for a first Halloween, in sum.

October Sensory Bottle (9)

Sensory Pumpkin Decorating

Sensory Pumpkin Decorating (8)

This activity is half sensory bin, half a way to decorate a pumpkin with your toddler without pulling out the carving knives. Which adds up to 100% fun!

I wanted an assortment of items to decorate our pumpkins, aiming for a variety of textures. I also wanted to stick to a white and black color scheme for Halloween. So in a shallow craft tray, I lined up: dried corn, black feathers, uncooked white rice, black birdseed, and white sesame seeds.

Sensory Pumpkin Decorating (1)

You can mix and match based on what you have on hand, but aim for a nice variety of texture and size. Veronika immediately wanted to dig through the items in the tray with little plastic cups, so things didn’t stay in their “area” for long.

Sensory Pumpkin Decorating (2)

But I loved watching her explore all the texture. She especially seemed to like those fluffy craft feathers!

Sensory Pumpkin Decorating (5)

Meanwhile, I set to work making the first pumpkin for her. Add big dabs of glue to a pumpkin with a craft stick, working around the stem. I then sprinkled one of our sensory materials on each portion.

Sensory Pumpkin Decorating (3)

These made a neat ring around the stem once I had finished, and now she could feel along them for a great sensory experience.Sensory Pumpkin Decorating (4)

I left the decorating of the second pumpkin entirely up to her. She poured the glue around the top in a full ring, then used her little plastic cup to scoop and pour.

Sensory Pumpkin Decorating (7)

The end result was a neat mishmash of all the items.

Sensory Pumpkin Decorating (9)

I loved that the sensory play was part of both the decorating process and the final product.

Sensory Pumpkin Decorating (10)

Fall Squishy Bag

Fall Squishy Bag (3)

This quick sensory bag was very similar to a recent sensory bottle I made for Veronika, except this time it was in squishy form!

To start, fill a large zip-top bag with clear hair gel. I added yellow food coloring for the perfect autumnal hue.

Fall Squishy Bag (1)

Next I added leaves and acorns. You have two choices here: opt for silk leaves and plastic acorns if you have them from the store. And if not, simply use the real thing! We sure have lots of acorns and leaves from recent nature walks, so we went with the real deal.

Fall Squishy Bag (2)

Veronika really seemed to enjoy the contrast between soft leaves, squishy gel, and hard bumpy acorns.

Fall Squishy Bag (4)

She picked it up to see if it made shaky noises, but then realized this one was better suited to squishing around with her fingers.

Fall Squishy Bag (5)

She also tested out standing on it!

Fall Squishy Bag (8)

The bag was gorgeous sparkling in the light when the sun hit it mid-afternoon. In sum, a easy sensory bag, just right for autumn.

Fall Squishy Bag (7)

Halloween Shaving Cream Sensory Activity

Halloween Shaving Cream (6)

To get in the mood for all things orange this month, I turned the color into a sensory experience for Veronika today!

To start, I filled a shallow tray with a thick layer of foamy shaving cream. You can use orange food coloring for the next step, but I preferred to drizzle on some red and some yellow.

Halloween Shaving Cream (5)

This way, Veronika could see it “magically” turn orange as we mixed it all together.

Halloween Shaving Cream (3)

She wasn’t hesitant about getting her hands in it, but she quickly decided she didn’t like being goopy.

Halloween Shaving Cream (4)

Instead, I passed over a paintbrush. Now, she loved stirring through! So we pulled out orange and black construction paper and soon she was smearing the pages with the mixture. To make it more like puffy paint, add a little glue and stir to combine.

Halloween Shaving Cream (7)

As a final messy element (since, heck, we were already a mess!), sprinkle a little glitter on before the puffy paint dries. Once dry, scrape off any excess shaving cream.

Halloween Shaving Cream (8)

This is great way to have Halloween-themed sensory play with one- and two-year-olds, even before they’re old enough to understand the holiday!

Autumn Sensory Bottles

Autumn Sensory Bottles (5)

I confess that none of the following bottles turned out exactly the way I hoped! But with a little improvisation, I created three autumn-themed sensory bottles for Veronika that she quite enjoyed.

For all three, you’ll need to start with a clean and dry plastic water bottle, with the lid.

I poured white rice into the first, and then sprinkled in a few hidden autumn “treasures”, like miniature gourds.

Autumn Sensory Bottles (1)

She could shake this one, which made the rice hide the gourds, then turn it until she found them. She loved playing peek-a-boo with them! I had hoped to include other fall tidbits like mini scarecrows and pumpkins, but she seemed perfectly happy with this scaled-back version.

Autumn Sensory Bottles (2)

For the second version, I filled the bottle with water and tinted it an autumnal yellow with a little food coloring. I originally intended to add leaf-shaped confetti to this one, but couldn’t find any at the store. Instead, I simply added red and yellow buttons.

Autumn Sensory Bottles (4)

These fascinated Veronika, so it worked out well! She loved shaking this one and watching the buttons settle, or turning it this way and that.

Autumn Sensory Bottles (8)

For the final version, I had originally hoped to add silk leaves. Again, no dice. But what’s better than silk leaves? The real thing!

Autumn Sensory Bottles (7)

We added handfuls of small leaves we had found on a recent walk along with a few acorns (real ones!) for sensory sound. The bottle turned out so pretty.

Autumn Sensory Bottles (11)

This one was light as a feather and made fantastic clicking noises.

Autumn Sensory Bottles (3)

She spent some time with all three of them, but the button-and-water version was clearly her favorite. In fact, she then wanted extra buttons to hold, since she was frustrated she couldn’t screw the lids off.

Autumn Sensory Bottles (10)

Between the buttons and the bottles, she kept quite busy with this activity!

Black Bean Indoor Sandbox

Black Bean Sandbox (1)

Perhaps I should have held off on this particular indoor sandbox for a couple of days until October is officially here. But when I spotted my bulk bag of dried black beans, the color instantly made me think of all the Halloween decor I just stocked up on. So it was a spooky indoor sandbox a few days early!

I poured the beans into a shallow tray and added a few Halloween items that lent themselves well to sensory play. These included cupcake liners (with spiderweb and black-and-orange print designs), as well as felt skeleton figures.

Black Bean Sandbox (2)

First her attention went to the little skeletons, and she loved putting them in the cupcake liners, or burying them under the beans and then digging them back up again (spooky!).

Black Bean Sandbox (5)

She could also use the cupcake liners for scooping and pouring, which was great for fine motor skills.

Black Bean Sandbox (3)

She spent quite some time transferring beans back and forth this way.

Black Bean Sandbox (4)

I had planned just to let her use her hands, but she requested a spoon to scoop through, too.

Black Bean Sandbox (7)

Then to my surprise, she first sat in the beans…

Black Bean Sandbox (8)

…and then stood right up in them! This gave her the giggles.

Black Bean Sandbox (9)

In sum, the bin was a great one for keeping her busy and for introducing the upcoming holiday!

Black Bean Sandbox (6)

No-Cook Squishy Bags

No-Cook Squishy Bag (4)

I’ve made plenty of squishy sensory bags for Veronika in the past, but never before lots at once! The purpose of today’s activity was more about comparing and contrasting, rather than focusing on the way one particular material (i.e. shaving cream) felt within the bag.

I wanted to use small, sandwich-size zip-top bags since I’ve found these are easier for her hands, but I was running low! Instead, I used 3 small ones and 2 larger ones. The bags contained the following:

hair gel (tinted with green food coloring)

vanilla pudding

body lotion

ketchup

mustard

fingerpaint

No-Cook Squishy Bag (1)

I sealed each bag tightly. Here’s where the difference kicked in. Most of the bags were at room temperature, but the ketchup and the pudding were both very cold from the fridge. Meanwhile, I set the bag with lotion in a bowl of hot water until warmed through. (You can also microwave the bags for about 10 seconds, as I later did for the hair gel bag).

I presented them all to Veronika, and it was like a surprise each time she put her hand down. The lotion was warm! The pudding was cold!

No-Cook Squishy Bag (5)

The lotion was still warm! The ketchup was cold!

No-Cook Squishy Bag (2)

She loved moving her hands back and forth, and tended to ignore the ones that were just room temperature in favor of these two extremes.

No-Cook Squishy Bag (6)

She wanted to pick some of the bags up and give them a “tour” of the apartment. And of course she enjoyed the process of squeezing and squishing them!

No-Cook Squishy Bag (8)

This was a great game for talking about opposites in addition to being hands-on fun.

Silly Listening Ears (3)