Indoor Ice Caves and Snowball Fights

Indoor Fort (2)

Sometimes it’s too windy and cold to play in a snowstorm, but you can bring the snow in instead of sending the kids out. Imaginary snow, that is.

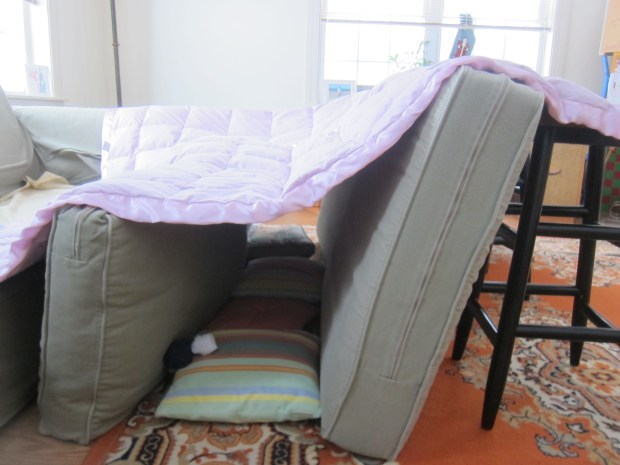
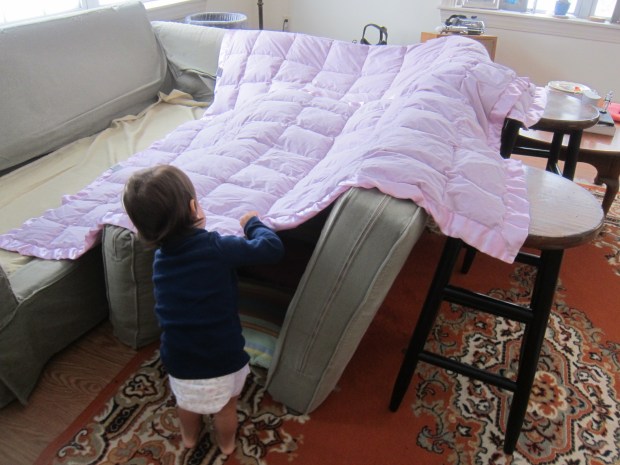
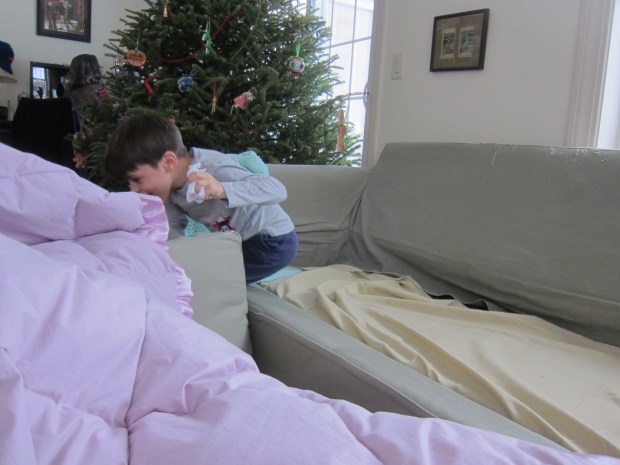
To wit, first I made Veronika an ice palace. Whether your kids pretend this is an ice cave, a snow fort, or a polar bear’s arctic den, imaginations will go wild as they crawl through any tunnel made with pillows and blankets. We went all out, adding blankets from the beds upstairs, not just the ones from the living room.

Indoor Fort (1)

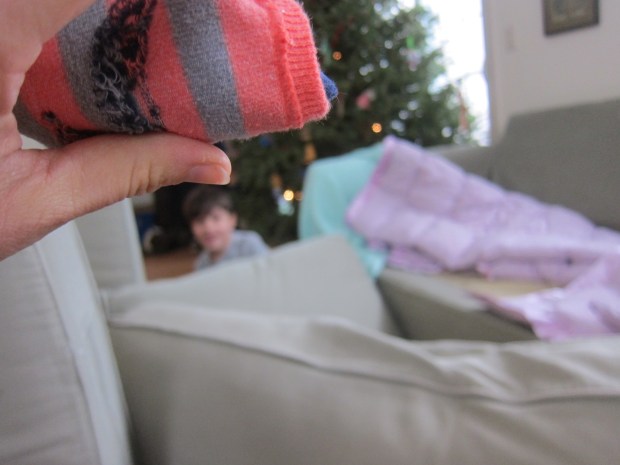
Veronika loved loading it up with “snowballs” (a.k.a. rolled up socks).

Indoor Fort (3)

And she was thrilled when she discovered a secret back entrance.

Indoor Fort (6)

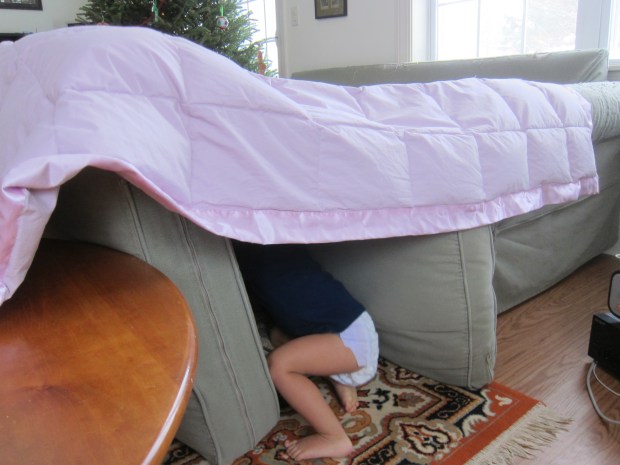
There was even a secret window to peek through halfway down the tunnel.

Indoor Fort (5)

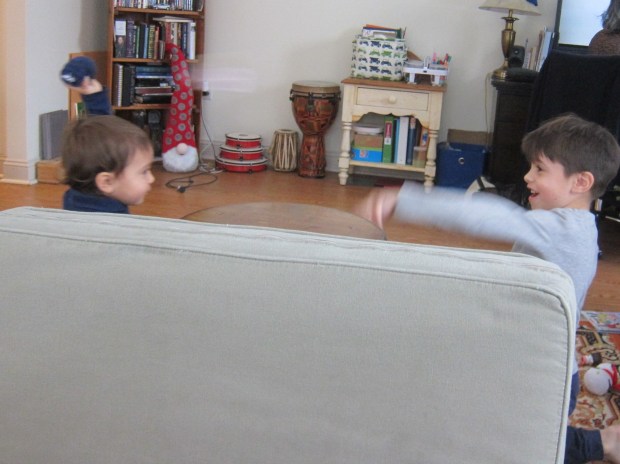
Then we split up the ice tunnel into two barricades and it became the perfect snow fort for a snowball fight!

Indoor Snowball Fight (6)

For snowballs, we simply balled up pairs of socks and added a few from crumpled white tissue paper. Now it was mommy versus Travis for all out war!

Indoor Snowball Fight (3)

Travis cackled with glee hiding behind his wall or popping up to pelt me.

Indoor Snowball Fight (7)

And he loved staging sneak attacks. Veronika may not have entirely understood, but she certainly picked up on the glee and soon tried her hand at tossing a few “snowballs”.

Indoor Snowball Fight (5)

Attack!

Indoor Snowball Fight (4)

By now I had two gleeful kids who would happily have played in their “snow fort” all day. I think at this point they were pretending it was a ski slope with avalanches rolling downhill!

Indoor Snowball Fight (8)

Don’t forget clean-up: Make it a race to see who can toss all those sock balls back into a bin the fastest.

Indoor Snowball Fight (1)

What will your kids do with an indoor snow fort? Please share in the comments!

Slippery Sledding Bin

Slippery Sledding Bin (4)

When your kids wake up to a huge snowstorm outside and sledding is in the near future, but it’s too windy and cold to go sledding just yet… Take the toys sledding instead!

I loved the set-up for this activity because it required only one ingredient: shaving cream. I turned a glass bowl upside down over a craft tray and sprayed liberally with shaving cream. The kids were sort of in awe that mommy was doing this!

Slippery Sledding Bin (2)

Smooth down into an even layer, then add toys and send them sledding! Lids from the kitchen make perfect sleds for Playmobil figures (we used one from a peanut jar).

Slippery Sledding Bin (1)

We also have a few Little People figures who came with their own skis and slids, and they were perfect for sending down the “hill”.

Slippery Sledding Bin (4)

Travis loved having figures face plant in the snow!

Slippery Sledding Bin (5)

Veronika just thought it was amazing to see how slippery and soapy the tray was, making it more of a sensory game for her.

Slippery Sledding Bin (7)

This was messy for sure, but a fun way to start the morning.

Slippery Sledding Bin (8)

‘Let It Snow’ Winter Town

Christmas Town (11)

Here’s a fun way to make a winter playset for kids, especially on days when it’s too cold to really go outside and play.

The first step is to paint toilet paper tubes white; the more tubes you have, the bigger your town will be! I considered having Veronika join in for this step of the project, but then decided to paint the night before so she wouldn’t have to wait for it to dry in the morning. I covered 4 tubes with white paint but then ran out and had to use sparkly silver on a few instead.

Christmas Town (1)

In the morning, the kids helped set up the rest of this little town. First we decorated the tubes with marker to make windows and doors. Veronika loved proudly scribbling.

Christmas Town (2)

Big brother Travis was very deliberate with his architectural features.

Christmas Town (3)

He was particularly proud of this triangular window!

Christmas Town (6)

For rooftops, we glued on white coffee filters (which I  had to trim slightly to fit). White cupcakes liners would work for this step, too.

Christmas Town (5)

For snowy streets, I showed the kids how to pull cotton balls apart slightly so they were light and fluffy, just like snow on the ground. You might even consider piling a few cotton balls together to make “snowmen”!

Christmas Town (7)

It was time to make our town sparkle with snow. Veronika wanted to use glitter glue and I only had purple, which spoiled the look slightly. But then we sprinkled over it with white glitter!

Christmas Town (9)

Now it was a sparkly, snowy scene!

Christmas Town (10)

Veronika loved adding play figures to wander in the streets of town. We included some seasonally-appropriate toys from her advent calendar, like a small Christmas tree and snowman.

Christmas Town (16)

She loved the way the soft cotton balls felt, and also enjoyed putting her toy people inside the tube houses. I guess they were staying cozy and warm!

Christmas Town (15)

What will go in your winter town? Please share in the comments!

Extra-Easy Melting Snowman

Easy Melted Snowman (3)

Veronika has enjoyed snowmen crafts lately, but since she’s too young to draw a snowman shape herself, the activities have required a lot of mommy guidance. The solution to letting her paint her own way? A melted snowman!

We made puffy paint yesterday that she loved so much I decided to use it again for this craft, although you can use regular white paint in a pinch. In a tray, I mixed up equal parts white glue and shaving cream until we had a puffy, sticky mixture.

Easy Melted Snowman (1)

She immediately started brushing it over a piece of construction paper. Anywhere at all was fine; this snowman has melted under the winter sun!

Easy Melted Snowman (2)

I made a second messy painting alongside her so we could have companion snowmen. Once the puffy paint dried, we used a glue stick to attach all of the accessories. Again, these can go anywhere on the paper that your toddler wants!

We added hats, carrot noses, and mittens cut from construction paper, and red pom poms for buttons.

Snowman Craft from Tin Cans

Snowman from Tin Cans (11)

Many years ago I tried to make a tin can wind chime with Travis that failed spectacularly because I didn’t have a proper way to string them together. This was an update on that idea for Veronika, with a winter snowman twist!

I set out three cleaned and dried cans on a tray, and told Veronika we needed to cover them with white paint. Even more fun, we used homemade puffy paint!

Snowman from Tin Cans (1)

I squirted a puddle of white glue onto our craft tray, then covered that with a layer of shaving cream. Mix it all up with a paint brush and start to paint the cans. Note: This is also a fantastic hack any time you need lots of white paint but don’t have much on hand.

Snowman from Tin Cans (2)

Veronika absolutely loved this paint and was quite serious about applying it to one of the cans while I worked on the other two.

Snowman from Tin Cans (8)

Once painted, we wanted to make them sparkly, so added some fake snowflake glitter. At this point I confess I questioned my sanity a little, because sticky puffy paint + fake snow sparkles = a spectacular mess. But she was having so much fun it was worth it!

Snowman from Tin Cans (5)

While I set the cans aside to dry, she kept playing with leftover snow sparkles, puffy paint, and a spare can on the tray for a while.

Snowman from Tin Cans (6)

I was pleasantly surprised with how fast the puffy paint dried. By the time she woke up from her nap, the cans were dry and it was time to turn them into a snowman.

Snowman from Tin Cans (4)

I used hot glue to add tidbits from our craft bin onto pieces of magnet tape. We used pom poms for eyes, black buttons for, well, buttons, and pipe cleaner pieces in red and orange for the mouth and carrot nose, respectively. You’ll need two magnets to make the red pipe cleaner piece curve into a smile.

Snowman from Tin Cans (7)

To attach the cans, I first made a hole in each with a hammer and nail. This isn’t difficult, but definitely a grown-up step.

Snowman from Tin Cans (9)

Next, I used a length of floral wire, inserting down through one can, then through a second, and then looping it so it wouldn’t come back up out of the hole. This was a touch tricky, so we decided to call it a win and have a two can snowman instead of a three can one.

Snowman from Tin Cans (10)

Now the magnet pieces will adhere right onto the tin cans, yes even through the puffy paint! As a final step, I twisted the top length of floral wire around our porch lamp outside so the tin snowman can dangle in the winter wind.

Snowman from Tin Cans (12)

Marshmallow Snowman Stamping

Marshmallow Snowman Stampers (7)

If your toddler loves dot markers, then edible dot markers are even better! To wit, all you need to make this craft are large marshmallows. We love the vegan ones from Dandies.

Marshmallow Snowman Stampers (1)

I set out a plate of the marshmallows along with a dish of white paint and black construction paper. I showed Veronika how to dip one end of a marshmallow in the paint and then onto the paper. It made a perfect circle!

Marshmallow Snowman Stampers (2)

Indeed, this craft was all about circles. The marshmallows make little circle prints, and if you help your toddler slightly, you’ll end up with three circles for a snowman: small, medium, and large. I highly recommend having a few marshmallows on the side just for eating so you can avoid paint on little tongues. Veronika loved snacking while we crafted!

Marshmallow Snowman Stampers (5)

The craft was easiest for her if I stamped an outline of the snowman first, which she then could fill in with her marshmallow stamp.

Marshmallow Snowman Stampers (3)

Once the paint dried, I cut out a few features from construction paper to glue down, like top hats, carrot noses, and tree branch arms. Add any final details with marker.

Marshmallow Snowman Stampers (6)

Why did we paint our snowmen on a black background? Because we finished the day with a read of Snowmen at Night, a book about all the silly things snowmen might get up to after dark. Hot cocoa and snowball fights? Yes please!

Marshmallow Snowman Stampers (8)

Gingerbread People

Gingerbread People (13)

Gingerbread cookies are the perfect baking project with a toddler. There’s messy dough to mix up, wonderful spices to smell, adorably-shaped cookie cutters, and little people to decorate. In sum, Veronika had lots of floury, sticky, sensory fun with this one!

Gingerbread People (1)

To start, we needed to make the dough. She loved smelling each spice before we added it into the dry ingredients!

Ingredients:

  • 1 tablespoon flaxseed
  • 3 tablespoons cold water
  • 1 cup shortening
  • 3/4 cup agave nectar
  • 1 cup molasses
  • 1 and 1/2 teaspoons baking soda
  • 1/2 teaspoon salt
  • 1 teaspoon ground ginger
  • 1 teaspoon ground cinnamon
  • 1 teaspoon ground cloves
  • 5 cups flour
  1. In a small bowl, whisk together the flaxseed and water; let stand for 5 minutes.
  2. In the bowl of a stand mixer, combine the shortening, agave, molasses, and flaxseed mixture; beat until combined.
  3. Combine the baking soda, salt, ginger, cinnamon, cloves, and flour in a large bowl. Add the dry ingredients to the wet ingredients and stir until combined. Wrap the dough in plastic wrap and chill for at least 1 hour.

Veronika loved watching the dough mix up in our stand mixer!

Gingerbread People (2)

And as you can see, she also loved taste-testing right from the bowl!

Gingerbread People (4)

She marveled at how sticky the dough was as we wrapped it in plastic to chill in the fridge.

Gingerbread People (3)

Once the dough had chilled, we rolled it out on a generously floured surface, then used gingerbread man cookie cutters to cut out our little people. I gave Veronika a plate filled with decorating goodies: raisins, almonds, licorice strips, and small jelly bean candies. It was up to her to decorate!

Gingerbread People (6)

She thought this was delightful! She loved giving the people eyes and a “skirt”.

Gingerbread People (7)

Since I knew her cookies risked getting broken or mashed, I worked alongside her to ensure we had enough people for a few real batches of cookies.

Gingerbread People (12)

Big brother Travis thought it looked so fun that he needed to join in the action!

Gingerbread People (8)

He was so proud of this very ornately-decorated fellow, with almond shoes and licorice shirt sleeves.

Gingerbread People (11)

Once the people have been fully adorned, bake at 375 degrees F for 10 minutes. And then comes the best part of all; it was time for a taste test!

Gingerbread People (9)

You might consider ending the day with a read of the classic Gingerbread Man tale.

No Mess Paper Plate Snowflakes

No Mess Paper Plate Snowflakes (9)

Last week, Veronika painted snowflakes with q-tips, a great toddler method with very little mess. Today’s version meant even easier clean-up, since all the paint was inside a zip-top plastic bag!

To start, I cut out snowflakes from paper plates. I folded each plate in half, then in half again, and snipped out triangles, ovals, and heart shapes. Open back up to reveal the “snowflake” to your child.

No Mess Paper Plate Snowflakes (2)

In retrospect, I would have scalloped the edges, too, for a prettier result. Veronika sure thought this was neat, though, and loved sitting beside me with her own pair of safety scissors!

No Mess Paper Plate Snowflakes (1)

Place each plate in a large zip-top bag and add a little bit of silver and blue paint. You can also add a little glitter to each bag, but since we happened to have glitter paint, everything went in all at once! I sealed the bags and showed Veronika how to mush the paint around with her hands until the plate was painted.

No Mess Paper Plate Snowflakes (3)

She was so surprised when she first reached down and realized she could touch the paint but not get messy. And then she just really enjoyed it! I helped a little to spread the paint to the edges of the plates.

No Mess Paper Plate Snowflakes (5)

It took a little trial and error to figure out the right amount of paint to use. Too much and the plate was so saturated that it ripped upon removal from the bag. Too little and you won’t be able to spread the paint far enough. So my recommendation is to start with less than you think you need and work your way up.

No Mess Paper Plate Snowflakes (6)

Next time, I would use a little white paint, too, since the blue dominated over the silver. Still, they turned out pretty!

No Mess Paper Plate Snowflakes (7)

Let the plates dry completely, then hang the snowflakes around the house for a winter snowstorm.

Winter Road

Winter Road (1)

What do you do when the kids want to play in the snow but you only have a thin, icy layer that’s not great for making snowmen? Make a road, instead!

I did this the easiest way ever, not even a shovel required. Instead, I took a few old markers and drew the outline of a road directly onto the snow.

Winter Road (2)

Now all the kids had to do was drive along the track.

Winter Road (3)

We added a few cross streets and curves to our road, and even a little stop sign for an early lesson on road safety.

Winter Road (5)

I had mostly intended the track for Veronika, but it turned out that big brother Travis loved driving the cars, too.

Winter Road (6)

Construction vehicles were particularly fun, like our bulldozer and dump truck which could scoop up snow or be filled with it.

Winter Road (7)

The icy wind drove us indoors fairly quickly, but at least we got in a little creative snow play!

Winter Road (4)

Coloring the Snow with Droppers

Coloring Snow with Droppers (11)

We have snow, but it’s not the soft fluffy kind you’d want to roll around in. This snow iced over pretty quickly in a thin layer on the ground. So it was the kind of snow to take inside!

I scooped some of the snow onto a tray, and set it out alongside pipettes and liquid watercolors (in the compartments of an ice cube tray). Because I only had 3 colors of liquid watercolor, I added food coloring to a few compartments, too.

Coloring Snow with Droppers (1)

I showed Veronika how to dip a pipette in one of the colors, squeeze to fill it up, and then squeeze again to release the color over the snow.

Coloring Snow with Droppers (2)

She loved watching the colors appear against the white snow. “It’s yellow!” she exclaimed with delight for her favorite color.

Coloring Snow with Droppers (5)

It was hard for her to get the mechanics of filling and releasing the pipette, but that was totally fine since this is the first time I’ve introduced her to the tool.

Coloring Snow with Droppers (4)

She was so proud of her work nonetheless and did a lot of simply stabbing at the snow, or dipping the tip of the pipette into the colors and brushing it over the snow like a paintbrush.

Coloring Snow with Droppers (6)

We mixed colors, too, (although our mix of red and blue looked more black than purple), which was good for a quick art lesson. After she tired of that, we put small chunks of snow directly into the ice cube tray, which now only had a shallow layer of each color. The color would saturate the snow immediately, which was fun to watch.

Coloring Snow with Droppers (9)

Veronika worked so seriously to move the snow pieces over to the ice cube tray with tongs; another tool to hone her fine motor skills!

Coloring Snow with Droppers (8)

When your toddler tires of the play, clean up couldn’t be easier. Simply put your snow in the sink and let it melt!

Coloring Snow with Droppers (10)