Baby Oil Sensory Bag

Baby Oil Bag (4).JPG

If you’re looking for a safe way to incorporate messy materials into play with the under-one-year-old set, then gallon-sized plastic bags are your perfect solution. To wit, Veronika has “painted” in a plastic bag, and today we used baby oil for a fun sensory experience.

Pour some baby oil into the bag. Add a few blobs of food coloring.

Baby Oil Bag (2)

I went with a blue theme simply because that was what I had on hand, and added blue buttons and blue pony beads as well.

Now all she had to do was squish! The food coloring is fun, because your baby can chase the blobs around in the baby oil, much like blobs in a lava lamp.

Baby Oil Bag (3)

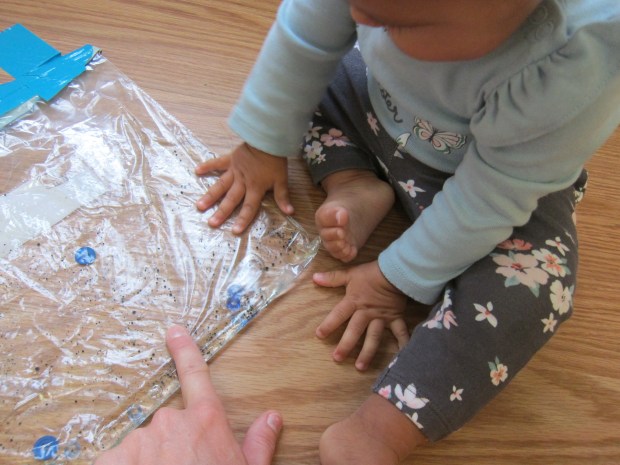
If your baby is as hands-on as Veronika, you’re going to want to duct tape along the sealed closure for extra security.

Baby Oil Bag (5)

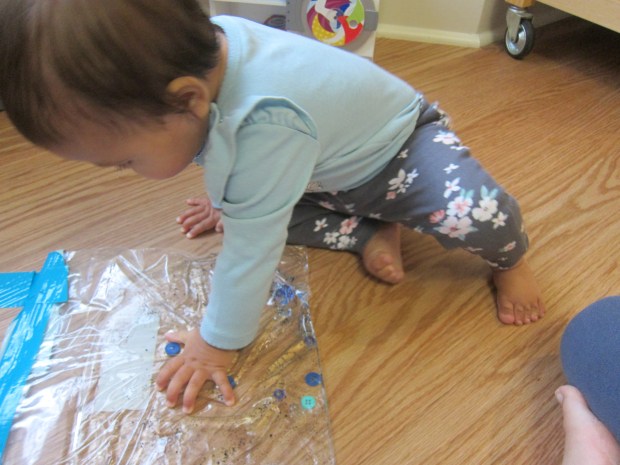
It was also helpful to duct tape the bag to the floor, because this focused her play on squishing items around within the bag, instead of picking up the whole bag and smooshing it in her hands.

Baby Oil Bag (6)

What hands-on fun for a weekend morning!

Dragonfly Fishing

Dragonfly Fishing (9)

When I spotted this craft in Travis’s latest issue of Highlights, I knew it was going to be more of a mommy project. Since Highlights appeals to kids up to age 12, some of the activities inside are a bit complicated for my kindergartner. But I knew he’d love the water-powered dragonfly, which relies on hydraulics to scoop up little homemade “flies”.

To start, tint a bowl of water with blue food coloring. Use a medical oral syringe to inject water into 3 feet of air-line tubing, and then fill the syringe.

Dragonfly Fishing (1)

Remove the air from a second oral syringe, and insert these into the ends of the piping. I found it useful to duct tape around the connections for added security.

Dragonfly Fishing (2)

Use hot glue to attach two jumbo craft sticks so they overlap slightly. Glue the water-filled syringe onto one end of the craft sticks.

Dragonfly Fishing (3)

Next, glue the bottom half of a paper cup to the other end of the craft sticks. Although not necessary, we painted our cups green. Glue a second bottom half of a paper cup to the end of the syringe’s plunger; your two cup tops should touch.

Use washi tape or thin duct tape to secure the tubing to the end of the craft sticks, below the filled syringe. Tape a 1-foot dowel to the empty syringe and tubing, as shown.

Dragonfly Fishing (6)

For the finishing touch, we made a dragonfly out of cardstock, adding eyes and wings outlined in marker. Glue this onto the craft sticks above the cups.

Dragonfly Fishing (5)

For our “flies,” we decorated yellow pom poms with cardstock wings (cut a heart shape from white cardstock) and wiggle eyes.

Dragonfly Fishing (4)

Now it was time to test the hydraulics! Release the water from the first syringe. Ideally, it will power the second syringe, which powers the cup “mouth” to open.

Dragonfly Fishing (8)

See if you can scoop up your flies!

Dragonfly Fishing (7)

Apple or Banana Yogurt

Apple Yogurt (2)

If you want to introduce yogurt to your baby, adding fruit is a great way to incorporate a little sweetness without buying a sugary variety. For both of these recipes, I use almond milk yogurt.

Apple Yogurt:

  • 3 tablespoons plain non-dairy yogurt
  • 2 tablespoons applesauce
  1. Stir together until combined.

Apple Yogurt (1)

Banana Yogurt:

  • 1 ripe banana
  • 1 (5-ounce) container plain non-dairy yogurt
  1. Mash the banana with a fork until very smooth. Stir in the yogurt.

Banana Yogurt (2)

The latter recipe is best served immediately, or you can freeze it in the cubes of an ice cube tray for high chair shenanigans.

Banana Yogurt (1)

Shall I Pour?

Shall I Pour (7)

Pouring dry items from cup to cup is a fantastic way to build the fine motor skills that will one day allow your little one to pour liquids. Don’t expect your baby to be pouring his or her own water and juice after this game, but it is great practice and cute fun!

I put a soft blanket down on the kitchen floor, then filled two cups with O cereal and left two cups empty (one set for me, one for Veronika).

Shall I Pour (1)

Once I had her attention, I showed her how to pour the cereal from a full cup to an empty one.

Shall I Pour (2)

“Watch me pour!” I instructed.

Shall I Pour (4)

Well at first she was simply delighted to discover that the game involved a snack. Yum!

Shall I Pour (3)

She also seemed to love the visual of the cereal trickling from one cup to another.

Shall I Pour (8)

After showing her a few times, her hand reached out to mimic me, which I had anticipated; ten-month-olds are fantastic mimics!

Shall I Pour (9)

She tried her own hand at pouring…

Shall I Pour (5)

…and then just wanted to play with Os and cups. As I said, don’t expect your baby to be a pro after the game (your play space will probably look like mine, below), but your little one will have a blast!

Shall I Pour (10)

Magical Realism

Magical Realism (3).JPG

This lesson on a popular Latin American genre was meant to accompany the chimichurri sandwiches in Travis’s Raddish Kids crate. It was a bit advanced for a kindergartner, but Travis got into it!

First I taped a large piece of craft paper to the wall with two columns and labeled them “real” and “magical”. I asked Travis to name real items first. The list he came up with certainly isn’t the one I would have, but that was part of the lesson’s charm!

Magical Realism (1)

I thought “magical” might be harder for him but he was familiar with concepts from favorite stories, including “magic wand” and “the Force.” I pointed out to him the key to the magical realism genre: a story that takes place in a real setting, but that has magical elements that the characters accept to be real.

With that definition in place, we followed up with concrete examples: a book and a movie. First he watched James and the Giant Peach, a great example because it starts out with live actors and then transforms to animation once the magic sets in.

Next was a read-aloud of Where the Wild Things Are and Travis pointed out the magical components of the story as we came to them.

As a final task, we made up our own magical realism story. You can run through the elements of a story with your kids first, namely:

Characters

Setting

Problem

Solution

Travis’s tale was a bit simplified, but it centered around a vortex that opened up (magical!) while he was playing with his friend on the school playground (real!) where an alien came to meet them.

Magical Realism (4)

The alien had 14 eyes and 34 legs. What creativity! There wasn’t exactly a problem or solution to his tale, but for a kindergarten, it was a great first intro to this genre.

Bouncing Monkey

Bouncing Monkey (4)

What’s not to love about the Five Little Monkeys rhyme? It’s educational (counting), involves a cautionary tale (don’t jump on the bed!), has fun rhythm and words, and… there’s bouncing!

Today, Veronika and I did exactly what the rhyme cautions not to: bouncing on the bed! I supported her firmly and bounced her up and down as I recited the words, enlisting big brother’s help to capture the huge grin on her face.

Bouncing Monkey (5)

For extra fun, we added props! Our book of the rhyme has touch-and-feel elements on the monkey’s faces, and I added a phone so we could “call” the doctor whenever we reached that line.

Bouncing Monkey (1)

Even more fun was bouncing along a stuffed monkey friend, to make the verse come alive for her.

Bouncing Monkey (6)

In case you need a refresher, here are the words:

Five little monkeys bouncing on the bed.

One fell of and bumped his head.

Mama called the doctor and the doctor said,

“No more monkey business bouncing on the bed!”.

Repeat with four monkeys, then three, then two, then one. Then no more monkeys!

Bouncing Monkey (3)

Old-Fashioned Apple Slump

Apple Slump (2)

It’s apple picking season and we recently returned home with a bounty of ginger golds from a local orchard! It was the perfect opportunity to test out a recipe near and dear to my heart.

The recipe comes from Louisa May Alcott, known to many as the author of Little Women. Alcott lived in my hometown, and her story and life have always been an inspiration. So when we recently attended a local apple festival and brought home the recipe, Travis and I couldn’t wait to find out what an 1800’s apple dessert tasted like! We updated it slightly for a modern kitchen and vegan lifestyle.

Ingredients:

  • 6 tart apples
  • 2 tablespoons lemon juice
  • 1/2 teaspoon vanilla extract
  • 1/2 cup brown sugar
  • 1/2 teaspoon cinnamon
  •  1/4 teaspoon salt
  • 1 and 1/2 cups whole wheat flour
  • 1/3 cup sugar
  • 2 teaspoons baking powder
  • 2 Ener-G eggs
  • 1/2 cup unsweetened almond milk
  • 6 tablespoons melted Earth Balance butter
  • 1/2 cup chopped walnuts
  1. To prepare the apple base, peel, core, and slice the apples. Place in a bowl and stir in the lemon juice and vanilla. Add the brown sugar, cinnamon, and salt, stirring until the apples are coated.
  2. Spoon into a 9×13-inch baking dish coated with cooking spray. Bake at 350 degrees F for 20 minutes.
  3. Meanwhile, prepare the topping: In a bowl, combine the flour, sugar, baking powder, Ener-G eggs, milk, and butter, stirring gently until combined.
  4. Pour the flour mixture over the apples, spreading slightly, and sprinkle evenly with the walnuts. Bake an additional 25 minutes.

Apple Slump (1)

Unwrap

Unwrap (1)

Now that Veronika is old enough to understand a good surprise, this little bath time game was a big hit. It’s as simple as this: I showed her a toy, and then wrapped it up in her washcloth.

Unwrap (2)

Where did owl go?

Unwrap (3)

She eagerly grabbed at the cloth and figured out how to work her way through the layers to the owl. She looked quite pleased, although she may have enjoyed the washcloth “prize” a bit more!

Unwrap (4)

As she turned her attention to a little foam bear, I pulled that one aside and made sure she saw it go into the washcloth next.

Unwrap (6)

I wrapped him up… and she got to “unwrap” a present!

Unwrap (5).JPG

If you prefer a dry version of this game, babies love unwrapping their toys from wrapping paper or tissue paper. What’s old is instantly new again! Who says presents are just for birthdays?

Roly-Poly Pictures

Roly Poly Pictures (7).JPG

This rolling “book” is a fantastic craft to put together for your baby. It’s a toy and a book at the same time, with so many possibilities for play!

Cut out pictures from magazines that feature items your child will recognize.

Roly Poly Pictures (1)

Good candidates include animals (big brother’s Ranger Rick is full of good pictuers!), foods (apples, veggies), everyday items (watches, shoes), or holiday and seasonally themed images (like pumpkins and leaves).

Veronika loved “going through” the magazines with me!

Roly Poly Pictures (2)

I glued all of the pictures around an empty oatmeal canister. Any food box that is cylindrical would work just as well. Cover with a layer of clear contact paper to ensure your little one doesn’t rip the pictures right off.

Roly Poly Pictures (3)

At first I just showed the cylinder to Veronika to see how she would interact with it.

Roly Poly Pictures (4)

Next we played roly poly along the floor!

Roly Poly Pictures (8)

But here’s where this toy gets educational. As it came to a stop, we talked about which picture it landed on.

Roly Poly Pictures (6)

This becomes a great leaping off point to discuss colors, nouns, or little stories about the pictures. “Once upon a time there was a little cat…” The possibilities are almost endless!

Roly Poly Pictures (5)