Play Dough Suncatcher Craft


Playdough Suncatchers alt

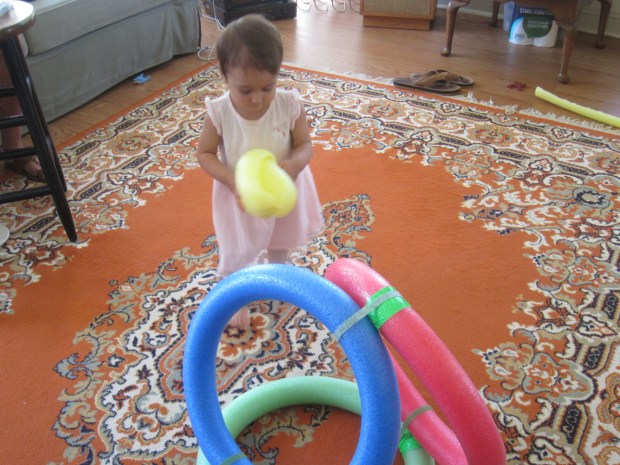
You can never go wrong with a morning of play dough play, but to add a fun twist when I pulled out all the colors for Veronika this morning, I thought it would be fun to make suncatchers.

Playdough Suncatchers (1)

I showed Veronika how to press small pieces of color into an empty yogurt container lid.

Playdough Suncatchers (2)

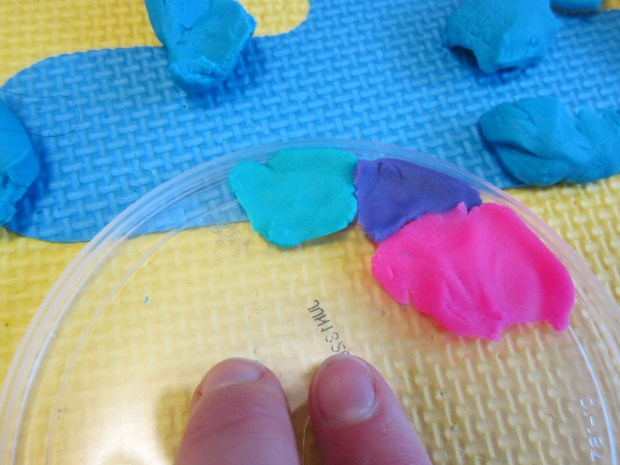
She loved to help mush them in, which was great for fine muscle development!

Playdough Suncatchers (3)

Even more, though, she loves to tear play dough into tiny pieces.

Playdough Suncatchers (4)

That meant she unwittingly created the perfect size pieces for me to gather up and arrange in the lids, alternating colors as much as possible.

Playdough Suncatchers (6)

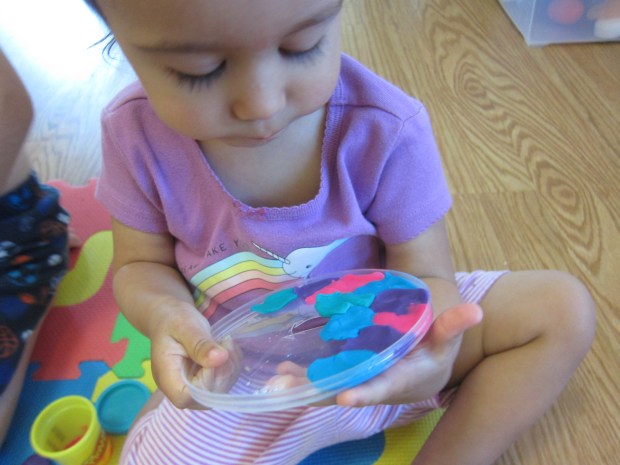
We filled two lids this way!

Playdough Suncatchers (7)

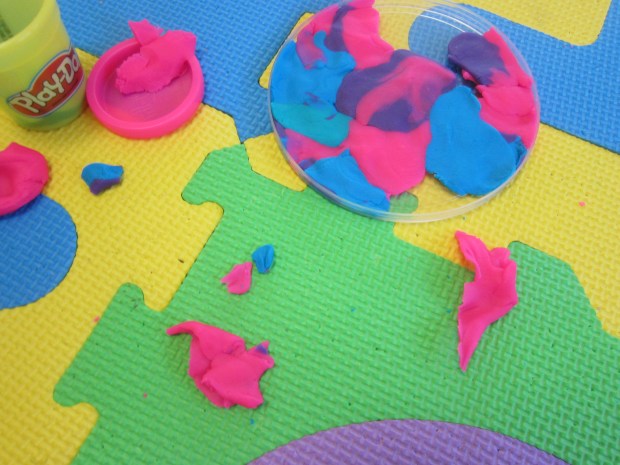
In order to hang them once complete, I cut two pieces of string and made a loop for each suncatcher, securing with an additional blob of play dough.

Playdough Suncatchers (9)

Let the play dough harden and dry overnight, and then you can hang these the next day to catch the morning sunlight.

Playdough Suncatchers (8)

At first I suspended them in the plastic lids. But then I realized the play dough had set enough that I could pop them out from these molds and simply hang in the window. Even prettier!

Playdough Suncatchers var


“We Love You Because…” Scavenger Hunt

We Love You Hunt (5)

This love-filled hunt was the perfect way to bring a smile to dad’s face this Father’s Day! You could also use this cute twist on a scavenger hunt for anyone’s birthday, or at Valentine’s Day.

I first traced hearts on construction paper using cookie cutters, making one large heart and 10 small ones. We used pink paper (for love of course) as well as orange because that’s daddy’s favorite color!

We Love You Hunt (1)

Travis helped me brainstorm a list of all the things we love about daddy. I loved leaving this up to him, ranging from the big (he’s daddy so we love him!) to the small (like references to games they play).

We Love You Hunt (2)

We then had fun secreting the pieces of paper all around the house in places that dad was sure to find them throughout his day, like on the coffee pot or near his desk.

We Love You Hunt (3)

Then it was time to surprise daddy with the large heart, which read, “We love you because…” And off he went to find the 10 reasons. The kids looked so proud leading the way on the hunt, and of course their dad loved it.

We Love You Hunt (6)

Who will you make a scavenger hunt for? Please share in the comments!

Tea Scented Ice Sensory Play

Scented Ice Play (7)

We’ve been busy with ice lately during a heat wave, and today we added an olfactory element to the fun: ice cubes scented with tea! You’ll want strongly scented teas for the best results with this activity. Think flavors like cinnamon, maple, ginger, mint, or other bold scents.

Scented Ice Play (1)

The night before, I brewed strong cups of 3 tea varieties, using 3 or 4 tea bags for each mug of hot water. Let cool and then pour into the compartments of an ice cube tray.

Scented Ice Play (2)

Partly to add a visual sensory element to the game and partly just so I would remember which cube was which, I also color-coded the three different teas with food coloring. Yellow was for peppermint, red for cinnamon apple, and blue for maple ginger.

In the morning, it was HOT out on our patio and the ice was frozen solid, the perfect combination.

Scented Ice Play (3)

The ice cubes came out of the tray within moments. I held each different scent up to Veronika’s nose in turn. Look how happy the maple ginger made her!

Scented Ice Play (4)

She loved leaning in for a big whiff of each, asking for “more more” insistently since at first the cubes were too cold for her to touch and lift.

Scented Ice Play (5)

Then she wanted to take a lick! She loved the peppermint best.

Scented Ice Play (6)

As the ice melted, the yellow, blue, and red coloring began to trickle off. I couldn’t decide if I was glad I’d used color or not. The kids were more into the smells and tastes anyway, not the sensory look of the colors, and it just meant messier fingers. But oh well!

Scented Ice Play (8)

And then they discovered that the ice on the hot patio melted in a matter of seconds.

Scented Ice Play (9)

I guess this disproves the theory that watching ice melt is dull!

Scented Ice Play (11)

Both kids loved smelling the tea and swirling the cubes and tasting until the last drop of ice had melted.

Scented Ice Play (10)

A perfect sensory experience for a hot morning.

Shaving Cream Fingerpaint

Shaving Cream Fingerpaint (11)

There’s more to this activity than just the sensory fun of shaving cream or the artistic fun of colors and “painting”; half the fun was doing the activity right on the tabletop!

I squirted about half a can of shaving cream onto the kids’ table, which immediately piqued everybody’s interest, Veronika and big brother alike.

Shaving Cream Fingerpaint (1)

The curiosity grew once I added drops of food coloring throughout.

Shaving Cream Fingerpaint (2)

Now it was time for the real sensory fun to begin! I demonstrated for Veronika that she could put her hands right in the mixture, either to swirl the colors around or just to get messy.

Shaving Cream Fingerpaint (3)

Interestingly, she was hesitant at first, but soon a little finger dipped in. Foamy!

Shaving Cream Fingerpaint (4)

The sensation must have made her quite happy because it merited a little swirling dance.

Shaving Cream Fingerpaint (8)

After that, though, I couldn’t quite tell if she liked the shaving cream or was a little afraid of it. She did lots of delicate dabbing, but never got as messy as I had anticipated.

Shaving Cream Fingerpaint (9)

Big brother Travis tried his hand gladly and liked creating “animal footprints” through the shaving cream.

Shaving Cream Fingerpaint (7)

Veronika preferred just having some of the shaving cream on her palms. She smooshed her hands together and admired both the creaminess and the color left behind. Then it was time to wash! And the shaving cream mixture wipes off of the table like a dream.

Shaving Cream Fingerpaint (10)

Overall, this wasn’t the best version of fingerpainting we’ve done as far as producing art. But it was still a great sensory experience.


Pool Noodle Seahorse

Pool Noodle Seahorse (5)

It was time for the last of our pool noodle crafts this morning, and it turned out to be the biggest and best yet!

To start, curl the end of one long pool noodle so it resembles a seahorses’s curlicue tail. Secure with garden Velcro strips.

Pool Noodle Seahorse (1)

For the head, curl down the top 10 inches or so of a second pool noodle; secure with a garden strip. We then glued on two foam eyes (alternatively, use sticky-back foam and eliminate the need for glue).

Pool Noodle Seahorse (3)

Travis loved helping with the mane; snip a piece of craft foam to create fringe, then make a slit in the seahorse’s head with scissors and insert the foam.

Pool Noodle Seahorse (2)

Now tape the head and tail pieces together securely with duct tape. Our original seahorse seemed a bit too tall, so I cut about 6 inches from each noodle and then taped them. Now it was the perfect height. Travis was immediately galloping his seahorse around!

Pool Noodle Seahorse (6)

Little sister loved it so much that we needed to make a mini version from just one pool noodle!

Pool Noodle Seahorse (4)

As with the Ball Toss game we made, yes you could use the seahorse in a real pool, but the kids were ecstatic even on dry land. So don’t feel like you need to wait for water before making this craft!

Pool Noodle Sprinkler

Pool Noodle Sprinkler (8)

Here was the perfect project for a day that hit 90 degrees even before noon: turn a pool noodle into a sprinkler to cool off!

We’ve been having lots of fun with pool noodles the past few days, but this was the first time we added water to the mix. Travis loved helping with the set up. Use a sharpie to make dots on a long pool noodle, spaced about 5 or 6 inches apart. Poke through with a skewer.

Pool Noodle Sprinkler (1)

Cut a small piece of foam from a second pool noodle to plug up one end of the long pool noodle. Leave the other end open.

Pool Noodle Sprinkler (2)

Now it was time to get wet! We headed outside and hooked up a garden hose to the faucet, and inserted it into the noodle. Turn the hose on gently and increase the flow as needed.

Pool Noodle Sprinkler (3)

Both kids loved it right away!

Pool Noodle Sprinkler (6)

Our sprinkler turned out to be better for getting hands and feet wet than for running through, but they both seemed just fine with that.

Pool Noodle Sprinkler (5)

The “sprinkler” was also a little faulty; too little pressure and the water wouldn’t rise up through the holes. Too much and the plug on the other end flew out! (You can help avoid this risk if you use a zip-tie to secure the plug, but we had skipped that step).

Pool Noodle Sprinkler (4)

Nonetheless, the kids loved it, even when the hose came out wildly and added to the splashy fun. One thing is for sure: we’ll be using this sprinkler again as the hot summer continues!

Pool Noodle Sprinkler (7)

Salt Painting, Two Ways

Salt Painting (6)

Today Veronika made art with salt! We tried two variations on this project, and I definitely preferred the former. But test them both out and see which one your child enjoys more!

For the first, you’ll need small empty spice containers, or any similar container with small holes in the lid. In each jar, I combined a little bit of salt with a little bit of powdered paint. Put the lid on securely and shake to combine.

Salt Painting (1)

Veronika then helped squeeze glue onto dark construction paper. Squeezing glue bottles is great for strengthening little hands, so resist the urge to help out too much!

Salt Painting (2)

Once we had a nice gluey canvas, I showed her how to shake the containers. Not only did they make a great noise, but she loved watching the colored salt sprinkle down.

Salt Painting (5)

She liberally poured, but it was easy to tip the paper and shake off the excess when it was time to set her masterpiece aside to dry.

Salt Painting (10)

Now on to version number two! This time, we made big blobs of glue on the paper. Instead of colored salt, we poured on regular salt.

Salt Painting (7)

Then we added little pools of food coloring for her to swirl through with a paintbrush.

Salt Painting (8)

Unfortunately this project got goopy very quickly. I would use less glue and less food coloring next time! But she enjoyed the messy process, and seemed very curious about the thick mixture tangled in the bristles of her paintbrush.

Salt Painting (9)

Which one did your family like best? Please share in the comments!

Kindergarten Home School Week 14: Thursday

last day (1)

We did it! My son is a Kindergarten graduate and I successfully taught seventy days of home school. There were tears and smiles, tantrums and triumphs, and lots of learning along the way for everyone involved. Thank you to the readers who have followed along on this journey, something I never intended to do or blog!

It would have been cruel to make it a full school day for Travis, knowing that summer was mere hours away. So here’s a quick rundown of the morning.

9-9.30: Workbook pages. Travis had only a few pages left in his workbook, including: ELA (adjectives and a poem), math (addition), and social studies (map reading). He zipped through them and put all the final stickers on his progress poster.

last day (5)

9.30-9.45: Math. We got in exercise and math by skip-counting as we tossed a ball. We did this by both 10’s and 5’s to 100, a perfect review before summer!

last day (9)

9.45-10: Specials. Travis recorded himself singing his favorite song from Music this year. He then watched a final story in Spanish (The Three Little Pigs) and an Adios song.

last day (6)

10-10.30: Snack/storytime. Travis’s teacher had sent links to 2 final books to watch: Mrs. Bindergarten Celebrates the Last Day of Kindergarten and This Year Was Different.

last day (4)

Well how about that! We needed to celebrate with vegan ice cream, of course.


Pool Noodle Ball Games

Pool Noodle Ball (12)

After making marshmallow launchers with pool noodles, today we got even craftier with them, setting up two silly sports: a Ball Toss and a Golf Game.

For the former, you’ll need to first make the “hoop”. Fold three long pool noodles into a circle and secure with Duct tape. Travis was so proud helping me with this step, definitely a two person job. Repeat two times, for three rings total.

Pool Noodle Ball (1)

Use garden Velcro strips to attach the three rings together in sort of a triangle, as shown.

Pool Noodle Ball (3)

To make the ball, cut a pool noodle in half vertically. Tie each half into a knot, and fold the ends in.

Pool Noodle Ball (2)

It was a bit tricky to get the knot tight, but the tighter it is, the rounder your ball.

Pool Noodle Ball (15)

Time to slam dunk!

Pool Noodle Ball (6)

This game would of course be awesome to play in a pool, but we loved it even on dry land.

Pool Noodle Ball (9)

As you can probably guess, the ball and rings alone were great fun to play with, even when we weren’t keeping score.

Pool Noodle Ball (10)

Then we repurposed the pool noodles to set up the latter game outside. Highlights magazine billed this as golf, but it looked more like croquet to me! For your wickets, fold a pool noodle into an arc and anchor into the ground using two wooden skewers.

Pool Noodle Ball (11)

For a club, cut a notch near the bottom of one long pool noodle. Bend and secure with duct tape to hold the curvature in place. Travis thought this was fun, but then declared it too easy! We’ll have to think of ways to make it trickier.

Pool Noodle Ball (13)

Looking for other ways to get moving at home this summer? Check out some of the simple “sports” we set up last week.

Pool Noodle Ball (7)

Feather Painting

Feather Painting (4)

It’s fun to give toddlers something other than a paint brush to paint with, whether a cotton ball, an ice cube, or even just their fingers. Today, Veronika got to try painting with feathers, plus a few other items from nature!

I had some brightly colored feathers from the craft store that were perfect for this activity. To set up, I filled three cups with different colors of paint and added a little glue to each, making the mixture slightly sticky.

Feather Painting (1)

Veronika loved dipping the tips of the feathers in the cups…

Feather Painting (2)

…and then transferring over to her paper. She loves to say “dot dot dot!” as she paints and watches the color appear. The feathers themselves fascinated her, too.

Feather Painting (3)

Whenever one became too limp and saturated with paint, we simply added it to the painting and grabbed a fresh “brush”. As the gluey paint dries, the feathers will stick and become part of the final masterpiece.

Feather Painting (8)

We then decided to try the activity with other items, this time truly from nature and not a craft store. In the yard, we found “brushes” from pine needles and leaves.

Feather Painting (6)

Time to repeat the process! Dip the edges in the paint, use them as your brush, and whenever one gets too painty, it becomes part of the artwork!

Feather Painting (7)

These turned out so pretty! I loved that the tactile feel of the different nature items was just much a part of the activity as the paint was.

Feather Painting (9)