Dropping Games

Dropping Game (6)

Chances are your toddler sometimes throws a tantrum by dropping objects, a tactic that I find far more adorable than effective. It’s a good thing tantrums are so darn cute at this age! Harness that toddler love of all-things-dropping with this fun game, and you might just turn a tantrum into giggles.

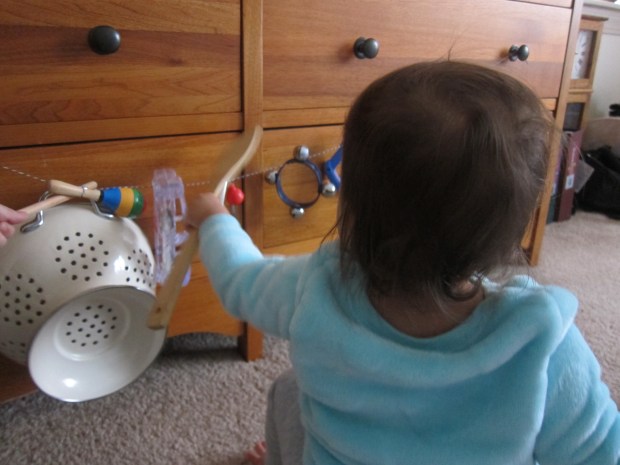
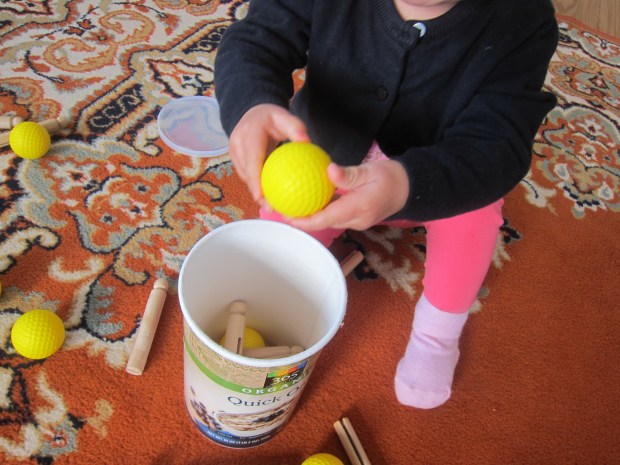
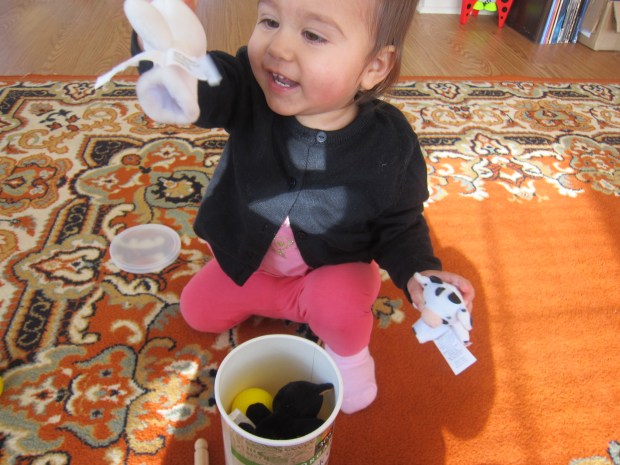
When we first played, Veronika was in a good mood. The idea was just to have fun dropping! Over an empty oatmeal canister, we dropped in clothespins (the non-pinching kind) and small golf balls.

Dropping Game (2)

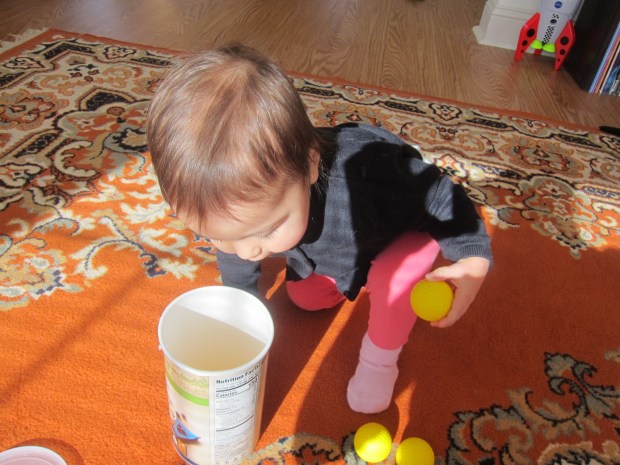
Veronika loved peering inside to see where the items landed, as well as the “plink” that they made as they fell.

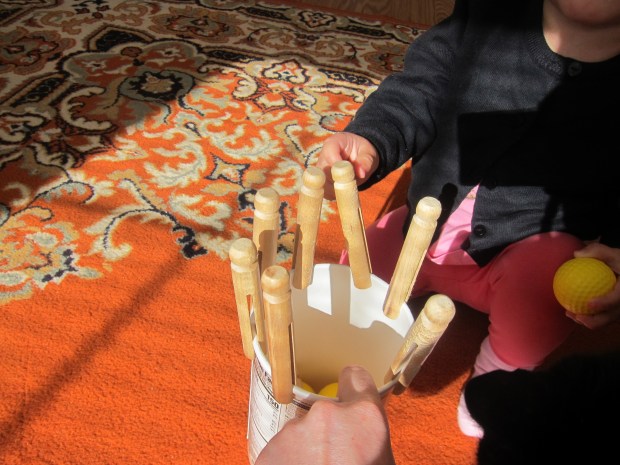
For a little extra strength-building, put the clothespins on the edge of the canister so your child has to pull them off before he or she can drop them in.

Dropping Game (3)

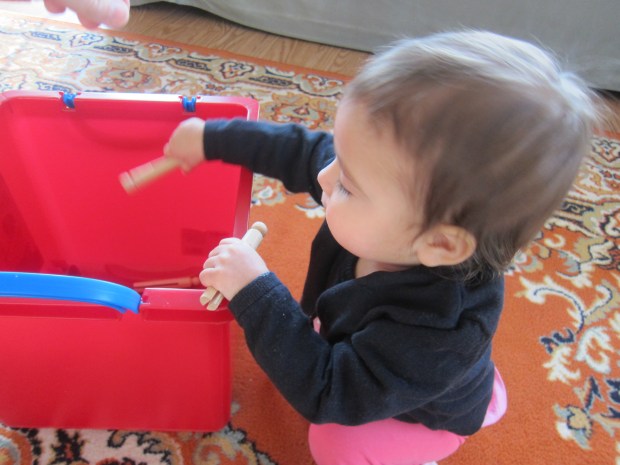
I also encouraged her to stand up so she could see the items falling from a greater height. This turned out to be easier using a large storage container instead of the small oatmeal one. If you’re comfortable with the idea, you could even let your child stand on a chair for greater height!

Dropping Game (1)

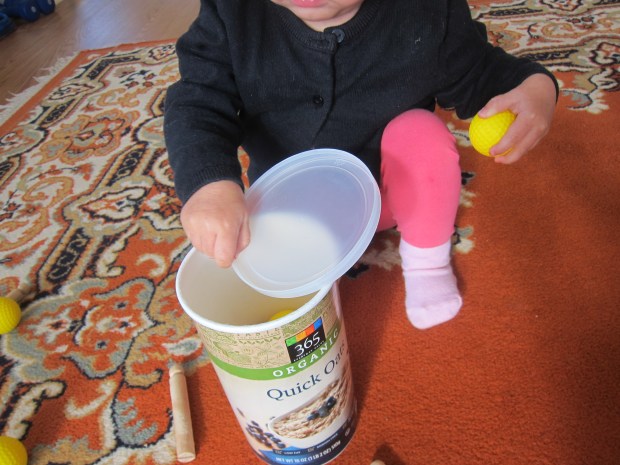
Returning to the oatmeal container: once it was full, we put on the lid and rolled it across the floor.

Dropping Game (4)

Then she delighted in prying off the lid to begin again.

Dropping Game (7)

Drop anything else in the container that seems fun, too! Little stuffed toys got lots of giggles.

Dropping Game (8)

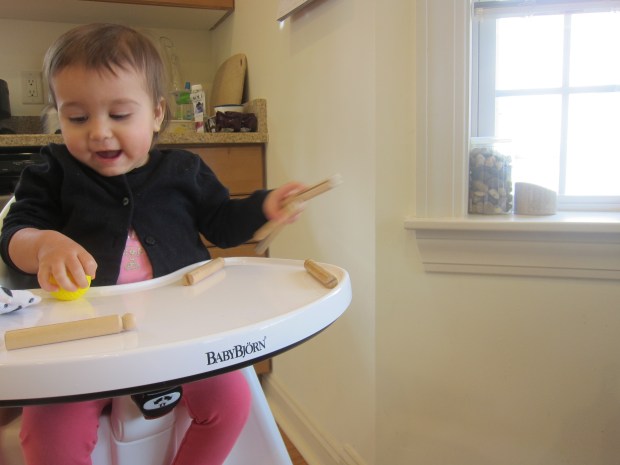
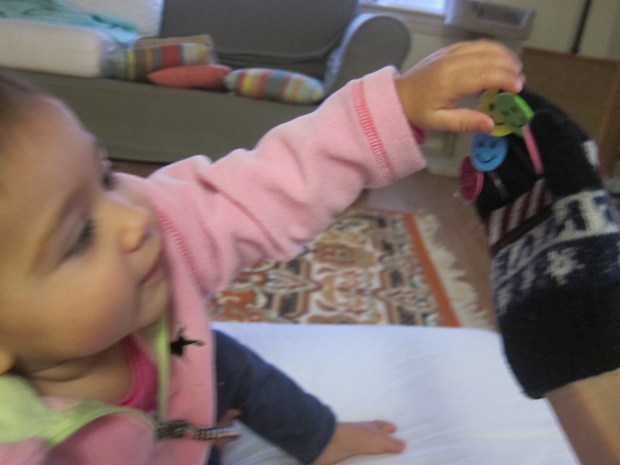
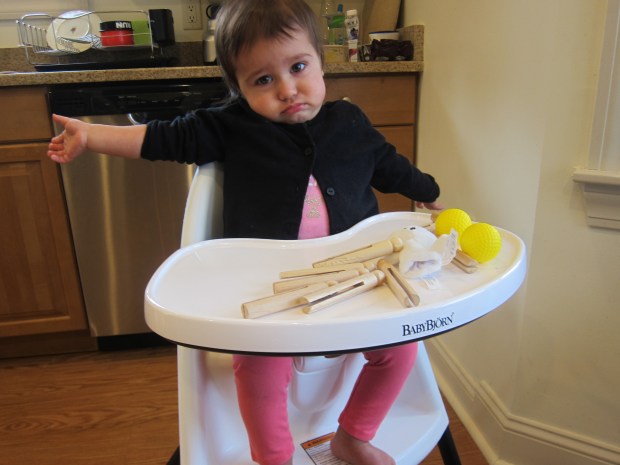
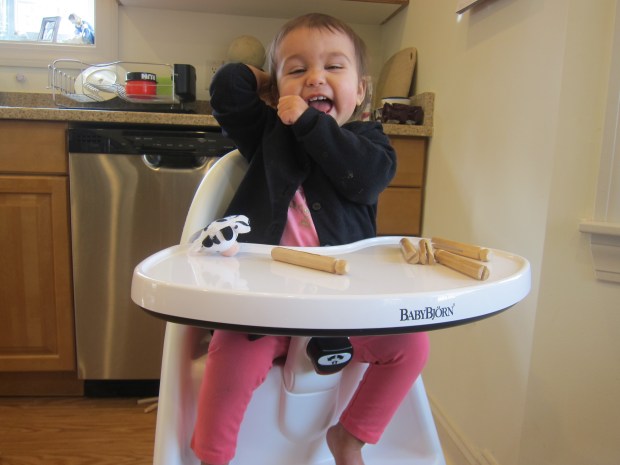
Later in the day came the real test; could a dropping game turn a tantrum frown upside down? She was quite moody in her high chair, so I set out the three items we had used earlier: the clothespins, the golf balls, and the small soft toys.

She immediately scattered some to the ground, no doubt daring me to make a stern mommy face and to say, “No”.

Dropping Game (9)

Imagine her surprise, then, when I exclaimed, “Dropsie!” and returned the items to her tray with a smile.

Dropping Game (12)

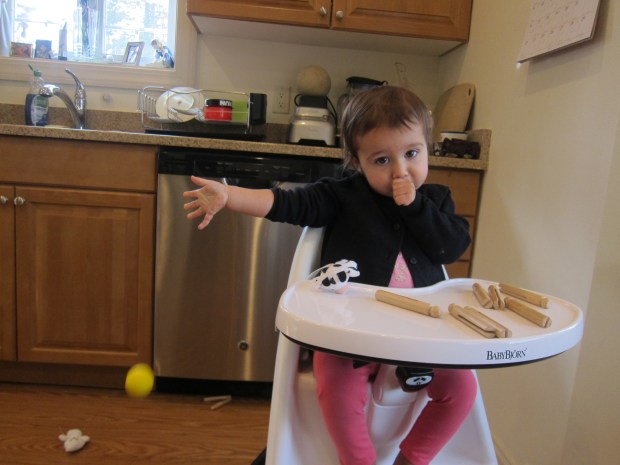
So she tried it again. Take that, mommy. “Dropsie!” I said happily.

Dropping Game (11)

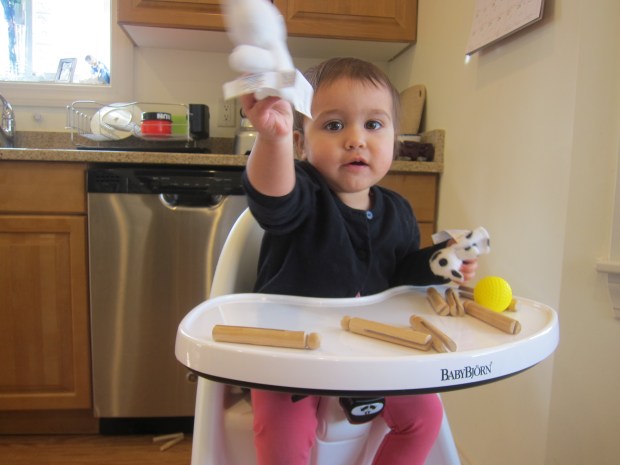
Well now she was smiling!

Dropping Game (13)

This was such a fun way to divert a tantrum, to harness her love of dropping, and to teach cause-and-effect, too. Plus toddlers will love seeing a parent scramble around to pick up the dropped items and return them to the tray.

The only note of caution here is not to play this game too often, else you’ll find yourself endlessly playing “dropsie”.

Dropping Game (14)

Tick Tock, Water Clock

Tick Tock Water Clock (5)

Having recently experimented with a marble timer, Travis set out to make a modern version of an ancient time-telling method: a water clock, also known as a clepsydra. He loved it so much that he decided this would be his project for the upcoming school Science Fair. His scientific question: Can you tell time with water? His hypothesis: Yes!

For the set up, first mark two paper cups, one A and one B, with a permanent marker.

Poke a hole in the bottom of each with a pen. You want the hole to be bigger than just the nib, but not as wide as the whole pen.

Tick Tock Water Clock (1)

Tear off a 1/4 sheet of a paper towel, and crumple into a ball. Saturate with water and place in cup B, then cover with cup A. Mark cup A with a fill line.

Tick Tock Water Clock (2)

Place this whole apparatus on top of a clear plastic jar (we upcycled a peanut butter jar). Place a piece of masking tape on one side of the jar. Mark a paper cup as C and use this to fill cup A; let the “clock” run through once.

Tick Tock Water Clock (3)

On the first try, we realized our hole was too small. The cup would have taken nearly an hour to drain!

Tick Tock Water Clock (4)

After enlarging the hole, it was time to tick off 30 second intervals on the masking tape., We set a stopwatch and marked the water line every 30 seconds. Travis had made a 1 minute and 30 second clock!

We noticed how the second two notches were much closer together than the first two.

Tick Tock Water Clock (6)

Travis can’t wait to talk about the project at the Science Fair! This is a great project for such an event, because it can be done over and over, simply by pouring the water back from the jar into the “C” fill cup and repeating.

Zucchini Corn Muffins

Zucchini Muffins (1)

Sneak some shredded zucchini into these yummy corn muffins and your kids will get a dose of veggies right at breakfast!

Ingredients:

  • 1 cup cornmeal
  • 1 cup flour
  • 2 and 1/4 teaspoons baking powder, divided
  • 1 teaspoon baking soda
  • 1/2 teaspoon salt
  • 1/4 cup applesauce
  • 1/2 cup apple juice concentrate, thawed
  • 3/4 cup oat milk
  • 3 tablespoons melted Earth Balance butter
  • 1 cup shredded zucchini
  1. In a bowl, combine the cornmeal, flour, 2 teaspoons baking powder, baking soda, and salt; set aside.
  2. Stir together the applesauce and remaining 1/4 teaspoon baking powder in a large bowl. Add the apple juice concentrate, the milk, and the butter.
  3. Stir the dry ingredients into the wet ingredients, then gently stir in the zucchini.
  4. Divide the mixture evenly among 12 muffin cups coated with cooking spray. Bake at 400 degrees F for 20 minutes.

Zucchini Muffins (2)

Hanging Instruments to Crash, Rattle, and Bang!

Hanging Instruments (5)

Old toys that don’t get much attention can seem novel if presented to your kids in a different way. To wit, Veronika hasn’t been very into her musical instruments lately… until I strung up a few on a cord and introduced this novel way to have musical play!

We played this game indoors against a dresser, but if it’s a beautiful sunny day and a warm time of year, it works equally well against a fence!

Using colored twine, I threaded instruments that could slot easily along the line, namely tambourines, bells, and a triangle. Get creative with your definition of “instrument” here, too; a colander from the kitchen added some percussion!

Hanging Instruments (1)

Once I had everything threaded up, I presented Veronika with wooden spoons and rhythm sticks, and it was time to make music!

She loved using the wooden spoon in particular and soon there was bashing…

Hanging Instruments (2)

…crashing…

Hanging Instruments (3)

…tapping, and jingling. She also loved reaching out with a hand to shake the bells on the cord.

Hanging Instruments (4)

This game will no doubt entice older siblings over to play, too! A great way to revive a bag of old instruments.

Hanging Instruments (6)

Marble Timer Kiwi Crate

Kiwi Time (7)

Travis’s kit this month from Kiwi Co was all about time, and the different ways humans have devised throughout the centuries to keep time. I’ve simplified the steps we followed in my account below, but the projects could be put together with items from a craft and hardware store.

The main project was a Marble Timer. Travis gamely followed complicated instructions for applying nuts, bolts, and wooden pieces to the provided backboard in the proper order.

Kiwi Time (1)

Wooden shelves are then slotted into the holes of the backboard, following handy white lines as a guide. These now make a ramp that the seven provided black marbles can roll down.

Kiwi Time (2)

When one marble reaches the bottom, it falls into the notch of a wooden slat, which triggers the wooden handle, which turns the wooden circle, which then feeds the next marble onto the ramp. The instructions help kids understand how each marble takes the exact same amount of time to complete this course, hence why it can be used as a timer.

Kiwi Time (3)

Unfortunately, our alignment was slightly off, making this project frustrating for Travis. One of us had to keep a finger on the wooden slat at the bottom in order for it to function.

Kiwi Time (4)

But Travis was still able to grasp the concept, and he liked the Marble Timer Experiments that followed: what would happen when he rejiggered the position of the wooden pieces?

Travis loved fiddling with this idea. After a few tries where the marbles dropped straight down or missed the lever, he had a course set up that was much faster than the original “timer”.

Kiwi Time (12)

The final project was the A part of STEAM, as often seems to be the case in Kiwi Crates: Dip-Dye Wood Art. First he squeezed the provided liquid watercolors into the provided cups, adding water as instructed.

Kiwi Time (8)

Use a clip to hold wooden shapes into the dye for the length of time it takes the marbles to move through the “timer”.

Kiwi Time (10)

Kids can then experiment with what happens if a piece is dyed for a second round. Again, because our marble timer was slightly wonky, we sort of fudged this step and just counted out seconds.

As a nice final touch, Kiwi provided cord to loop through the dyed pieces.

Kiwi Time (5)

The resulting trinkets make great keychains on Travis’s backpack!

Kiwi Time (6)

The booklet this month contained no suggested books for further reading, which was a shame, but Travis did find goodies like time-telling methods through the centuries, a Find It page, and an experiment that turned our to be perfect for his upcoming school Science Fair (stay tuned!).

For further reading, I highly recommend Telling the Time from Usborne books and A Kids Book of Experiments with Time by Robert Gardner.

Kiwi Time alt

Creamy Pasta with Broccoli and Chick’n

Creamy Pasta Version 2

The kids loved a recent creamy pasta recipe, so I mixed things up with this variation to keep it novel. You can use all broccoli, all cauliflower, or a mix of the two.

Ingredients:

  • 1/2 cup vegan mayonnaise
  • 1/4 cup non-dairy ranch dressing
  • 3 tablespoons oat milk
  • 2 tablespoons red wine vinegar
  • 14/ teaspoon mustard
  • 2 cups cooked rotini pasta
  • 1 cup cooked and finely chopped broccoli and cauliflower florets
  • 4 ounces cooked and finely chopped Gardein chick’n strips
  1. Whisk together the mayonnaise, dressing, milk, vinegar, and mustard in a large bowl.
  2. Add the cooked pasta, broccoli/cauliflower, and chick’n, stirring to coat. Serve warm or chilled!

For a Mediterranean spin on the pasta, omit the broccoli and chick’n, and instead stir in 1/2 cup chopped artichoke hearts, 1/2 cup sliced black olives, and 1/2 cup cooked zucchini (or summer squash).

Creamy Mediterranean Pasta

Finger Puppet Play

Finger Puppet Play (1)

There’s an easy way to play this game and a hard way, and I definitely went with the easier for the obvious reason that I’m not a seamstress. Using an old pair of children’s gloves, I simply attached a smiley face sticker to each fingertip and these became friendly little puppets to interact with Veronika!

FInger Puppet Play (5)

She grinned as soon as she saw the smiling stickers and loved hearing them say hello to her, give kisses to cheeks, and sing songs (like “If You’re Happy and You Know It”).

Finger Puppet Play (2)

Then they played peekaboo from behind her teddy bear!

Finger Puppet Play (3)

Of course she also loved the fact that the faces were stickers, which she soon impishly pulled off.

For a version that will last much longer, cut the fingers from an old glove instead and then sew on felt pieces to be ears, noses, whiskers, and more. Then slide these onto each finger as individual puppets.

(Note: A middle-of-the-road option might be just to draw the details on with a fabric pen instead of sewing on all that felt).

And if you don’t want to get crafty at all, just play with store-bought finger puppets! We have an assortment that includes cows, cats, Halloween ghosts, and more.

Finger Puppet Play (4)

Today I trotted them all out and they sang to Veronika, chatted with her, wiggled around, and made silly noises. These little toys are perfect for car rides, so I stash a few in my purse.

Does your child have a favorite finger puppet? Please share in the comments!

Sweet Sunflower Seed Butter Dip

Sunflower Dip (1)

This creamy sunflower-based spread is a healthy alternative to butter or jelly on toast slices. And it’s school-safe, too! You can also use it for dipping veggies like very tender cooked carrots or steamed broccoli florets.

Sunflower Dip (2)

Ingredients:

  • 3 tablespoons sunflower seed butter
  • 3 tablespoons non-dairy vanilla yogurt
  • 1 tablespoon agave nectar
  1. Whisk together all the ingredients in a small bowl, and chill until ready to serve.

Sunflower Dip (3)

Quinoa Bean Salad

Quinoa Bean Salad

This vibrant salad has so many beautiful colors, beans for extra protein, and a lemony dressing that kids will love!

Ingredients:

  • 1 cup quinoa
  • 2 cups water
  • 1 (12-ounce) box kidney beans
  • 1 cup canned corn
  • 1 finely chopped red bell pepper
  • 1/3 cup minced fresh cilantro
  • 1 lemon
  • 3 tablespoons balsamic vinegar
  • 1/2 cup olive oil
  • 2 tablespoons cumin
  1. Combine the quinoa and water in a saucepan; cook over medium heat for 20 minutes, until the liquid is absorbed
  2. Fluff the quinoa with a fork and transfer to a large bowl. Add the beans, corn, bell pepper, and cilantro.
  3. Squeeze the lemon juice over the quinoa mixture, then add the balsamic, olive oil, and cumin, stirring to coat.

Food Exploration Station

Food Explore Station (3)

The compartments of an ice cube tray are just the right size for setting up a station that allows your toddler to touch, taste, poke at, and other wise explore food! This game is great for soon after a meal so that the emphasis is on all the senses, not just on eating.

I wanted to fill the tray with a variety, but not an overwhelming amount of different objects for Veronika. I included warm cooked carrots, chilled slices of watermelon just out of the fridge, soft chunks of room temperature banana, and a crumbly cookie.

Food Explore Station (2)

Veronika wasted no time getting her hands in there! “Hot!” she said to me, feeling the carrot, quickly follow by a surprised, “Cold!” to the watermelon. She smooshed one of the banana pieces in her hand, but mostly passed that over in favor of the watermelon.

Food Explore Station (4)

The cookie certainly got a few nibbles, too. You can use any fruits or veggies (or cookies!) for this activity, or play multiple times with seasonal fruits at different times of the year. Because all of the foods were about the same size, they are fun for stacking, too.

For some slipperier tactile play, I cooked up green linguine noodles. These were great both for the texture (somewhat slimy, which can take toddlers a while to get used to) and for the color.

Food Explore Station (5)

I thought she might hesitate, but she loved mushing through the noodles with her fingers. Once she took a nibble, she looked at me with recognition. “Pasta!” she said.

Food Explore Station (6)

Don’t forget, toddlers learn about food when exploring like this. So the next time this happens…

Food Explore Station (1)

…don’t scold. It’s all about the process! And kind of like an art project, too.