Toilet Paper Tube Towers

Toilet Paper Tube Towers (6)

Since we stocked up on all that toilet paper during social distancing, I figured I might as well start saving the toilet paper tubes once they were empty. We now have quite a stockpile: 12 in total! So when Veronika was fussy before dinner and I needed to keep her little hands busy, I knew exactly what to give her.

I invited her over first just to explore the tubes with her senses. She could roll them, or peek through them. “I see you!” she said.

Toilet Paper Tube Towers (5)

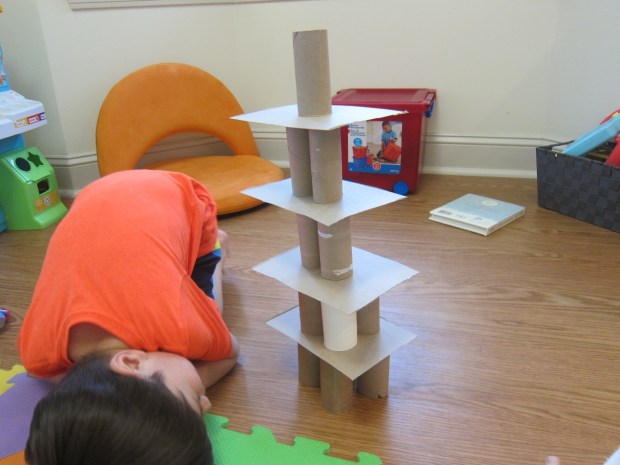
I wanted to show her how to build towers with them, though it turned out that the methods I chose were a tad complicated for a toddler. In the first, we stood the tubes upright, then added a thin layer of cardboard, followed by another layer of upright tubes, another layer of cardboard and so on.

Toilet Paper Tube Towers (1)

But these towers quickly toppled when the balance wasn’t right… or when Veronika impishly knocked them over! Needless to say, we never built very high.

Toilet Paper Tube Towers (3)

Next I showed her how to stack them almost like honeycomb. This too was unstable with an eighteen month old around.

Toilet Paper Tube Towers (4)

But she sure loved the way they rolled! So I left her just to play on her own from there, and wouldn’t you know, she found her own method for building a tower. She began placing them so carefully on a board game box as a base.

Toilet Paper Tube Towers (9)

Mostly she stopped at one level high, but sometimes she succeeded in stacking two levels.

Toilet Paper Tube Towers (8)

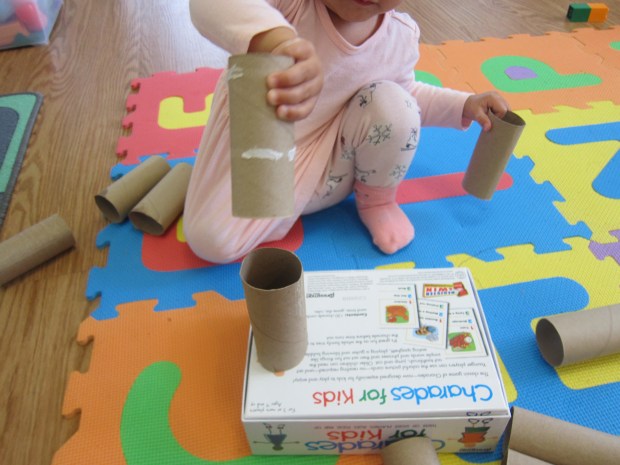
She counted the tubes out as she went, as high as “5”!

Toilet Paper Tube Towers (10)

She also said “white” when she noticed the one white roll; I hadn’t realized she knew this color word yet.

Toilet Paper Tube Towers (11)

I loved watching her busy at her building, and all the more so because she created her own method for doing so.

Toilet Paper Tube Towers (7)

Big brother Travis did later help me stack all those thin cardboard layers up to 4 levels high.
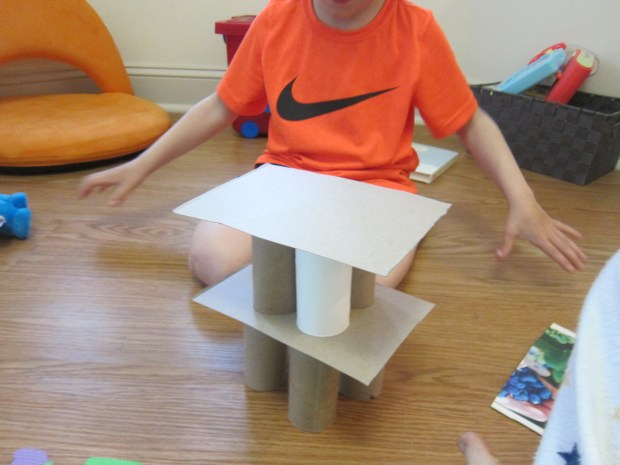
Toilet Paper Tube Towers (13)

He was so proud!

Toilet Paper Tube Towers (14)

Older kids might also like making two notches in the top and bottom of each tube, after which you can build towers that slot together.

IMG_0038

A Box is a Box

Box is a Box (e)

With big brother involved in box play for home school, I threw in a few boxes for Veronika, too! We started out with the very simple (a box hat!) and moved on to ideas that were more complex.

Box is a Box (a)

She loved climbing in one that was just the right size for sitting in, so we made it into a “boat”. We rowed all around the living room, of course.

Box is a Box (c)

Next up was making a garage for some of her cars. She loved helping to decorate this, and we added a cut-out for her cars to drive in and out.

Box is a Box (b)

If a box is big enough, it can become a cave for your toddler. Because she loves painting, we decided to paint the outside of the “cave”.

Box is a Box (g)

Of course I knew this would be an invitation to a mess, but she loved the big tray of paint and large brushes I laid out.

Box is a Box (i)

Not only did she love crawling in once the paint was dry, but she climbed on top and made it a slide, too!

None of these ideas were very complicated, especially compared to past projects like mailboxes, houses, railroad stations, and even castles. But it was a case in point that boxes never fail to entertain!

Shadow Play

Shadow Play (2)

With big brother engaged in a game ofshadow tag today, Veronika fit in some learning about shadows, too! She says “Hi shadow” every time we go for a walk, so I knew she was interested in the topic already.

First, I showed her how we could change our shadows with movements. Waving hands is the obvious choice, but try stomping a foot, wiggling an arm, or turning your head.

Then I stood still so she could fill my shadow in with nature finds! This might have been easier with big items like leaves, but she loved sprinkling in grass.

Shadow Play (1)

Next up we tried covering just a portion of our body with a small blanket, and observing how this changed the shadow. This turned into a game of “peek-a-boo shadow!” of course.

Shadow Play (3)

And of course you can never go wrong with a game of shadow tag. Toddlers will giggle as you stomp in their shadow, even if they don’t understand the rules quite yet.

DIY Abacus for Toddlers

DIY Abacus (5)

This giant version of a classic abacus is a great way to get toddlers thinking about counting, long before they are aware of concepts like addition and subtraction. To set up, you simply need any object that your toddler can slide along a string, as well as a sturdy stool or chair. Tie a string to one leg of the stool with a secure knot, then add whatever items you’ll be sliding.

DIY Abacus (1)

First, I tried out large wooden beads on one string and pipe cleaners looped into circles on a second. Tie the other end of the strings securely to the stool. But Veronika wanted to grab these big items off so much that this version was short-lived!

DIY Abacus (2)

I moved on to a second version, this time stringing small pony beads onto the string. Now, Veronika loved sliding the beads back and forth!

DIY Abacus (6)

She already mimics counting up to about 5, so I showed her how to slide and count. “One, two, three!” she parroted.


DIY Abacus (4)

Of course, being a toddler, she also just loved the way the strings dangled on the stool, and enjoyed solo time twisting the beads around.

DIY Abacus (7)

This was a great way to keep her busy – and make her feel included! – for part of home school. Other ideas for threading include large buttons or straws cut into pieces.

Homemade Potato Man

Homemade Potato Man (2)

We don’t own a classic Mr. Potato Head doll, but the toy is great for so many reasons. Of course there’s the pure silliness of mixing and matching the facial features, but Mr. Potato is also a teaching tool for the names of facial features and for emotions. With an extra potato in the fridge, today I made Veronika this silly homemade version!

To start, I drew two faces on the potato with permanent marker: one side of his face was happy and the other was sad. Veronika wanted to add a few pen marks of her own.

Homemade Potato Man (1)

Poke two toothpicks into the sides of the potato as arms, then use hot glue to add pom poms to the tips, covering up the sharp points. You can also add pom poms or even buttons on top for a hat! Two wiggle eyes completed the look.

Homemade Potato Man (3)

If you want to get more detailed, draw other features with permanent marker, too. Finally, I sliced a bit off the bottom so Mr. Potato could stand upright. Now I presented him to Veronika, and she was smitten!

Homemade Potato Man (5)

She loved that his expression changed whenever she turned him around, and this was a great way to talk about emotions. “Mr. Potato is feeling sad,” I told her… and oh no she pouted her lip in sympathy until we turned him to his smile.

Homemade Potato Man (4)

We also pointed to all his features, rattling off a vocab list of eyes, nose, mouth, and ears. She loved finding these and then touching the corresponding part on me.

Homemade Potato Man (6)

And then she just loved playing with him as an “action figure”! Have you ever made toys out of food? Please share in the comments!

Homemade Potato Man (7)


Cling Wrap Painting

Cling Wrap Painting (9)

Veronika loves to smoosh her fingers through paint, and today I found a way to make that smooshing a part of the process, minus the mess!

To start, cover your work surface and lay down sheets of white paper. Set out plastic cups filled with paint, and add a plastic spoon in each cup.

Cling Wrap Painting (1)

I showed her how to use the spoons to dribble paint onto the paper. Veronika liked making both big blobs and using the edge of the spoon more like a paintbrush.

Cling Wrap Painting (3)

When each page was filled with enough splotches and blobs (and just when her hands were itching to get messy in the paint!) I laid a piece of cling wrap over the paper. Make sure the paper is completely covered.

Cling Wrap Painting (5)

Now use your hands to smooth over the paint.

Cling Wrap Painting (7)

The blobs will squish and flatten in a fun sensory way. You’ll get some color mixing, too! I pointed out to her where our blues and yellows had made green, or where red and blue had mashed together for purple.

Cling Wrap Painting (6)

Lift up the cling wrap and set the painting aside to dry completely before displaying your little one’s art.

Cling Wrap Painting (8)

This was a novel painting method, and her hands even stayed (mostly!) clean.

Cling Wrap Painting (2)

Blob Painting

Blob Painting (4)

Veronika is so into painting these days, but all too often she drops the brush and decides to smear with her hands instead. I wondered if using a few novel tools might distract her from doing so!

For this project, you’ll need anything your toddler can squeeze paint out of. We used two versions: an old infant medicine syringe (for pushing) and an empty cosmetic bottle (for squeezing).

I filled each with a little paint, and showed Veronika how to either squeeze or squirt blobs of paint onto the paper. As it turned out, both methods were a little advanced for her muscle development, but she loved seeing the blobs that appeared!

Blob Painting (1)

I folded the paper in half over the blobs we had made, then opened back up to show her a big smeary picture. As an alternative version, place another piece of paper over your blobs, rub firmly, and then lift up.

Blob Painting (3)

She loved the way both versions came out!

Blob Painting (2)

We continued squeezing and blobbing the paint, and she started to use the medicine syringe tip more like a paintbrush.

Blob Painting (8)

For extra fun, we tested out blobbing onto different surfaces, like coffee filters or paper towels.

Blob Painting (6)

Did this project keep her from painting with her hands?

Blob Painting (7)

Not entirely, but it definitely mixed up the art experience around here!

Blob Painting (9)

I Hear Thunder

I Hear Thunder (1)

We’ve had crazy weather lately, including unseasonable May snow today. It had me thinking about weather songs to sing with Veronika, and this one has always been a favorite.

First, I simply sang the words for Veronika:

I hear thunder. I hear thunder.

Hear it roar. Hear it roar.

Pitter patter raindrops,

Pitter patter raindrops.

I’m all wet. I’m all wet.

The second time through, we added actions. You can just use your body at first: stomp feet on the floor for thunder, flutter your fingers through the air for rain, and give a big shiver at the end.

I Hear Thunder (6)

The shiver in particular made Veronika laugh every time!

I Hear Thunder (5)

Then we added props. Drums made the perfect thunder of course.

I Hear Thunder (3)

And shaky instruments like maracas and rain sticks were great for raindrops.

I Hear Thunder (4)

Veronika chimed in (literally!) on the triangle.

I Hear Thunder (7)

This all made for fun musical play on a windy cold morning.

Dress-Up Box

Dress Up Box (7)

Veronika has played dress-up with tot-sized clothes in the past, but sometimes it’s even more fun just to raid mommy’s closet!

Today, I pulled out items that were either old or that I simply didn’t mind Veronika playing with, and we set everything out on the ground for easy access.

Dress Up Box (1)

In no time, she was trying on old bathrobes and sports jerseys (which looked more like adorable dresses on her!).

Dress Up Box (5)

Add accessories like hats, purses, and shoes, and the mixing and matching can begin!

Dress Up Box (2)

For added fun, we decided our dress-up trunk (really just an old box) needed some sprucing up.

Dress Up Box (9)

Big brother joined in to help paint the sides of the box in multiple colors. This got pretty messy pretty quickly, but there’s no time like a chilly May morning to make a mess indoors!

Dress Up Box (10)

We left the pile of clothes out pretty much all day, and every time she went over to it, Veronika selected something new.

Dress Up Box (8)

Do your kids have a favorite dress-up item? Please share in the comments!

Dress Up Box (11)


Color Match

Color Match (7)

Veronika is showing great interest in colors now. She knows all the words of the rainbow, but adorably gets them all wrong. “Yellow!” she’ll say with confidence, holding a blue crayon. “Purple!” she calls out, to just about anything. So today we played this little game to help associate each color with the correct word.

I set out pairs of construction paper and crayons, sticking with only four colors so as not to overwhelm her. We used: blue, red, yellow, and green.

Color Match (5)

For each color, I showed her the crayon and said (for example), “Yellow. Can you find me the yellow paper?” I then directed her to the right sheet so she could draw yellow on yellow.

Color Match (2)

Repeat with the remaining colors, or reverse it: “Here is blue paper. Can you find me the blue crayon?”

Color Match (3)

After she’d scribbled for a while, I wrote the name of each color on the paper, using black crayon.

Color Match (6)

Don’t expect your toddler to get this “right” on the first try, of course, as that’s not the point. These early color games are all about introducing the concept.

Color Match (4)

And of course she loved just scribbling.