Marshmallow Snowman Stamping

Marshmallow Snowman Stampers (7)

If your toddler loves dot markers, then edible dot markers are even better! To wit, all you need to make this craft are large marshmallows. We love the vegan ones from Dandies.

Marshmallow Snowman Stampers (1)

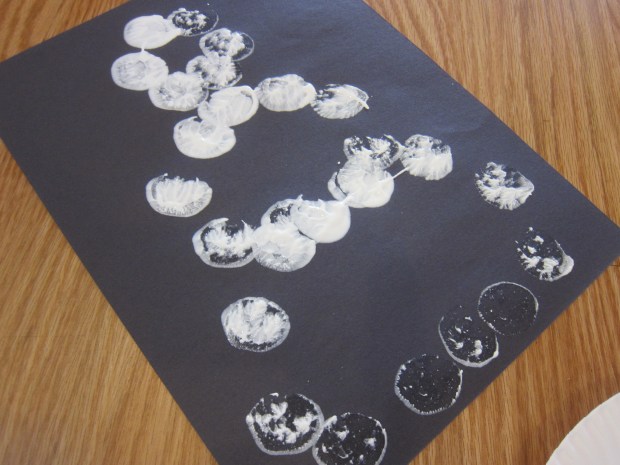
I set out a plate of the marshmallows along with a dish of white paint and black construction paper. I showed Veronika how to dip one end of a marshmallow in the paint and then onto the paper. It made a perfect circle!

Marshmallow Snowman Stampers (2)

Indeed, this craft was all about circles. The marshmallows make little circle prints, and if you help your toddler slightly, you’ll end up with three circles for a snowman: small, medium, and large. I highly recommend having a few marshmallows on the side just for eating so you can avoid paint on little tongues. Veronika loved snacking while we crafted!

Marshmallow Snowman Stampers (5)

The craft was easiest for her if I stamped an outline of the snowman first, which she then could fill in with her marshmallow stamp.

Marshmallow Snowman Stampers (3)

Once the paint dried, I cut out a few features from construction paper to glue down, like top hats, carrot noses, and tree branch arms. Add any final details with marker.

Marshmallow Snowman Stampers (6)

Why did we paint our snowmen on a black background? Because we finished the day with a read of Snowmen at Night, a book about all the silly things snowmen might get up to after dark. Hot cocoa and snowball fights? Yes please!

Marshmallow Snowman Stampers (8)

Styrofoam Ornaments

Styrofoam Ornaments (8)

Here’s a way to upcycle those Styrofoam trays that come home from the produce department now and then (I’m looking at you, mini cucumbers) and use them in a holiday craft. Today, Veronika and I turned them into ornaments!

Once the tray had been washed and dried, we pulled out a few Christmas cookie cutters and traced around them, then cut out. Veronika loved talking about all the shapes.

Styrofoam Ornaments (1)

Now use the tip of a white crayon to make imprinted designs in the Styrofoam. I showed Veronika an example of lines and dots on a stocking shape. Since it was hard for her to press down the crayon hard enough or with precision, I took directions from her instead. She asked for circles on the candy cane and triangles on the star!

Styrofoam Ornaments (2)

Next, we painted the shapes with acrylic paint. She was so excited when she noticed that the paint had made lines on her paintbrush, at one point.

Styrofoam Ornaments (3)

Finally, it was time to squirt on glitter glue. Aim to use a corresponding color of glitter for each color of paint you’ve used (although with a toddler, be prepared for some mixing and matching). Ideally, once you brush the glitter glue across the surface of the shapes with a paintbrush, it will sink into the etched lines you made with the white crayon.

Styrofoam Ornaments (5)

However, since I was doing this project with a toddler, ours didn’t come out quite that neatly. But Veronika loved simply squirting big globs of glitter glue, which was just fine.

Styrofoam Ornaments (6)

Punch a hole in the top once dry, thread with string, and hang from the tree!

Styrofoam Ornaments var

Cinnamon Drawings

Cinnamon Drawings (8)

If there’s one scent that evokes Christmas in our home, than cinnamon is it. Here’s a fantastic sensory project that allows toddlers to take in one of the best smells of the season while making art!

To start, I cut out two simple Christmas-themed shapes from sandpaper. I had a coarse grade in green and a medium grade in brown, so it worked out nicely to draw a Christmas tree on the green and a simple gingerbread man on the brown.

Cinnamon Drawings (2)

Cut out your shapes and give to your toddler along with a few whole cinnamon sticks. Of course the first thing to do is take a nice big smell. “I smell with my nose!” Veronika is learning to say of her sense of smell.

Cinnamon Drawings (1)

Then I showed her that if she rubbed the cinnamon against the rough sandpaper, it left behind a trail of scented brown cinnamon.

Cinnamon Drawings (3)

Of course we had to smell the artwork again once it was covered!

Cinnamon Drawings (5)

Veronika loved both the shapes and the smell, but she was also very interested in transferring the cinnamon sticks in and out of their jar for a while. That meant this turned into a fine motor skills activity, too!

Cinnamon Drawings (4)

When the sandpaper was covered, I drew on a few final features with marker, then punched a hole and threaded ribbon through each so they could hang on our tree.

Cinnamon Drawings (7)

Gingerbread People

Gingerbread People (13)

Gingerbread cookies are the perfect baking project with a toddler. There’s messy dough to mix up, wonderful spices to smell, adorably-shaped cookie cutters, and little people to decorate. In sum, Veronika had lots of floury, sticky, sensory fun with this one!

Gingerbread People (1)

To start, we needed to make the dough. She loved smelling each spice before we added it into the dry ingredients!

Ingredients:

  • 1 tablespoon flaxseed
  • 3 tablespoons cold water
  • 1 cup shortening
  • 3/4 cup agave nectar
  • 1 cup molasses
  • 1 and 1/2 teaspoons baking soda
  • 1/2 teaspoon salt
  • 1 teaspoon ground ginger
  • 1 teaspoon ground cinnamon
  • 1 teaspoon ground cloves
  • 5 cups flour
  1. In a small bowl, whisk together the flaxseed and water; let stand for 5 minutes.
  2. In the bowl of a stand mixer, combine the shortening, agave, molasses, and flaxseed mixture; beat until combined.
  3. Combine the baking soda, salt, ginger, cinnamon, cloves, and flour in a large bowl. Add the dry ingredients to the wet ingredients and stir until combined. Wrap the dough in plastic wrap and chill for at least 1 hour.

Veronika loved watching the dough mix up in our stand mixer!

Gingerbread People (2)

And as you can see, she also loved taste-testing right from the bowl!

Gingerbread People (4)

She marveled at how sticky the dough was as we wrapped it in plastic to chill in the fridge.

Gingerbread People (3)

Once the dough had chilled, we rolled it out on a generously floured surface, then used gingerbread man cookie cutters to cut out our little people. I gave Veronika a plate filled with decorating goodies: raisins, almonds, licorice strips, and small jelly bean candies. It was up to her to decorate!

Gingerbread People (6)

She thought this was delightful! She loved giving the people eyes and a “skirt”.

Gingerbread People (7)

Since I knew her cookies risked getting broken or mashed, I worked alongside her to ensure we had enough people for a few real batches of cookies.

Gingerbread People (12)

Big brother Travis thought it looked so fun that he needed to join in the action!

Gingerbread People (8)

He was so proud of this very ornately-decorated fellow, with almond shoes and licorice shirt sleeves.

Gingerbread People (11)

Once the people have been fully adorned, bake at 375 degrees F for 10 minutes. And then comes the best part of all; it was time for a taste test!

Gingerbread People (9)

You might consider ending the day with a read of the classic Gingerbread Man tale.

No Mess Paper Plate Snowflakes

No Mess Paper Plate Snowflakes (9)

Last week, Veronika painted snowflakes with q-tips, a great toddler method with very little mess. Today’s version meant even easier clean-up, since all the paint was inside a zip-top plastic bag!

To start, I cut out snowflakes from paper plates. I folded each plate in half, then in half again, and snipped out triangles, ovals, and heart shapes. Open back up to reveal the “snowflake” to your child.

No Mess Paper Plate Snowflakes (2)

In retrospect, I would have scalloped the edges, too, for a prettier result. Veronika sure thought this was neat, though, and loved sitting beside me with her own pair of safety scissors!

No Mess Paper Plate Snowflakes (1)

Place each plate in a large zip-top bag and add a little bit of silver and blue paint. You can also add a little glitter to each bag, but since we happened to have glitter paint, everything went in all at once! I sealed the bags and showed Veronika how to mush the paint around with her hands until the plate was painted.

No Mess Paper Plate Snowflakes (3)

She was so surprised when she first reached down and realized she could touch the paint but not get messy. And then she just really enjoyed it! I helped a little to spread the paint to the edges of the plates.

No Mess Paper Plate Snowflakes (5)

It took a little trial and error to figure out the right amount of paint to use. Too much and the plate was so saturated that it ripped upon removal from the bag. Too little and you won’t be able to spread the paint far enough. So my recommendation is to start with less than you think you need and work your way up.

No Mess Paper Plate Snowflakes (6)

Next time, I would use a little white paint, too, since the blue dominated over the silver. Still, they turned out pretty!

No Mess Paper Plate Snowflakes (7)

Let the plates dry completely, then hang the snowflakes around the house for a winter snowstorm.

Winter Road

Winter Road (1)

What do you do when the kids want to play in the snow but you only have a thin, icy layer that’s not great for making snowmen? Make a road, instead!

I did this the easiest way ever, not even a shovel required. Instead, I took a few old markers and drew the outline of a road directly onto the snow.

Winter Road (2)

Now all the kids had to do was drive along the track.

Winter Road (3)

We added a few cross streets and curves to our road, and even a little stop sign for an early lesson on road safety.

Winter Road (5)

I had mostly intended the track for Veronika, but it turned out that big brother Travis loved driving the cars, too.

Winter Road (6)

Construction vehicles were particularly fun, like our bulldozer and dump truck which could scoop up snow or be filled with it.

Winter Road (7)

The icy wind drove us indoors fairly quickly, but at least we got in a little creative snow play!

Winter Road (4)

Coloring the Snow with Droppers

Coloring Snow with Droppers (11)

We have snow, but it’s not the soft fluffy kind you’d want to roll around in. This snow iced over pretty quickly in a thin layer on the ground. So it was the kind of snow to take inside!

I scooped some of the snow onto a tray, and set it out alongside pipettes and liquid watercolors (in the compartments of an ice cube tray). Because I only had 3 colors of liquid watercolor, I added food coloring to a few compartments, too.

Coloring Snow with Droppers (1)

I showed Veronika how to dip a pipette in one of the colors, squeeze to fill it up, and then squeeze again to release the color over the snow.

Coloring Snow with Droppers (2)

She loved watching the colors appear against the white snow. “It’s yellow!” she exclaimed with delight for her favorite color.

Coloring Snow with Droppers (5)

It was hard for her to get the mechanics of filling and releasing the pipette, but that was totally fine since this is the first time I’ve introduced her to the tool.

Coloring Snow with Droppers (4)

She was so proud of her work nonetheless and did a lot of simply stabbing at the snow, or dipping the tip of the pipette into the colors and brushing it over the snow like a paintbrush.

Coloring Snow with Droppers (6)

We mixed colors, too, (although our mix of red and blue looked more black than purple), which was good for a quick art lesson. After she tired of that, we put small chunks of snow directly into the ice cube tray, which now only had a shallow layer of each color. The color would saturate the snow immediately, which was fun to watch.

Coloring Snow with Droppers (9)

Veronika worked so seriously to move the snow pieces over to the ice cube tray with tongs; another tool to hone her fine motor skills!

Coloring Snow with Droppers (8)

When your toddler tires of the play, clean up couldn’t be easier. Simply put your snow in the sink and let it melt!

Coloring Snow with Droppers (10)

Make a Snowscape Window

Snowscape Window (8)

We had a rain storm today, but the kids definitely wished it was snow instead. Luckily, I had a quick way we could turn at least one window into a snowy landscape.

I set out two paper plates, one filled with torn pieces of white tissue paper and the other with watered down Mod Podge. I showed Veronika how to dip a paintbrush in the Mod Podge mixture and then smear it all over the window of the playroom.

Snowscape Window (2)

She loved doing this, and was also thrilled that she got to stand on a chair while doing so. My big girl!

Snowscape Window (5)

As we covered the window in the Mod Podge, we then added pieces of tissue paper which will stick right on. I guided the placement of the tissue paper only slightly so it roughly formed a bell curve, mimicking the look of a snowdrift.

Snowscape Window (4)

If your kids have crafted any small Christmas trees from foam or felt this holiday season, you can tape these up to your snowy landscape. In a pinch, we added a few tree with washable green paint.

Snowscape Window (7)

The internet leads me to believe all of this will wash off easily once December is over, and my fingers are crossed!

Snowscape Window (6)

But in the meantime, Veronika’s artwork now makes the perfect backdrop for the rest of our Christmas decor.

Snowscape Window alt

Christmas Sparkle Cloud Dough

Christmas Cloud Dough (10)

Cloud dough is a great alternative to homemade play dough since it comes together from just two ingredients. Plus it’s one of those great sensory materials that you can vary only slightly to make it fit each season!

To wit, today it was time for sparkly Christmas cloud dough. I added 2 cups flour and 1/2 cup vegetable oil to a craft tray, and simply mixed it all together with my hands. (Note: You can use an equal amount of cornstarch in place of the flour if you want the dough to be a more pure snow white).

Christmas Cloud Dough (2)

We then added green glitter for some Christmas spirit! Veronika was thrilled to see the sparkles and began spooning through the mixture with a little scoop.

Christmas Cloud Dough (3)

I showed her that she could squeeze it into balls, which we called “Christmas cakes”.

Christmas Cloud Dough (5)

It also made great snowmen if we piled a few atop each other.

Christmas Cloud Dough (6)

We then pulled out an arctic set of plastic animals she loved tromping them through the dough, adding an imaginative element to the sensory play.

Christmas Cloud Dough (7)

Overall, this was very simple but clearly great fun!

Christmas Cloud Dough (8)

Painting with Baby Food

Painting with Baby Food (4)

We had a few leftover jars of early-stage baby food (i.e. smooth purees) that Veronika will never eat at this point. So we decided to paint with them instead!

I laid down a long piece of butcher paper and poured two colors (er, flavors) of baby food onto paper plates. We had yellow/peach paint and purple paint.

Painting with Baby Food (3)

At first I thought we would use this like finger paint, but Veronika was already playing with her toy cars this morning and it turned into car painting, instead! I showed her how to drive a car through a plate, and then along the paper.

She didn’t waste any time, and soon was happily vrooming. I loved that she talked about colors while she played, too. “Red car makes yellow tracks! Blue car makes purple tracks!”

Painting with Baby Food (2)

Your child might want to get in there with fingers instead of cars, which of course is perfectly fine since this is an edible paint. And there’s a high probability that the paint might turn into snack time, too!

Painting with Baby Food (5)

After she was done driving the cars around, Veronika decided they needed a car wash. I set down a tray filled with a little sudsy water and she spent arguably just as long driving the cars through the wash as she had painting with them. All in all it was a nice activity for our morning.

Painting with Baby Food (7)