Drip Pots

Drip Pots (7)

We had two teeny tiny terracotta pots here in the house, and Earth Day prompted me to think of a use for them: they’re the perfect size to grow a few windowsill herbs! Although we don’t have a garden, I loved the idea of showing Travis how we can be responsible for our own food (seasoning at least). You could use this paint method on any size clay pot, though, and plant flowers or succulents instead.

The night before, we painted the pots with a few coats of white acrylic paint and left them to dry overnight.

Drip Pots (1)

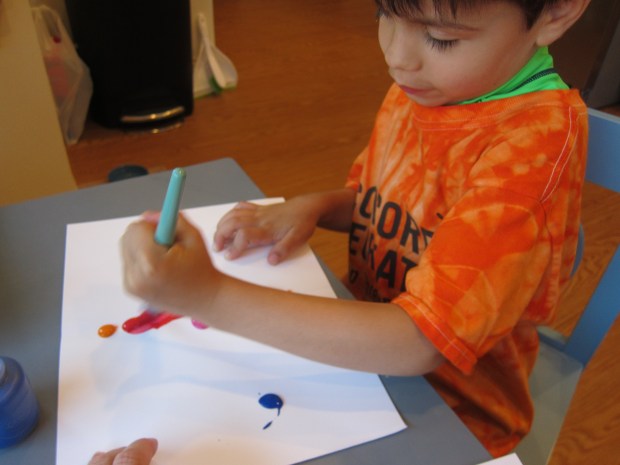
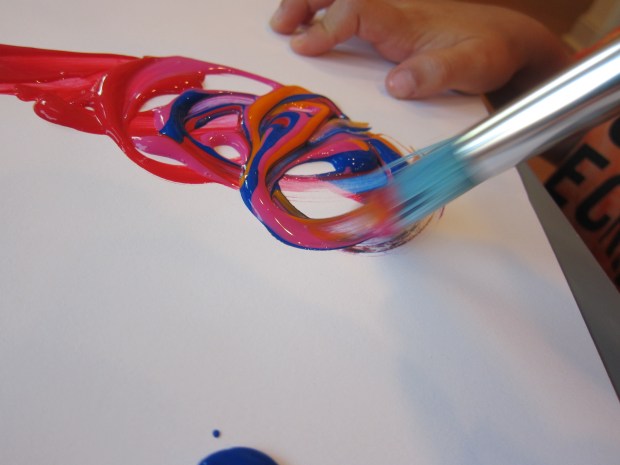
In the morning, Travis helped mix up red and blue acrylic paints with a little water. You want the mixture to look like glue.

Drip Pots (2)

Turn the pots upside down and place on a work surface. I showed Travis how to dip a brush in the paint and then hold near the rim of the pot. Let the paint drip down in rivulets. It took him a moment to get the hang of it, but then he loved this new painting method!

Drip Pots (4)

Let dry completely, then add a coat of clear sealer, if desired.

Drip Pots (5)

Then just add your planting and enjoy the greenery!


Drip Pot alt

Easy Easter Eggs

Easy Easter Egg (7)

For Veronika’s final contribution to Easter decorations this year, I gave her wooden eggs to paint instead of egg-shaped paper. To set up, simply squirt pastel colors into a paint tray, then give your toddler q-tips and cotton balls to paint with rather than a regular paint brush!

Easy Easter Egg (1)

Of the two, Veronika definitely preferred the q-tips. She loved delicately dipping them into the paint and then dotting onto the egg. The little spots she produced seemed to fascinate her!

Easy Easter Egg (3)

I showed her how to dip a cotton ball in the paint, too, and press it against an egg for a larger smear, but she wasn’t as interested.

Easy Easter Egg (2)

She did, though, discover that she could dip a little fingertip into the paint and make a similar dot against the eggs. She so carefully repeated this several times, smearing the paint lightly.

Easy Easter Egg (5)

I didn’t help her out with the paint at all, aside from rotating the eggs. The resulting speckled and spotted eggs were decidedly her project, and she looked so proud.

Easy Easter Egg (4)

They looked so pretty gathered together in a glass bowl for a little Easter centerpiece!

Easy Easter Egg (6)

Edible Finger Paint Activity on Foil

Baby Foil Painting (6)

Between an edible yogurt-based paint, pretty colors, an outdoor setting, and a shiny piece of foil as the canvas, what’s not to love about this project? The edible paint means it’s safe to play with toddlers or even younger babies.

It was warm enough that we took the activity outside to the patio, where a big beach towel could contain any mess. If it’s summer, you might consider stripping baby down to a bathing suit or diaper, in fact!

To make the paint, spoon non-dairy vanilla yogurt into containers or cups and add a few drops of food coloring to each. The pretty pastel colors felt just right for spring.

Baby Foil Painting (1)

For her “canvas”, I lightly crumpled up a piece of aluminum foil, then opened it back up again. This added lots of fun texture and shine to capture her attention. Note: I did also set down a brown paper bag in case she wanted to paint on that, too, but the foil was the definite favorite.

Baby Foil Painting (3)

She was eager to paint right away, and especially intrigued with using a brush instead of her fingers. Then she started painting her pants! Luckily it was warm enough to take them off and continue the activity.

Baby Foil Painting (5)

Next she loved pouring the paint cups right onto the canvas. After that we swished the yogurt around to even out the big blobs.

Baby Foil Painting (7)

Here is her final masterpiece:

Baby Foil Painting (8)

This activity was good yummy colorful fun.


Mix ‘n’ Squish Heart Sensory Bags

Mix n Squish Heart (2)

Here’s a Valentine’s heart activity that even the youngest toddlers can enjoy without making a mess These hearts get “painted” inside a zip-top bagQ

There’s a little color mixing lesson thrown in, too, and although toddlers won’t yet grasp the difference between primary and secondary colors, kids are never too young to marvel at how yellow and blue make green, red and blue make purple etc.

I drew a heart with sharpie on each of three snack-sized zip-top bags. These were the perfect size for little hands, although you could make a large version in gallon-sized zip-top bags.

Mix n Squish Heart (1)

Carefully squeeze two primary colors of paint into each heart. We had one each of the follow:

  • red + yellow
  • yellow+ blue
  • blue + red

Aim to line these up so that each color fills half the heart. Now it was up to Veronika! She immediately loved squishing the bags in her hands.

Mix n Squish Heart (3)

She most likely didn’t notice the “hearts” she was filling in, but she clearly delighted in the texture and colors.

Mix n Squish Heart (5)

When she tired of the beautiful green she made, it was time to make purple!

Mix n Squish Heart (7)

The red and yellow squished together and resulted in a pretty peach for her to see.

Mix n Squish Heart (9)

In sum, it’s safe to say that Veronika loved this little Valentine’s Day activity.

Mix n Squish Heart (10)

Flower-Power Pendants

Flower Pendants (7)

Kids will love this novel bubble-based painting method. The resulting pendant necklaces are perfect for class Valentines!

To create the bubble paint, fill a short cup with 3 tablespoons dish soap, 1 tablespoon water, and 2 tablespoons paint. In order to make our cups short enough, I snipped the top half from regular 8-ounce paper cups.

Flower Pendants (1)

Use a straw to blow into the mixture and you’ll create colored bubbles that rise to the surface. Press a piece of thick white paper firmly over the top. Repeat with more bubbles and more pressing until you’ve covered the sheet of paper, then let dry.

Flower Pendants (2)

Travis loved that the bubbles toppled over the edge of our cup each time; needless to say, this is a bit of a messy project! We repeated with three different paint colors.

Flower Pendants (3)

Once dry, cut the pages into flower shapes, repeating for the desired amount of Valentines.

Flower Pendants (4)

Punch a hole in each flower and thread with cord (available at craft stores), to complete each necklace.

Flower Pendants (5)

On the back, we wrote the sweet message, “You’re a great bud!”

Flower Pendants (6)

Easy Edible Paint Made with Real Fruit

Edible Fruit Paint (3)

Veronika wants to paint every time big brother gets paints and brushes, but I worry still that she’ll put the paintbrush in her mouth. With this fruit paint, there’s no need to fret; these brushes were made for tasting!

To prepare three colors of paint, I pureed a batch each of: blueberries, bananas, and kiwi. For the bananas and kiwi, I thickened the “paint” slightly with a little applesauce from a pouch, and then added a few drops of all-natural food coloring (in yellow and green, respectively) to amp up the color. Here’s the before of the kiwi:

Edible Fruit Paint (1)

Versus the after:

Edible Fruit Paint (2)

I used frozen blueberries, which pureed into a deep, thick purple that needed no embellishment. If you use fresh blueberries, you may find you also want a squeeze of applesauce and a few drops of blue food coloring.

I set out all three colors in paper cups for Veronika, along with paintbrushes and a thick piece of watercolor paper.

Edible Fruit Paint (4)

Say no more, she absolutely loved it! First she just wanted to dip the paintbrush into the blueberry paint over and over. I prompted her to think about her sense of smell as she played, the fresh fruit filling her nostrils.

Then she moved paintbrush to paper experimentally. She loved discovering she could make blobs and swirls.

Edible Fruit Paint (5)

I worried that the blueberry would stain little fingers and clothes, so I gently pushed the banana and kiwi into prime position. She was equally entranced!

Edible Fruit Paint (6)

She kept busy with this for quite some time before eventually dumping some of the kiwi paint onto the paper.

Edible Fruit Paint (9)

At this point I simply moved the paper aside and it was fun for her to smear.

Edible Fruit Paint (10)

Did she taste it? Not really, actually! I think she might have gotten a tiny lick of the banana once, but mostly she seemed happy to paint with it.

Edible Fruit Paint (7)

It was fantastic to see her so engaged with this artistically, and to know that even a nibble was worry-free.

Edible Fruit Paint (8)

High Chair Painting

High Chair Painting (5).JPG

I’ve loved my first forays into making art with Veronika, and today I dared to give her real paint for the first time, meaning it wasn’t sealed up or homemade. The verdict? She did not eat any! In fact, there wasn’t much of a mess at all.

For this age, though, I do recommend strapping baby into a highchair before pulling out the paints, resulting in the safest, least messy location. You can cover the floor below with newspaper if desired, and tape down the paper to the high chair.

High Chair Painting (1)

I started this way, using a few blobs of store-bought finger paint. But this time I gave her paintbrushes, and showed her how to dab into the blobs and swish it around. She looked so proud to hold the brush!

High Chair Painting (2)

After a few strokes, though, she preferred to pick at the masking tape. Hmm…

Thinking quickly, I gave her a fresh sheet of paper with no tape, and just held onto it firmly.

High Chair Painting (3)

Now, Veronika loved it. The serious look on her face was her way of really processing how it worked to smoosh down the bristles and see new paint appear.

High Chair Painting (8)

She kept at it for quite some time.

High Chair Painting (4)

You’re an artist, Veronika!

High Chair Painting (7)

A proud first paintbrush painting!

High Chair Painting (9)

Paint-Popper Art

Paint Popper (2)

If the kids aren’t in camp and need to get out some crazy summer energy, then this project is for you!

To make the popper, cut an empty toilet paper tube in half. Tie a knot in two balloons, and cut off the tops. Slip one balloon over each half of the empty tube and secure with tape. Bright and colorful tape isn’t necessary, but does add an element of fun.

Paint Popper (1)

Because we knew we were going to make a mess, Travis and I headed outside for this one. I put an old sheet on the ground and covered it with thick craft paper. We filled each paint popper with a separate color and I showed Travis how to pull back on the knot of the balloon and splash the paint forward.

Paint Popper (3)

Now this was fun!

Paint Popper (4)

He loved selecting which color to use next, and sometimes just dripped the paint out of the popper for big thick blobs on his canvas.

Paint Popper (5)

The one drawback is that the poppers didn’t last long. After a few colors, the tape and balloon came lose and the cardboard roll lost its shape.

Paint Popper (6)

But it was more than enough time for him to produce fantastic splattery art.

Paint Popper (9)

And get some sunshine in the process!

Paint Popper (7)

Symmetrical Art


Symmetrical Art (10)

Travis has done so many crafts at camp that it felt like a while since we’d sat down just to paint together. We amended that this morning with a craft intended to follow up on recent fun with symmetry.

First he folded a piece of paper in half, very importantly made a nice crease, and opened it back up again.

Symmetrical Art (6)

I squirted out big blobs of paint near the center crease, according to his preference. “Red, and orange, and blue!” he instructed.

Symmetrical Art (1)

He smeared them all together, noting the way the blobs ran together, made new colors (purple!), and got super smeary.

Symmetrical Art (2)

Now we folded the paper over again, smooshing the paint inside. We opened it back up for a neat symmetrical reveal. “I made a footprint!” he said.

Symmetrical Art (3)

He loved it so much that he immediately requested to use the second piece of paper I’d folded. This time he chose a different set of colors, including light blue, yellow, and black.

Symmetrical Art (4)

Blob blob blob and smoosh smoosh smoosh and we opened it up again.

Symmetrical Art (5)

He thought this one looked like Darth Vader’s mask – even cooler!

Symmetrical Art (7)

Make Handprint Keepsakes

Handprint Keepsake (6)

It’s been a couple of months since I last captured the size of Veronika’s hands and feet – si clearly it was time to do so again!

Use a non-toxic and washable paint and brush it gently onto your little one’s palms and the soles of his or her feet. Press firmly onto watercolor paper. You’ll probably get a little wiggling around, but that’s ok! Make sure you have wipes ready to go for quick clean up. Why are there no pictures of this process? Because paint + eight month old = lots of wrangling!

Handprint Keepsake (1)

Once the prints dried, I used them in two ways. With the handprint, I made a framed keepsake. Cover the backing of a picture frame with decorative fabric, and secure the fabric in place with masking tape.

Handprint Keepsake (2)

Use double-sided tape to attach the handprint in the middle of the fabric. Slip back into the frame and display in the nursery – or give this as a gift to grandparents perhaps!

Handprint Keepsake (3)

The footprint simply went into her memory box which was a great trip down memory lane. There were a few mementos in there I had already forgotten about!

Handprint Keepsake (5)

As long as you don’t mind the mess of painting with a baby, this is a fun project with great keepsakes as a result.

Handprint Keepsake (4)