Leaf Glitter

leaf-glitter-3

Turn autumn leaves into a masterpiece with this simple but delightful project!

Half the fun, of course, was just heading outside to select our leaves. With a warm and dry fall so far, the color wasn’t as vibrant as I hoped, but I set Travis the task of finding leaves in all the possible colors – greens, reds, oranges, yellows, and browns – and we came away with a better collection than I expected. Travis loved the adventure in the park!

leaf-glitter-4

We let the leaves dry at home for a couple of days, and then it was time to turn them into “glitter”! What toddler can resist ripping leaves into tiny pieces?

leaf-glitter-5

Exercise those little hand muscles and let your child squeeze glue all over a piece of construction paper. You can sprinkle on the leaf glitter almost like confetti, pressing down to adhere.

leaf-glitter-2

We shook our creation off a few times to figure out which leaves weren’t stuck yet, and then added more glue as needed.


Autumn Painting

apple-prints-4

Prints are a great way to keep painting projects fresh and different for toddlers. At any time of year, items around the house (like toilet paper tubes and Duplo blocks!) make for fun print painting. Two very autumnal items lend themselves perfectly to this idea.

First, Travis and I tried apple prints. Cut an apple in half and remove the seeds, lightly drying the inside of the apple with a paper towel. This is also a great way to take about the fruit with your toddler, since the inside looks so different from the outside!

apple-prints-1

Dip the cut apple halves in paint and press onto paper for a neat, almost heart-shaped effect.

apple-prints-3

Next we tried corn rolling, using ears of beautiful dried corn from the farmers’ market. Travis loved the corn, carrying it all around the house, so I was surprised that when the time came to paint, he wasn’t interested.

corn-rolling-2

Aside from one brief roll, he had a very toddler moment wanting to dip his whole hand into the blue paint. So… you win some you lose some! On the other hand, he loved looking at the example I finished, proudly telling anyone who saw it that we made it with corn.

corn-rolling-4

What other fall items have you made prints with? Please share in the comments!

No-Bake Pumpkin Cookies

pumpkin-cookies-3

October is the perfect time to make this no-bake treat, whether you use canned pumpkin or mashed fresh sugar pumpkin. Because there’s no oven involved, even toddlers can put the whole recipe together! Older kids can help with the measuring, too.

Ingredients:

  • 1 cup quick oats
  • 1/4 cup sugar
  • 1/4 cup raisins
  • 1/2 teaspoon ground cinnamon
  • 1/2 teaspoon ground ginger
  • 1/2 cup canned pumpkin
  • 1 teaspoon vanilla extract
  1. In a bowl, combine the oats, sugar, raisins, cinnamon, and ginger.
  2. Add the pumpkin and vanilla, stirring until the mixture is moist.
  3. Using your hands, divide the batter into 15 to 20 portions, rolling each into a small ball.
  4. You can transfer to the fridge to chill for a few hours, or eat right away if the kids can’t wait!

pumpkin-cookies-2

More Spider Fun!

paper-plate-spider-3

Between spider lanterns and spider rocks, we’ve been having fun with all manner of creepy-crawly arachnids leading up to Halloween. Today we not only made a new spider, but gave him a web to call home!

For the spider, invite your child to color on two paper plates with crayons however they like. Preschoolers can draw their own spider face, but I helped by drawing a spider on one plate and letting Travis have free reign on the other.

paper-plate-spider-1

Punch a hole in the center of one plate, and thread through a knotted piece of string. You’ll be able either to hang your creation, or to jump it about like a jumping spider once complete!

We then glued 8 strips of black construction paper onto the inside rim of one plate before gluing the two plates together.

paper-plate-spider-2

Let dry completely before the play begins.


Paper-Plate Spider (4).JPG

I had leftover cooked and cooled spaghetti on hand, so for Itsy Bitsy’s web, we got nice and goopy again!


Fill a shallow plate with glue, and show your child how to dip the spaghetti strands in the glue before arranging in a “web” on waxed paper.

spider-web-2

Travis couldn’t wait to get his hands on the spaghetti, and very quickly decided they also looked like worms. I finished our web while he had a blast stirring the worms around and making them “wiggle” a nice reminder that toddlers are very good at creating their own games no matter what materials we present to them!

spider-web-3

Let the web dry completely, then peel off the wax paper. Because the web is very delicate, I found it was best to leave some of the wax paper behind as backing.

img_0009

Don’t forget to add one of your spider friends to live inside!

img_0032


Spaghetti Monsters

spaghetti-monster-7

If ever there was a time for oopy goopy fun, Halloween is it! Travis is too young for classic Halloween gags like a bowlful of spaghetti “brains,” but it’s the perfect time to play with cooked spaghetti and make friendly “monsters” instead.

Present your child with a bowl of cooked and cooled spaghetti. Demonstrate how to take a handful of spaghetti, dip it in a shallow plate or pie tin filled with tempera paint, and then smear onto construction paper.

spaghetti-monster-2

I thought Travis might be hesitant to get so messy, but he dove right in! He had so much fun dipping the spaghetti in the paint that I had to remind him to transfer over to the paper on occasion.

spaghetti-monster-4

When the paint is dry, finish your friendly “monsters” with googly eyes and any other scraps you have on hand, like ribbon, yarn, or fabric.

spaghetti-monster-6

The silly looking monsters are a nice way to decorate with non-threatening creatures around the house, making sure the holiday isn’t too scary for little ones.

spaghetti-monster-8

Harvest Bowling


Harvest Bowling (1).JPG

Gourds aren’t just for decoration… Help develop your toddler’s coordination with this adorable take on bowling!

Set up a variety of gourds at the end of a masking tape “alley.” Look for ones that are shaped similar to bowling pins, wide on the bottom and tapering on top.

harvest-bowling-2

Use a small sugar pumpkin as the bowling ball. Adults can give the pumpkin a roll all the way from the end of the alley.

harvest-bowling-3

Kids will likely have to roll from very close, but that won’t dampen their excitement when all the “pins” fall over.

harvest-bowling-4

Strike!

Tissue Paper Ghosts

Tissue Ghosts (6).JPG

Probably the simplest and oldest Halloween craft in the books, this one still delights adults and children alike. You can make just a few ghosts, but I think it’s better to make a whole bunch of them and hang all around the house (or yard if you have one).

Show your toddler how to fold a tissue paper over a cotton ball, and then secure the tissue just under the cotton ball with a piece of masking tape. If you’re going to hang the ghosts, make sure to stick a length of string or yarn under the tape as well. Travis helped with a couple, but then just loved playing with the materials involved while I prepared more.

tissue-ghosts-1

We had a big pile pretty soon!

tissue-ghosts-2

Decorate the faces with marker. For the best ghost-y mouth, show your toddler how to press a marker firmly into the tissue paper for a big spooky O.

tissue-ghosts-3

Travis liked fluttering the ghosts about by hand, and helping me hang them.

tissue-ghosts-4

I confess the resulting ghosts look a bit morbid, dangling from their necks, but heck, it IS Halloween…

tissue-ghosts-5

Spider Rocks

Spider Rocks (5).JPG

Following up on our spider lantern decorations, Travis helped me create a few more spider friends to populate our house for the Halloween season!

Find a few small, round rocks and paint in any color – we used blue and black for a dark Halloween feel, but neon bright colors might be fun too! Let dry overnight.

spider-rocks-1

Cut pipe cleaners in half. For the legs of each spider, wrap one pipe cleaner piece around the middle of three others, then bend the ends out to make the legs. This part was a bit complicated for Travis, but he loved watching me do it, and thought the legs made great “crickets” to jump around for a while.

spider-rocks-2

Glue one rock onto each set of pipe cleaner “legs” and let dry completely – I recommend lying them upside down.

spider-rocks-3

All you need to add are stickers or googly eyes for the cutest little spiders I’ve ever had in my house!

spider-rocks-4


Spider Lantern

spider-lantern-5

It’s beginning to look a lot like Halloween around here! Since Travis loves spiders, I knew this easy decoration would be a big hit. It was our first Halloween craft of the season, so as we made the lantern I talked about the creepy crawly things that come out on All Hallow’s Eve!

Cut the top off an empty 1-liter bottle of soda; tape around the rim to cover any sharp edges.

spider-lantern-2

Wrap the bottle in cheesecloth, draping the excess inside, then wrap colored yarn around the bottle. Kids can help with this step!

Once finished, tuck a plastic or rubber spider into your web. Add a battery-operated candle for spooky glowing decor come nighttime.

spider-lantern-4

S Week!

s-week-14

Welcome to our S week of play! As always, thanks to Letter of the Week for some of the ideas below. Travis was funny about the letter, since my prompts that a word began with a “sss” sound made him think we were in C-week for soft c words. It turned into a joke, me pointing to our S poster, and him still saying “C!” Confusion aside, here’s some of the fun we had.

shadow-dancing-4

Shadows: We kicked off the week with shadow dancing! It was such a magical moment that it merited a blog post all its own, so please check out the link above. Shadows are also great for making animal shapes against the wall, or just observing as you walk outside in autumn sunlight.

s-week-7

Sun/Sail/Sand: A few Summer-y words made it a beach-y week here in the fall. Cute sun projects included making a sun on a stick (a yellow painted paper plate with orange construction paper for the center)…

s-week-6

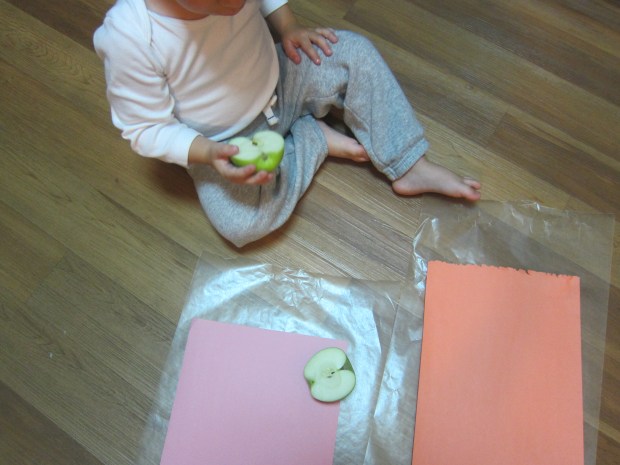
… and magic sun prints.The result was cool even for me as a grown-up!

We then set up an indoor beach day with blankets for water and sand (with our sun on a stick of course!) and pulled out sand toys for make believe inside. To add to the s-themed fun, we turned one of his blankets into a “sailboat” and sailed around the room.

s-week-4

Meanwhile, there was so much to do with sand that I devoted a blog post to it. For simple sand play, just fill an indoor bin with a layer of sand and set out cars and street signs, then have your child draw roads through the sand with a stick or spatula.

s-week-10

Soccer: This word was perfect for our gross motor play of the week. Get outside and kick around a ball!

s-week-9

Shaving cream: As simple as can be; have some good old goopy fun and finger paint with shaving cream. Your toddler will thank you.

starry-starry-night-2

Stars: We had fun making a starry starry night painting, using both cookie cutters and sponges in the shape of stars to stamp onto construction paper. Travis added moons too, making for a very creative night sky! To continue the star fun, put together a toddler-sized pair of binoculars and head outside to spot the real thing before bed.

A few other things we did this week:

Fine art: Make a sand anthill! You could do this by sprinkling sand onto glue and pressing down, but we used sandpaper for our hill, and added thumbprint ants. Travis had so much fun that our anthill was soon teeming with denizens.

s-week-15

Food: Lots to choose from… we enjoyed both whole strawberries and strawberry pancakes for breakfast, and had soup one afternoon for lunch.

s-week-2

Books: It wasn’t the right time of year to play games in the snow, but we talked about the word with the help of two books: The Snowy Day by Ezra Jack Keats and Cat and Mouse in the Snow by Tomek Bogacki. Travis also enjoyed Sea, Sand, Me! by Patricia Hubbell and No Sleep for the Sheep! by Karen Beaumont.

Song: It was a no-brainer to introduce Travis to the Snowman, one of the most magical videos from my own childhood! More properly an instrumental video than a song, this classic hasn’t lost any of its beauty. Travis’s smile when the snowman came to life was priceless.

Math: I gently introduced the concept of subtraction with the help of a few more stars. Cut out paper stars and have your child make “shooting stars” flutter away one by one, counting how many remain. I promise it’s a coincidence that Travis was in his star pajamas!

s-week-12

There’s always lots we can’t get to of course. You might also want to play with snakes or go on a safari, or have soapy fun with dish soap. Please add your other S ideas in the comments!